Scanner Tutorial for macOS
Use NSScanner to analyze strings from natural form to computer languages. In this NSScanner tutorial, you’ll learn how to extract information from emails. By Hai Nguyen.
Extracting Cost-Related Information
A good example of parsing unstructured data is to determine whether the email’s body contains cost-related information. To do this, you’ll use Scanner to search for an occurrence of a dollar character: $.
Still working on ParserEngine.swift, add the following implementation inside ParserEngine class:
func costInfoByExtractingFrom(_ string: String) -> [Double] {
  // 1.
  var results = [Double]()

  // 2.
  let dollar = CharacterSet(charactersIn: "$")

  // 3.
  let scanner = Scanner(string: string)
  scanner.charactersToBeSkipped = dollar

  // 4.
  while !scanner.isAtEnd && scanner.scanUpToCharacters(from: dollar, into: nil) {
    results += [scanner.scanDouble()].flatMap { $0 }
  }

  return results
}
The code is fairly straightforward:
- Defines an empty array to store the cost values.
- Creates a
CharacterSetobject with a$character. - Initializes a
Scannerinstance and configures it to ignore the $ character. - Loops through
string‘s content and when a$is found, grabs the number after$with your helper method and appends it toresultsarray.
Parsing the Message
Another example of parsing unstructured data is finding keywords in a given body of text. Your search strategy is to look at every word and check it against a set of keywords to see if it matches. You’ll use the whitespace and newline characters to take the words in the message as scanning.

Add the following code at the end of ParserEngine class:
// 1.
let keywords: Set<String> = ["apple", "macs", "software", "keyboard",
                             "printers", "printer", "video", "monitor",
                             "laser", "scanner", "disks", "cost", "price",
                             "floppy", "card", "phone"]

/// Return a set of keywords extracted from
func keywordsByExtractingFrom(_ string: String) -> Set<String> {
  // 2.
  var results: Set<String> = []

  // 3.
  let scanner = Scanner(string: string)

  // 4.
  while !scanner.isAtEnd, let word = scanner.scanUpTo(" ")?.lowercased()  {
    if keywords.contains(word) {
      results.insert(word)
    }
  }

  return results
}
Here’s what this code does:
- Defines the keywords set that you’ll match against.
- Creates a
SetofStringto store the found keywords. - Initializes a
Scannerinstance. You’ll use the defaultcharactersToBeSkipped, which are the whitespace and newline characters. - For every word found, checks whether it’s one of the predefined
keywords. If it is, appends it intoresults.
There — you have all of the necessary methods to acquire the desired information. Time to put them to good use and create HardwarePost instances for the 49 data files.
Connecting the Parser With Data Samples
Open HardwarePost.swift and add this initializer into HardWarePost structure:
init(fromData data: Data) {
  // 1.
  let parser = ParserEngine()

  // 2.
  let string = String(data: data, encoding: String.Encoding.utf8) ?? ""

  // 3.
  let scanner = Scanner(string: string)

  // 4.
  let metadata = scanner.scanUpTo("\n\n") ?? ""
  let (sender, email, subject, date, organization, lines) = parser.fieldsByExtractingFrom(metadata)

  // 5.
  self.sender = sender
  self.email = email
  self.subject = subject
  self.date = date
  self.organization = organization
  self.numberOfLines = lines

  // 6.
  let startIndex = string.characters.index(string.startIndex, offsetBy: scanner.scanLocation)                                               // A
  let message = string[startIndex..<string.endIndex]                      // B
  self.message = message.trimmingCharacters(in: .whitespacesAndNewlines ) // C

  // 7.
  costs = parser.costInfoByExtractingFrom(message)
  keywords = parser.keywordsByExtractingFrom(message)
}
Here's how HardwarePost initializes its properties:
- Simply creates a
ParserEngineobject namedparser. - Converts
datainto aString. - Initializes an instance of
Scannerto parse the Metadata and Message segments, which are separated by "\n\n". - Scans up to the first
\n\nto grab the metadata string, then invokes theparser'sfieldsByExtractingFrom(_:)method to obtain all of the metadata fields. - Assigns the parsing results to the
HardwarePostproperties. - Prepares the message content:
- Gets the current reading cursor from
scannerwithscanLocationand converts it toString.CharacterView.Index, so you can substitutestringby range. - Assigns the remaining string that
scannerhas yet to read into the newmessagevariable. - Since
messagevalue still contains\n\nwhere thescannerleft off from the previous reading, you need to trim it and give the new value back to theHardwarePostinstance'smessageproperty.
- Gets the current reading cursor from
- Invokes the
parser's methods withmessageto retrieve values forcostandkeywordsproperties.
- Gets the current reading cursor from
scannerwithscanLocationand converts it toString.CharacterView.Index, so you can substitutestringby range. - Assigns the remaining string that
scannerhas yet to read into the newmessagevariable. - Since
messagevalue still contains\n\nwhere thescannerleft off from the previous reading, you need to trim it and give the new value back to theHardwarePostinstance'smessageproperty.
At this point, you can create HardwarePost instances directly from the files' data. You are only few more steps from displaying the final product!
Displaying Parsed Data
Open PostCell.swift and add the following method inside the PostCell class implementation:
func configure(_ post: HardwarePost) {

  senderLabel.stringValue = post.sender
  emailLabel.stringValue = post.email
  dateLabel.stringValue = post.date
  subjectLabel.stringValue = post.subject
  organizationLabel.stringValue = post.organization
  numberOfLinesLabel.stringValue = "\(post.numberOfLines)"

  // 1.
  costLabel.stringValue = post.costs.isEmpty ? "NO" :
                                               post.costs.map { "\($0)" }.lazy.joined(separator: "; ")

  // 2.
  keywordsLabel.stringValue = post.keywords.isEmpty ? "No keywords found" :
                                                      post.keywords.joined(separator: "; ")
}
This code assigns the post values to the cell labels. costLabel and keywordsLabel require special treatment because they can be empty. Here's what happens:
- If the
costsarray is empty, it sets thecostLabelstring value to NO; otherwise, it concatenates the cost values with "; " as a separator. - Similarly, sets
keywordsLabelstring value toNo words foundfor an empty set ofpost.keywords.
You're almost there! Open DataSource.swift. Delete the DataSource initializer init() and add the following code into the class:
let hardwarePosts: [HardwarePost] // 1.

override init() {
  self.hardwarePosts = Bundle.main                                                // 2.
    .urls(forResourcesWithExtension: nil, subdirectory: "comp.sys.mac.hardware")? // 3.
    .flatMap( { try? Data(contentsOf: $0) }).lazy                                 // 4.
    .map(HardwarePost.init) ?? []                                                 // 5.

  super.init()
}
This is what the code does:
- Stores the
HardwarePostinstances. - Obtains a reference to the application's main Bundle.
- Retrieves urls of the sample files inside the comp.sys.mac.hardware directory.
- Lazily acquires an array of
Datainstances by reading file contents withDatafailable initializer andflatMap(_:). The idea of usingflatMap(_:)is to get back a subarray containing only elements that are notnil. - Finally, transforms the
Dataresults to aHardwarePostobject and assigns them to theDataSourcehardwarePostsproperty.
Now you need to set up the table view's data source and delegate so that your app can show your hard work.
Open DataSource.swift. Find numberOfRows(in:) and replace it with the following:
func numberOfRows(in tableView: NSTableView) -> Int {
    return hardwarePosts.count
}
numberOfRows(in:) is part of the table view’s data source protocol; it sets the number of rows of the table view.
Next, find tableView(_:viewForTableColumn:row:) and replace the comment that says: //TODO: Set up cell view with the code below:
cell.configure(hardwarePosts[row])
The table view invokes its delegate tableView(_:viewForTableColumn:row:) method to set up every individual cell. It gets a reference to the post for that row and invokes PostCell's configure(_:) method to display the data.
Now you need to show the post in the text view when you select a post on the table view. Replace the initial implementation of tableViewSelectionDidChange(_:) with the following:
func tableViewSelectionDidChange(_ notification: Notification) {
  guard let tableView = notification.object as? NSTableView else {
    return
  }
  textView.string = hardwarePosts[tableView.selectedRow].message
}
tableViewSelectionDidChange(_:) is called when the table view’s selection has changed. When that happens, this code gets the hardware post for the selected row and displays the message in the text view.
Build and run your project.
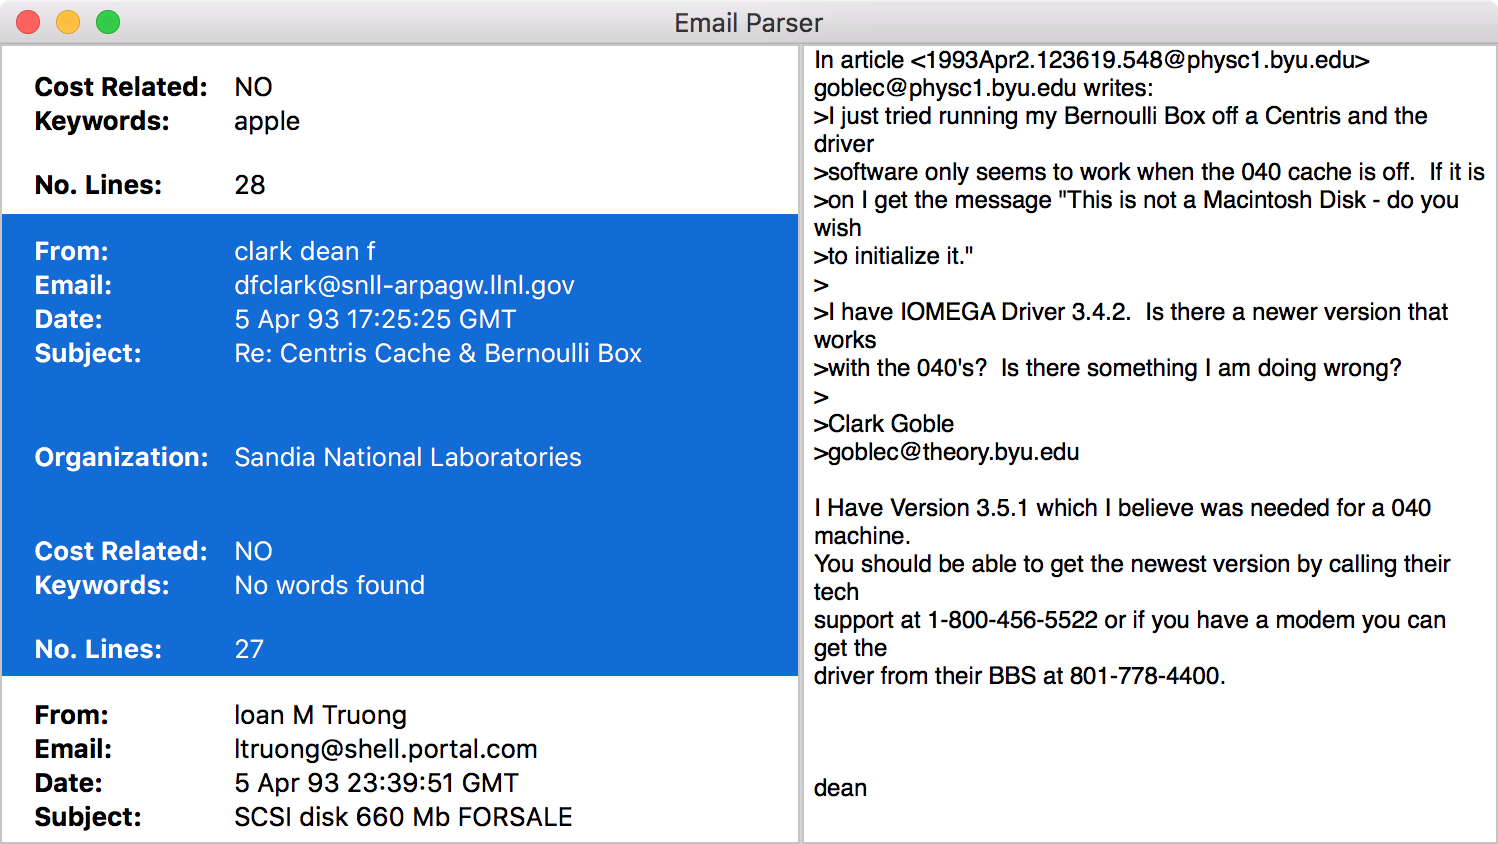
All of the parsed fields are now neatly displayed on the table. Select a cell on the left, and you'll see the corresponding message on the right. Good Job!