Drag and Drop Tutorial for macOS
The drag-and-drop mechanism has always been an integral part of Macs. Learn how to adopt it in your apps with this drag and drop tutorial for macOS. By Warren Burton.
Supplying a Standard Dragging Type
The dragging source will be ImageSourceView — the class of the view that has the unicorn. Your objective is simple: get that unicorn onto your collage.
The class needs to adopt the necessary protocols NSDraggingSource and NSPasteboardItemDataProvider, so open ImageSourceView.swift and add the following extensions:
// MARK: - NSDraggingSource
extension ImageSourceView: NSDraggingSource {
  //1.
  func draggingSession(_ session: NSDraggingSession, sourceOperationMaskFor context: NSDraggingContext) -> NSDragOperation {
    return .generic
  }
}

// MARK: - NSDraggingSource
extension ImageSourceView: NSPasteboardItemDataProvider {
  //2.
  func pasteboard(_ pasteboard: NSPasteboard?, item: NSPasteboardItem, provideDataForType type: String) {
    //TODO: Return image data
  }
}
- This method is required by
NSDraggingSource. It tells the dragging session what sort of operation you’re attempting when the user drags from the view. In this case it’s a generic operation. - This implements the mandatory
NSPasteboardItemDataProvidermethod. More on this soon — for now it’s just a stub.
Start a Dragging Session
In a real world project, the best moment to initiate a dragging session depends on your UI.
With the project app, this particular view you’re working in exists for the sole purpose of dragging, so you’ll start the drag on mouseDown(with:).
In other cases, it may be appropriate to start in the mouseDragged(with:) event.
Add this method inside the ImageSourceView class implementation:
override func mouseDown(with theEvent: NSEvent) {
  //1.
  let pasteboardItem = NSPasteboardItem()
  pasteboardItem.setDataProvider(self, forTypes: [kUTTypeTIFF])

  //2.
  let draggingItem = NSDraggingItem(pasteboardWriter: pasteboardItem)
  draggingItem.setDraggingFrame(self.bounds, contents:snapshot())

  //3.
  beginDraggingSession(with: [draggingItem], event: theEvent, source: self)
}
Things get rolling when the system calls mouseDown(with:) when you click on a view. The base implementation does nothing, eliminating the need to call super. The code in the implementation does all of this:
- Creates an
NSPasteboardItemand sets this class as its data provider. ANSPasteboardItemis the box that carries the info about the item being dragged. TheNSPasteboardItemDataProviderprovides data upon request. In this case you’ll supply TIFF data, which is the standard way to carry images around in Cocoa. - Creates a
NSDraggingItemand assigns the pasteboard item to it. A dragging item exists to provide the drag image and carry one pasteboard item, but you don’t keep a reference to the item because of its limited lifespan. If needed, the dragging session will recreate this object.snapshot()is one of the helper methods mentioned earlier. It creates anNSImageof anNSView. - Starts the dragging session. Here you trigger the dragging image to start following your mouse until you drop it.
Build and run. Try to drag the unicorn onto the top view.

An image of the view follows your mouse, but it slides back on mouse up because DestinationView doesn’t accept TIFF data.
Take the TIFF
In order to accept this data, you need to:
- Update the registered types in
setup()to accept TIFF data - Update
shouldAllowDrag()to accept the TIFF type - Update
performDragOperation(_:)to take the image data from the pasteboard
Open DestinationView.swift.
Replace the following line:
var acceptableTypes: Set<String> { return [NSURLPboardType] }
With this:
var nonURLTypes: Set<String>  { return [String(kUTTypeTIFF)] }
var acceptableTypes: Set<String> { return nonURLTypes.union([NSURLPboardType]) }
You’ve just registered the TIFF type like you did for URLs and created a subset to use next.
Next, go to shouldAllowDrag(:_), and add find the return canAccept method. Enter the following just above the return statement:
else if let types = pasteBoard.types, nonURLTypes.intersection(types).count > 0 {
  canAccept = true
}
Here you’re checking if the nonURLTypes set contains any of the types received from the pasteboard, and if that’s the case, accepts the drag operation. Since you added a TIFF type to that set, the view accepts TIFF data from the pasteboard.
Unarchive the Image Data
Lastly, update performDragOperation(_:) to unarchive the image data from the pasteboard. This bit is really easy.
Cocoa wants you to use pasteboards and provides an NSImage initializer that takes NSPasteboard as a parameter. You’ll find more of these convenience methods in Cocoa when you start exploring drag and drop more.
Locate performDragOperation(_:), and add the following code at the end, just above the return sentence return false:
else if let image = NSImage(pasteboard: pasteBoard) {
  delegate?.processImage(image, center: point)
  return true
}
This extracts an image from the pasteboard and passes it to the delegate for processing.
Build and run, and then drag that unicorn onto the sticker view.
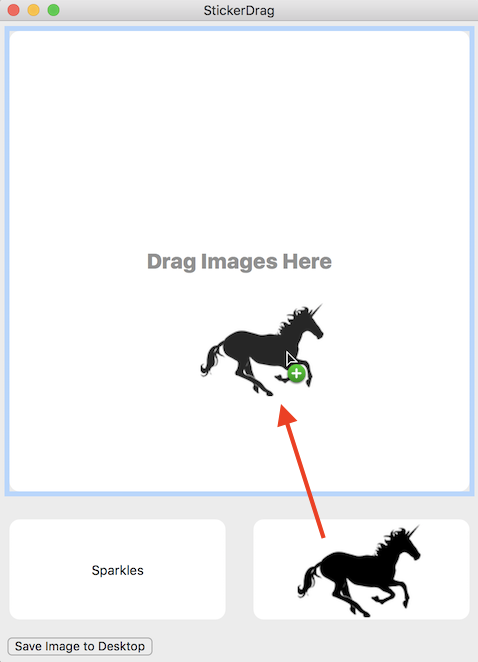
You’ll notice that now you get a green + on your cursor.
The destination view accepts the image data, but the image still slides back when you drop. Hmmm. What’s missing here?
Show me the Image Data!
You need to get the dragging source to supply the image data — in other words: fulfil its promise.
Open ImageSourceView.swift and replace the contents of pasteboard(_:item:provideDataForType:) with this:
//1.
if let pasteboard = pasteboard, type == String(kUTTypeTIFF), let image = NSImage(named:"unicorn") {
  //2.
  let finalImage = image.tintedImageWithColor(NSColor.randomColor())
  //3.
  let tiffdata = finalImage.tiffRepresentation
  pasteboard.setData(tiffdata, forType:type)
}
In this method, the following things are happening:
- If the desired data type is
kUTTypeTIFF, you load an image named unicorn. - Use one of the supplied helpers to tint the image with a random color. After all, colorful unicorns are more festive than a smattering of all-black unicorns. :]
- Transform the image into TIFF data and place it on the pasteboard.
Build and run, and drag the unicorn onto the sticker view. It’ll drop and place a colored unicorn on the view. Great!
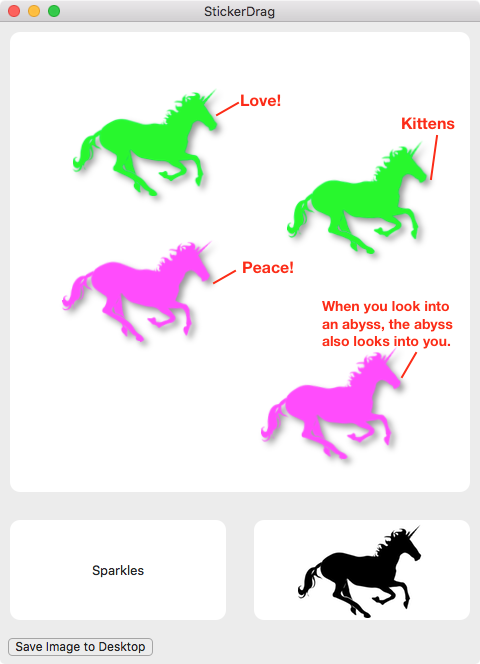
So.many.unicorns!
Dragging Custom Types
Unicorns are pretty fabulous, but what good are they without magical sparkles? Strangely, there’s no standard Cocoa data type for sparkles. I bet you know what comes next. :]

Note: In the last section you supplied a standard data type. You can explore the types for standard data in the API reference.
Note: In the last section you supplied a standard data type. You can explore the types for standard data in the API reference.
In this section you’ll invent your own data type.
These are the tasks on your to-do list:
- Create a new dragging source with your custom type.
- Update the dragging destination to recognize that type.
- Update the view controller to react to that type.