Beginning Blender Tutorial: Animating and Rendering a Mushroom
Learn how to make a mushroom nod and bounce in this beginning blender tutorial on animation and rendering! By John R. Nyquist.
In the previous Blender tutorial, you created a happy little mushroom, who is quite the “fun guy”. However, a static mushroom in your game won’t be terribly exciting; the mushroom should hop and nod as he moves around the game scene.
Fortunately, Blender can help with this task. In this tutorial, you’ll learn how to render out a series of images you can use in a sprite sheet to animate your mushroom.
This tutorial assume you have gone through our previous Blender tutorial or at least know the very basic of the Blender user interface.
Let’s get hopping!
![]()
Getting Started
For this tutorial, you can either start with the mushroom you created in the previous tutorial, or if you’d rather get right into things, you can download the starter project here. Either way, there are a few steps you need to complete before you can animate your mushroom.
Even though you can see everything clearly in Blender, if you rendered the 3D scene to a 2D image right now, you wouldn’t see anything in the images!
This is because in the previous tutorial, you created a texture within blender, but you never formally associated it with the mushroom object’s material. This is required so that Blender knows to apply the texture to the object when rendering. You’ll do this now.
Adding a Texture
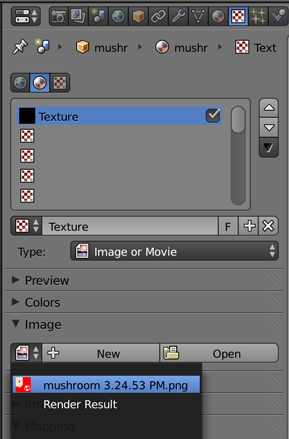
In the Properties window, left-click the Texture Context button — it looks a little like a checkerboard, as shown below:

Add a new texture by clicking the New button (no surprises there), like so:

A name field and drop down list for the type of text appears; change the default Type from Clouds to Image or Movie. In the Image panel, click the drop-down to the left of the New button and select either the mushroom image you made in the previous tutorial or mushroom 3.24.53.png if you are using the starter file for this article.
In the Mapping panel, select UV for Coordinates, as such:

Still in the Mapping panel, select UVMap for the Map.

Okay — that’s all the tweaks you need to make to the original file. It’s a good idea to save your changes as you move through the tutorial.
In order to animate this character, you’ll need to add an armature.
Armatures for Amateurs
An armature in a 3D program works much like a skeleton. Just as your muscles move with your skeleton, the mushroom’s mesh will move with its armature. In Blender, the armature is simply another type of object; you’ve already worked with mesh objects. The armature object comes with one bone in it by default.
Adding Rigging, Bones and Skinning
First, you’ll need to cover a few bits of terminology. The process of building the skeleton is called rigging. You’ll first create an armature with one bone, then you’ll add an additional bone; this will be your rig.
Rigs can get very complicated, such as when you’re constructing a 3D human character. There are constraints and modifiers that can be added to your rig to simplify the animator’s job when working with complex rigs. Your mushroom’s rig will be simple, but will serve your needs just fine.
Skinning is simply the process of associating the vertices of your mesh with the bones in your armature.
Once you’ve created a model, you animate it with the following steps:
- Add an armature to your scene
- Add some bones to your armature
- Skin the mesh to the bones
- Animate the armature by posing the bones
Adding an Armature
First, press Option-Z to toggle the viewport shading from textured to solid — this way, it will be easier to see the armature. You can also toggle the viewport shading by clicking on the little sphere at the bottom of the 3D view to bring up the Viewport Shading menu and choosing Solid, as so:

Your mushroom will now appear white rather than your beautiful mario-style white and red.
Move your mouse over the 3D View and press Shift-A. Select Armature -> Single Bone. from the Add menu, as illustrated below:

The Object Data Context
In the Properties window, click on the Object Data context button that looks like a stick figure, and ensure Names and X-Ray in the Display panel are checked.
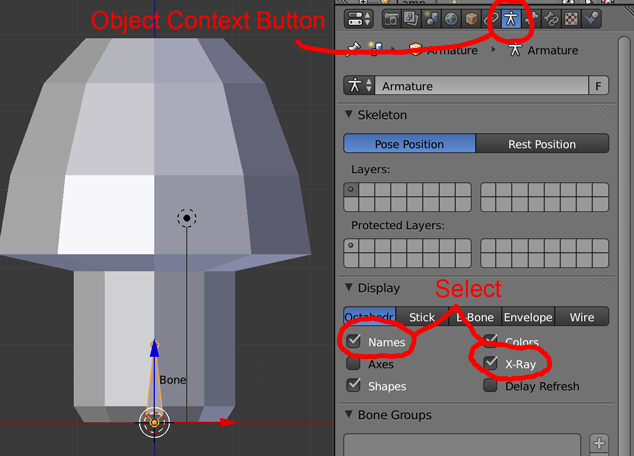
The Names option shows the names of the bones in your 3D View, while X-Ray ensures the armature remains visible even when objects are in front of it.
The context button in your case represents the armature’s object context. If your mushroom was the active object instead, then this button would be displayed as a mesh. Since an armature is currently the active object, the icon reflects the armature context.
In the Properties window, the buttons relate to different contexts; for example, the Render context, or the Scene context. The number of buttons in the Properties window changes based on which object you select in the scene, as shown in the image below:

Additionally, some of the buttons even change images; the Object Data context button changes from a stick figure to a mesh to a movie camera, depending on what is currently selected.
The tooltip of the button says “Object data” which makes sense: if you have an armature object selected, then the data corresponding to that object is an armature in the current context — hence “object data context”.
Entering Edit Mode
Move your back over the 3D View and press Tab to switch to Edit Mode for your armature.
Take a look at your armature: every bone in your armature is made up of three parts: the root, body, and tip, as shown below:

Right-click on the tip of your bone, press G to grab it, then type Z to restrict its movement to the Z axis. Move the tip of the bone to the top of the mushroom’s stalk, as shown below:

Left-click to confirm your action. This bone will be the one associated with moving the vertices of the stalk.