MapKit Tutorial: Overlay Views
In this MapKit Overlay tutorial, you’ll learn how to draw images and lines over a native iOS map to make it more interactive for your users. By Rony Rozen.
Don’t Fence Me In: MKPolygon
MKPolygon is similar to MKPolyline, except the first and last points in the set of coordinates are connected to each other to create a closed shape.
You’ll create an MKPolygon as an overlay that shows the park boundaries. The park boundary coordinates are defined in MagicMountain.plist. Look at init(filename:) in Park.swift to see where the boundary points are read from the plist file.
Now, in ContentView.swift, replace the TODO implementation of addBoundary() with:
mapView.addOverlay(MKPolygon(
  coordinates: park.boundary,
  count: park.boundary.count))
Given the boundary array and point count from the park instance, you can quickly and easily create a new MKPolygon instance!
Can you guess the next step here? It’s similar to what you did for MKPolyline.
Yup, that’s right. MKPolygon conforms to MKOverlay like MKPolyline does, so you need to update the delegate method again.
Go back to mapView(_:rendererFor:) and add this else if clause to the existing conditions:
else if overlay is MKPolygon {
  let polygonView = MKPolygonRenderer(overlay: overlay)
  polygonView.strokeColor = .magenta
  return polygonView
}
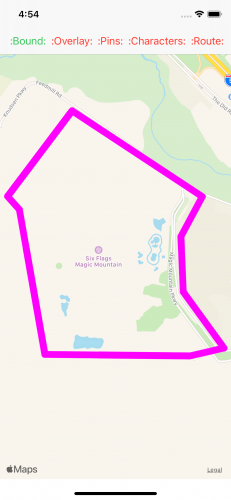
You create an MKOverlayView as an instance of MKPolygonRenderer and set the stroke color to magenta.
Run the app and enable the :Bound: option to see your new boundary in action. You may have to zoom out so the park boundaries can fit the simulator’s screen bounds.
That takes care of polylines and polygons. The last drawing method to cover is drawing circles as an overlay, which you’ll do with MKCircle.
Circle in the Sand: MKCircle
MKCircle is also very similar to MKPolyline and MKPolygon, except it draws a circle when given the center coordinate point and a radius that determines the size of the circle.
Many park visitors like to visit with the characters. You can help them find the characters by marking where they were last spotted on the map with circles. The MKCircle overlay lets you do this easily.
The Park Information folder also contains the character location files. Each file is an array of a few coordinates where the user spotted characters.
First, create a new swift file under the Models group called Character.swift. Then replace its contents with the following code:
import MapKit

// 1
class Character: MKCircle {
  // 2
  private var name: String?
  var color: UIColor?

  // 3
  convenience init(filename: String, color: UIColor) {
    guard let points = Park.plist(filename) as? [String] else {
      self.init()
      return
    }

    let cgPoints = points.map { NSCoder.cgPoint(for: $0) }
    let coords = cgPoints.map {
      CLLocationCoordinate2D(
        latitude: CLLocationDegrees($0.x),
        longitude: CLLocationDegrees($0.y))
    }

    let randomCenter = coords[Int.random(in: 0...3)]
    let randomRadius = CLLocationDistance(Int.random(in: 5...39))

    self.init(center: randomCenter, radius: randomRadius)
    self.name = filename
    self.color = color
  }
}
Here’s what this code does:
-
Character class conforms to
MKCircleprotocol. - It defines two optional properties:
nameandcolor. - The convenience initializer accepts a plist filename and color to draw the circle. Then it reads in the data from the plist file and selects a random location from the four locations in the file. Next, it chooses a random radius to simulate the time variance. The
MKCirclereturned is set and ready to be put on the map!
Now you need a method to add the characters. So, open ContentView.swift and replace the TODO implementation of addCharacterLocation() with:
mapView.addOverlay(Character(filename: "BatmanLocations", color: .blue))
mapView.addOverlay(Character(filename: "TazLocations", color: .orange))
mapView.addOverlay(Character(filename: "TweetyBirdLocations", color: .yellow))
This method performs pretty much the same operations for each character: It passes the plist filename for each one, decides on a color and adds it to the map as an overlay.
You’re almost done! Do you remember the last step?
Right! You need to give the map view a MKOverlayView by using the delegate method.
Go back to mapView(_:rendererFor:) and add this else if clause to the existing conditions:
else if let character = overlay as? Character {
  let circleView = MKCircleRenderer(overlay: character)
  circleView.strokeColor = character.color
  return circleView
}
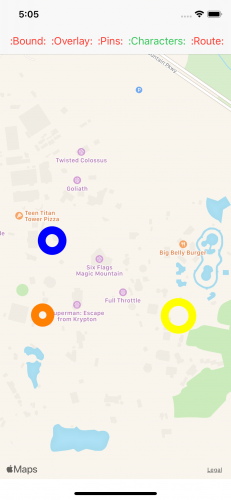
Build and run the app, and enable the :Characters: option to see where everyone is hiding!
Where to Go From Here?
You can download the complete project by using the Download Materials button at the top or bottom of this tutorial.
Congratulations! You’ve worked with some of the most important capabilities that MapKit provides. With a few basic functions, you’ve implemented a full-blown and practical mapping app complete with annotations and custom overlays.
There are many ways to generate overlays that range from very easy to very complex. The approach taken in this tutorial for the overlay_park image was the easy, yet tedious, route.
There are much more advanced, and perhaps more efficient, methods to create overlays. For example, you could use KML tiles or other third party provided resources.
To learn more about MapKit, check out the other MapKit tutorials on our site, such as Advanced MapKit Tutorial: Custom Tiles.
I hope you enjoyed this tutorial, and I hope to see you use MapKit overlays in your own apps. If you have any questions or comments, please join the forum discussion below!