MapKit Tutorial: Overlay Views
In this MapKit Overlay tutorial, you’ll learn how to draw images and lines over a native iOS map to make it more interactive for your users. By Rony Rozen.
Adding Annotations
If you’ve ever searched for a location in the native Maps app, you’ve seen those colored pins appear on the map. These are annotations created with MKAnnotationView. You can use annotations in your own app and use any image you want, not just pins!
Annotations are useful to help highlight specific points of interest to park visitors. They work similarly to MKOverlay and MKOverlayRenderer, but instead you’ll work with MKAnnotation and MKAnnotationView.
Writing Your First Annotation
First, create a new Swift file in the Annotations group called AttractionAnnotation.swift. Then, replace its contents with:
import MapKit

// 1
enum AttractionType: Int {
  case misc = 0
  case ride
  case food
  case firstAid

  func image() -> UIImage {
    switch self {
    case .misc:
      return UIImage(imageLiteralResourceName: "star")
    case .ride:
      return UIImage(imageLiteralResourceName: "ride")
    case .food:
      return UIImage(imageLiteralResourceName: "food")
    case .firstAid:
      return UIImage(imageLiteralResourceName: "firstaid")
    }
  }
}

// 2
class AttractionAnnotation: NSObject, MKAnnotation {
  // 3
  let coordinate: CLLocationCoordinate2D
  let title: String?
  let subtitle: String?
  let type: AttractionType

  // 4
  init(
    coordinate: CLLocationCoordinate2D,
    title: String,
    subtitle: String,
    type: AttractionType
  ) {
    self.coordinate = coordinate
    self.title = title
    self.subtitle = subtitle
    self.type = type
  }
}
Here’s what you added:
-
AttractionTypehelps you categorize each attraction into a type. This enum lists four types of annotations: misc, rides, foods and first aid. There’s also a handy method to grab the correct annotation image. - You create this class and make it conform to
MKAnnotation. - Much like
MKOverlay,MKAnnotationhas a requiredcoordinateproperty. You define a handful of properties specific to this implementation. - Finally, you define an initializer that lets you assign values to each of the properties.
Next, you’ll create a specific instance of MKAnnotationView to use for your annotations.
Associating a View With Your Annotation
First, create another Swift file called AttractionAnnotationView.swift in Annotations group. Then, replace its contents with the following snippet:
import MapKit

class AttractionAnnotationView: MKAnnotationView {
  // 1
  // Required for MKAnnotationView
  required init?(coder aDecoder: NSCoder) {
    super.init(coder: aDecoder)
  }

  // 2
  override init(annotation: MKAnnotation?, reuseIdentifier: String?) {
    super.init(annotation: annotation, reuseIdentifier: reuseIdentifier)
    guard
      let attractionAnnotation = self.annotation as? AttractionAnnotation else {
        return
    }

    image = attractionAnnotation.type.image()
  }
}
Here’s a code breakdown:
-
MKAnnotationViewrequiresinit(coder:). Without its definition, an error prevents you from building and running the app. To avoid this, define it and call its superclass initializer. - You also override
init(annotation:reuseIdentifier:)and set a different annotation image based on the annotation’s type property.
Now that you’ve created the annotation and its associated view, you can start adding annotations to your map view!
Adding Annotations to the Map
To determine the location of each annotation, you’ll use the info in the MagicMountainAttractions.plist file, which you can find under the Park Information group. The plist file contains coordinate information and other details about the attractions at the park.
Go back to ContentView.swift and replace the TODO: implementation of addAttractionPins() with:
// 1
guard let attractions = Park.plist("MagicMountainAttractions")
  as? [[String: String]] else { return }

// 2
for attraction in attractions {
  let coordinate = Park.parseCoord(dict: attraction, fieldName: "location")
  let title = attraction["name"] ?? ""
  let typeRawValue = Int(attraction["type"] ?? "0") ?? 0
  let type = AttractionType(rawValue: typeRawValue) ?? .misc
  let subtitle = attraction["subtitle"] ?? ""
  // 3
  let annotation = AttractionAnnotation(
    coordinate: coordinate,
    title: title,
    subtitle: subtitle,
    type: type)
  mapView.addAnnotation(annotation)
}
Here’s a step by step breakdown:
- First, you read MagicMountainAttractions.plist and store it as an array of dictionaries.
- Then, you iterate over each dictionary in the array.
- For each entry, you create an instance of
AttractionAnnotationwith the point’s information and add it to the map view.
You’re almost there! Last but not least, you need to implement another delegate method that provides the MKAnnotationView instances to the map view so it can render them on itself.
Add the following method to the Coordinator class at the top of the file:
func mapView(
  _ mapView: MKMapView,
  viewFor annotation: MKAnnotation
) -> MKAnnotationView? {
  let annotationView = AttractionAnnotationView(
    annotation: annotation,
    reuseIdentifier: "Attraction")
  annotationView.canShowCallout = true
  return annotationView
}
This method receives the selected MKAnnotation and uses it to create the AttractionAnnotationView. Since the property canShowCallout is set to true, a call-out appears when the user touches the annotation. Finally, the method returns the annotation view.
Build and run to see your annotations in action! Don’t forget to turn on the :Pins: option.

The Attraction pins are looking rather sharp at this point! :]
So far, you’ve covered several complicated bits of MapKit, including overlays and annotations. But what if you need to use some drawing primitives, like lines and circles?
The MapKit framework also lets you draw directly onto a map view. MapKit provides MKPolyline, MKPolygon and MKCircle for this purpose. Time to try them out!
I Walk The Line: MKPolyline
If you’ve ever been to Magic Mountain, you know that the Goliath hypercoaster is an incredible ride. Some riders like to make a beeline for it as soon as they walk in the gate! :]
To help these riders out, you’ll plot a path from the entrance of the park straight to the Goliath.
MKPolyline is a great solution for drawing a path that connects multiple points, such as plotting a non-linear route from point A to point B.
To draw a polyline, you need a series of longitude and latitude coordinates in the order they should be plotted. EntranceToGoliathRoute.plist, again found in the Park Information folder, contains the path information.
Now, you need a way to read that plist file and create the route for the riders to follow.
First, open ContentView.swift and find addRoute(). Then, replace it’s current TODO implementation with:
guard let points = Park.plist("EntranceToGoliathRoute") as? [String] else {
  return
}

let cgPoints = points.map { NSCoder.cgPoint(for: $0) }
let coords = cgPoints.map { CLLocationCoordinate2D(
  latitude: CLLocationDegrees($0.x),
  longitude: CLLocationDegrees($0.y))
}
let myPolyline = MKPolyline(coordinates: coords, count: coords.count)

mapView.addOverlay(myPolyline)
This method reads EntranceToGoliathRoute.plist and converts the individual coordinate strings to CLLocationCoordinate2D structures.
It’s remarkable how simple it is to implement a polyline: You simply create an array containing all of the points and pass it to MKPolyline! It doesn’t get much easier than that.
Remember, updateMapOverlayViews() already calls addRoute() whenever the user toggles this option via the UI. All that’s left now is for you to update the delegate method so it returns the actual view you want to render on the map view.
Go back to mapView(_:rendererFor:) and add this else if clause to the existing condition:
else if overlay is MKPolyline {
  let lineView = MKPolylineRenderer(overlay: overlay)
  lineView.strokeColor = .green
  return lineView
}
The process of displaying the polyline view is very similar to previous overlay views. However, in this case, you don’t need to create any custom view objects. You simply use the provided MKPolyLineRenderer class and initialize a new instance with the overlay.
MKPolyLineRenderer also lets you change some of the polyline’s attributes. In this case, you’ve modified the stroke color to show as green.
Build and run your app. Enable the :Route: option and it’ll appear on the screen:
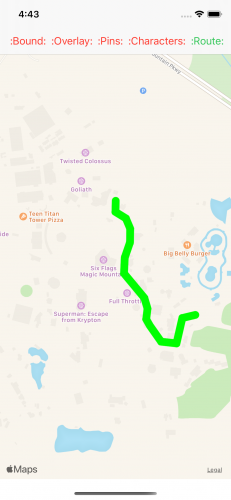
Now Goliath fanatics can make it to the coaster in record time! :]
It would be nice to show the park patrons where the park boundaries are, since the park doesn’t actually occupy the entire space shown on the screen.
You could use MKPolyline to draw a shape around the park boundaries, but MapKit provides another class specifically designed to draw closed polygons: MKPolygon.