Swift Algorithm Club: Swift Binary Search Tree Data Structure
Learn how to implement a Swift binary search tree. Code snippets for quick reference, plus a step-by-step tutorial and explanation. By Kelvin Lau.
CustomStringConvertible
Verifying a tree structure can be hard without any console logging. Swift has a handy protocol named CustomStringConvertible, which allows you define a custom output for print statements. Add the following code just below your BinaryTree enum:
extension BinaryTree: CustomStringConvertible {
  var description: String {
    switch self {
    case let .node(left, value, right):
      return "value: \(value), left = [" + left.description + "], right = [" + right.description + "]"
    case .empty:
      return ""
    }
  }
}
Print the tree by writing the following at the end of the file:
print(tree)
You should see something like this:
value: +,
    left = [value: *,
        left = [value: 5, left = [], right = []],
        right = [value: -,
            left = [value: a, left = [], right = []],
            right = [value: 10, left = [], right = []]]],
    right = [value: *,
        left = [value: -,
            left = [],
            right = [value: 4, left = [], right = []]],
        right = [value: /,
            left = [value: 3, left = [], right = []],
            right = [value: b, left = [], right = []]]]
With a bit of imagination, you can see the tree structure. ;-) It helps if you indent it:
value: +,
left = [value: *,
left = [value: 5, left = [], right = []],
right = [value: -,
left = [value: a, left = [], right = []],
right = [value: 10, left = [], right = []]]],
right = [value: *,
left = [value: -,
left = [],
right = [value: 4, left = [], right = []]],
right = [value: /,
left = [value: 3, left = [], right = []],
right = [value: b, left = [], right = []]]]
Getting The Count
Another useful feature is being able to get the number of nodes in the tree. Add the following just inside your BinaryTree enumeration:
var count: Int {
  switch self {
  case let .node(left, _, right):
    return left.count + 1 + right.count
  case .empty:
    return 0
  }
}
Test it out by adding this to the end of your playground:
tree.count
You should see the number 12 in the sidebar, since there are 12 nodes in the tree.
Great job making it this far. Now that you’ve got a good foundation for binary trees, it’s time to get acquainted with the most popular tree by far – the Binary Search Tree!
Binary Search Trees
A binary search tree is a special kind of binary tree (a tree in which each node has at most two children) that performs insertions and deletions such that the tree is always sorted.
“Always Sorted” Property
Here is an example of a valid binary search tree:
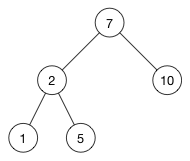
Notice how each left child is smaller than its parent node, and each right child is greater than its parent node. This is the key feature of a binary search tree.
For example, 2 is smaller than 7 so it goes on the left; 5 is greater than 2 so it goes on the right.
Insertion
When performing an insertion, starting with the root node as the current node:
- If the current node is empty, you insert the new node here.
- If the new value is smaller, you go down the left branch.
- If the new value is greater, you go down the right branch.
You traverse your way down the tree until you find an empty spot where you can insert the new value.
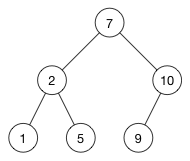
For example, imagine you want to insert the value 9 into the above tree:
- Start at the root of the tree (the node with the value 7), and compare it to the new value 9.
- 9 > 7, so you go down the right branch
- Compare 9 with 10. Since 9 < 10, go down the left branch.
- This left branch is empty, thus you’ll insert a new node for 9 at this location.
The new tree now looks like this:
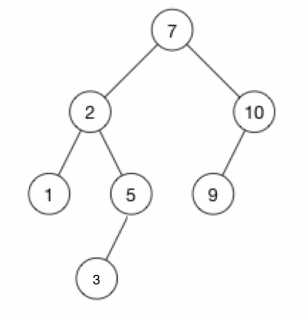
Here’s another example. Imagine you want to insert 3 into the above tree:
- Start at the root of the tree (the node with the value 7), and compare it to the new value 3.
- 3 < 7, so you go down the left branch
- Compare 3 with 2. Since 3 > 2, go down the right branch.
- Compare 3 with 5. Since 3 < 5, go down the left branch.
- The left branch is empty, thus you’ll insert a new node for 3 at this location.
The new tree now looks like this:
There is always only one possible place where the new element can be inserted in the tree. Finding this place is usually pretty quick. It takes O(h) time, where h is the height of the tree.
Challenge: Implementing Insertion
Now that you’ve got an idea of how insertion works, it’s implementation time. Add the following method to your BinaryTree enum:
// 1.
mutating func naiveInsert(newValue: T) {
  // 2.
  guard case .node(var left, let value, var right) = self else {
    // 3.
    self = .node(.empty, newValue, .empty)
    return
  }

  // 4. TODO: Implement rest of algorithm!

}
Let’s go over this section by section:
- Value types are immutable by default. If you create a method that tries to mutate something within the value type, you’ll need to explicitly specify that by prepending the
mutatingkeyword in front of your method. - You’re using the
guardstatement to expose the left child, current value, and right child of the current node. If this node isempty, thenguardwill fail into it’selseblock. - In this block,
selfisempty. You’ll insert the new value here. - This is where you come in – hang tight for a second.
In a moment, you will try to implement section 4 based on the algorithm discussed above. This is a great exercise not only for understanding binary search trees, but also honing your recursion skills.
But before you do, you need to make a change to the BinaryTree signature. In section 4, you’ll need to compare whether the new value with the old value, but you can’t do this with the current implementation of the binary tree. To fix this, update the BinaryTree enum to the following:
enum BinaryTree<T: Comparable> {
  // stuff inside unchanged
}
The Comparable protocol enforces a guarantee that the type you’re using to build the binary tree can be compared using the comparison operators, such as the < operator.
Now, go ahead and try to implement section #4 based on the algorithm above. Here it is again for your reference:
- If the current node is empty, you insert the new node here. Done!
- If the new value is smaller, you go down the left branch. You need to do this.
- If the new value is greater, you go down the right branch. You need to do this.
If you get stuck, you can check the solution below.
[spoiler title="Solution"]
// 4. TODO: Implement naive algorithm!
if newValue < value {
  left.naiveInsert(newValue: newValue)
} else {
  right.naiveInsert(newValue: newValue)
}
[/spoiler]