Swift Algorithm Club: Swift Binary Search Tree Data Structure
Learn how to implement a Swift binary search tree. Code snippets for quick reference, plus a step-by-step tutorial and explanation. By Kelvin Lau.
The Swift Algorithm Club is an open source project on implementing data structures and algorithms in Swift.
Every month, Chris Pilcher and I feature a cool data structure or algorithm from the club in a tutorial on this site. If you want to learn more about algorithms and data structures, follow along with us!
In this tutorial, you’ll learn how about binary trees and binary search trees. The binary tree implementation was first implemented by Matthijs Hollemans, and the binary search tree was first implemented by Nico Ameghino.
Getting Started
The Binary Tree is one of the most prevalent data structures in computer science. More advanced trees like the Red Black Tree and the AVL Tree evolved from the binary tree.
Binary trees themselves evolved from the general purpose tree. If you don’t know what that is, check out last month’s tutorial on Swift Tree Data Structure.
Let’s see how this works.
Binary Tree Data Structure
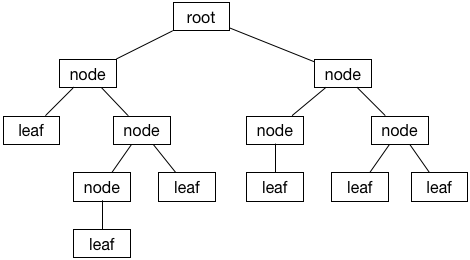
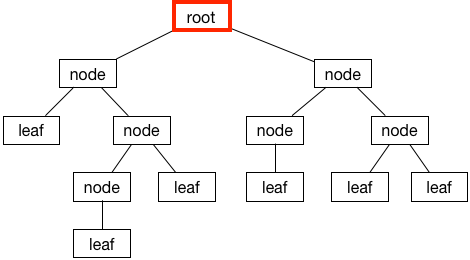
A binary tree is a tree where each node has 0, 1, or 2 children. The important bit is that 2 is the max – that’s why it’s binary.
Here’s what it looks like:
Terminology
Before we dive into the code, it’s important that you understand some important terminology first.
On top of all the terms related to a general purpose tree, a binary tree adds the notion of left and right children.
Left Child
The left child descends from the left side:
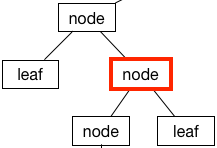
Right Child
Surprisingly, the right side is the right child:
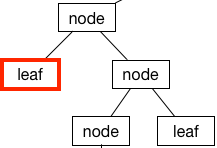
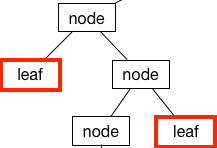
Leaf Node
If a node doesn’t have any children, it’s called a leaf node:
Root
The root is the node at the top of the tree (programmers like their trees upside down):
Binary Tree Implementation in Swift
Like other trees, a binary tree is composed of nodes. One way to represent a node is using a class (don’t enter this into a Playground yet, this is just an example):
class Node<T> {
  var value: T
  var leftChild: Node?
  var rightChild: Node?

  init(value: T) {
    self.value = value
  }
}
In a binary tree, every node holds some data (value), and has a left and right child (leftChild and rightChild). In this implementation, leftChild and rightChild are optionals, meaning they can be nil.
That’s the traditional way to build trees. However, the thrill seeker you are shall rejoice today, because you’ll try something new! :]
Value Semantics
One of the core ideas of Swift is using value types (like struct and enum) instead of reference types (like class) where appropriate. Well, creating a binary tree is a perfect case to use a value type – so in this tutorial, you’ll you’ll implement the binary tree as an enum type.
Create a new Swift playground (this tutorial uses Xcode 8 beta 5) and add the following enum declaration:
enum BinaryTree<T> {

}
You’ve declared a enum named BinaryTree. The
States
Enumerations are rigid, in that they can only be in one state or another. Fortunately, this fits into the idea of binary trees quite elegantly. A binary tree is a finite set of nodes that is either empty, or consists of the value at the node and references to it’s left and right children.
Update your enum accordingly:
enum BinaryTree<T> {
  case empty
  case node(BinaryTree, T, BinaryTree)
}
If you’re coming from another programming language, the node case may seem a bit foreign. Swift enums allow for associated values, which is a fancy term for saying you can attach stored properties with a case.
In node(BinaryTree, T, BinaryTree), the parameter types inside the brackets correspond to the left child, value, and the right child, respectively.
That’s a fairly compact way of modelling a binary tree. However, you’re immediately greeted with a compiler error:
Recursive enum 'BinaryTree<T>' is not marked 'indirect'
Xcode should make an offer to fix this for you. Accept it, and your enum should now look like this:
indirect enum BinaryTree<T> {
  case empty
  case node(BinaryTree, T, BinaryTree)
}
Indirection
Enumerations in Swift are value types. When Swift tries to allocate memory for value types, it needs to know exactly how much memory it needs to allocate.
The enumeration you’ve defined is a recursive enum. That’s an enum that has an associated value that refers to itself. Recursive value types have a indeterminable size.

So you’ve got a problem here. Swift expects to know exactly how big the enum is, but the recursive enum you’ve created doesn’t expose that information.
Here’s where the indirect keyword comes in. indirect applies a layer of indirection between two value types. This introduces a thin layer of reference semantics to the value type.
The enum now holds references to it’s associated values, rather than their value. References have a constant size, so you no longer have the previous problem.
While the code now compiles, you can be a little bit more concise. Update BinaryTree to the following:
enum BinaryTree<T> {
  case empty
  indirect case node(BinaryTree, T, BinaryTree)
}
Since only the node case is recursive, you only need to apply indirect to that case.
Example: Sequence of Arithmetical Operations
An interesting exercise to check out is to model a series of calculations using a binary tree. Take this for an example for modelling (5 * (a - 10)) + (-4 * (3 / b)):
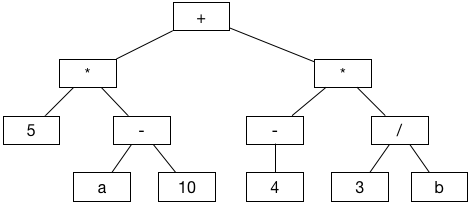
Write the following at the end of your playground file:
// leaf nodes
let node5 = BinaryTree.node(.empty, "5", .empty)
let nodeA = BinaryTree.node(.empty, "a", .empty)
let node10 = BinaryTree.node(.empty, "10", .empty)
let node4 = BinaryTree.node(.empty, "4", .empty)
let node3 = BinaryTree.node(.empty, "3", .empty)
let nodeB = BinaryTree.node(.empty, "b", .empty)

// intermediate nodes on the left
let Aminus10 = BinaryTree.node(nodeA, "-", node10)
let timesLeft = BinaryTree.node(node5, "*", Aminus10)

// intermediate nodes on the right
let minus4 = BinaryTree.node(.empty, "-", node4)
let divide3andB = BinaryTree.node(node3, "/", nodeB)
let timesRight = BinaryTree.node(minus4, "*", divide3andB)

// root node
let tree = BinaryTree.node(timesLeft, "+", timesRight)
You need to build up the tree in reverse, starting with the leaf nodes and working your way up to the top.