Introduction to Unity Scripting
In this tutorial, learn the basics of scripting in Unity by creating a classic arena shooter whereby geometric shapes try to crush you. By Georgi Ivanov.
Working with Prefabs
Simply running around and avoiding enemies is a pretty one-sided game. Its time to arm the Player for combat.
Click the Create button in the Hierarchy and select 3D Object/Capsule. Name it Projectile and give it the following transform values:
- Position: (0, 0, 0)
- Rotation: (90, 0, 0)
- Scale: (0.075, 0.246, 0.075)

Each time the Player shoots, it will fire an instance of Projectile. To make this happen, you need to create a Prefab. Unlike the objects you already have in the scene, Prefabs are created on-demand by the game logic.
Create a new folder under Assets, called Prefabs. Now drag the Projectile object into this folder. That's it: you have a Prefab!
Your Prefab will need a bit of script. Create a new script inside the Scripts folder named Projectile and add to it the following class variables:
public float speed;
public int damage;

Vector3 shootDirection;
Just like any moving object so far in this tutorial, this one will also have speed and damage variables, since it's part of the combat logic. The shootDirection vector determines where the Projectile will go.
Put that vector to work by implementing the following methods inside the class:
// 1
void FixedUpdate () {
  this.transform.Translate(shootDirection * speed, Space.World);
}

// 2
public void FireProjectile(Ray shootRay) {
  this.shootDirection = shootRay.direction;
  this.transform.position = shootRay.origin;
}

// 3
void OnCollisionEnter (Collision col) {
  Enemy enemy = col.collider.gameObject.GetComponent<Enemy>();
  if(enemy) {
    enemy.TakeDamage(damage);
  }
  Destroy(this.gameObject);
}
Here's what's going on in the above code:
- The
Projectilemoves differently than everything else in this game. It doesn't have a target, or some force applied to it over time; instead, it moves in a predetermined direction for its entire lifecycle. - Here you set the starting position and direction of the Prefab. This
Rayargument seems pretty mysterious, but you'll soon learn how it's calculated. - If a projectile collides with an enemy, it calls
TakeDamage()and destroys itself.
In the scene Hierarchy, attach the Projectile script to the Projectile GameObject. Set the Speed to 0.2 and Damage to 1, then click the Apply button located near the top of the Inspector. This will apply the changes you just made to all instances of this prefab.

Remove the Projectile object from the scene Hierarchy - you don't need it anymore.
Firing Projectiles
Now that you have a prefab that can move and apply damage, you're ready to start shooting.
Inside the Player folder, create a new script named PlayerShooting and attach it to the Player in the scene. Inside the class, declare the following variables:
public Projectile projectilePrefab;
public LayerMask mask;
The first variable will contain a reference to the Projectile Prefab you created earlier. Every time your Player fires a projectile, you'll create a new instance from this Prefab. The mask variable is used to filter GameObjects.
Wait, casting Rays? What is this sorcery?
No, there's no black magic afoot - there are times in your game when you'll need to know if a collider exists in a particular direction. To do this, Unity can cast an invisible ray from a certain point to a direction you specify. You'll likely encounter a lot of GameObjects that intersect with the ray, so using a mask lets you filter out any unwanted objects.
Raycasts are incredibly useful and can used for a variety of purposes. They're commonly used to test if another player has been struck by a projectile, but you can also use them to test if there is any geometry underneath a mouse pointer. To learn more about Raycasts, check out this Unity live training video on the Unity site.
The image below shows a ray cast from a cube to a cone. Since the ray has a iconsphere mask on it, it ignores that GameObect and reports a hit on the cone:

Now it's time for you to fire your own rays.
Add the following method to PlayerShooting.cs:
void shoot(RaycastHit hit){
  // 1
  var projectile = Instantiate(projectilePrefab).GetComponent<Projectile>();
  // 2
  var pointAboveFloor = hit.point + new Vector3(0, this.transform.position.y, 0);

  // 3
  var direction = pointAboveFloor - transform.position;

  // 4
  var shootRay = new Ray(this.transform.position, direction);
  Debug.DrawRay(shootRay.origin, shootRay.direction * 100.1f, Color.green, 2);

  // 5
  Physics.IgnoreCollision(GetComponent<Collider>(), projectile.GetComponent<Collider>());

  // 6
  projectile.FireProjectile(shootRay);
}
Here's what the above code does:
- Instantiates a projectile Prefab and gets its
Projectilecomponent so it can be initialized. - This point always looks like
(x, 0.5, z). X and Z are coordinates on the floor where the ray cast from the mouse click position hits. This calculation is important, because the projectile has to be parallel to the floor – otherwise you'd be shooting downward, and only amateurs shoot towards the ground. :] - Calculates the direction from the Player GameObject to
pointAboveFloor. - Creates a new ray that describes the projectile trajectory by its origin and direction.
- This line tells Unity's physics engine to ignore collisions between the
Player colliderandProjectile collider. OtherwiseOnCollisionEnter()in theProjectile scriptwould be called before it had the chance to fly off. - Finally, it sets the trajectory for the projectile.
Debug.DrawRay() when ray casting is invaluable as it can help you visualize how the ray looks and what it hits.With the firing logic in place, add the following methods to let the player actually pull the trigger:
// 1
void raycastOnMouseClick () {
  RaycastHit hit;
  Ray rayToFloor = Camera.main.ScreenPointToRay(Input.mousePosition);
  Debug.DrawRay(rayToFloor.origin, rayToFloor.direction * 100.1f, Color.red, 2);

  if(Physics.Raycast(rayToFloor, out hit, 100.0f, mask, QueryTriggerInteraction.Collide)) {
    shoot(hit);
  }
}

// 2
void Update () {
  bool mouseButtonDown = Input.GetMouseButtonDown(0);
  if(mouseButtonDown) {
    raycastOnMouseClick();
  }
}
Taking each numbered comment in turn:
- This method casts a ray from the camera to the point where the mouse clicked. Then it checks to see if this ray intersects a game object with the given LayerMask.
- On every update, the script checks for a left mouse button press. If it finds one, it calls
raycastOnMouseClick().
Return back to Unity and set up the following variables in the Inspector:
- Projectile Prefab: reference the Projectile from the prefab folder
- Mask: Floor

You can create your own by clicking the Layer dropdown of a GameObject and selecting Add Layer:
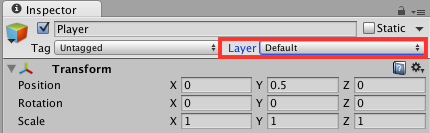
To assign a layer to a GameObject, select it from the Layer dropdown:

For more information about layers, check out Unity's Layers documentation.
Run the project and fire at will! The projectiles are fired in the desired direction, but something seems a bit off, doesn't it?

It would be much cooler if the projectiles were pointing in the direction of travel. To fix this, open up the Projectile.cs script and add the following method:
void rotateInShootDirection() {
  Vector3 newRotation = Vector3.RotateTowards(transform.forward, shootDirection, 0.01f, 0.0f);
  transform.rotation = Quaternion.LookRotation(newRotation);
}
Interested in learning more about quaternions and why they're useful? Check out this excellent article: How I learned to Stop Worrying and Love Quaternions
RotateTowards is very similar to MoveTowards, but it treats vectors as directions instead of positions. Also, you don't need to change rotation over time so using a step close to zero will suffice. Transform rotations in Unity are expressed using quaternions, which are beyond the scope of this tutorial. All you need to know for this tutorial is that they have advantages over vectors when making calculations that involve rotations in 3D.
At the end of FireProjectile(), add a call to rotateInShootDirection(). FireProjectile() should now look like the following:
public void FireProjectile(Ray shootRay) {
  this.shootDirection = shootRay.direction;
  this.transform.position = shootRay.origin;
  rotateInShootDirection();
}
Run the game once again and fire in a few different directions; this time the projectiles will point in the direction they are shot:

Remove the Debug.DrawRay calls as you won't need them further.