Introduction to Unity Scripting
In this tutorial, learn the basics of scripting in Unity by creating a classic arena shooter whereby geometric shapes try to crush you. By Georgi Ivanov.
Sign up/Sign in
With a free Kodeco account you can download source code, track your progress, bookmark, personalise your learner profile and more!
Create accountAlready a member of Kodeco? Sign in
Sign up/Sign in
With a free Kodeco account you can download source code, track your progress, bookmark, personalise your learner profile and more!
Create accountAlready a member of Kodeco? Sign in
Contents
Generating More Bad Guys
Having only one enemy isn't terribly challenging. But now that you know about Prefabs, you can spawn all the adversaries you want! :]
To keep the player guessing, you can randomize the health, speed and location of each Enemy.
Creating an empty game object - GameObject\Create Empty. Name it EnemyProducer and add a Box Collider component. Set the values in the Inspector as follows:
- Is Trigger: true
- Center: (0, 0.5, 0)
- Size: (29, 1, 29)
- Position: (0, 0, 0)
- Box Collider:
The collider you attached defines a particular 3D space inside the Arena. To see this, select the Enemy Producer GameObject in the Hierarchy and look inside the Scene view:
The green wire outlines represent a collider.
You are about to write a script that picks a random location in this space along the X and Z axis and instantiates an enemy Prefab.
Create a new script called EnemyProducer and attach it to the EnemyProducer GameObject. Inside the newly set up class, add the following instance members:
public bool shouldSpawn;
public Enemy[] enemyPrefabs;
public float[] moveSpeedRange;
public int[] healthRange;

private Bounds spawnArea;
private GameObject player;
The first variable enables and disables spawning. The script will pick a random enemy prefab from enemyPrefabs and instantiate it. The next two arrays will specify a minimal and maximal value of speed and health. The spawn area is that green box you saw in the Scene view. Finally, you'll need a reference to the Player and pass it as target to the bad guys.
Inside the script, define the following methods:
public void SpawnEnemies(bool shouldSpawn) {
  if(shouldSpawn) {
    player = GameObject.FindGameObjectWithTag("Player");
  }
  this.shouldSpawn = shouldSpawn;
}

void Start () {
  spawnArea = this.GetComponent<BoxCollider>().bounds;
  SpawnEnemies(shouldSpawn);
  InvokeRepeating("spawnEnemy", 0.5f, 1.0f);
}
SpawnEnemies() gets a reference of a game object with tag Player and determines whether an enemy should spawn.
Start() initializes the spawn area and schedules the invocation of a method 0.5 seconds after the game starts. It will get called repeatedly every second. Besides acting as a setter method, SpawnEnemies() also gets a reference of a game object with tag Player.
The Player game object isn't tagged yet - you'll do that now. Select the Player object from the Hierarchy and then in the Inspector tab, choose Player from the Tag dropdown menu:
Now, you need to write the actual spawning code for an individual enemy.
Open up the Enemy script and add the method below:
public void Initialize(Transform target, float moveSpeed, int health) {
  this.targetTransform = target;
  this.moveSpeed = moveSpeed;
  this.health = health;
}
This simply acts as a setter for creating the object. Next up: the code to spawn your leagues of enemies. Open EnemyProducer.cs and add the following methods:
Vector3 randomSpawnPosition() {
  float x = Random.Range(spawnArea.min.x, spawnArea.max.x);
  float z = Random.Range(spawnArea.min.z, spawnArea.max.z);
  float y = 0.5f;

  return new Vector3(x, y, z);
}

void spawnEnemy() {
  if(shouldSpawn == false || player == null) {
    return;
  }

  int index = Random.Range(0, enemyPrefabs.Length);
  var newEnemy = Instantiate(enemyPrefabs[index], randomSpawnPosition(), Quaternion.identity) as Enemy;
  newEnemy.Initialize(player.transform,
      Random.Range(moveSpeedRange[0], moveSpeedRange[1]),
      Random.Range(healthRange[0], healthRange[1]));
}
All that spawnEnemy() does is pick a random enemy prefab, instantiate it at a random position and initialize the Enemy script public variables.
EnemyProducer.cs is almost ready to go!
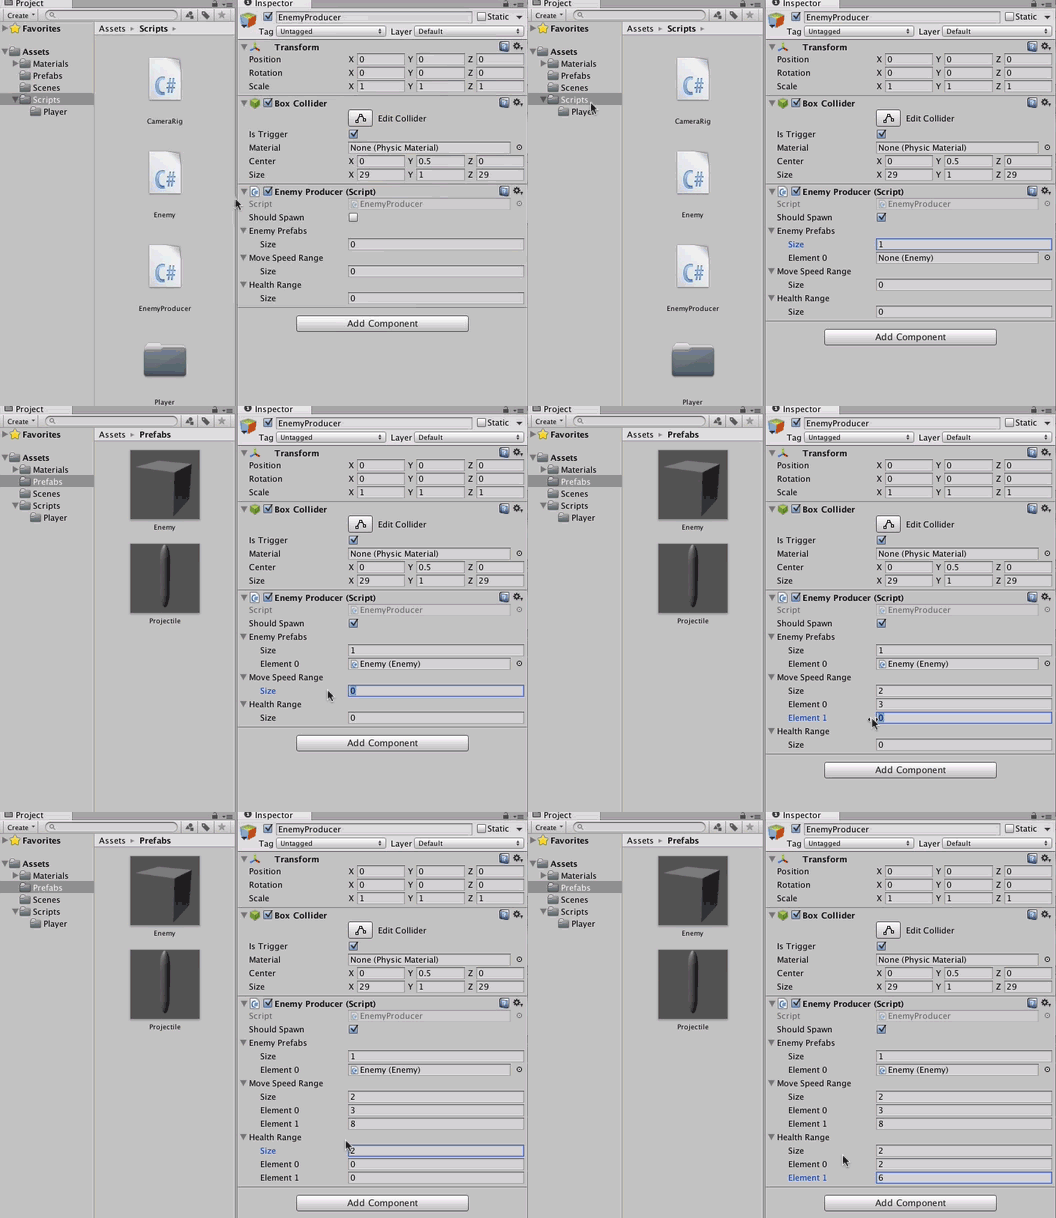
Return back to Unity. Create an Enemy prefab by dragging the Enemy object from the Hierarchy to the Prefabs folder. Remove the enemy object from the scene - you don't need it anymore. Next set the Enemy Producer script public variables like so:
- Size: 1
- Element 0: Reference the enemy prefab
- Size: 2
- Element 0: 3
- Element 1: 8
- Size: 2
- Element 0: 2
- Element 1: 6
- Should Spawn: True
- Enemy Prefabs:
- Move Speed Range:
- Health Range:
Run the game and check it out - an endless stream of bad guys!
Okay, those cubes don't look terribly frightening. Time to spice things up.
Create a 3D Cylinder and Capsule in the scene. Name them Enemy2 and Enemy3 respectively. Just as you did earlier with the first enemy, add a Rigidbody component and the Enemy script to both of them. Select Enemy2 and change its configuration in the Inspector like so:
- Use Gravity: False
- Freeze Position: Y
- Freeze Rotation: X, Y, Z
- Move Speed: 5
- Health: 2
- Damage: 1
- Target Transform: None
- Scale: (0, 0.5, 0)
- Rigidbody:
- Enemy Component:
Now do the same for Enemy3, but set its Scale to 0.7:
Next, turn them into Prefabs, just as you did with the original Enemy, and reference all of them in the Enemy Producer. The values in the Inspector should look like this:
-
Enemy Prefabs:
- Size: 3
- Element 0: Enemy
- Element 1: Enemy2
- Element 2: Enemy3
- Size: 3
- Element 0: Enemy
- Element 1: Enemy2
- Element 2: Enemy3
Run the game; you'll see different prefabs spawn inside the Arena.
It won't take long before you realize that you're invincible! As awesome as that is, you need to level the playing field a bit.
Implementing the Game Controller
Now that you have shooting, movement and enemies in place, you'll implement a basic game controller. It will restart the game once the Player is "dead". But first, you'll have to create a mechanism to notify any interested parties that the Player has reached 0 health.
Open the Player script and add the following above the class declaration:
using System;
Inside the class add the following new public event:
public event Action<Player> onPlayerDeath;
An event is a C# language feature that lets you broadcast changes in objects to any listeners. To learn how to use events, check out Unity's live training on events..
Edit collidedWithEnemy() to look like the code below:
void collidedWithEnemy(Enemy enemy) {
  enemy.Attack(this);
  if(health <= 0) {
    if(onPlayerDeath != null) {
      onPlayerDeath(this);
    }
  }
}
Events provide a neat way for objects to signal state changes between themselves. A game controller would be very interested in the event declared above. In the Scripts folder, create a new script called GameController. Double-click the file to edit it, and add to it the following variables:
public EnemyProducer enemyProducer;
public GameObject playerPrefab;
The script will need to have some control over the enemy production, as it doesn't make sense to spawn enemies once the Player has perished. Also, restarting the game means you will have to recreate the Player which means...that's right, it will become a Prefab.
Add the following methods:
void Start () {
  var player = GameObject.FindGameObjectWithTag("Player").GetComponent<Player>();
  player.onPlayerDeath += onPlayerDeath;
}

void onPlayerDeath(Player player) {
  enemyProducer.SpawnEnemies(false);
  Destroy(player.gameObject);

  Invoke("restartGame", 3);
}
In Start(), the script gets a reference to the Player script and subscribes for the event you created earlier. Once the Player's health reaches 0 onPlayerDeath() will be called, stoping enemy production, removing the Player object from the scene and invoking restartGame() method after 3 seconds.
Finally, add the implementation of the restart game action:
void restartGame() {
  var enemies = GameObject.FindGameObjectsWithTag("Enemy");
  foreach (var enemy in enemies)
  {
    Destroy(enemy);
  }

  var playerObject = Instantiate(playerPrefab, new Vector3(0, 0.5f, 0), Quaternion.identity) as GameObject;
  var cameraRig = Camera.main.GetComponent<CameraRig>();
  cameraRig.target = playerObject;
  enemyProducer.SpawnEnemies(true);
  playerObject.GetComponent<Player>().onPlayerDeath += onPlayerDeath;
}
Here you're doing a bit of cleanup: you destroy all enemies in the scene and create a new Player object. You then reassign the camera rig's target to this instance, resume enemy production, and subscribe Game Controller to the player death event.
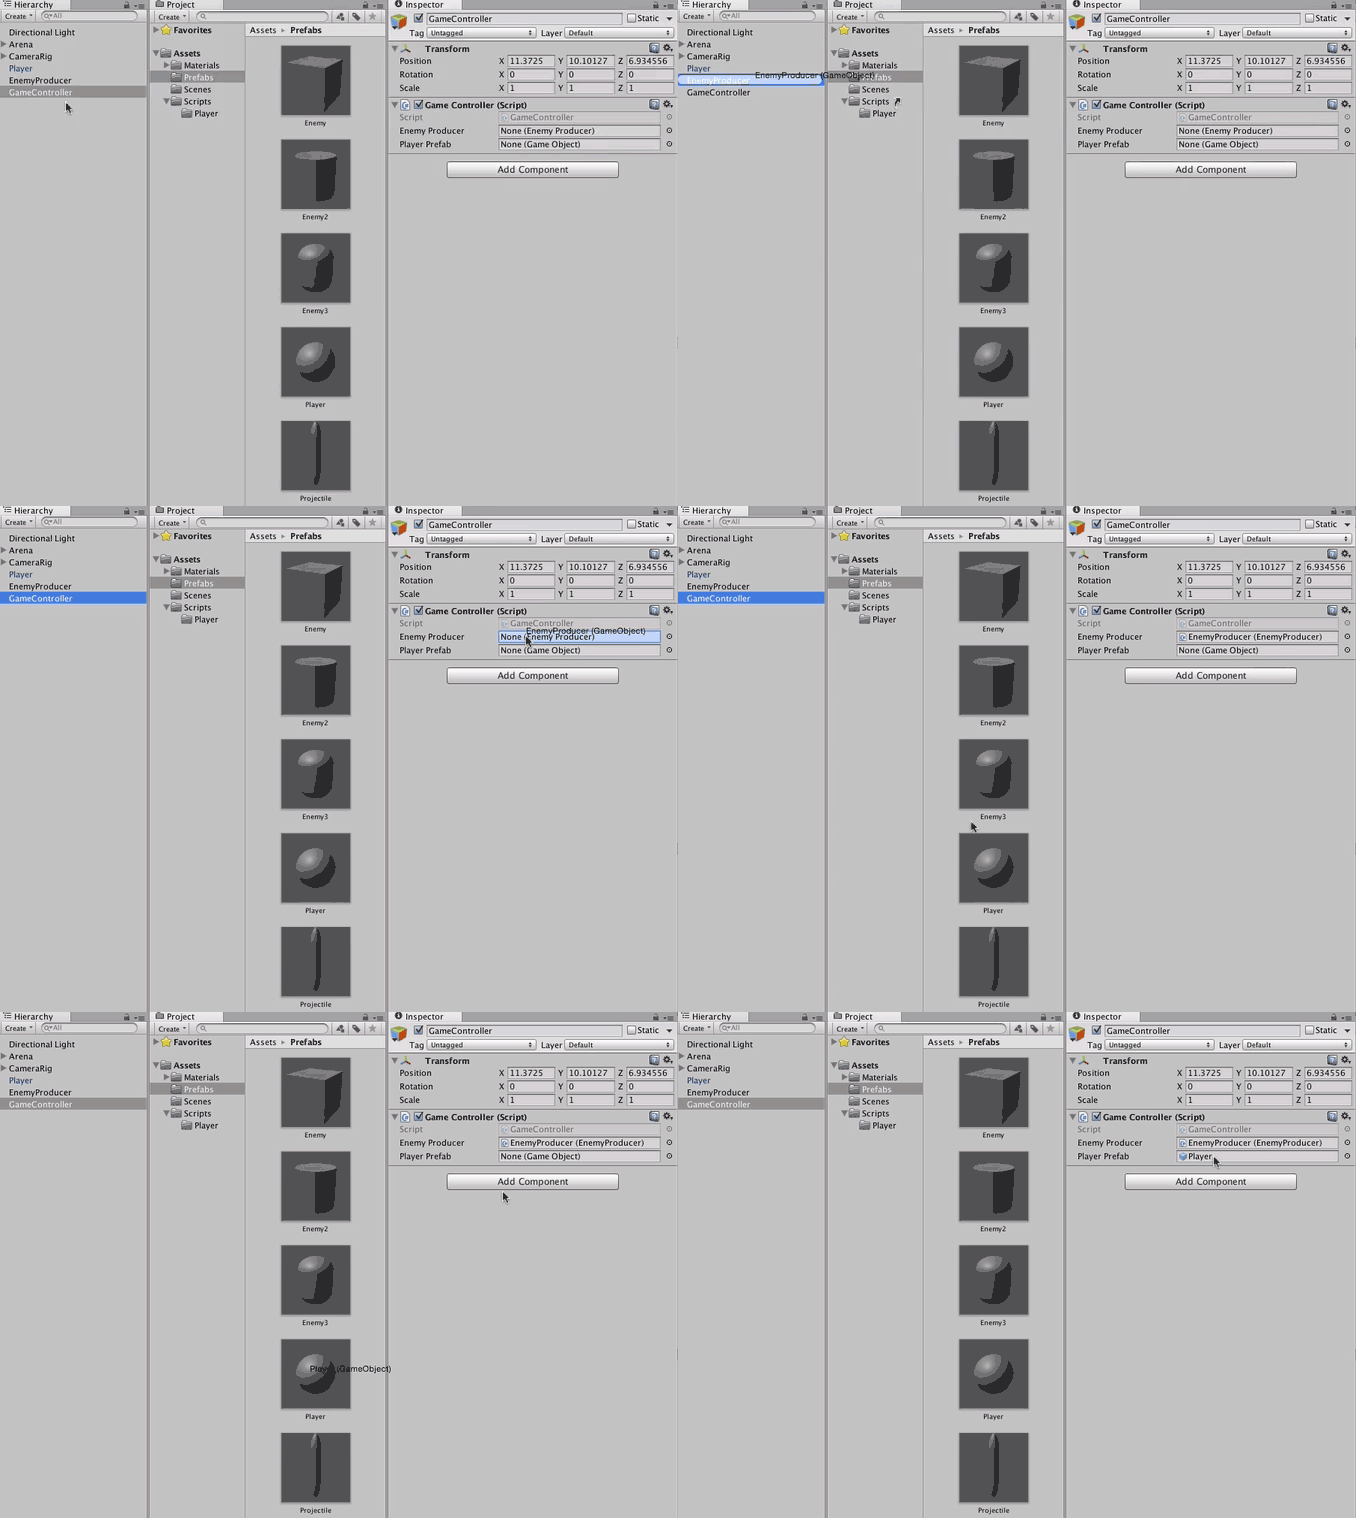
Now return to Unity, open the Prefabs folder and change the tag of all Enemy prefabs to Enemy. Next, make the Player game object into a Prefab by dragging it into the Prefabs folder. Create an empty game object, name it GameController and attach the script you just created. Hookup all the required references in Inspector.
By now you're pretty familiar with this pattern. Try placing the references by yourself and then check your results against the illustration hidden below:
[spoiler]
Game Controller:
- Enemy Producer: Enemy Producer reference from the Hierarchy
- Player Prefab: reference it from the Prefabs folder
Run the game again to see the game controller in action.
That's it – you've scripted your first Unity game! Congratulations! :]


