Introduction to Unity Scripting
In this tutorial, learn the basics of scripting in Unity by creating a classic arena shooter whereby geometric shapes try to crush you. By Georgi Ivanov.
Creating the Camera Script
In the Scripts folder, create a new script called CameraRig and attach it to the Main Camera. Need a bit of help to figure out the steps? You can check the hint below for the solution.
[spoiler]With the Scripts folder selected, click the Create button in the Project Browser, then select C# Script. Name the new script CameraRig. Finally, drag and drop it over the Main Camera object like so:
 [/spoiler]
Now create the following variables inside the newly created CameraRig class, right above the Start() method:
public float moveSpeed;
public GameObject target;

private Transform rigTransform;
As you might have guessed, moveSpeed is the speed with which the camera will follow the target – which can be any game object inside the scene.
Inside of Start(), add the following line:
rigTransform = this.transform.parent;
This code gets a reference to the parent Camera object's transform in the scene hierarchy. Every object in a scene has a Transform, which describes the position, rotation and scale of an object.

In the same script, add the method below:
void FixedUpdate () {
  if(target == null){
    return;
  }

  rigTransform.position = Vector3.Lerp(rigTransform.position, target.transform.position,
    Time.deltaTime * moveSpeed);
}
The CameraRig movement code is a bit simpler than the one in PlayerMovement. This is because you don't need a Rigidbody; simply interpolating between the positions of the rigTransform and target is enough.
Vector3.Lerp() takes two points in space and a float in the range of [0, 1], which describes a point along the two endpoints. The left endpoint is 0, and the right endpoint is 1. Passing in 0.5 to Lerp() would return a point exactly between both endpoints.
This moves the rigTransform closer to the target position with a little bit of easing. In short – the camera follows the player.
Return to Unity. Make sure the Main Camera is still selected in the Hierarchy. In the Inspector, set the Move Speed to 8 and the Target to the Player:

Run the game and move around the scene; the camera should follow the target transform smoothly wherever it goes.

Creating an Enemy
A shooter game without enemies would be easy to beat, but a bit boring. :] Create an enemy cube by clicking GameObject\3D Object\Cube from the top menu. Rename your Cube to Enemy and add a Rigidbody component.
In the Inspector, first set the Cube's Transform to (0, 0.5,4). In the Constraints section of the Rigidbody component, check the Y checkbox in the Freeze Position category.

Excellent - now to make your enemies move around in a menacing manner. Create a script named Enemy in the Scripts folder. You should be a pro at this by now, but if not, check the instructions earlier in the tutorial for reference.
Next, add the following public variables inside the class:
public float moveSpeed;
public int health;
public int damage;
public Transform targetTransform;
You probably can figure out what those variables represent without too much difficulty. You used moveSpeed earlier to create the camera rig, and it has the same effect here. health and damage help determine when an enemy should die and how much their death will hurt the Player. Finally, targetTransform references the Player's transform.
Speaking of the Player, you'll need to create a class to represent all the Player goodness that the enemy wants to destroy.
In the Project Browser, select Player folder and create a new script named Player; this script will react to collisions and keep track of the Player's health. Double-click the script to edit it.
Add the following public variable to store the Player's the health:
public int health = 3;
This provides a default value for the health, but it can be modified in the Inspector as well.
To handle collisions, add the following methods:
void collidedWithEnemy(Enemy enemy) {
  // Enemy attack code
  if(health <= 0) {
    // Todo
  }
}

void OnCollisionEnter (Collision col) {
    Enemy enemy = col.collider.gameObject.GetComponent<Enemy>();
    collidedWithEnemy(enemy);
}
OnCollisionEnter() triggers when two rigidbodies with colliders touch. The Collision argument contains information about such things as contact points and impact velocities. In this case, you're only interested in the Enemy component of the colliding object, so you can call collidedWithEnemy() and execute the attack logic – which you'll add next.
Switch back to Enemy.cs and add the following methods:
void FixedUpdate () {
  if(targetTransform != null) {
    this.transform.position = Vector3.MoveTowards(this.transform.position, targetTransform.transform.position, Time.deltaTime * moveSpeed);
  }
}

public void TakeDamage(int damage) {
  health -= damage;
  if(health <= 0) {
    Destroy(this.gameObject);
  }
}

public void Attack(Player player) {
  player.health -= this.damage;
  Destroy(this.gameObject);
}
You're already familiar with FixedUpdate(), the slight difference is you're using MoveTowards() instead of Lerp(). This is because the Enemy should move at the same speed all the time and not ease-in as it approaches the target. When an enemy is hit with a projectile, TakeDamage() is called; when the Enemy gets to 0 health it will destroy itself. Attack() is similar - it applies damage to the Player and then the enemy destroys itself.
Switch back to Player.cs and in collidedWithEnemy(), replace the Enemy attack code comment with the following:
enemy.Attack(this);
The player will take damage and the enemy will self destruct in the process.
Switch back to Unity. Attach the Enemy script to the Enemy object and in the Inspector, set the following values on the Enemy:
- Move Speed: 5
- Health: 2
- Damage: 1
- Target Transform: Player
By now you should be able to do all of this yourself. Try it on your own, and then compare the result with the GIF below:
[spoiler]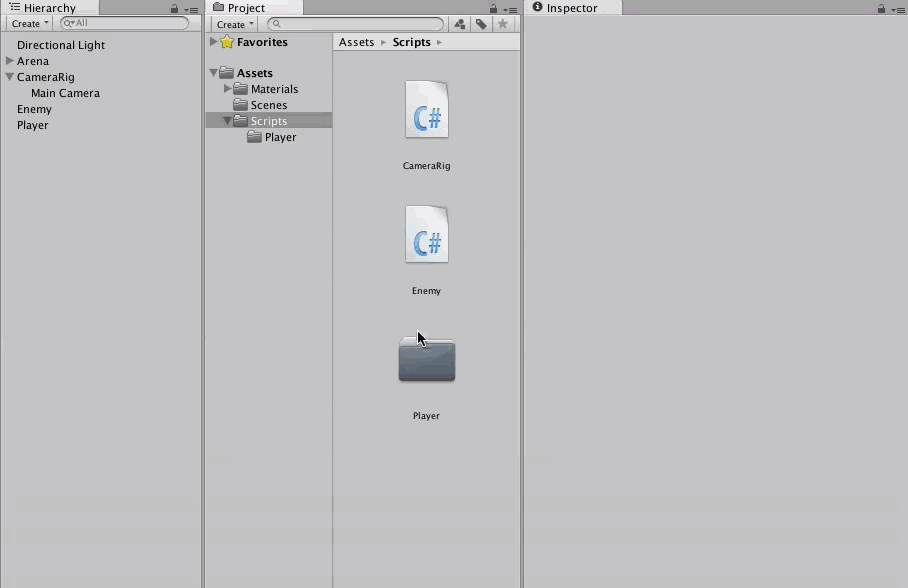 [/spoiler]
In the game, an Enemy collising with the Player constitutes a valid enemy attack. Detecting collisions with Unity's physics is almost a trivial task.
Finally, attach the Player script to the Player in the Hierarchy.
Run the game, and keep an eye on the console:

When the enemy reaches the Player, it performs the attack successfully and reduces the Player's health variable to 2. However there is a NullReferenceException thrown in the console, pointing to the Player script:

Aha - the Player can collide not only with enemies, but also other parts of the game world, such as the Arena. These game objects don't have an Enemy script and therefore GetComponent returns null.
Open Player.cs. In OnCollisionEnter(), wrap collidedWithEnemy() in an if statements:
if(enemy) {
  collidedWithEnemy(enemy);
}
No more nulls!