Advanced MapKit Tutorial: Custom MapKit Tiles
In this custom MapKit tiles tutorial, you’ll learn to modify the default MapKit tiles by adding cool, custom tiles to an adventure game. By Adam Rush.
Sign up/Sign in
With a free Kodeco account you can download source code, track your progress, bookmark, personalise your learner profile and more!
Create accountAlready a member of Kodeco? Sign in
Sign up/Sign in
With a free Kodeco account you can download source code, track your progress, bookmark, personalise your learner profile and more!
Create accountAlready a member of Kodeco? Sign in
Sign up/Sign in
With a free Kodeco account you can download source code, track your progress, bookmark, personalise your learner profile and more!
Create accountAlready a member of Kodeco? Sign in
Contents
Advanced MapKit Tutorial: Custom MapKit Tiles
25 mins
- Getting Started
- Testing Location
- Simulating a Location
- Simulating an Adventure
- Replacing the Tiles With OpenStreetMap
- Creating a New Overlay
- Dividing up the Earth
- Creating Custom MapKit Tiles
- Loading the Pre-rendered Tiles
- Bounding the Zoom Level
- Creating Tiles
- Deciding Which Tiles You Need
- Customizing Appearances
- Placing the Tiles
- Fancifying the Map
- Replacing the User Annotation
- Annotations for Specific Locations
- Using Custom Overlay Rendering
- Where to Go From Here?
Maps are ubiquitous in modern apps. They provide locations of nearby points of interest, help users navigate a town or park, find nearby friends, track progress on a journey or provide context for an augmented reality game.
Unfortunately, this means most maps look the same from app to app. Booooooring!
This tutorial covers how to include hand-drawn maps in your apps, instead of programmatically-generated maps, as Pokémon GO uses. You’ll learn how to:
- Replace existing MapKit tiles with a different set of tiles.
- Create your own tiles to show on the map.
- Add custom overlays to your map.
You’ll learn this by building a location-based adventure game. Taking a walk down fantasy Central Park, you’ll encounter formidable beasts that you’ll defeat on your way to glory!
Hand-drawing a map takes significant effort. Given the size of the planet, it’s only practical for a well-defined, geographically small area. If you have a well-defined area in mind for your map, a custom map can add a ton of sizzle to your app.
To create custom MapKit tiles, you’ll first have to know how to show a map. To get familiar with MapKit, check out MapKit Tutorial: Getting Started
or the video course MapKit and Core Location.
Getting Started
Start by downloading the project materials using the Download Materials button at the top or bottom of this tutorial. Open the starter project and check out the project files.
MapQuest is the start of a fun adventure game. The hero runs around Central Park, NYC in real life, but embarks on adventures, fights monsters, and collects treasure in an alternate reality. It has a cute, childish design to make players feel comfortable and to indicate the game isn’t that serious.
The game has several Points of Interest that define locations where the player can interact with the game. These can be quests, monsters, stores or other game elements. Entering a 10-meter zone around a Point of Interest starts the encounter. For the sake of this tutorial, the game-play isn’t as important as learning how to render the map.
There are two heavy-lifting files in the project:
- MapViewController.swift: Manages the map view and handles user interaction logic and state changes.
- Game.swift: Contains the game logic and manages the coordinates of some game objects.
The main view of the game is an MKMapView
. MapKit uses tiles at various zoom levels to fill its view and provide information about geographic features, roads, etc.
The map view can display either a traditional road map or satellite imagery. This is helpful for navigating around a city, but useless for imagining you’re adventuring around a medieval world. However, MapKit lets you supply your own map art to customize the information it presents.
A map view is made up of many tiles that load dynamically as you pan around the view. The tiles are 256 by 256 pixels and are arranged in a grid that corresponds to a Mercator map projection.
To see the map in action, build and run the app.
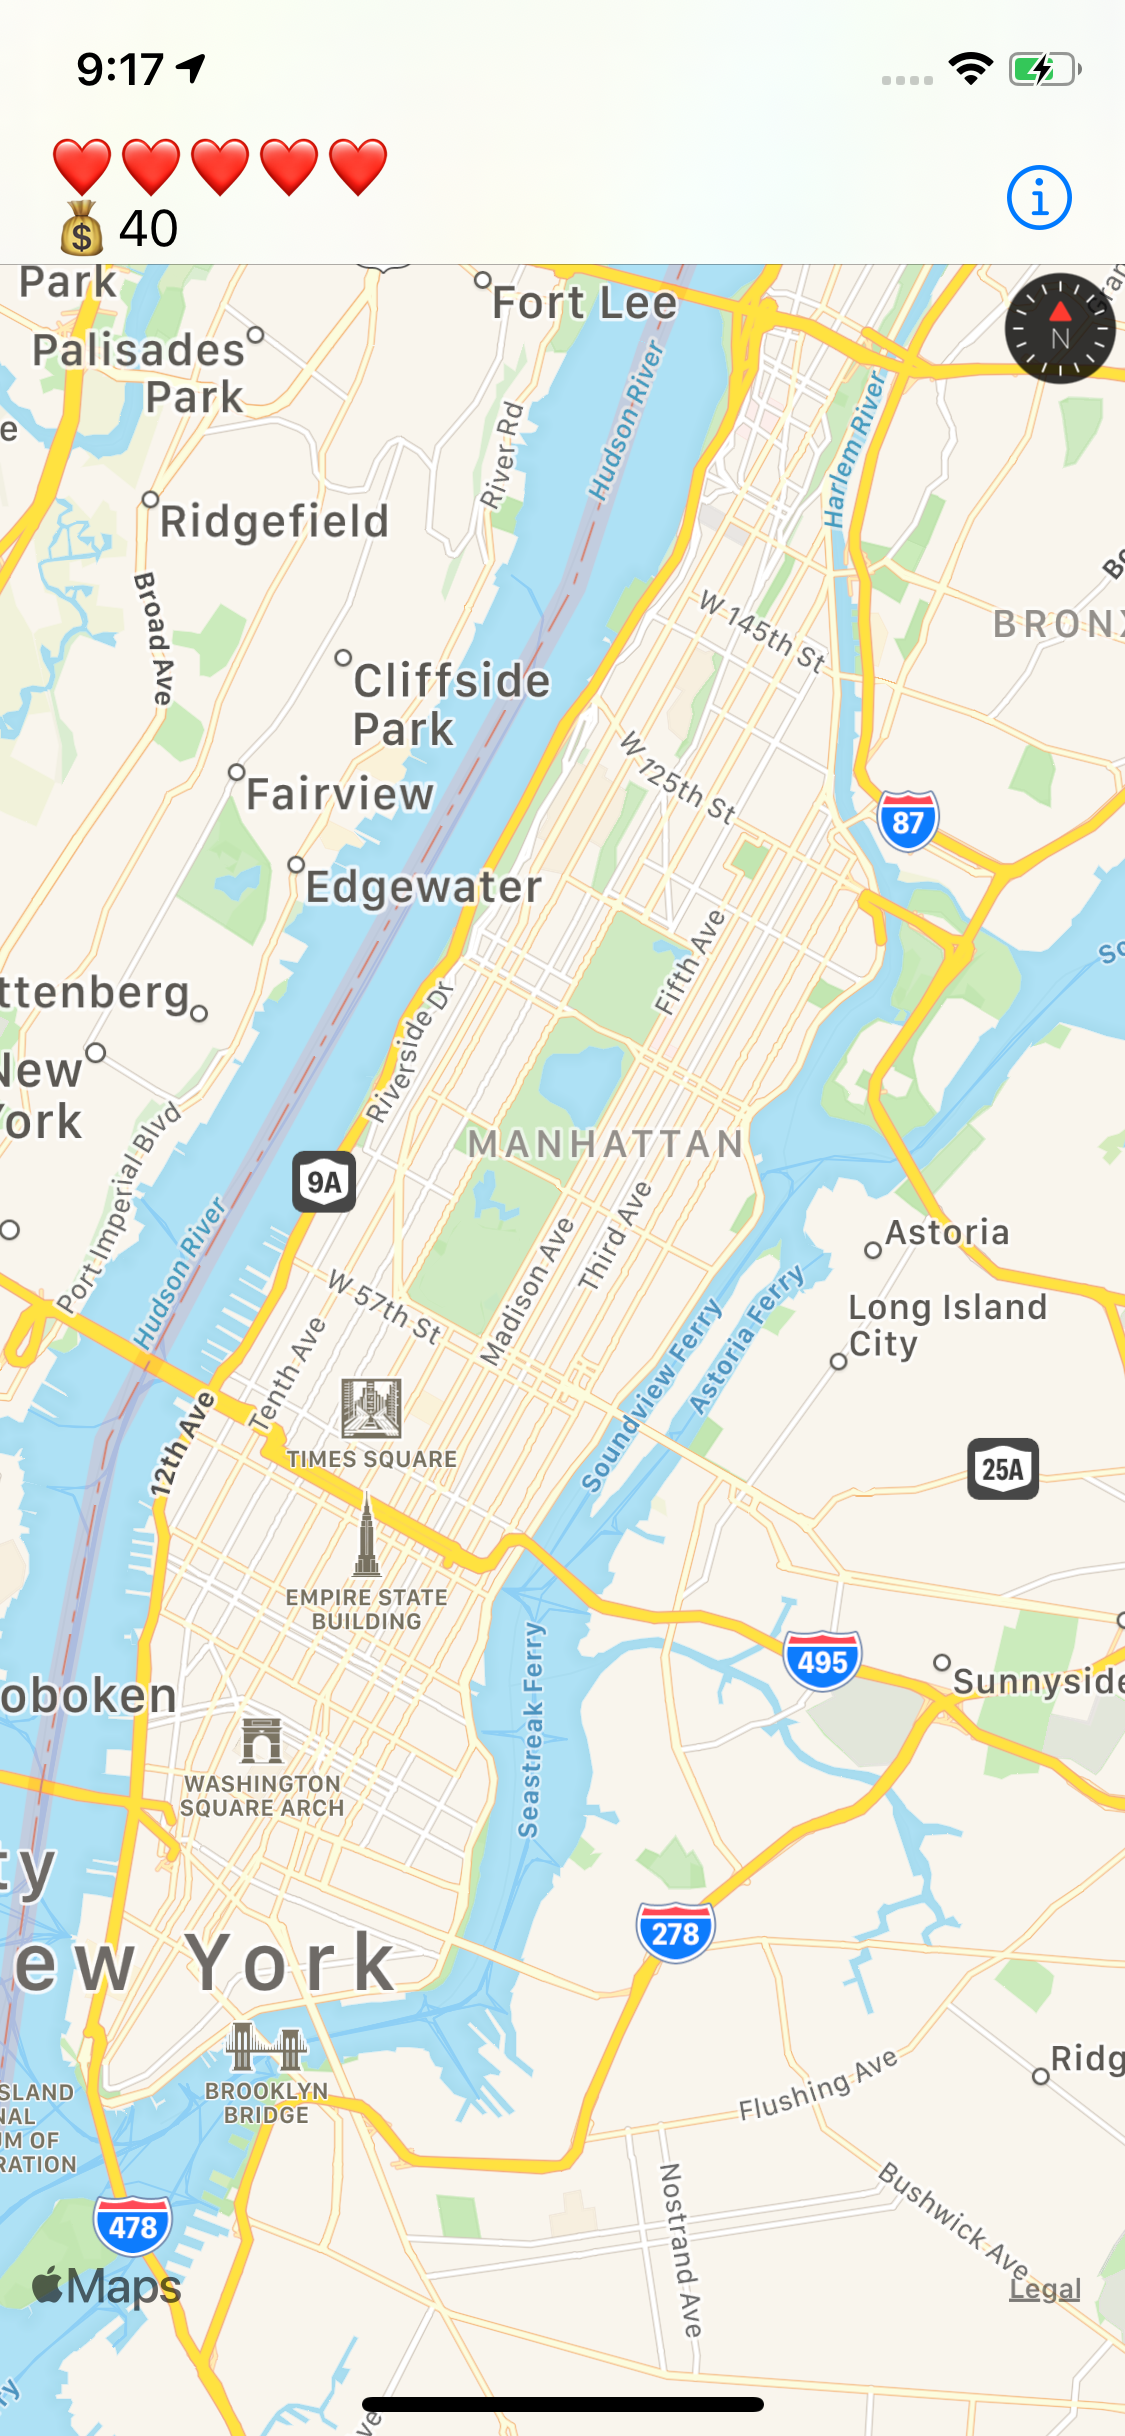
Wow! What a pretty town. The game’s primary interface is location, which means there’s nothing to see or do without visiting Central Park. Don’t worry, though, you won’t need to buy a plane ticket just yet.
Testing Location
Unlike other tutorials, MapQuest is a functional app right out of the gate! But, unless you live in New York City, you can’t do much with the app. Fortunately, Xcode comes with at least two ways of handling this problem.
Simulating a Location
With the app still running in the iPhone Simulator, set the user’s location by going to Features ▸ Location ▸ Custom Location… and setting the Latitude to 40.767769
and Longitude to -73.971870
.
This activates the blue user location dot and focuses the map on the Central Park Zoo. A wild goblin lives here. You’ll fight it, then collect its treasure.
After beating up the helpless goblin, the app will place you in the zoo. Note the blue dot.
Simulating an Adventure
A static location is useful for testing many location-based apps. However, this game requires visiting multiple locations as part of the adventure. The simulator can simulate changing locations for a run, a bike ride and a drive. These pre-included trips are for Cupertino, but MapQuest only has encounters in New York.
Occasions such as these call for simulating location with a GPX, or GPS Exchange Format, file. This file specifies waypoints and the simulator will interpolate a route between them.
Creating this file is outside the scope of this tutorial, but the sample project includes a test GPX file for you.
Open the scheme editor in Xcode by selecting Product ▸ Scheme ▸ Edit Scheme….
Select Run in the left pane, then the Options tab on the right. In the Core Location section, click the checkbox for Allow Location Simulation. In the Default Location drop-down, choose Game Test.
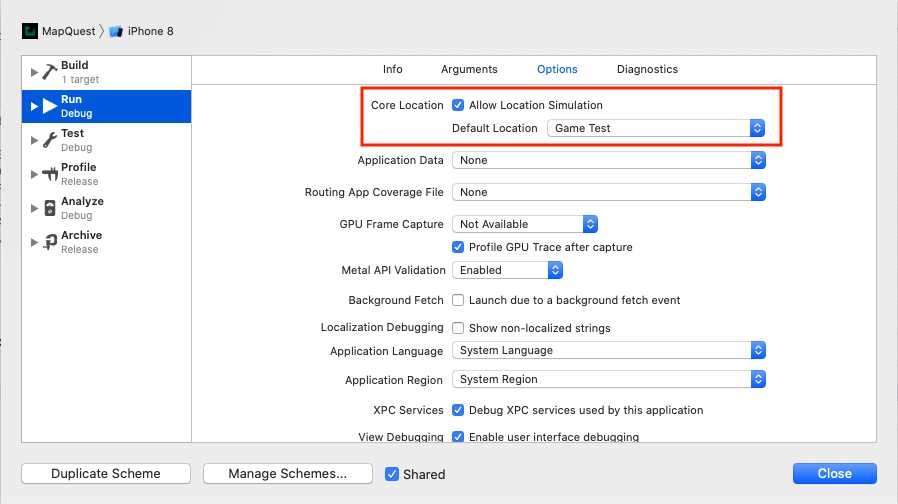
Now, the app will simulate moving between the waypoints specified in Game Test.gpx.
Build and run.
The simulator will have your character walk from the 5th Avenue subway to the Central Park Zoo, where you’ll have to fight the goblin again. After that, it’s on to your favorite fruit company’s flagship store to buy an upgraded sword. Once you’ve completed the loop, the adventure will start over.
Now that the hero is walking down the map, you can get started adding custom MapKit tiles.
Replacing the Tiles With OpenStreetMap
OpenStreetMap is a community-supported open database of map data. You can use that data to generate map tiles like Apple Maps uses. The OpenStreetMap community provides more than basic road maps, they also offer specialized maps for topography, biking and artistic rendering.
Creating a New Overlay
To replace the map tiles, you need to use an MKTileOverlay
to display new tiles on top of the default Apple Maps.
Open MapViewController.swift and replace setupTileRenderer()
with the following:
private func setupTileRenderer() {
// 1
let template = "https://tile.openstreetmap.org/{z}/{x}/{y}.png"
// 2
let overlay = MKTileOverlay(urlTemplate: template)
// 3
overlay.canReplaceMapContent = true
// 4
mapView.addOverlay(overlay, level: .aboveLabels)
//5
tileRenderer = MKTileOverlayRenderer(tileOverlay: overlay)
}
By default, MKTileOverlay
supports loading tiles by using a URL that’s templated to take a tile path.
Here’s what the code above does:
- First, you declare a URL template to fetch a tile from OpenStreetMap’s API. You replace the
{x}
,{y}
, and{z}
at runtime with the individual tile’s coordinates. How much the user has zoomed in on the map determines the z-coordinate, or zoom level coordinate. The x and y are the index of the tile for the section of the Earth you’re displaying. You need to supply a tile for each x and y coordinate for every zoom level you support. - Next, you create the overlay.
- Then, you indicate that the tiles are opaque and that they should replace the default map tiles.
- You add the overlay to the
mapView
. Custom MapKit tiles can be either above the roads or above the labels (like road and place names). OpenStreetMap tiles come pre-labeled, so they should go above Apple’s labels. - Finally, you create a tile renderer, which handles drawing the tiles.
Before the tiles can appear, you have to set up the tile renderer with MKMapView
. So your next step is to add the following line to the bottom of viewDidLoad()
:
mapView.delegate = self
This sets the MapViewController
to be the delegate of its mapView
.
Next, in the MKMapViewDelegate
extension, add the following method:
func mapView(
_ mapView: MKMapView,
rendererFor overlay: MKOverlay
) -> MKOverlayRenderer {
return tileRenderer
}
An overlay renderer tells the map view how to draw an overlay. The tile renderer is a special subclass for loading and drawing map tiles.
That’s it! Build and run to see how OpenStreetMap replaces the standard Apple map. But, how can this work with only a few lines of code?
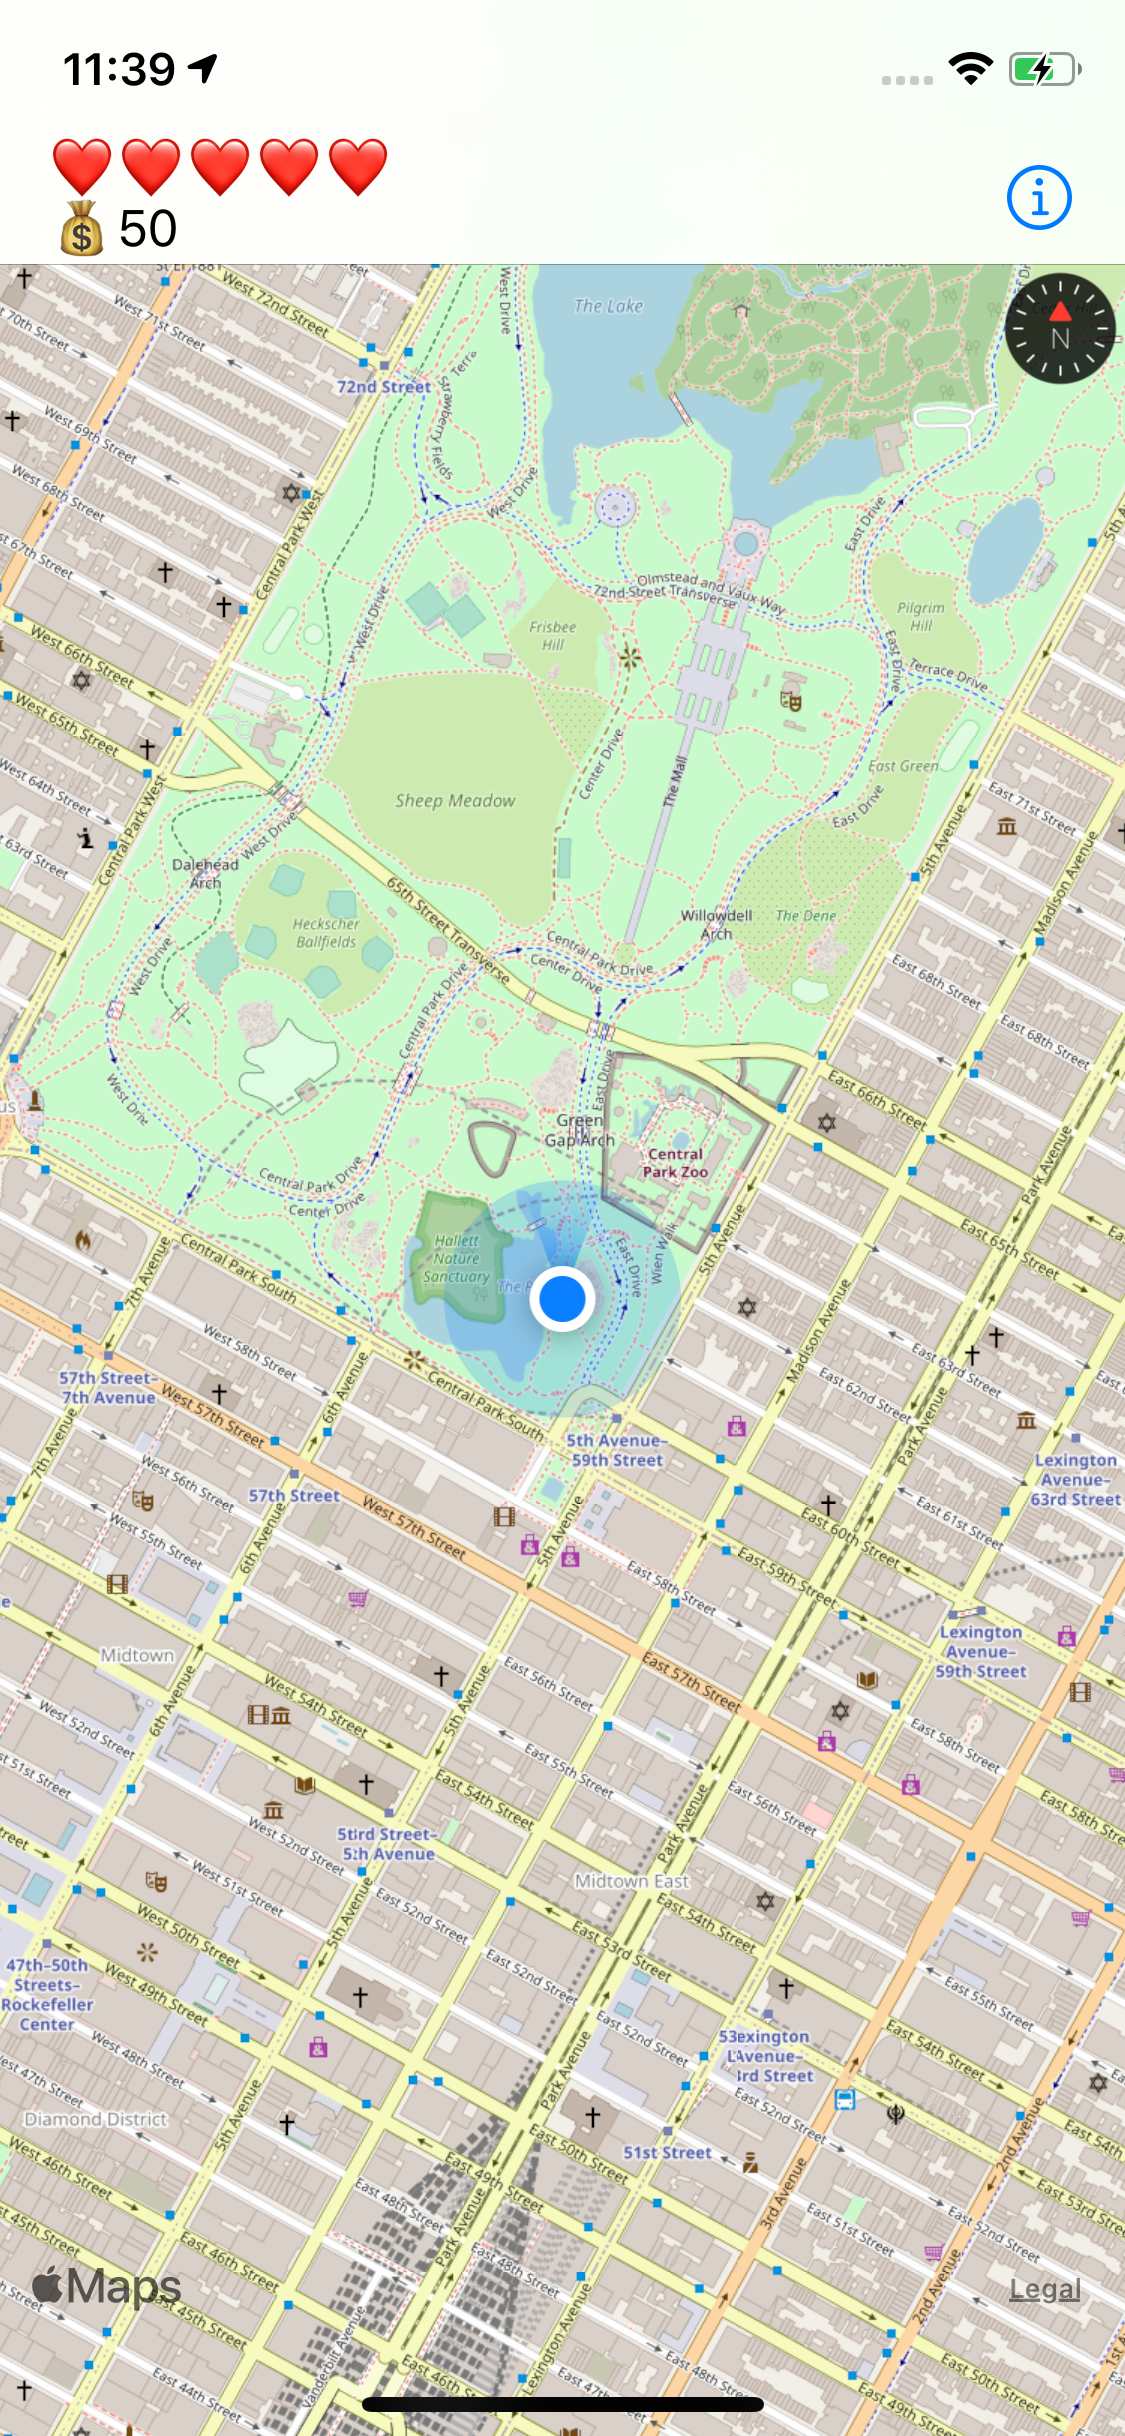
At this point, you can really see the difference between the open-source maps and Apple Maps!
Dividing up the Earth
The magic of the tile overlay is the ability to translate from a tile path to a specific image asset. Three coordinates represent the tile’s path: x, y, and z. The x and y correspond to indices on the map’s surface, with 0,0 being the upper-left tile. The z-coordinate represents the zoom level and determines how many tiles make up the whole map.
At zoom level 0, a 1×1 grid, requiring one tile, represents the whole world:
At zoom level 1, you divide the whole world into a 2×2 grid. This requires four tiles:
At level 2, the number of rows and columns doubles again, requiring sixteen tiles:
This pattern continues, quadrupling both the level of detail and the number of tiles at each zoom level. Each zoom level requires 22*z tiles, all the way down to zoom level 19, which requires 274,877,906,944 tiles!
Now that you’ve replaced Apple’s tiles with OpenStreetMap’s, it’s time to step it up a notch and show your own fully custom MapKit tiles!
Creating Custom MapKit Tiles
Since the map view follows the user’s location, the default zoom level is 16, which shows a good level of detail to give users the context of where they are.
However, zoom level 16 would require 4,294,967,296 tiles for the whole planet! It would take more than a lifetime to hand-draw these tiles.
Having a smaller bounded area, like a town or park, makes it possible to create custom artwork. For a larger range of locations, you can procedurally generate the tiles from source data.
Because the starter project includes pre-rendered tiles for this game, you simply need to load them. Unfortunately, a generic URL template is not enough, because you want your game to fail gracefully if the renderer requests one of the billions of tiles not included with the app.
To do that, you’ll need a custom MKTileOverlay
subclass. Add one by opening AdventureMapOverlay.swift and adding the following code:
class AdventureMapOverlay: MKTileOverlay {
override func url(forTilePath path: MKTileOverlayPath) -> URL {
let tileUrl =
"https://tile.openstreetmap.org/\(path.z)/\(path.x)/\(path.y).png"
return URL(string: tileUrl)!
}
}
This sets up the subclass and replaces the basic class using a templated URL with a specialized URL generator.
Keep the OpenStreetMap tiles, for now, to test the custom overlay.
Open MapViewController.swift and replace setupTileRenderer()
with the following:
private func setupTileRenderer() {
let overlay = AdventureMapOverlay()
overlay.canReplaceMapContent = true
mapView.addOverlay(overlay, level: .aboveLabels)
tileRenderer = MKTileOverlayRenderer(tileOverlay: overlay)
}
This swaps in the custom subclass instead of the overlay supplying OpenStreetMap tiles.
Build and run again. The game looks exactly the same as before. Yay!
You’re using your MKTileOverlay
subclass, but you’re still loading OpenStreetMap data within that subclass. Next, you’ll replace those tiles with your own custom MapKit tiles.
Loading the Pre-rendered Tiles
Now comes the fun part. Open AdventureMapOverlay.swift and replace url(forTilePath:)
with the following:
override func url(forTilePath path: MKTileOverlayPath) -> URL {
let tilePath = Bundle.main.url(
forResource: "\(path.y)",
withExtension: "png",
subdirectory: "tiles/\(path.z)/\(path.x)",
localization: nil)
}
Here, you try to locate a matching tile in the resource bundle using a known naming scheme. This will find files that are already loaded in your project. In the starter project, you can find these inside the tiles folder. You’ll notice the tiles are grouped in folders by their z-coordinate, and then grouped again by their x-coordinate. The files themselves are PNGs named after their y-coordinate.
Next, add the following code to the end of the method:
if let tile = tilePath {
return tile
} else {
return Bundle.main.url(
forResource: "parchment",
withExtension: "png",
subdirectory: "tiles",
localization: nil)!
}
Return the found tile if it exists. Otherwise, if a tile is missing, you’ll replace it with a parchment pattern that gives the map a fantasy medieval feel. This also obviates the need to supply a unique asset for every tile path.
Build and run again. Now, you’ll see the custom map.
Try zooming in and out to see different levels of detail.
If you’re hearing your phone ringing right now, that’s Apple staff trying to get your game into Apple Arcade. ;]
Bounding the Zoom Level
There’s a small issue with your game, though. If you zoom too far in or out, you’ll lose the map altogether.
Fortunately, this is an easy fix. Open MapViewController.swift and add the following lines to the bottom of setupTileRenderer()
:
overlay.minimumZ = 13
overlay.maximumZ = 16
This informs the mapView
that you’ve only provided tiles between those zoom levels. Changing the zoom beyond that scales the tile images provided in the app. The user won’t get any additional detail, but at least the displayed image now matches the scale.
You can go even further and restrict zooming in too far. Open MapViewController.swift and add the following lines below initialRegion
in viewDidLoad()
mapView.cameraZoomRange = MKMapView.CameraZoomRange(
minCenterCoordinateDistance: 7000,
maxCenterCoordinateDistance: 60000)
mapView.cameraBoundary = MKMapView.CameraBoundary(
coordinateRegion: initialRegion)
Here, you use cameraZoomRange
and cameraBoundary
to restrict the zooming in capability to your initialRegion
.
Creating Tiles
The chances that you’re reading this tutorial to make a fantasy adventure game are pretty slim. In this section, you’ll take a look at how to build your own custom MapKit tiles that fit your needs.
The hardest part of this maneuver is creating tiles of the right size and lining them up properly. To draw your own custom MapKit tiles, you’ll need a data source and an image editor.
Open the project folder and take a look at MapQuest/tiles/14/4825/6156.png. This tile shows the bottom part of Central Park at zoom level 14. The app contains dozens of these little images to form the map of New York City, where the game takes place. Each one was drawn by hand using rudimentary skills and tools.
Deciding Which Tiles You Need
The first step to making your own map is to figure out which tiles you’ll need to draw. To start, download the source data from OpenStreetMap and use a tool like MapNik to generate tile images from it.
Unfortunately, the source is a 57GB download! Plus, the tools are a little obscure and out of the scope of this tutorial. However, for a bounded region like Central Park, there’s an easier workaround.
In AdventureMapOverlay.swift add the following line to url(forTilePath:)
:
print("requested tile\tz:\(path.z)\tx:\(path.x)\ty:\(path.y)")
Build and run. Now, as you zoom and pan around the map, the tile paths display in the console output. This shows you exactly which tiles you’ll need to create.
Compiler error: Invalid library file
in the Xcode console. This is a simulator bug and can safely be ignored. Unfortunately, it makes the console rather noisy, making it more difficult to see the results of your print
statements.Next, you need to get a source tile and customize it. You can reuse the URL scheme from before to get an OpenStreetMap tile.
The following terminal command will grab a tile and store it locally.
curl --create-dirs -o z/x/y.png https://tile.openstreetmap.org/z/x/y.png
You can change the URL, replacing the x, y, and z with a particular map path. For the south section of Central Park, try:
curl --create-dirs -o 14/4825/6156.png \ https://tile.openstreetmap.org/14/4825/6156.png
This directory structure — zoom-level/x-coordinate/y-coordinate — makes it easier to find and use the tiles later.
Customizing Appearances
The next step is to use the base image as a starting point for customization. Open the tile in your favorite image editor. For example, this is what it looks like in Pixelmator:
Now, you can use the brush or pencil tools to draw roads, paths, or interesting features.
If your tool supports layers, drawing different features on separate layers will allow you to adjust them to give the best look. Using layers makes drawing a little more forgiving, as you can use other features to cover up messy lines.
Now, repeat this process for all the tiles in the set, and you’re good to go. As you can see, this will take a bit of time.
You can make the process a little easier:
- Combine all the tiles for a whole layer first.
- Draw the custom map.
- Split the map back into tiles.
Placing the Tiles
After you create your new tiles, put them back in the tiles/zoom-level/x-coordinate/y-coordinate folder structure in the project. This keeps things organized and easily accessible.
That also means you can access them easily, as you did in the code you added for url(forTilePath:)
.
let tilePath = Bundle.main.url(
forResource: "\(path.y)",
withExtension: "png",
subdirectory: "tiles/\(path.z)/\(path.x)",
localization: nil)
That’s it. You’re ready to go forth and draw some beautiful maps!
Fancifying the Map
The map looks great and fits the aesthetic of the game. But there’s so much more to customize!
Your hero is not well represented by a blue dot, which is why you’ll replace the current location annotation with some custom art.
Replacing the User Annotation
Start replacing your hero’s icon by opening MapViewController.swift and adding the following method to the MKMapViewDelegate
extension:
func mapView(
_ mapView: MKMapView,
viewFor annotation: MKAnnotation
) -> MKAnnotationView? {
switch annotation {
// 1
case let user as MKUserLocation:
// 2
if let existingView = mapView
.dequeueReusableAnnotationView(withIdentifier: "user") {
return existingView
} else {
// 3
let view = MKAnnotationView(annotation: user, reuseIdentifier: "user")
view.image = #imageLiteral(resourceName: "user")
return view
}
default:
return nil
}
}
This code creates a custom view for the user annotation. Here’s how:
- If MapKit is requesting a
MKUserLocation
, you’ll return a custom annotation. - Map views maintain a pool of reusable annotation views to improve performance. You first try to find a view to reuse and return it if there is one.
- Otherwise, you create a new view. Here, you use a standard
MKAnnotationView
which is pretty flexible. Here, you only use it to represent the adventurer with an image.
Build and run. Instead of the blue dot, you’ll now see a little stick figure wandering around.
Not the most heroic-looking of heroes, but a hero none the less! :]
Annotations for Specific Locations
MKMapView
also allows you to mark up your own locations of interest. MapQuest plays along with the NYC subway, treating the subway system as a great big warp network, letting you teleport from one station to another.
To make this clear to your players, you’ll add some markers to the map for nearby subway stations. Open MapViewController.swift and add the following line at the end of viewDidLoad()
:
mapView.addAnnotations(Game.shared.warps)
Build and run. A selection of subway stations now have pins representing them.
Like the blue dot that used to show the user location, these standard pins don’t match the game’s aesthetic. Custom annotations come to the rescue.
In mapView(_:viewFor:)
, add the following case to switch
, above the default case:
case let warp as WarpZone:
if let existingView = mapView.dequeueReusableAnnotationView(
withIdentifier: WarpAnnotationView.identifier) {
existingView.annotation = annotation
return existingView
} else {
return WarpAnnotationView(
annotation: warp,
reuseIdentifier: WarpAnnotationView.identifier)
}
Use the same pattern you did earlier to make the annotation. If there’s an existing one, return that one, otherwise, create a new one. Build and run again.
The custom annotation view now uses a template image and color for the specific subway line. If only the subway were an instantaneous warp in real life!
Using Custom Overlay Rendering
MapKit has many ways to spruce up the map for the game. For your next step, you’ll take advantage of one of these by using an MKPolygonRenderer
to draw a gradient-based shimmer effect on the reservoir.
Start by replacing setupLakeOverlay()
in MapViewController.swift with:
private func setupLakeOverlay() {
// 1
let lake = MKPolygon(
coordinates: &Game.shared.reservoir,
count: Game.shared.reservoir.count)
mapView.addOverlay(lake)
// 2
shimmerRenderer = ShimmerRenderer(overlay: lake)
shimmerRenderer.fillColor = #colorLiteral(
red: 0.2431372549,
green: 0.5803921569,
blue: 0.9764705882,
alpha: 1)
// 3
Timer.scheduledTimer(withTimeInterval: 0.1, repeats: true) { [weak self] _ in
self?.shimmerRenderer.updateLocations()
self?.shimmerRenderer.setNeedsDisplay()
}
}
This sets up a new overlay by:
- Creating an
MKPolygon
that’s the same shape as the reservoir. These coordinates are pre-programmed in Game.swift. - Setting up a custom renderer to draw the polygon with the special effect.
ShimmerRenderer
uses Core Graphics to draw a polygon and a gradient on top of the polygon. - Since overlay renderers are not meant to be animated, this sets up a 100ms timer to update the overlay. Each time the overlay is updated, the gradient will shift a bit, producing a shimmering effect.
Next, replace mapView(_:rendererFor:)
with:
func mapView(
_ mapView: MKMapView,
rendererFor overlay: MKOverlay
) -> MKOverlayRenderer {
if overlay is AdventureMapOverlay {
return tileRenderer
} else {
return shimmerRenderer
}
}
This selects the right renderer for each of the two overlays.
Build and run, then pan over the reservoir to see the Shimmering Sea!
Congratulations! You’ve now seen how to use MapKit to make custom maps for your apps.
Where to Go From Here?
Download the completed project files by clicking the Download Materials button at the top or bottom of the tutorial.
Creating hand-drawn custom MapKit tiles is time-consuming, but they give your apps a distinct, immersive feel. And while creating the assets takes some effort, using them is pretty straightforward.
In addition to the basic tiles, OpenStreetMap has a list of specialized tile providers for things like cycling and terrain. OpenStreetMap also provides data to use if you want to design your own tiles programmatically.
If you want a custom but realistic map appearance without hand-drawing everything, take a look at third-party tools such as MapBox, which allows you to customize the appearance of a map with good tools at a modest price.
Finally, if you want to fancify your MapKit views even further, take a look at MapKit Tutorial: Overlay Views.
If you have any questions or comments on this tutorial, feel free to join in the discussion below!
OpenStreetMap data and images are © OpenStreetMap contributors. The map data is available under the Open Database License and the cartography tile data are licensed as CC BY-SA.
All videos. All books.
One low price.
A Kodeco subscription is the best way to learn and master mobile development — plans start at just $19.99/month! Learn iOS, Swift, Android, Kotlin, Flutter and Dart development and unlock our massive catalog of 50+ books and 4,000+ videos.
Learn more