Using Meshroom to Insert Real Life Objects in Unity
In this article you’ll learn how to use Photogrammetry to photoscan and insert real life objects into your Unity projects with Meshroom. By Sean Duffy.
Sign up/Sign in
With a free Kodeco account you can download source code, track your progress, bookmark, personalise your learner profile and more!
Create accountAlready a member of Kodeco? Sign in
Sign up/Sign in
With a free Kodeco account you can download source code, track your progress, bookmark, personalise your learner profile and more!
Create accountAlready a member of Kodeco? Sign in
Sign up/Sign in
With a free Kodeco account you can download source code, track your progress, bookmark, personalise your learner profile and more!
Create accountAlready a member of Kodeco? Sign in
Contents
Using Meshroom to Insert Real Life Objects in Unity
20 mins
- Getting Started
- Finding Good Objects to Capture
- When to Take Photographs
- Capturing Photos
- Camera Settings
- Creating Photoscans With Meshroom
- Importing Photos to Meshroom
- Beginning the Meshroom Reconstruction Process
- Importing to Blender
- Touching Up With Blender
- Removing the Grass
- Selecting the Vertices
- Closing the Base of the Mesh
- Repositioning the Dragon
- Bringing it all Into Unity
- Where to Go From Here?
In the context of 3d models, photogrammetry is the process of making 3D models from objects you’ve scanned.
Have you ever needed some realistic 3D models for a game idea on a budget and felt helpless? Do you have an ultra-realistic game environment to create? If so, then you’ll want to read on!
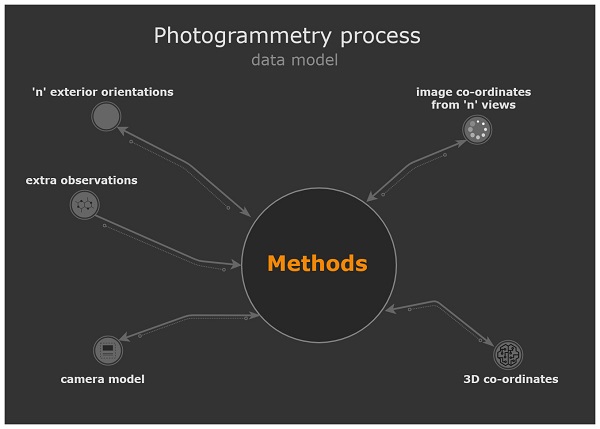
With photogrammetry, you take a bunch of inputs, your photos, and run them through a pipeline, or series of methods that process them. Data from these processes, or outputs, inform the creation of the final 3D model.
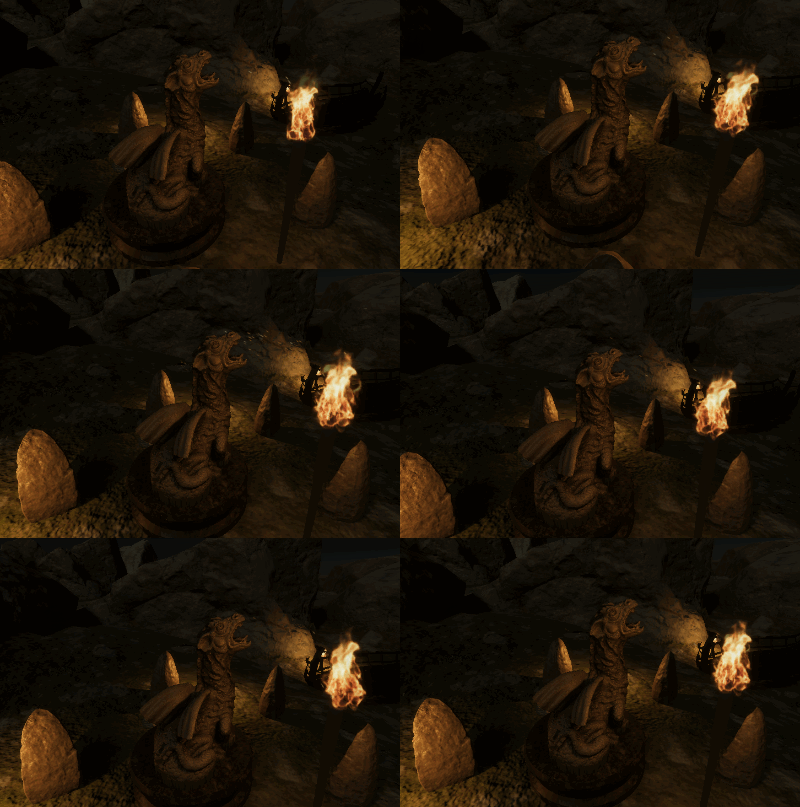
In this tutorial, you’ll use several photographs of a dragon statue to create a detailed 3D model, clean it up in Blender and import the result to a dark and moody Unity Viking village scene.
Along the way you’ll learn how to:
- Choose a good object to photoscan.
- Take suitable photographs.
- Decide when and where to take the photographs.
- Cull bad photographs.
- Use Meshroom to create 3D scans.
- Import models to Blender for cleaning and touching up.
- Reduce polygon count.
- Prepare and import 3D models to Unity.
Despair no longer! Soon you’ll know the secrets of creating ultra-realistic objects for your games! :]
Getting Started
Download the project materials by clicking the Download Materials button at the top or bottom of this tutorial. Next, extract the zip file to a convenient location.
The download contains the Starter and Final project files, which you’ll get to later.
To create a good photoscan you need to capture your model from many angles. In this tutorial, you already have all the photographs you need at your disposal.
Before you get to those photos, it’s important to learn a few tricks for when you go out into the wild to do your own captures.
Finding Good Objects to Capture
Of course you’ll want to capture objects that are relevant to your environment or game idea. After this obvious priority, there are some traits that make an object easier to photoscan:
- Flat bases.
- Decent contrast in colors or tones.
- Not too dark, or difficult to see detail.
- Not too big, making it difficult to move around and capture from different angles.
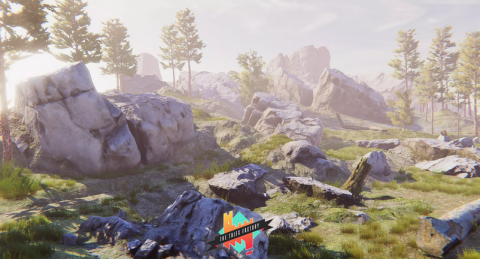
You should also consider doing photoscans of objects that would be difficult to model. For example, items in nature are challenging to model because it can be difficult to create organic materials.
These rocks from The Tales Factory on the Unity Asset Store are a good example.
When to Take Photographs
As with photography, there are certain conditions and times of the day that make for better photoscans.
If you have an indoor studio and lighting, you could model these conditions yourself with a bit of careful planning. If you don’t, you’ll need to work outside.
When working outside, keep the following in mind:
- Capture photos in daylight.
- Overcast skies are great. The clouds diffuse the light which results in more even light distribution on your model.
- Dry conditions are good and wet conditions are bad! In wet conditions, you’re likely to get more reflections on your final result. In some cases, you might also find your 3D model has a shiny gloss that detracts from the realism.
Choose a neutral looking model that could suit a variety of potential conditions. Then you could apply effects depending on the conditions in your game.
Is it raining? Throw on a shader that adds a glossy, wet effect. Or, is your game set in some post-apocalyptic world where everything is old and worn out? Add an aging or corrosion effect instead.
Capturing Photos
Download the photo collection you’ll use for this tutorial. It’s not in the Download Materials link because of its size. Click this link to begin the download:
Download dragon sculpture photos (zip file, 695 MB)
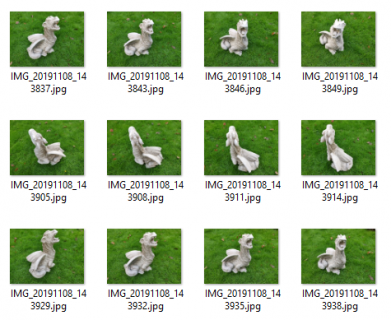
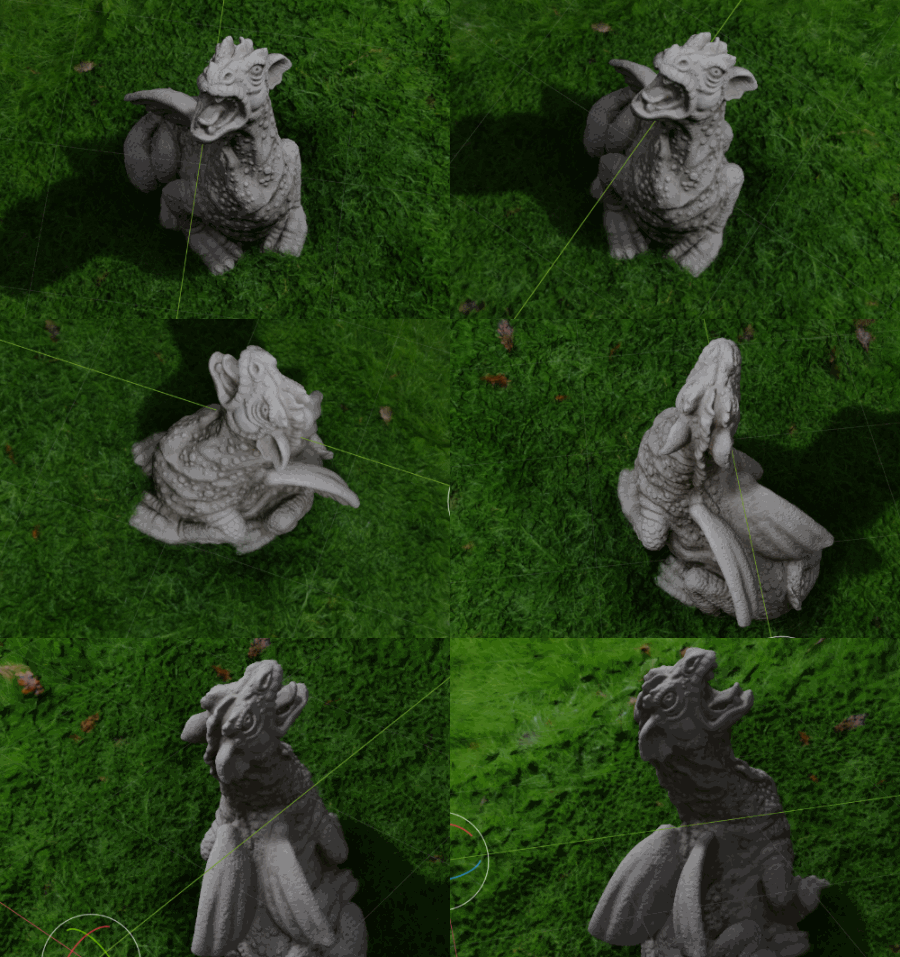
Now, extract the zip file to a convenient location and open the folder. You’ll see about 100 photos of the dragon sculpture, taken from various angles and heights.
This is what you should aim for when capturing photos. A 360 degree covering of photos from various angles and heights ensures you get the details you need.
When taking pictures, move around the object to get views from various angles. Try to move in the smallest possible increments and take photos both closeup and from a bit further away. You’re aiming to get close up details and photos that show the entire model.
Don’t move the model or turn it during your capture session as this tends to throw some software off. Instead, move around the subject, while leaving it stationary.
Camera Settings
To get a uniform looking set of photos, set your camera to manual or pro mode. Most smartphone cameras let you enter this mode, while hand-held DSLR cameras always have a manual or M mode.
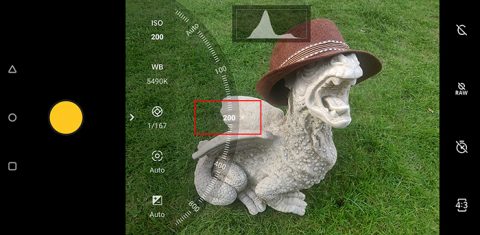
- First, set a Fixed ISO mode. This changes how sensitive your digital camera’s sensor is to light. Higher numbers make it easier to capture photos in darker conditions but result in noisier images. Outdoors in good lighting, you can usually keep this down to 100 or 200. For photoscan images, always choose a fixed number.
- If you’re new to photography, use a fixed shutter or fixed aperture mode on your camera. These are sometimes called Priority modes. Doing so helps you pin down that setting and lets the camera control the other settings to maintain an even exposure. Again, this is all in the name of getting well-lit photos.
- When taking your pictures, always make sure they’re in focus. You don’t want any blurry images.
- Keep your pictures in one orientation, either landscape or portrait, throughout.
Setting the ISO to a fixed 200 worked well for middle of the day, overcast lighting in this situation.
Creating Photoscans With Meshroom
Meshroom is an open-source photogrammetry app you can use to create 3D models from photographs. You’ll use it to create a photoscan of the dragon sculpture.
Download the latest version here and install it. You need either Windows or Linux to run the software.
Upon running Meshroom, you’ll see the main interface. You can do everything you need to create your photoscan in this view.
Here’s a quick run-through of each section of the main interface:
- This is where you drag and drop the photos you want to recreate in 3D.
- The Image Viewer is simply a preview pane for individual photos.
- Once the process begins, the 3D Viewer shows you the results of the reconstruction of your object. It also shows you the different angles your photos were taken at based on metadata the program gets from your images.
- Graph Editor shows the pipeline of processes the app runs through to reconstruct your object in 3D. Each stage is represented by a Node. These are a series of inputs and outputs with processing that occurs at each stage. Your photos run through this pipeline, with the result of each stage feeding into the next.
- In the Node pane you can access details about individual nodes in the Graph Editor. You can tweak each node’s settings, but for this tutorial, the default settings are enough.
Importing Photos to Meshroom
Now, locate the downloaded dragon sculpture photos. Then drag and drop them into the Images pane in Meshroom.
The photos appear in the Images pane in filename order.
Next, click File ► Save As… and choose a new folder location somewhere on your drive and save the project as Dragon.mg.
Now, close all non-essential apps in preparation for the Meshroom reconstruction process. The scan won’t start if your computer is low on resources.
Beginning the Meshroom Reconstruction Process
At this point, you’re ready to begin reconstruction. As Captain Picard would say, make it so! Click the Start button to begin the process.
While the process is running, you can track its progress in the Graph Editor view. Notice a small colored progress bar on each node. Your CPU will also most likely max out for 15 to 30 minutes, depending on its speed.
On completion, you’ll see the resulting scan in the 3D Viewer pane.
Now Left-click and drag your mouse cursor to rotate, or Middle-click and drag to pan the 3D view around. Bask in the 3D glory your CPU cycles have helped create!
Next, open the folder where you saved your Meshroom project file. You’ll notice a folder called MeshroomCache. This is where the scanned object files were output.
Importing to Blender
Next, you’ll use Blender, a popular 3D computer graphics application, to import the dragon 3D model scan and clean it up in preparation for import to Unity.
If you don’t have Blender version 2.80 or higher installed, download and install it now. You can download it here.
After the installation has finished, launch Blender.
If you’re new to Blender, take a deep breath in and relax! While the interface and controls can be confusing for beginners, you’ll find many key combinations and screenshots to help you here.
With the Blender launch screen open, click General under New File. The new file contains a cube object by default. Click the Cube to select it, then press Delete to get rid of it. Now you have a clean space to work in:
Next, click File ► Import ► Wavefront (.obj). Navigate to the MeshroomCache folder, where Meshroom saved your scanned object model files. Under this folder, find the model in the sub-folder MeshroomCache/Texturing/GUID. GUID is a folder name with a random ID assigned when your scan finished.
Then, double click texturedMesh.obj to import the scan to Blender.
The import might take a while because the photoscanned model file is quite large.
Start by getting a feel for how the photoscanned dragon looks by default. Click the Viewport Shading button in the main Blender viewport to enable full Viewport Shading and texturing.
Next, hold Shift + Middle Mouse and drag the viewport to pan the main dragon model to the middle of your screen. Then hold Middle Mouse and drag to rotate the viewport. You can zoom in and out by scrolling the mouse.
Look at how good the scan looks by default. Great job! :]
Touching Up With Blender
The model is complex with high vertex count and detail. Next, you’ll reduce the polygon count with a quick and effective Blender modifier called Decimate.
For commercially released games that need more optimization, you might want to spend more time reducing polygon count. For now, Decimate does a good enough job.
Using the Scene Collection panel in Blender, click texturedMesh ► Modifiers ► Add Modifier.
From the selection, choose Decimate.
A small configuration area appears with the Decimate options.
Now, choose Collapse with a Ratio of 0.1, and Factor of 2.0. Then click Apply.
This reduces the detail in the entire model and reduces the vertex count by a factor of about 10! You shouldn’t notice too much visual loss in detail, and your Unity profiler and game performance will love you for this!
Removing the Grass
Now to tackle the elephant in the room.
If you’re planning to create a scene where a dragon sits in the middle of a playground or pristine section of green grass, then you’re already set. But you going to place this particular dragon in a Viking village setting, so this grass won’t do.
Now, you’ll focus on removing the grass from the mesh.
In Blender, change from Object Mode to Edit Mode. You can use the UI to do this, or press Tab on the keyboard.
Notice your viewport changes to show all the dragon’s vertices selected.
Selecting the Vertices
Next, you’ll select only the vertices for the area of grass around the dragon’s base and then delete them.
Be warned: The next step requires a fair bit of patience.
First, select the Select Lasso tool by pressing Shift + Space, L. That’s Shift and Space together and then L.
Or, use the UI tool bar to choose the Select Lasso tool.
Next, use a combination of Middle Mouse click and drag to rotate and Middle Mouse + Shift click and drag to pan t around to view the model from all angles.
From each angle, Lasoo selects vertices of the areas of grass and carefully around the base of the dragon. Between each selection, press Shift when selecting new areas to ensure they’re added to your existing vertex selection.
Here’s a GIF that illustrates this process:
You need to rotate the view occsasionally to also select vertices that are behind bumps and ridges in the grassy mesh.
If you select some vertices that you don’t want to delete, Shift + Left Click them individually to remove them from your selection.
Once you have all grass and surrounding vertices selected, press Delete ► Vertices to delete them.
Have a good look around the remaining mesh, zooming in and out and rotating the view. Repeat the select and delete process again for any vertices that you missed.
You’ll get something resembling this menacing fellow once done:
Closing the Base of the Mesh
Now, go into Edit Mode, if you are not already there. Selecting Tab switches modes. Then, select the entire bottom edge of vertices on the dragon mesh using the Select tool and holding down Shift. This takes some patience.
Or, you can use the Select Lasoo tool for this.
With the vertices selected, click Vertex Smooth Vertices.
This smooths the ring of vertices you’ve selected a bit.
Now, select the 3D Cursor tool by clicking Shift + Space, Space and position it in line with the lowest vertex in the bottom edge selection of vertices using Left Click. You can pan and rotate your view to get a side-on view of the dragon to determine the lowest vertex.
Next, press the period, ., key to the Pivot Point and then choose 3D Cursor to use the 3D Cursor’s position as the pivot point.
Then, press S, Z, 0, Enter. That’s a zero, not an O. This series of commands scales all the selected vertices to the same height as the pivot point you created with the 3D Cursor.
Now you’ll have a mesh that resembles this:
Finally, click Vertex ► New Edge/Face from Vertices.
This completes the new base for your dragon by capping the selected vertices and creating a new face.
Repositioning the Dragon
Next, change back to Object Mode by clicking Tab and Select the texturedMesh object. Position the dragon using the Move tool by clicking Shift + Space, G to the origin point of the scene, where the green and red lines cross. Then use the Rotate tool by clicking Shift + Space Bar, R to rotate it into an upright position.
Now, select the 3D Cursor tool and click it approximately in the center of the dragon on its back. Press F3, then type Set Origin and press Enter. Next choose Origin to 3D Cursor from the new list of commands that appears.
A yellow dot will appear in the middle of the 3D cursor to signify the new origin point of the model.
You’re ready to export!
Next, click File ► Export ► Wavefront (.obj).
Make sure to select Path Mode ► Copy and check the Selection Only option in the Export Settings. Save the file as Dragon.obj in a convenient location.
A Path Mode of Copy for the export ensures the textures are copied and referenced from the same folder the .obj model file is. This helps prevent missing texture issues once imported into Unity.
Bringing it all Into Unity
Now, open the Starter project in Unity, then open the Assets/RW/Scenes/PhotoscanDragon scene. Locate the empty pedestal between the rock formations in the village. This is where you’ll position your photoscanned dragon model.
Now, drag and drop the exported model and associated export files into the Assets/RW/Models/Dragon project folder.
Then, use the Unity Hierarchy window to locate the FocalPoint GameObject. Drag and drop the Assets/RW/Models/Dragon/Dragon.obj model into the Scene, and child it to the FocalPoint GameObject.
Now,change the position and rotation of the Dragon Transform Component as follows:
- Position: (X:-33.32, Y:0.53, Z:5.08)
- Rotation: (X:-2.229, Y:90, Z:-0.6)
Then, click Play and marvel at your very own photoscanned dragon, taken from the real world, and re-constructed in full 3D. :]
Where to Go From Here?
You can download the completed project using the Download Materials button at the top or bottom of this tutorial.
You’ve covered many steps to get here, and in the process, learned about Photogrammetry, editing 3D meshes in Blender, Vertex operations and bringing that all into Unity!
I’d like to add a special mention and thanks to The Tales Factory on the Unity Asset Store for letting me use their Photoscanned MountainsRocks PBR asset in the Dragon Viking Village scene in the included project files here.
Go check out their excellent photoscanned assets.
The next step is up to you. What would you like to re-construct and bring into your Unity projects? Here are some resources and further reading that might help you along the way:
- photogrammetry.com
- Meshroom on Github
- Display.Land – a new app for creating 3D captures of physical spaces using your own smartphone camera.
Please share anything you capture and create on the forums for this article with the link below! :]