Google Maps iOS SDK Tutorial: Getting Started
In this tutorial, you’ll learn how to use the Google Maps iOS SDK to make an app that searches for nearby places to eat, drink or shop for groceries. By Ron Kliffer.
Sign up/Sign in
With a free Kodeco account you can download source code, track your progress, bookmark, personalise your learner profile and more!
Create accountAlready a member of Kodeco? Sign in
Sign up/Sign in
With a free Kodeco account you can download source code, track your progress, bookmark, personalise your learner profile and more!
Create accountAlready a member of Kodeco? Sign in
Contents
Google Maps iOS SDK Tutorial: Getting Started
30 mins
- Getting Started
- Creating the API Key
- Adding the SDK
- Creating the Map View
- Adding a UIView
- Adding the Constraints for the Map View
- Creating an Outlet for the Map View
- Getting the Location
- Adding MapViewController Extension
- Creating an Instance of CLLocationManager
- Asking for Permission to Get Location
- Showing the Street Address
- Creating the UI for the Address
- Getting Address From a Coordinate
- Updating the Address
- Fixing the Street Address UI
- Finding Places
- Marking Locations on the Map
- Searching for Nearby Places
- Adding a Refresh Map Option
- Showing Additional Place Information
- Tidying up the UI
- Google Maps Versus Apple MapKit
- Advantages of Google Maps iOS SDK
- Advantages of Apple’s MapKit
- Where to Go From Here?
Before 2012, Google Maps was the mapping engine for all iOS devices. That year, Apple made a dramatic change in iOS 6 by replacing Google Maps with an in-house mapping engine: MapKit.
A few months later, Google released its own standalone Google Maps app for iOS, along with the Google Maps iOS SDK for developers.
MapKit and the Google Maps iOS SDK each have their strengths and weaknesses. You’ll have to decide which one best fits your use case. If you decide to use the Google Maps SDK, this tutorial is for you!
In this tutorial, you’ll build an app called Feed Me, which gets the user’s current location and searches for nearby places to eat, drink or shop for groceries. In the process, you’ll learn how to use the Google Maps iOS SDK to:
- Get the user’s location.
- Show street addresses.
- Present nearby search results.
- Provide additional information for the places found.
Getting Started
Use the Download Materials button at the top or bottom of this tutorial to download the project materials. This project already uses CocoaPods, so open Feed Me.xcworkspace.
Take a look around to get familiar with the project. Important things to notice are:
- MapViewController.swift: The main view controller of this project and the only one you’ll modify in this tutorial.
- GoogleDataProvider.swift: Wrapper class for making Google API calls. You’ll review the methods it contains later in the tutorial.
- GooglePlace.swift: Model for place results returned from Google.
-
MarkerInfoView.swift: Subclass of
UIView
that displays details of places. It comes with a matching .xib file.
Before you start coding, build and run your app. You’ll see the following screen appear:
Right now, all you’ll see is a blank screen with a pin in the middle. Next, press the action button on the right side of the navigation bar to see the TypesTableViewController
screen:
That’s all there is to see in the app at the moment. It’s up to you to add some magic!
Creating the API Key
The first thing you’ll need is an API key for the Google Maps SDK and the Google API you’ll use. If you don’t already have a Google account, create one (they’re free!) and log in to the Google Developers Console.
Click Create to create a new project, name your project Feed Me and click Create:
If your project doesn’t appear right away, refresh the page until it does. In the newly-created project, select Enable APIs and services:
Search for and enable these APIs:
- Maps SDK for iOS
- Places API
Select Credentials under APIs & Services in the left menu panel. Click Create Credentials, and then click API key to create the key:
Before you can use the key, you’ll add the actual Google Maps iOS SDK. So keep the window open for the moment.
Adding the SDK
Open Podfile in the Pods project and add the following, right above end
:
pod 'GoogleMaps', '~> 3.7.0'
Next, Open Terminal and navigate to the directory that contains your Feed Me project by using the cd
command:
cd ~/Path/To/Folder/Containing/Feed Me
Enter the following command to install the Google Maps iOS SDK:
pod install
You should see output like the following:
Analyzing dependencies
Downloading dependencies
Installing GoogleMaps 3.7.0
Generating Pods project
Integrating client project
You now have GoogleMaps in your project. CocoaPods makes life a lot easier! :]
Open AppDelegate.swift and replace its contents with the following:
import UIKit
import GoogleMaps
//1
let googleApiKey = "ENTER_KEY_HERE"
@UIApplicationMain
class AppDelegate: UIResponder, UIApplicationDelegate {
var window: UIWindow?
func application(
_ application: UIApplication,
didFinishLaunchingWithOptions launchOptions:
[UIApplication.LaunchOptionsKey: Any]?
) -> Bool {
//2
GMSServices.provideAPIKey(googleApiKey)
return true
}
}
There are two new elements here:
- A constant to hold your Google API key. Replace
ENTER_KEY_HERE
with the Google API key you created earlier. - The instantiation of Google Maps services with your API Key using the
GMSServices
class methodprovideAPIKey()
.
Creating the Map View
Now that you have your API key in place you can log out and close the Google Developers Console window.
Adding a UIView
Start by opening Main.storyboard to bring up Interface Builder. Locate the MapViewController scene and drag a simple UIView
from the Object Library to the approximate center of MapViewController
‘s view. Use View ▸ Show Library to reveal the Object Library.
Change the view’s background color to light gray. Next, open the Document Outline using Editor ▸ Outline and re-order the view hierarchy so the object tree looks like this:
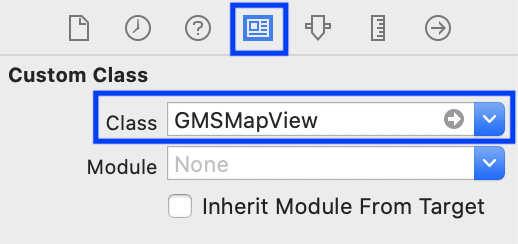
To turn this simple UIView
into a GMSMapView
, select the view you just added and open the Identity inspector by selecting the third tab from the left in the Utilities toolbar. Change the view’s Class to GMSMapView, as shown in the screenshot below:
Your MapViewController scene should now look like this:
Adding the Constraints for the Map View
Next, you’ll add some constraints to make the map fill the entire screen.
Select Map View in the Document Outline then choose the middle button in the bottom-right corner of the Interface Builder window. This is the Pin button (also known as the “TIE fighter button”).
Ensure that Constrain to margins is unchecked — this ensures that the map will fill all the available space on the screen — and add 0 space constraints from the top, left, bottom and right of the superview.
Your Pin editor should look like this:
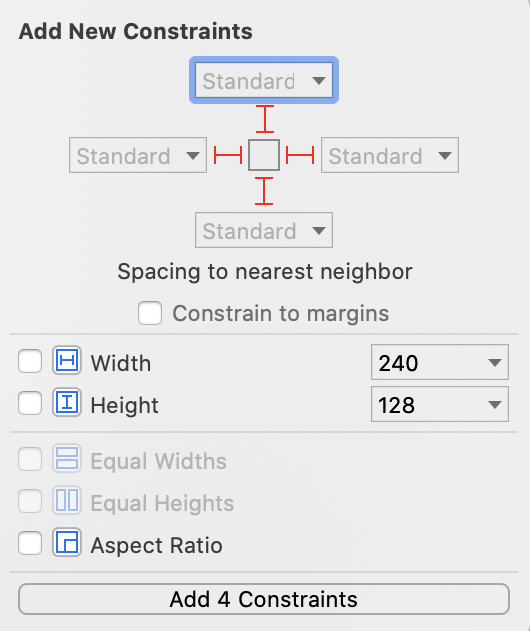
Click Add 4 Constraints to add the constraints to the map view.
Your MapViewController scene should look like the following, where the gray area represents the GMSMapView:
Creating an Outlet for the Map View
Before you build and run the project, add an IBOutlet
for the map view. To do that, bring up the Assistant Editor using the keyboard shortcut Command-Option-Control-Return.
Select the map view in Interface Builder, hold down the Control key and drag a line from the map view to MapViewController.swift. A pop-up will appear. Set the connection type to Outlet and Name to mapView. Keep the Type as GMSMapView
and click Connect:
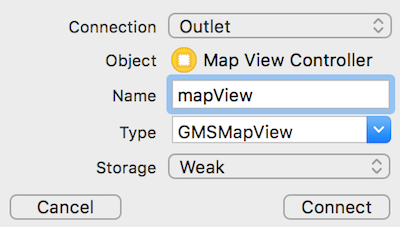
This will create a GMSMapView
property in MapViewController.swift and automatically connect it in Interface Builder. Finally, add the following to the top of the file, after import UIKit
:
import GoogleMaps
Build and run; you’ll now see a map like this:
You’re now using the Google Maps iOS SDK in your app. But you can do more than show a basic map, right? :] Your next step will be to customize the map for your user’s location.
Getting the Location
Feed Me is all about finding places near the user, and you can’t do that without getting the user’s location.
Adding MapViewController Extension
iOS uses a delegate to inform your app of your user’s location. Your next step is to make MapViewController
conform to CLLocationManagerDelegate
.
Add the following extension to the bottom of MapViewController.Swift:
// MARK: - CLLocationManagerDelegate
//1
extension MapViewController: CLLocationManagerDelegate {
// 2
func locationManager(
_ manager: CLLocationManager,
didChangeAuthorization status: CLAuthorizationStatus
) {
// 3
guard status == .authorizedWhenInUse else {
return
}
// 4
locationManager.requestLocation()
//5
mapView.isMyLocationEnabled = true
mapView.settings.myLocationButton = true
}
// 6
func locationManager(
_ manager: CLLocationManager,
didUpdateLocations locations: [CLLocation]) {
guard let location = locations.first else {
return
}
// 7
mapView.camera = GMSCameraPosition(
target: location.coordinate,
zoom: 15,
bearing: 0,
viewingAngle: 0)
}
// 8
func locationManager(
_ manager: CLLocationManager,
didFailWithError error: Error
) {
print(error)
}
}
In this extension, you:
- Create a
MapViewController
extension that conforms toCLLocationManagerDelegate
. - Create a
locationManager
delegate method that accepts aCLAuthorizationStatus
parameter. This method is called once the user grants or revokes location permissions. - Verify the user has granted you permission while the app is in use.
- Ask the location manager for their location.
- Add the user’s location indicator and the location button.
- Create a different
locationManager
method that accepts aCLLocation
array. This executes when the location manager receives new location data. - Update the map’s camera to center near the user’s current location. The
GMSCameraPosition
class aggregates all camera position parameters and passes them to the map for display. - Create a third
locationManager
that accepts anError
parameter. If the app throws an error, it prints to the console so that you can handle it and keep your app from crashing.
Creating an Instance of CLLocationManager
Now, you must do the work to request your user’s location.
First, add the following property to MapViewController
:
let locationManager = CLLocationManager()
This will add and instantiate a CLLocationManager
property named locationManager
.
Next, find the definition of viewDidLoad()
in the extension and replace it with the following:
override func viewDidLoad() {
super.viewDidLoad()
// 1
locationManager.delegate = self
// 2
if CLLocationManager.locationServicesEnabled() {
// 3
locationManager.requestLocation()
// 4
mapView.isMyLocationEnabled = true
mapView.settings.myLocationButton = true
} else {
// 5
locationManager.requestWhenInUseAuthorization()
}
}
Here’s what this does:
- Makes
MapViewController
the delegate oflocationManager
. - Checks if the user previously authorized the use of location services for this app.
- Asks the location manager for the user’s location.
- Sets
isMyLocationEnabled
andmyLocationButton
to true. This draws a light blue dot indicating the user’s location and adds a button to center the map on it. - Requests access to the user’s location while using the app if
locationServicesEnabled
is false.
You’re ready to check for permission but you still need to ask for it first. You’ll fix that next.
Asking for Permission to Get Location
Open the Feed Me project at the top of the Project navigator and select the Feed Me target. Then go to the Info tab and select the first line in the Custom iOS Target Properties section.
Control-click and select Raw Keys & Values from the menu. Now, click the + icon to add a new row.
Set NSLocationWhenInUseUsageDescription as the key, choose String for the type and enter the following text as the value:
By accessing your location, this app can find good places to eat for you.
When you’re finished, it will look like this:
Build and run. Once your app loads, you’ll be prompted with an alert asking for location permissions. Tap on Allow While Using App.
You now see a map centered on your location. Scroll the map a little, then tap the Locate button in the bottom-right corner. The map centers on your location again.
Showing the Street Address
Now that you have the user’s location, it would be nice to show the street address of that location. Google Maps has an object that does exactly that: GMSGeocoder
. This takes a coordinate and returns a readable street address.
Creating the UI for the Address
First, you’ll add some UI to present the address to the user.
Open Main.storyboard and add a UILabel
to the MapViewController scene. Make sure you add the label to MapViewController
‘s view, and not GMSMapView
.
Next, open the Attributes inspector, and set the following attributes for the label:
- Alignment to center.
- Lines to 0. Surprisingly, this lets the label take up as many lines as it needs to fit the text. Go figure! :]
- Background to white with 85% opacity.
The label’s Attributes inspector and the scene’s Object Tree should look like this when done:
Also, make sure that all the subviews are ordered as follows:
Finally, add 0 space constraints for left, bottom and right to the label as shown below:
This pins the label to the bottom of the screen and stretches it over the entire width of the screen.
Your storyboard scene should look like this:
Next, create an outlet for the label.
Bring up Assistant Editor and Control-drag from the label in the Document Outline to MapViewController.swift. Set the connection type to Outlet, the name to addressLabel and click Connect.
This adds a property to your MapViewController
that you can use in your code:
@IBOutlet weak var addressLabel: UILabel!
Getting Address From a Coordinate
Now that you have the address label, it’s time to get the address. Add the method below to MapViewController
:
func reverseGeocode(coordinate: CLLocationCoordinate2D) {
// 1
let geocoder = GMSGeocoder()
// 2
geocoder.reverseGeocodeCoordinate(coordinate) { response, error in
guard
let address = response?.firstResult(),
let lines = address.lines
else {
return
}
// 3
self.addressLabel.text = lines.joined(separator: "\n")
// 4
UIView.animate(withDuration: 0.25) {
self.view.layoutIfNeeded()
}
}
}
Here’s what each commented section does:
- Creates a
GMSGeocoder
object to turn a latitude and longitude coordinate into a street address. - Asks the geocoder to reverse geocode the coordinate passed to the method. It then verifies there is an address in the response of type
GMSAddress
. This is a model class for addresses returned by theGMSGeocoder
. - Sets the text of the
addressLabel
to the address returned by the geocoder. - Once the address is set, animates the changes in the label’s intrinsic content size.
Your next step is to keep the map updated when the user changes locations.
Updating the Address
You’ll want to call the method above every time the user changes position on the map. To do so, you’ll use GMSMapViewDelegate
.
Add another extension to the bottom of MapViewController.swift as follows:
// MARK: - GMSMapViewDelegate
extension MapViewController: GMSMapViewDelegate {
}
This will declare that MapViewController
conforms to GMSMapViewDelegate
.
Next, add the following line of code to viewDidLoad()
:
mapView.delegate = self
This makes MapViewController
the map view’s delegate.
Finally, add the following method to the newly-added extension:
func mapView(_ mapView: GMSMapView, idleAt position: GMSCameraPosition) {
reverseGeocode(coordinate: position.target)
}
This method is called each time the map stops moving and settles in a new position. You then make a call to reverse geocode the new position and update the addressLabel
‘s text.
Build and run. You’ll see the address of your current location — real or simulated — at the bottom of the screen.
Notice anything wrong with this picture?
[spoiler]The Google logo and Locate button are hiding behind the label![/spoiler]
Fixing the Street Address UI
Fortunately, GMSMapView
provides a very simple solution for this: padding. When you apply padding to the map, all of the visual elements will be placed according to that padding.
Head back to reverseGeocodeCoordinate(_:)
and add these lines just before the animation block:
// 1
let labelHeight = self.addressLabel.intrinsicContentSize.height
let topInset = self.view.safeAreaInsets.top
self.mapView.padding = UIEdgeInsets(
top: topInset,
left: 0,
bottom: labelHeight,
right: 0)
Now, replace the animation block with:
UIView.animate(withDuration: 0.25) {
//2
self.pinImageVerticalConstraint.constant = (labelHeight - topInset) * 0.5
self.view.layoutIfNeeded()
}
This does two things:
- Adds padding to the top and bottom of the map before the animation block. The top padding equals the view’s top safe area inset, while the bottom padding equals the label’s height.
- Updates the location pin’s position to match the map’s padding by adjusting its vertical layout constraint.
Build and run again. This time, the Google logo and locate button move to their new position once the label becomes visible.
Move the map around; you’ll notice that the address changes every time the map settles to a new position. You’ll add animation to dampen this effect.
Add the following method to the GMSMapViewDelegate
extension:
func mapView(_ mapView: GMSMapView, willMove gesture: Bool) {
addressLabel.lock()
}
This method is called every time the map starts to move. It receives a Bool
that tells you if the movement originated from a user gesture, such as scrolling the map, or if the movement originated from code.
If the movement came from the user, you call lock()
on addressLabel
to give it a loading animation.
When there’s a lock()
, there must also be a corresponding unlock()
. Add the following as the first line of the closure passed to reverseGeocode(coordinate:)
. It should come right before the guard let
:
self.addressLabel.unlock()
lock()
and unlock()
, check out UIView+Extensions.swift.Build and run. As you scroll the map, you’ll see a loading animation on the address label.
Finding Places
Now that you’ve set up the map and have the user’s location in hand, it’s time to get this user fed!
You’ll use Google Places API to search for places to eat and drink around the user’s location. This is a free web service API you can use to query to find establishments, geographic locations or other points of interest near any given point.
Marking Locations on the Map
Google Maps iOS SDK provides you with the GMSMarker
class to mark locations on a map. Each marker object holds a coordinate and an icon image and renders on the map when you add it.
For this app, you’ll provide additional information on each marker. To do this, you’ll create a subclass of GMSMarker
.
Create a new Cocoa Touch Class, name it PlaceMarker and make it a subclass of GMSMarker. Ensure you choose Swift as the language for this file.
Replace the contents of PlaceMarker.swift with the following:
import UIKit
import GoogleMaps
class PlaceMarker: GMSMarker {
// 1
let place: GooglePlace
// 2
init(place: GooglePlace, availableTypes: [String]) {
self.place = place
super.init()
position = place.coordinate
groundAnchor = CGPoint(x: 0.5, y: 1)
appearAnimation = .pop
var foundType = "restaurant"
let possibleTypes = availableTypes.count > 0 ?
availableTypes :
["bakery", "bar", "cafe", "grocery_or_supermarket", "restaurant"]
for type in place.types {
if possibleTypes.contains(type) {
foundType = type
break
}
}
icon = UIImage(named: foundType+"_pin")
}
}
Here’s what this code is doing:
- Adds a property of type
GooglePlace
to thePlaceMarker
. - Declares a new designated initializer that accepts a
GooglePlace
and available location types. Fully initializes aPlaceMarker
with a position, icon image and anchor for the marker’s position as well as an appearance animation.
Searching for Nearby Places
Next, add two more properties to MapViewController
:
let dataProvider = GoogleDataProvider()
let searchRadius: Double = 1000
You’ll use dataProvider
, defined in GoogleDataProvider.swift, to make calls to the Google Places Web API. And you’ll use searchRadius
to set the distance from the user for the search. You’ve set it to 1,000 meters.
Add the following method to MapViewController
:
func fetchPlaces(near coordinate: CLLocationCoordinate2D){
// 1
mapView.clear()
// 2
dataProvider.fetchPlaces(
near: coordinate,
radius:searchRadius,
types: searchedTypes
) { places in
places.forEach { place in
// 3
let marker = PlaceMarker(place: place, availableTypes: self.searchedTypes)
// 4
marker.map = self.mapView
}
}
}
In this method, you:
- Clear the map of all markers.
- Use
dataProvider
to query Google for nearby places within thesearchRadius
, filtered to the user’s selected types. - Iterate through the results returned in the completion closure and create a
PlaceMarker
for each result. - Set the marker’s map. This line of code is what tells the map to render the marker.
Here’s the $64,000 question: When do you want to call this method?
The answer is: When the app launches. Your user will expect to see some places to eat when they open an app called “Feed Me”!
Locate locationManager(_:didUpdateLocations:)
and add the following line of code at the end:
fetchPlaces(near: location.coordinate)
Next, because the user has the ability to change the types of places to display on the map, you’ll update the search results if the selected types change.
To do this, locate typesController(_:didSelectTypes:)
and add the following line of code to the end:
fetchPlaces(near: mapView.camera.target)
Finally, you’ll give the user the option to fetch new places when their location changes.
Adding a Refresh Map Option
Open Main.storyboard and drag a UIBarButtonItem
from the Object Library to the left side of the MapViewController
‘s navigation bar. Change the button’s System Item to Refresh, as shown below:
Bring up Assistant Editor and Control-drag from the Refresh button to MapViewController.swift. Choose Action and name the method refreshPlaces. Insert the following code into the newly-added method:
fetchPlaces(near: mapView.camera.target)
Build and run and you’ll see location pins popping up around the map. Change the search types in the TypesTableViewController
and see how the results change.
These markers sure add some color to the map, but they’re not much use without additional data to give the user details about the pinned locations.
Showing Additional Place Information
Add the following method to the GMSMapViewDelegate
extension in MapViewController.swift:
func mapView(
_ mapView: GMSMapView,
markerInfoContents marker: GMSMarker
) -> UIView? {
// 1
guard let placeMarker = marker as? PlaceMarker else {
return nil
}
// 2
guard let infoView = UIView.viewFromNibName("MarkerInfoView") as? MarkerInfoView
else {
return nil
}
// 3
infoView.nameLabel.text = placeMarker.place.name
infoView.addressLabel.text = placeMarker.place.address
return infoView
}
Each tap on a marker calls this method. If you return a view, it appears above the marker. If you return nil
, the button tap does nothing.
Here’s what you’re doing to create this behavior:
- You first cast the tapped marker to a
PlaceMarker
. - Next, you create a
MarkerInfoView
from its nib.MarkerInfoView
is aUIView
subclass that comes with the starter project for this tutorial. - Then you apply the place name to
nameLabel
and the place address toaddressLabel
.
Everything’s working nicely, but you have one more step to make sure that the UI looks right before finishing your app.
Tidying up the UI
You need to make sure the location pin doesn’t cover the info window. To do this, add the following method to the GMSMapViewDelegate
extension:
func mapView(_ mapView: GMSMapView, didTap marker: GMSMarker) -> Bool {
mapCenterPinImage.fadeOut(0.25)
return false
}
This method hides the location pin when the user taps a marker. The method returns false
to indicate that you don’t want to override the default behavior of centering the map around the marker when tapping it.
But the pin needs to re-appear at some point. So add the following to the end of mapView(_:willMove:)
:
if gesture {
mapCenterPinImage.fadeIn(0.25)
mapView.selectedMarker = nil
}
This checks if the movement originated from a user gesture. If so, it unhides the location pin using fadeIn(_:)
. It also sets the map’s selectedMarker
to nil
to remove the currently-presented infoView
.
Finally, add the following method to the GMSMapViewDelegate
extension:
func didTapMyLocationButton(for mapView: GMSMapView) -> Bool {
mapCenterPinImage.fadeIn(0.25)
mapView.selectedMarker = nil
return false
}
This method runs when the user taps the Locate button, causing the map to center on the user’s location. It also returns false
so that it doesn’t override the button’s default behavior.
Build and run. Select a marker and you’ll see the location pin fade out. Scroll the map and notice that the infoView
closes and brings the pin back:
That’s it, you’ve done it! You now have a fully functioning Google Maps app. :]
Google Maps Versus Apple MapKit
As you consider building your own map-based app, you may wonder if you should use MapKit instead. Here are some of the advantages of each SDK to help you decide which to use in your situation:
Advantages of Google Maps iOS SDK
- Frequent updates to the SDK.
- Uniform experience for cross-platform (iOS and Android) apps.
- Greater map detail than MapKit, especially outside the United States.
Advantages of Apple’s MapKit
- Native to iOS. MapKit always syncs with iOS and works with Swift out of the box.
- Greater stability.
- Better integration with CoreLocation and CoreAnimation.
Where to Go From Here?
Download the completed version of the project using the Download Materials button at the top or bottom of this tutorial.
The Google Maps SDK is too large to include in this download, so be sure to run pod install
before running a build. Also, insert your API key as you did at the beginning of this tutorial.
This tutorial only showed you the basics of what the Google Maps SDK can do. There’s much more to learn; you should definitely check out the full documentation for other great features this SDK has to offer.
For example, the Google Maps iOS SDK can also show directions, indoor maps, overlays, tile layers and Street View. For extra credit, try to use some of these features to enhance the Feed Me app.
If you’d like to learn more about Apple’s MapKit, check out our MapKit Tutorial: Getting Started.
We hope you enjoyed this tutorial. If you have any questions, tips or just wanna show off your cool mapping app, feel free to post about it in the discussion below!