Swift Package Manager for iOS
Learn how to use the Swift Package Manager (SwiftPM) to create, update and load local and remote Swift Packages. By Tom Elliott.
Updating Packages
Say you want to add some new functionality to the RemoteImageView package. How should you go about this?
Open RemoteImageFetcher.swift from the Swift Package Dependencies section of the Project Navigator. If you try to edit the file, nothing happens because you’re using a remote version of the package.
What to do?
Switch to Finder to view the window you opened in the previous section, showing the root directory for the RemoteImageView package. Double click Package.swift.
The package opens in Xcode in its own window. This time you can edit the sources files!

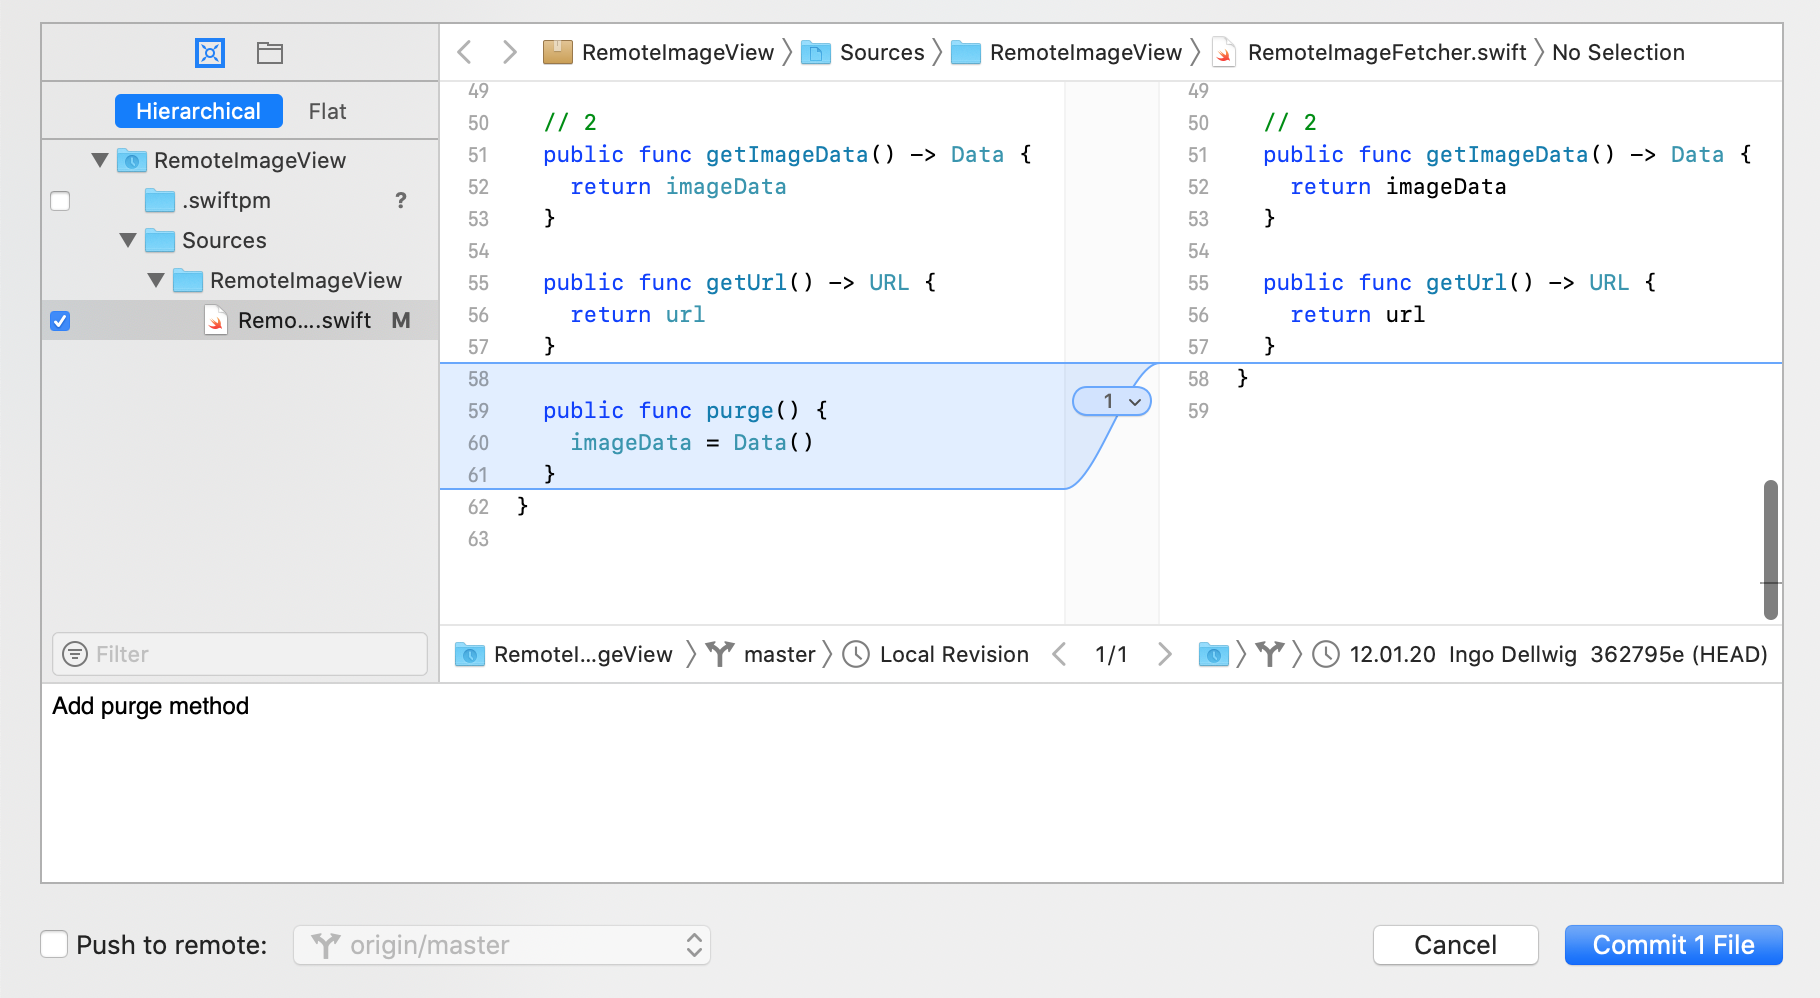
Open RemoteImageFetcher.swift. A ticket has come in, requesting that users of your package can purge the image data from the image fetcher, perhaps to free memory when things get tight. Add the following after getUrl():
public func purge() {
  imageData = Data()
}
This method sets the image data back to an empty Data struct.
Now, to publish your change, select Source Control ▸ Commit from Xcode’s menu bar, add a commit message and click Commit.
Next, add a new tag as before. Open the Source Control navigator, then open the context menu on the package and select Tag “master”.

But what version should you use for the new version? Remember semantic versioning from before?
In this instance, you’ve added a new method, but the package is backward compatible with the previous version. So, this requires a minor version increase. Tag your package as 1.1.0 and select Create.
Finally, select Source Control ▸ Push from the menu bar in Xcode, remember to select Include tags and select the Push button to push your changes to GitHub.
Importing Your Updated Package
In the menu bar, select Window ▸ PenOfDestiny to switch back to the app project. Look for the remote image view package in the Project Navigator and notice how the version number, 1.0.0, is displayed against the package.

Select File ▸ Swift Packages ▸ Update to Latest Package Versions in the Xcode menu and note how the remote image view package is now version 1.1.0.

Making Breaking Changes
Select Window ▸ RemoteImageView to switch back to the remote image view package window. Open RemoteImageFetcher.swift.
The initializer for the remote image fetcher isn’t as Swifty as it could be. Replace it with the following:
public init(from url: URL) {
  self.url = url
}
This new initializer simply adds an argument label, from, to the URL parameter.
Build the package and ensure it builds correctly, making sure you have an iOS device or simulator selected as build destination.
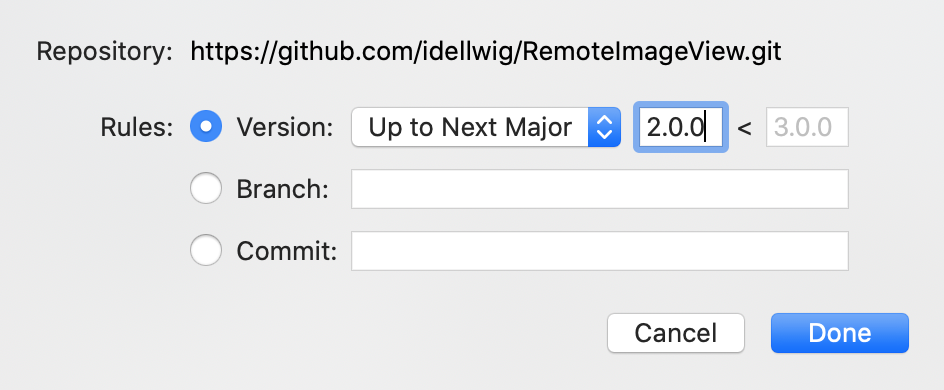
Follow the steps as before, committing the changes and adding a tag. Only this time, because the public API for RemoteImageFetcher has changed, you must create a new major version: 2.0.0. Push the changes to GitHub, remembering to include tags.
Switch back to the PenOfDestiny app and run Update to Latest Package Versions again. This time, nothing happens and RemoteImageFetcher is still set to 1.1.0.
That’s because you set the maximum version to be exclusive of 2.0.0 when you initially added the package to your project. Open the Swift Packages tab in the Project Settings.
Double click RemoteImageView, update the dependency to 2.0.0 and click Done. This time, when you update to the latest package versions, the RemoteImageView package shows 2.0.0.
But remember, this was a breaking change. So, you have to update your code accordingly. Open SpinningPenView.swift, locate the line with the image fetcher initialized and replace url with from as you did before.
Where to Go From Here?
I hope you enjoyed learning how you can use Swift Package Manager in your iOS apps. Now you can split your code into self-contained packages and publish them for everyone to use.
If you’d like to learn more about Swift Package Manager, check out its documentation.
There are some great videos from WWDC about the SwiftPM. I found this one and this one really useful.
Finally, the full documentation for the manifest file is available here.
If you have any questions or comments, please join the forum discussion below.