Swift Package Manager for iOS
Learn how to use the Swift Package Manager (SwiftPM) to create, update and load local and remote Swift Packages. By Tom Elliott.
Local Packages
You now know how SwiftPM helps you access open source packages written by other people. But did you know it also lets you split your code into packages for easier reuse among your projects.
Local packages differ from remote packages because you can edit their code directly within your project. That’s very useful when creating a new package that’s likely to change a lot before it’s ready for its first release.
In the previous section, you added the ability to download images from a remote URL. Since this functionality isn’t specific to Pen of Destiny, it’s a good candidate for factoring out into its own package.
In Xcode, select File ▸ New ▸ Swift Package…. Name the package RemoteImageView and add it to the Pen of Destiny project. Click Create.

Helpfully, Xcode created the package structure for you, with a README.md, Package.swift manifest file and folders for the sources and tests.

Open Package.swift and, after the name parameter, add the following line of code:
platforms: [.iOS(.v13)],
Here you tell the SwiftPM that this package can only be built for iOS and only for versions 13 and higher.
In the RemoteImageView package, open Sources/RemoteImageView and delete the RemoteImageView.swift file that Xcode just created. Drag both the finished RemoteImageView and RemoteImageFetcher files from the Pen of Destiny project into the RemoteImageView directory.

Next, open RemoteImageViewTests.swift from within the Tests/RemoteImageViewTests directory and delete all the code within the RemoteImageViewTests class. It would be great to have tests but that is beyond the scope of this tutorial!
Adding the New Package to the App
Open the PenOfDestiny target settings. In the General tab under Frameworks, Libraries, and Embedded Content, select the + icon and add the RemoteImageView library to your project.

Finally, open SpinningPenView.swift. At the top, after importing SwiftUI, add the following:
import RemoteImageView
Build and run the app. Nothing has changed, but now the remote image view code is in its own package.
Publishing Packages
Xcode makes publishing your own packages really easy. You’re now going to see how to do that by publishing the remote image view library you just created.
First, create a Git repository for your package. Select the README.md file and add a brief description of the remote image view library (you can put what you want in here!). Then select Source Control ▸ Create Git Repositories… from the menu bar in Xcode.
Select only the RemoteImageView project and click Create.
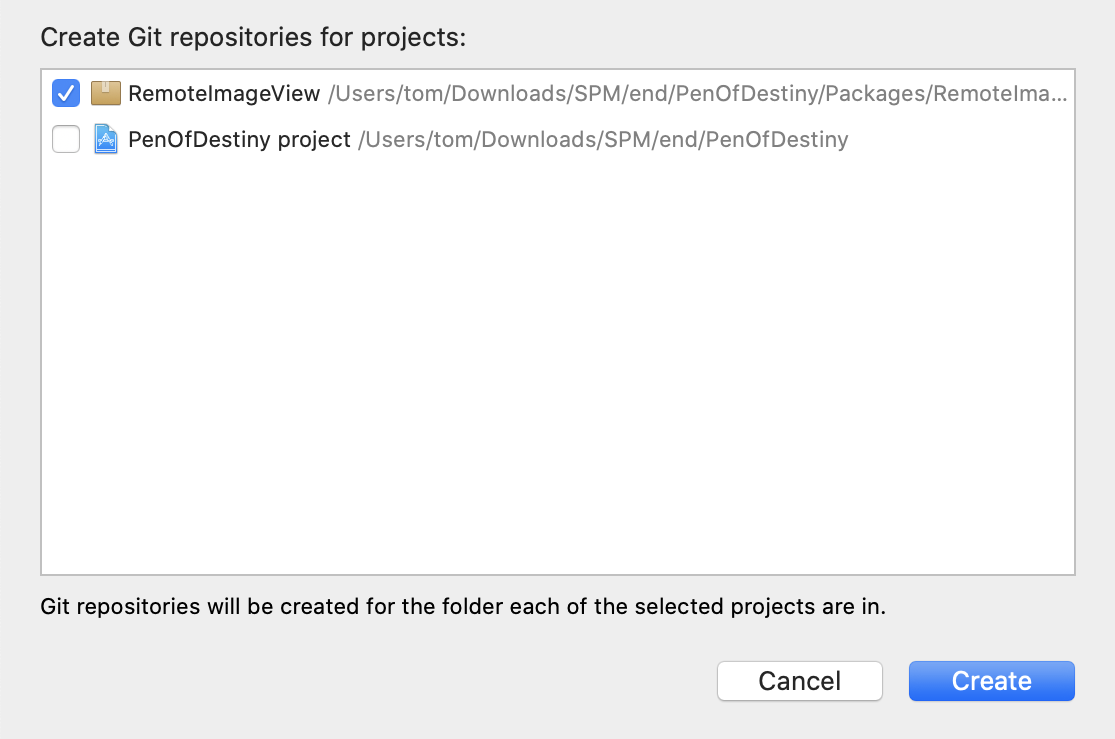
This creates a Git repository on your computer and an initial commit of your code. You can verify this by opening the RemoteImageView directory in a terminal:
(base) Toms-MBP:RemoteImageView % ls -lA
total 24
drwxr-xr-x  12 matt  staff   384  2 Feb 20:53 .git
-rw-r--r--   1 matt  staff    53  2 Feb 20:47 .gitignore
drwxr-xr-x   3 matt  staff    96  2 Feb 20:47 .swiftpm
-rw-r--r--@  1 matt  staff  1090  2 Feb 20:47 Package.swift
-rw-r--r--@  1 matt  staff    43  2 Feb 20:52 README.md
drwxr-xr-x   3 matt  staff    96  2 Feb 20:47 Sources
drwxr-xr-x   4 matt  staff   128  2 Feb 20:47 Tests

(base) Toms-MBP:RemoteImageView % git st
On branch master
nothing to commit, working tree clean

(base) Toms-MBP:RemoteImageView % git log
commit 8045920909fe3c3fd9517dc43a53c79c6b22351b (HEAD -> master)
Author: Matt Galloway <matt@galloway.me.uk>
Date:   Sun Feb 2 20:53:08 2020 +0000

    Initial Commit
Pushing Your Package to GitHub
Before you can publish your package for others to use, it must be available publicly. The easiest way to do this is to publish to GitHub.
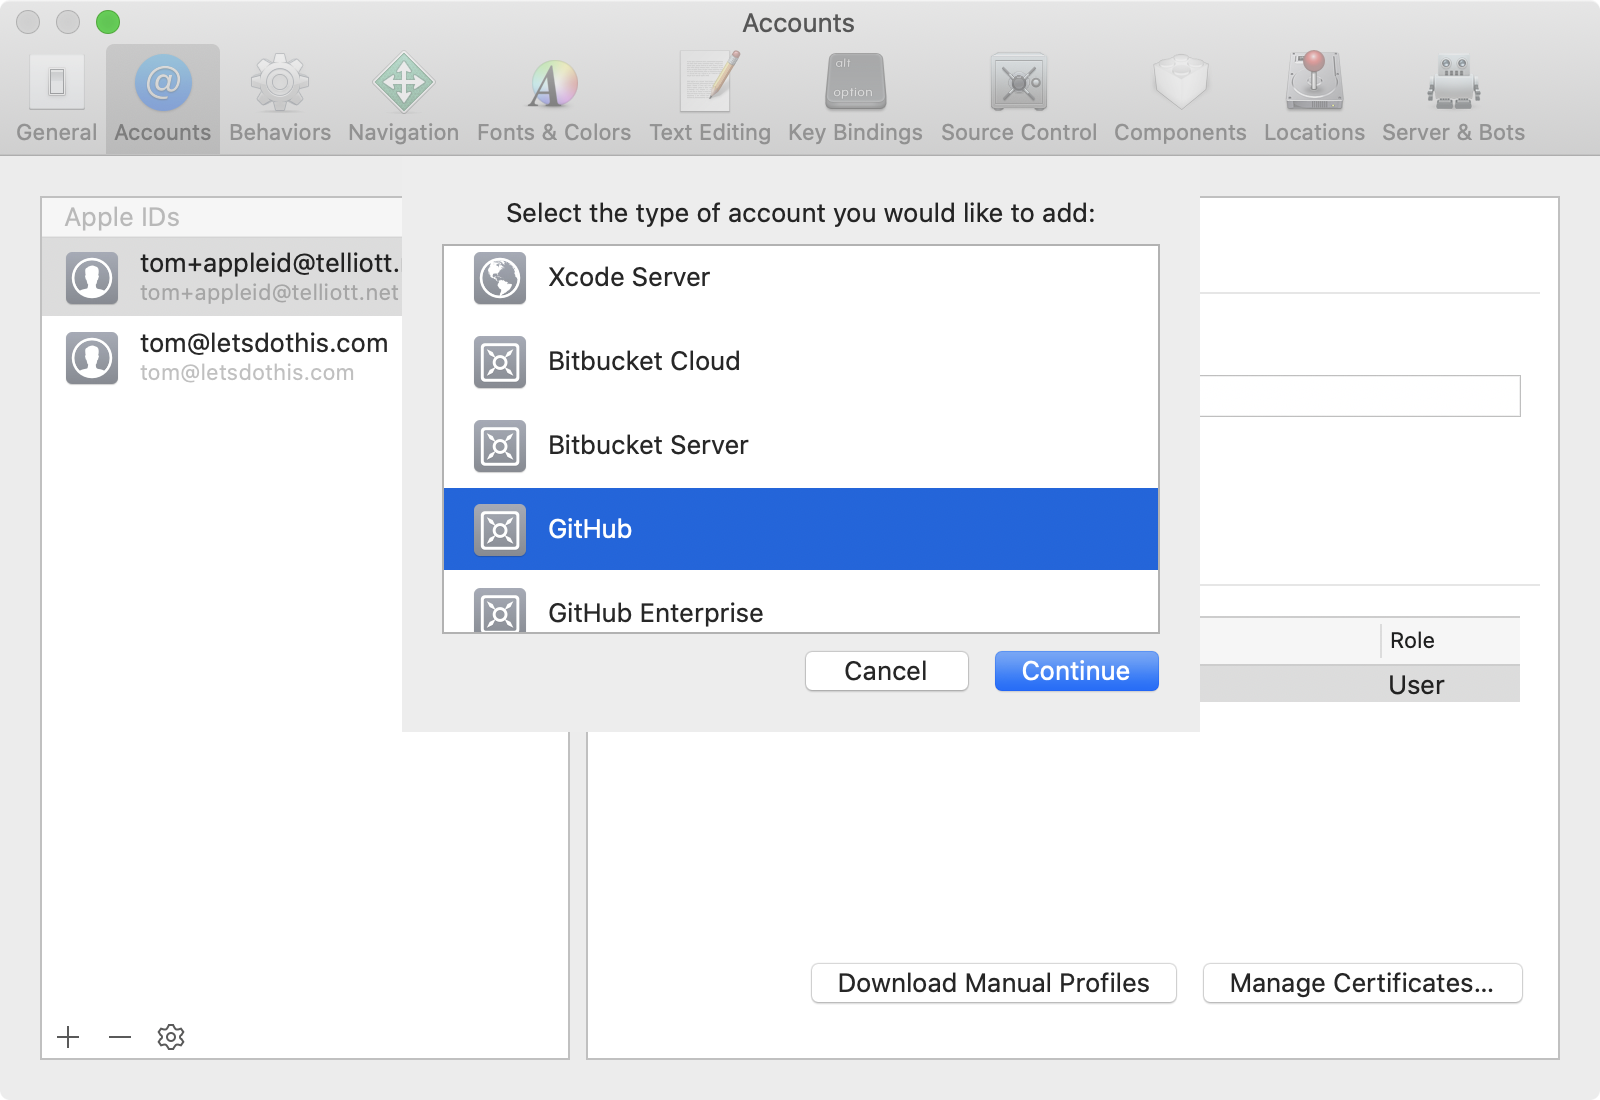
If you don’t have a GitHub account you can create one for free at github.com. Then, if you haven’t done so already, add your GitHub account to Xcode by selecting Xcode ▸ Preferences in the Xcode menu and then selecting Accounts.
Click the + button to add a new account. Select GitHub and fill in your credentials as requested.
Open the Source Control navigator and select the RemoteImageView package. Open the context menu (Right-click or Control-click) and select Create “RemoteImageView” Remote…. You can change the visibility to Private or accept the default settings. Click Create.

This creates a new repository on GitHub and automatically pushes the code there for you.
Next, create a Tag for your package, again using the context menu. This time, select Tag master…. Tag as version 1.0.0 and click Create.

Finally, select Source Control ▸ Push… from the Xcode menu bar. Make sure Include tags is selected then click Push. This pushes the tag to GitHub, where the SwiftPM can read it. Version 1.0.0 of your package is now live. :]

Converting Local Packages
Now that your remote image view package is on GitHub and released as version 1.0.0, you can add it to your app as a remote package.
Open the context menu for the remote image view package and select View on GitHub…. This opens a browser window and loads the newly created GitHub repository for you.
Select Clone or Download and copy the Git repository URL in the pop-up.

Next, go back to Xcode. Open the Project navigator and select the Package.swift for the RemoteImageView package. Open the context menu and select Show in Finder.
Your computer switches to Finder with the enclosing folder open. You don’t need this yet, but it’ll come in handy later, so make sure you keep this Finder window open. Switch back to Xcode.
Select the RemoteImageView package and delete it using Edit ▸ Delete from the menu bar. Then select Remove Reference.

Re-Adding as a Remote Package
Select File ▸ Swift Packages ▸ Add Package Dependency… and paste the Git repository URL you copied above in the search bar. Click Next. Depending on your GitHub settings, you may need to authenticate your SSH key here.
Under Rules, select Up to next Major, set the version to 1.0.0 and then click Next. After Xcode fetches the package, ensure the RemoteImageView product is selected and added to the Pen of Destiny app target, then select Finish.

Note how the package now displays next to Yams as a remote package in the Xcode package explorer.

Build and run your app to make sure everything runs as before.