iOS Accessibility in SwiftUI Tutorial Part 1: Getting Started
In this article, you’ll fix the accessibility of a SwiftUI master-detail app with various types of images that need more informative labels. By Audrey Tam.
SwiftUI: Accessibility by Default
Look at the code for this button in ContentView.swift — it’s a modifier for NavigationView:
.navigationBarItems(trailing:
  Toggle(isOn: $hideVisited, label: { Text("Hide Visited") }))
There’s no explicit accessibility code here, just the type of element — Toggle — and its label. SwiftUI uses these to generate an accessibility element:
- The accessibility label defaults to the element’s label Hide Visited.
- The accessibility value defaults to match the element’s value: 0, because the initial value of
hideVisitedisfalse. - The accessibility trait defaults to Button because this element is a Toggle.
label parameter, which should be used as the default accessibility label. You’ll see a current exception to this rule in Part 2.
Now advance the highlighting to the navigation view title Artworks:

Again, SwiftUI automatically creates an accessibility label Artworks, and assigns the trait Header, although there’s no specific accessibility code. There’s only this other NavigationView modifier to provide the default accessibility label:
.navigationBarTitle("Artworks")
Emoji Need Context
Next, advance the highlighting to the first list item, which happens to have a reaction emoji:

SwiftUI takes its accessibility label from the item’s Text, and identifies this as a Button.
The accessibility inspector also has a VoiceOver simulator — the button in the middle of the Quicklook section — which gives you a reasonable idea of what VoiceOver will say on a device.

Click the VoiceOver button to hear how this label sounds:
Glowing Star, Prince Jonah Kuhio Kalanianaole, Button
Do you feel the default label — emoji name Glowing Star — is not really helpful to someone who is just listening to the app? In the context of the app, this emoji indicates a Wow reaction. A big part of making your app accessible means ensuring your labels give context and meaning for the elements in your app. You’ll soon fix this problem by replacing the default label with a custom label.
Performing Actions
Now look at the accessibility inspector’s Action section: Activate, Scroll up and Scroll down. Click the Activate Perform button to simulate tapping the list item button in the simulator:

Now you’re on the detail view for Prince Jonah, and the accessibility inspector says the back button’s label is Artworks, while iOS shows an arrow, because the navigation bar title is so long:

That’s probably a feature, not a bug ;].
Unhelpful Image Names
Keep moving the highlighting. The title itself is a Header, then the image has another unhelpful default accessibility label 002_200105: This is the name of the image. You’ll soon fix this with the Image element’s label-based initializer.

The title below the image also has the unhelpful Glowing Star in its label, and the system image beside the location text has the unhelpful image name — mappin.and.ellipse — as its default accessibility label.
MapView Accessibility Information?
Click VoiceOver to turn it off, then tap the map pin to open the map view. Click VoiceOver to turn it on: It says Description for element unavailable, and there’s no information in the accessibility inspector!
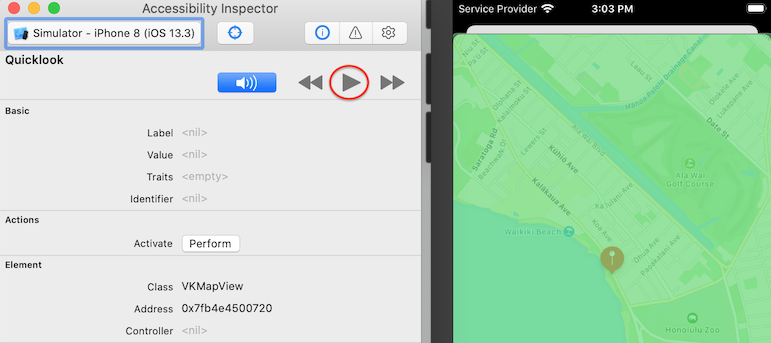
Now click the Play button to start auto-navigation: VoiceOver reads the points of interest that appear on the map, from top to bottom, leading to trailing edge, before visiting the map pin, and the rest of the elements:
Ala Wai Golf Course, Waikiki Beach, description for element unavailable, Honolulu Zoo, Kapiolani Regional Park, map pin, map pin, Legal, Link, Kuhio Beach, Done, Button.
So there is some accessibility information somewhere, but there’s none available for the most important location on the map. You’ll soon see a way to fix that.
Click VoiceOver to turn it off.
Context Menu Accessibility?
I almost forgot: The list has a context menu for setting an artwork’s reaction emoji. Navigate back to the master list view in the simulator, highlight an item, and click VoiceOver:
Glowing Star, Prince Jonah Kuhio Kalanianaole, Button
Nope, not a word about the context menu.
Long-press the item to show the context menu, then highlight each menu item to see they’re all accessible, and the whole-screen-highlighted UIVisualEffectView has the label Dismiss context menu:
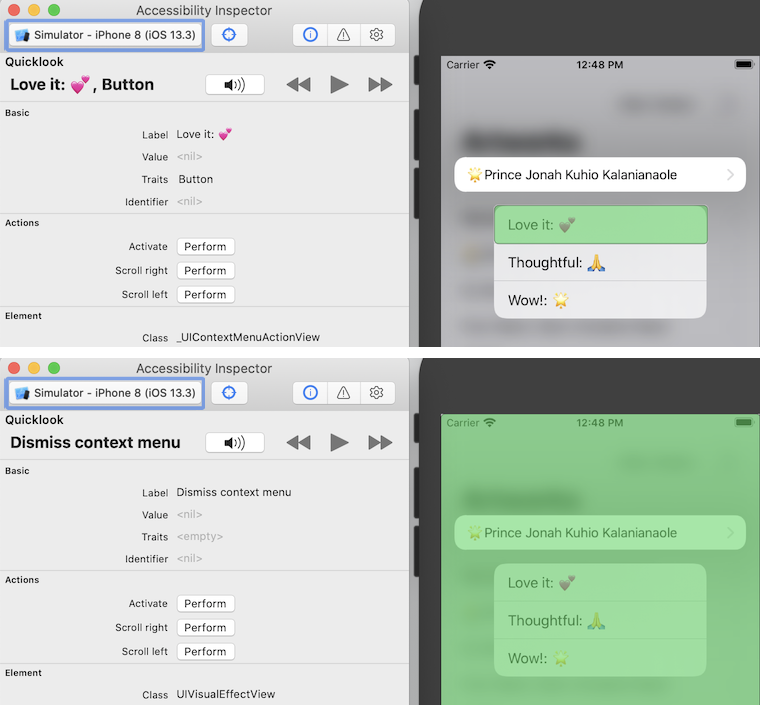
Further investigation is needed for this!
Accessibility Issues Identified
In a brief scan of this app, you’ve seen how SwiftUI automates accessibility for you, but you’ve also found these accessibility issues:
- Emoji names aren’t helpful information.
- Artwork image names aren’t helpful information.
- System image names aren’t helpful information.
- The map view has no accessibility information for the map pin.
- How does accessibility work for the context menu?

Next, you’ll jump in and fix these, before diving into the details of the Accessibility API.

Fixing Accessibility Labels
Fixing the artwork image label is easiest, so you’ll start with that.
Labeling Artwork Images
In DetailView.swift, the first element in the VStack is Image(artwork.imageName). Replace this with:
Image(artwork.imageName, label: Text(artwork.title))
You’re using the Image initializer with a label parameter to provide a meaningful label. VoiceOver will read this instead of the Image name.
Build and run the app, and navigate to a detail view. In the accessibility inspector, highlight the image:

Now the image’s label is the title of the artwork. Play the VoiceOver to hear:
Prince Jonah Kuhio Kalanianaole, Image
That’s right, VoiceOver reads out the Image trait, so you should never include this information in your accessibility label.
I told you that was easy. Next, you’ll fix the system image.