Parse Server Tutorial with iOS

In this tutorial you will learn how to setup your own Parse Server solution hosted on Heroku and connect it with your iOS app. By Ron Kliffer.

Leave a rating/review
Save for later
Share

Update 3/6/17: Updated for Swift 3, Xcode 8, and current state of Parse Server. Original tutorial by Marius Horga.

About a year ago, Parse, one of the most popular backend solutions for mobile apps, announced it was shutting down their hosted service and instead open sourcing their SKs.

Since that time, many developers have migrated their apps over to the open source Parse Server. The parse platform is quite active, with 143 contributors and ~13K stars on GitHub.

Even if you didn’t use Parse in the old days, the Parse Server is a nice easy-to-use option to set up a backend for your apps, since it’s open source and well maintained.

In this tutorial, we’ll show you how you can set up and host your very own Parse Server. Let’s dive in!

Note: This Parse server tutorial focuses on setting up the server itself, and not on the Parse SDK. We assumes you know the basics of developing iOS apps using the Parse SDK, and have worked through the Parse Tutorial: Getting Started with Web Backends.

If you haven’t gone through it, that’s fine, you can still read and make quite a bit of progress.

Getting Started

First, you need an existing iOS app that uses Parse so you can follow the steps in this Parse server tutorial. Feel free to use your own demo app, or download this Parse Starter project. It’s set up to work with Swift 3, iOS 10 and includes the latest Parse SDK (at the time of writing v1.14.2).

Build and run the project in Xcode to see the following:

parse server tutorial

About Parse Server & Prerequisites

In this Parse server tutorial, you’ll install your own Parse Server that can be maintained through the Parse SDK. It’s open source, thus (almost) guaranteeing it’ll never cease to exist. It can be hosted on all major web service providers, such as Heroku, Amazon AWS or Azure.

There are, however, a few features from Parse.com that have not been implemented on Parse Server, such as jobs, analytics and config. Moreover, with Parse Server, you do all of the work of installing and hosting the service either locally or in the cloud.

Parse made all the necessary tools available to help developers set up their server: an open source application server, Push Notification guide and a Parse Dashboard for local development.

Parse further recommends that you use mLab (formerly known as MongoLab) and Heroku to host the database and server, respectively.

The minimum requirements to install Parse Server are:

  • Homebrew, latest version
  • Node 4.3
  • MongoDB version 2.6.X or newer
  • Python 2.x
  • For deployment, Heroku Toolbelt

The MongoDB requirements for Parse Server are:

  • About 10 times the space you used with Parse, because it heavily compressed your content.
  • The failIndexKeyTooLong parameter must be set to false to accommodate indexed fields larger than 1024 bytes and collections larger than 1 million documents.
  • An SSL connection — although it’s not required, it’s strongly recommended.
  • For minimal latency, host your MongoDB servers in the US-East region.

Creating a New Database

Go to the mLab website and create an account if you don’t have one already, and then watch for the confirmation email that will let you activate your new account. Once activated, under MongoDB Deployments, click the Create New button:
mlab_create_new
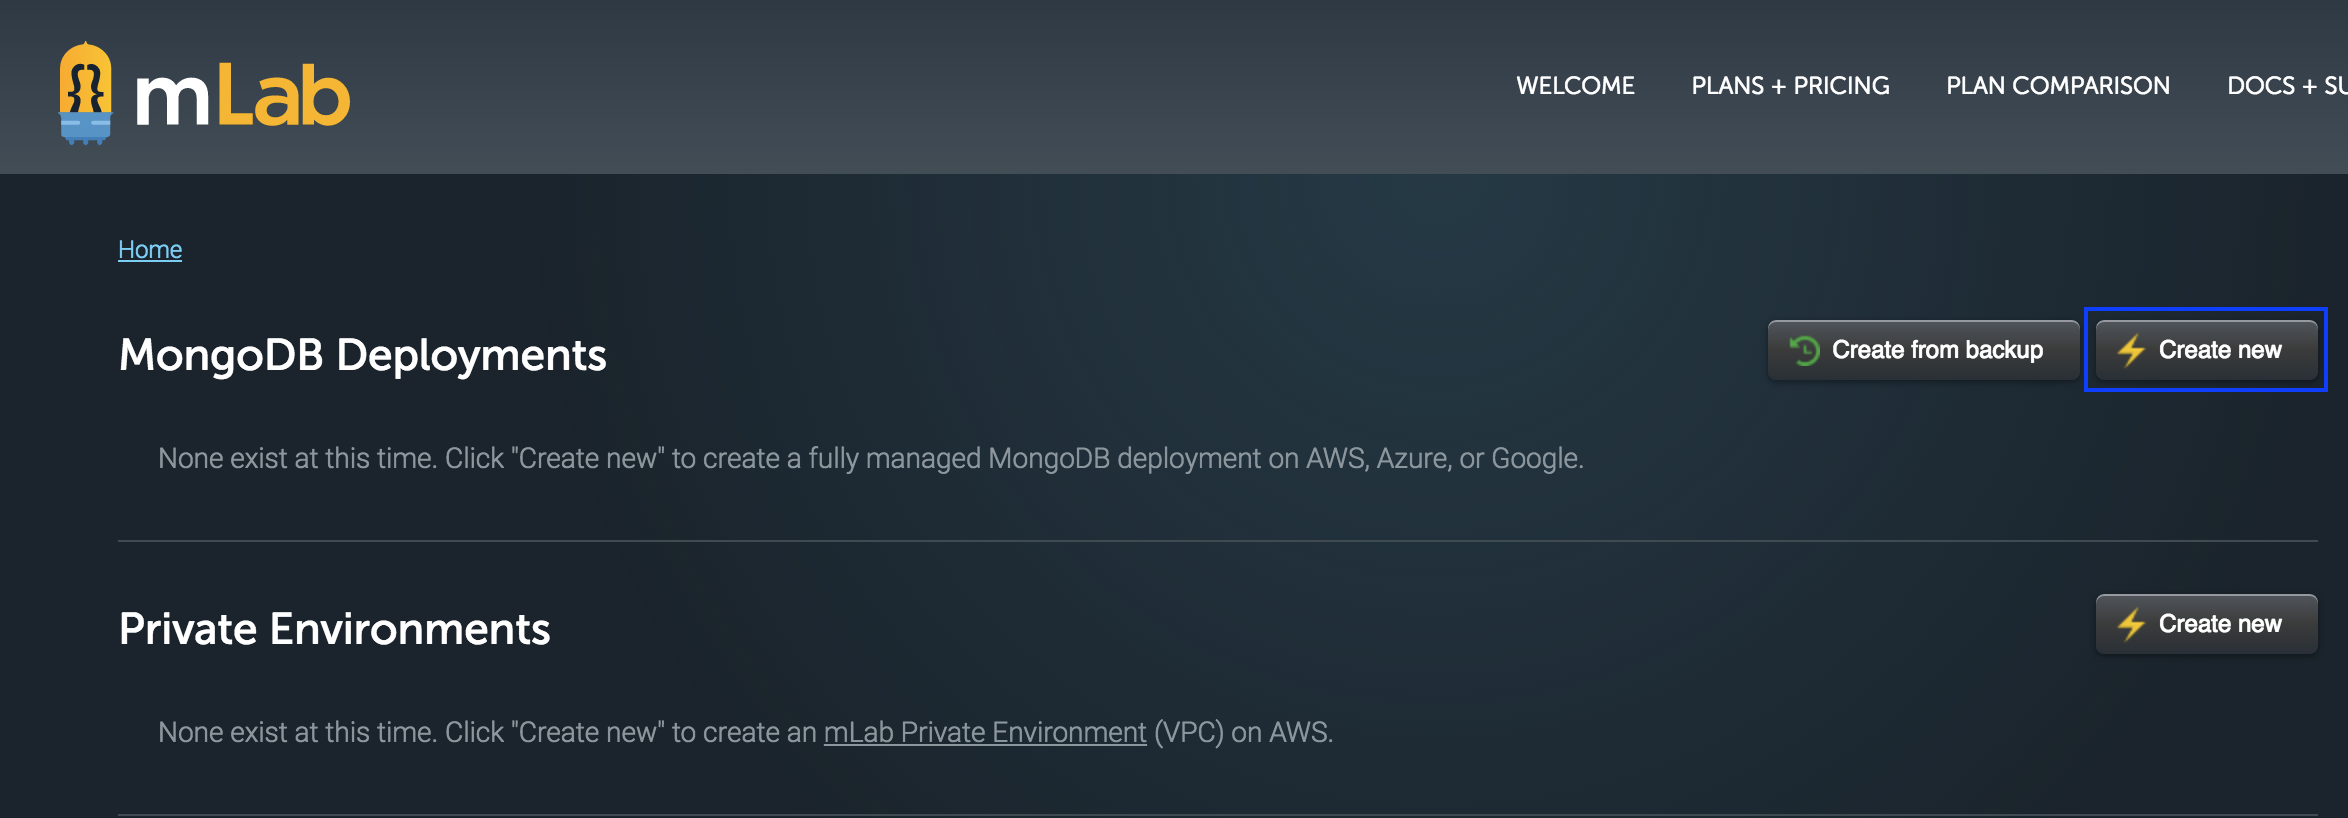
Choose Amazon AWS, US East, Single-node and Sandbox — these are the recommended free options:
mlab_sandbox

Your database name can be anything, but for now, just use tutorial-app. Click on Create new MongoDB deployment and wait for your new database to be created.

Next, select tutorial-app and go to Users / Add database user. Enter a username and password then click Create. Save your Database URI somewhere that’s easy to reference, because you’ll need it several times throughout this Parse server tutorial. It should look similar to the one below, but your database ID will be unique:

mongodb://<dbuser>:<dbpassword>@ds017678.mlab.com:17678/tutorial-app

Install the Prerequisites

Open Terminal and run through the below steps to make sure the required support is in place.

Homebrew

If you don’t have Homebrew, enter this command:

$ /usr/bin/ruby -e "$(curl -fsSL https://raw.githubusercontent.com/Homebrew/install/master/install)"

If you already have Homebrew, make sure it’s up to date by entering this command:

$ brew update

MongoDM

Next, install MongoDB — this can take a few minutes:

$ brew install mongodb --with-openssl

Create a local MongoDB database by running the following:

$ mkdir -p /data/db

Make sure that the /data/db directory has the right permissions by running the following:

$ sudo chown -R `id -un` /data/db

To allow connections to your local MongoDB daemon, run the following:

$ mongod --config /usr/local/etc/mongod.conf

Now you just need to verify that you have the required MongoDB version: v2.6.X or newer. In a new Terminal window run the following:

$ mongo
MongoDB shell version v3.4.0
connecting to: mongodb://127.0.0.1:27017
MongoDB server version: 3.4.0

Press Control + C to quit MongoDB.

Python

It’s usually installed on all major OS versions, but check if you have it first:

$ python -V
Python 2.7.10

If you get a no, install Python by running this:

$ brew install python

Node

Install the latest version of Node:

$ brew install node

Confirm that you have the required version — v4.3 or newer:

$ node --version
V7.2.0

Installing the Parse Server

To make life a little easier for developers, Parse created a local version of its server and pushed it to GitHub. Make a clone of it on your system:

$ git clone https://github.com/ParsePlatform/parse-server-example.git Parse

Change the directory to the freshly cloned Parse directory:

$ cd Parse

Install Parse Server in this directory:

$ npm install

Start Parse Server:

$ npm run start

Check if it was successful by copying and pasting http://localhost:1337 into your browser:

parse server tutorial

Well, at least it dreams of being something. Rather progressive for a server, don’t you think? :]
Quit the server by pressing Control + C.

Next, in the root folder of the Parse project, open index.js and replace the default database string with your MongoDB database URI:

// Replace this
var databaseUri = process.env.DATABASE_URI || process.env.MONGOLAB_URI;

// With this
var databaseUri = 'mongodb://<dbuser>:<dbpassword>@ds017678.mlab.com:17678/tutorial-app';

This configures Parse Server to talk to your mLab database.

You also need to specify your Application ID. This is a unique ID that identifies your app. Sounds familliar? You’re right, it’s pretty much like your app’s Bundle Identifier. Copy your app’s bundle identifier and open index.js again:

// Replace this
appId: process.env.APP_ID || 'myAppId',

// With this, the value that actually represents your Application ID
appId: process.env.APP_ID || '<myAppId>',

Now that you’ve wired it up, you need to test if the Parse Server is talking to the remote database. First, start the server again by running:

$ npm run start

Next, in a new Terminal window, run the following command. Remember to insert your Application ID from the Parse.com dashboard:

$ curl -X GET \
-H "X-Parse-Application-Id: <myAppId>" \
-H "Content-Type: application/json" \
-d '{}' \
http://localhost:1337/parse/classes/WallPost

The server shouldn’t return any results for now, but that will change once you set up and run the iOS app.

{"results":[]}

You now have a functioning Parse Server.

parse server tutorial

Configure the iOS app

At last you get to dive back into the comfortable familiarity of Swift. The starter app doesn’t have the correct configuration to use Parse SDK with Parse Server.

Pull up the app in Xcode, open AppDelegate.swift and look for the line below in application(_:didFinishLaunchingWithOptions:):

let configuration = ParseClientConfiguration {
      $0.applicationId = "APPLICATION_ID"
      $0.server = "SERVER_URL"
    }
    Parse.initialize(with: configuration)

Replace it with the block below, substituting APPLICATION_ID with your app’s bundle identifier:

let configuration = ParseClientConfiguration {
  $0.applicationId = "com.razeware.ParseTutorial"
  $0.server = "http://localhost:1337/parse"
}
Parse.initialize(with: configuration)

The ParseClientConfiguration object represents the configuration the Parse SDK should use to connect with the server. It lets you create configuration variables for various connection parameters, including your Application ID, Server URL and so on.

This configuration object is passed to initialize(with:), which then sets up the Parse SDK before connecting to the server.

Build, run and log in. Tap the Upload button and choose an image from your phone or Simulator’s stock images.

Write a short comment and tap Send. To double-check that you’re writing to the “online” database, try these two sanity checks:

  1. Go to the WallPost collection on the mLab website and look for the image you just sent.
  2. Delete the app from your phone or Simulator. Then build and run, log in and check if you can retrieve the image and comment from the Mongo database.

parse server tutorial

If it’s there, you’re ready to move the Parse Server to Heroku’s web hosting service.

Deploy the Parse Server to Heroku

In order to manage Heroku apps from Terminal, you’ll need to download and install the Heroku Toolbelt from the Heroku website. It’s a command line interface tool for creating and managing Heroku apps.

Note: Heroku is also available in Homebrew, however, it’s a standalone version of the Heroku Toolbelt that doesn’t include all the required components.

If you don’t already have a Heroku account, please visit the Heroku sign up page and do the needful.

Next, authenticate against Heroku by running the following command inside the local Parse Server directory:

$ heroku login

The Heroku platform uses git for deploying applications. When you create an application on Heroku, it associates a new git remote, typically named heroku, with the local git repository for your application. Since the Parse project was cloned from GitHub, a local git repository exists. All you need to do is initialize Heroku, and push to its remote.

From the Parse project directory, create an application on Heroku and push your source code to the Heroku server:

$ heroku create
heroku-cli: Installing core plugins... done
Creating app... done, stack is cedar-14
https://intense-chamber-52549.herokuapp.com/ | https://git.heroku.com/intense-chamber-52549.git

Notice a Heroku service was created for you (in my case it was at: https://intense-chamber-52549.herokuapp.com).

Next, commit your changes, and push the local Parse Server to the newly created Heroku service with the following command:

$ git add .
$ git commit -m "Commit with my custom config"
$ git push heroku master

Paste the URL you made with the create command into a web browser and you should see the same message as before when you tested the server locally:

I dream of being a web site.

Now you need to test if that shiny new Heroku service still responds to GET requests. Remember to replace <myAppId> with your app’s Bundle Identifier, as well as your Heroku server URL:

$ curl -X GET \
-H "X-Parse-Application-Id: <myAppId>" \
-H "Content-Type: application/json" \
-d '{}' \
https://<your URL>.herokuapp.com/parse/classes/WallPost

This is a similar curl as before when you were executing against a local server. This command goes against the remote server.

You should see the JSON version of the wall post record you created inside the iOS app:

{
  "results": [
    {
      "objectId": "a8536MK9nC",
      "image": {
        "__type": "File",
        "name": "57eb6f36cd8bcce8141dc5ccca3072c0_image.bin",
        "url": "http:\/\/afternoon-harbor-27828.herokuapp.com\/parse\/files\/" \
          "jJ5Ds5h0eXWYhv7DGWYIrfLQTn2rjB0okakvo3LH\/57eb6f36cd8bcce8141dc5cc" \
          "ca3072c0_image.bin"
      },
      "user": {
        "__type": "Pointer",
        "className": "_User",
        "objectId": "SLPlVVfsvx"
      },
      "comment": "great pic!",
      "updatedAt": "2016-03-14T17:36:20.849Z",
      "createdAt": "2016-03-14T17:36:20.849Z"
    }
  ]
}

It works! You’ve just set up your Parse app and database to the cloud, and that’s an accomplishment!

Implement Basic Push Notifications

Note: If you’re setting up push notifications on iOS for the first time and want to go through all the steps outlined below, you’ll need to head to the Push Notifications Tutorial and work through it until you’ve generated and downloaded the certificate.

When initializing Parse Server, you need to set up an additional push configuration. Inside the Parse Server directory, open the index.js file and add the following code block after the serverURL line:

push: {
  ios: [
    {
      pfx: 'cert.p12',
      bundleId: 'com.example.ParseTutorial',
      production: false
    }
  ]
},

The certificate cert.p12 is the one you exported from the Push Notifications Tutorial (it may be named WenderCastPush.p12). The bundleId should be the one you previously created in the Push Notifications Tutorial. You also need to change the Bundle Identifier for the app as well to match in Xcode.

production should be false if you’re using a development certificate, and true if you’re using a production certificate.

Additionally, add a Master Key to index.js. You can use any arbitrary string, but keep it secret!:

// Replace this
masterKey: process.env.MASTER_KEY || '',

// With the value of your app's Master Key completed:
masterKey: process.env.MASTER_KEY || '<your app's Master Key>',

Your next step is to put the certificate inside the local Parse Server directory, so it can be sent to the Heroku service. After doing that, run these commands in Terminal:

$ git add .
$ git commit -m "added certificate"
$ git push heroku master

Switch back to Xcode, open AppDelegate.swift and find the application(_:didFinishLaunchingWithOptions:) method. Replace this:

$0.server = "http://localhost:1337/parse"

With this (using your Heroku URL):

$0.server = "https://afternoon-harbor-27828.herokuapp.com/parse"

Now you’ll register your app for remote push notifications.
Go to the top of AppDelegate and add the following line:

import UserNotifications

Add the following lines to the end of application(_: didFinishLaunchingWithOptions:):

//1
let userNotificationCenter = UNUserNotificationCenter.current()
userNotificationCenter.delegate = self

//2
userNotificationCenter.requestAuthorization(options: [.alert, .badge, .sound]) { accepted, error in
  guard accepted == true else {
    print("User declined remote notifications")
    return
  }
//3
  application.registerForRemoteNotifications()
}

Here’s a step-by-step explanation of the above code:

  1. Get the UNUserNotificationCenter singleton object, and assign self as the delegate
  2. Request notification authorization for types .alert, .badge and .sound.
  3. If user grants authorization, register the application for remote notifications

Next, you need to implement UNUserNotificationCenterDelegate. Add the following to the bottom of AppDelegate.swift:

extension AppDelegate: UNUserNotificationCenterDelegate {
  
  func userNotificationCenter(_ center: UNUserNotificationCenter,
                                willPresent notification: UNNotification,
                                withCompletionHandler completionHandler:
                                @escaping (UNNotificationPresentationOptions) -> Void) {
    PFPush.handle(notification.request.content.userInfo)
    completionHandler(.alert)
  }
}

When your app receives a remote notification from the APNs, this delegate method is called. Here you pass the notification’s userInfo for the Parse SDK to handle its presentation.

Finally, you need to store the device token. Add the following below application(_:didFinishLaunchingWithOptions:):

// 1
func application(_ application: UIApplication, didRegisterForRemoteNotificationsWithDeviceToken deviceToken: Data) {
  let installation = PFInstallation.current()
  installation?.setDeviceTokenFrom(deviceToken)
  installation?.saveInBackground()
 }
// 2
func application(_ application: UIApplication, didFailToRegisterForRemoteNotificationsWithError error: Error) {
  if (error as NSError).code == 3010 {
    print("Push notifications are not supported in the iOS Simulator.")
  } else {
    print("application:didFailToRegisterForRemoteNotificationsWithError: %@", error)
  }
}

Here’s an explanation of what you just added:

  1. This method is called once the app successfully registers with the APNs (Apple Push Notification service). The device will only act on notifications that have the specified deviceToken.
  2. When the APNs can’t complete device registration due to an error, this method gets called with error information, so your app can determine why registration failed.

Before you build and run, make sure Push Notifications is turned on it the target’s Capabilities tab. If it’s off, press the toggle to turn it on. You might see the following:

capabilities

If that is the case, press Fix Issue to let Xcode handle it for you.

Build and run the app on a device because push notifications aren’t supported in iOS Simulator. To test, run this command in Terminal — remember to replace the Application ID, Master Key and server URL:

curl -X POST \
-H "X-Parse-Application-Id: <YOUR_APP_ID>" \
-H "X-Parse-Master-Key: <YOUR_MASTER_KEY>" \
-H "Content-Type: application/json" \
-d '{
  "where": {
    "deviceType": "ios"
  },
  "data": {
    "alert": "Hello, Parse!"
  }
}' https://<YOUR_SERVER_URL>.herokuapp.com/parse/push

If all went well, you should get a notification on your screen as shown below:

parse server tutorial

Bonus: Parse Dashboard

Only a few days after releasing push notifications for the Parse Server, the team at Parse also opened up the very useful dashboard. It can be used locally or in the cloud.

To install it locally, you need to clone the GitHub repository on your machine. Enter this into Terminal:

$ git clone https://github.com/ParsePlatform/parse-dashboard.git
$ cd parse-dashboard
$ npm install

In the Parse-Dashboard subfolder, edit parse-dashboard-config.json. Add your IDs, keys, URLs and names as shown below:

{
  "apps": [
    {
      "serverURL": "https://afternoon-harbor-27828.herokuapp.com/parse",
      "appId": "APPLICATION_ID",
      "masterKey": "APPLICATION_MASTER",
      "appName": "Heroku.com Tutorial App"
    },
    {
      "serverURL": "http://localhost:1337/parse",
      "appId": "APPLICATION_ID",
      "masterKey": "APPLICATION_MASTER",
      "appName": "Local Tutorial App"
    }
  ]
}

Run this command in the Parse Dashboard directory from Terminal:

$ npm run dashboard

Next, copy and paste http://localhost:4040 into your browser, and you’ll see your app in the dashboard! For your apps on Parse.com, you currently have full run of the place, including the data browser, Parse config and API console. Your cloud code and logs as there too.

For apps on the Parse Server, only the data browser and API console are available.

dashboard_parse

Where to go From Here?

You can download the finished project here. You’ll need to replace the applicationId and the server url with your own to make it all work right.

To expand on what you’ve done in this Parse server tutorial, you could:

  • Explore Parse dashboard’s full potential by setting up a full version of the Parse Server.
  • Explore the extended capabilities of using a push adapter for other push providers that use the default APN.
  • Look into and compare other Parse alternatives such as Firebase or CloudKit, but beware that these alternatives lack some features covered in this Parse server tutorial.

Now you know that even without the full services of Parse.com, using the Parse SDK along with Parse Server is a great backend solution that could easily replace developing a backend on your own.

There’s certainly a lot to talk about though, so bring your thoughts, questions and findings to the forums and let’s make some magic happen. I look forward to connecting with you!

Parse.com is dead, long live the Parse Server!