Building a Museum App with ARKit 2
Have you ever stood at a museum exhibit and wanted to know more about the art or artifact than the little placard provides? There should really be an app for that. Well, you can make such an app with image and object detection and tracking in ARKit 2! By Michael Katz.
Object Detection
Another useful ARKit function is object detection and tracking. TriassicLoupe detects known objects and annotates them. In reality, these would be dinosaurs in a diorama or dinosaur skeletons. For this tutorial, you’ll use whatever you have on hand.
Selecting Reference Objects
The first thing you need in order to detect an object is a reference object. With image detection, you can create, scan or take a picture of the image. But with a 3D object, the reference is harder to construct.
ARKit provides its own API for creating reference objects by scanning them with an iPhone. TriassicLoupe doesn’t use this directly since it only detects an already-known set of objects. You can scan them ahead of time using an Apple-provided utility.
You should download Apple’s Object Scanner project, if you can. It’s also included in the project download in the ScanningAndDetecting3DObjects folder, for your convenience. Note that the included project may be out of date by the time you read this.
This app scans objects and lets you export an .arobject file. You can then import this file as an asset into your Xcode project. Successful scanning requires having an appropriate object and good lighting. An appropriate object is:
- Solid.
- Has lots of details (like shape and color).
- Not reflective or transparent.
- Probably somewhere between the size of a softball and a chair.
You likely don’t have a 3D dinosaur display in your home, so you can use any household object for this tutorial. Good objects are a cookie jar, action figure or plant. Place the object on a flat surface with space around it under good lighting.
Creating the Reference Objects
Build and run this app to a device. For best results, use an iPhone 8, 8+ or X, which has enough processing power to maintain a good frame rate while performing the scan.
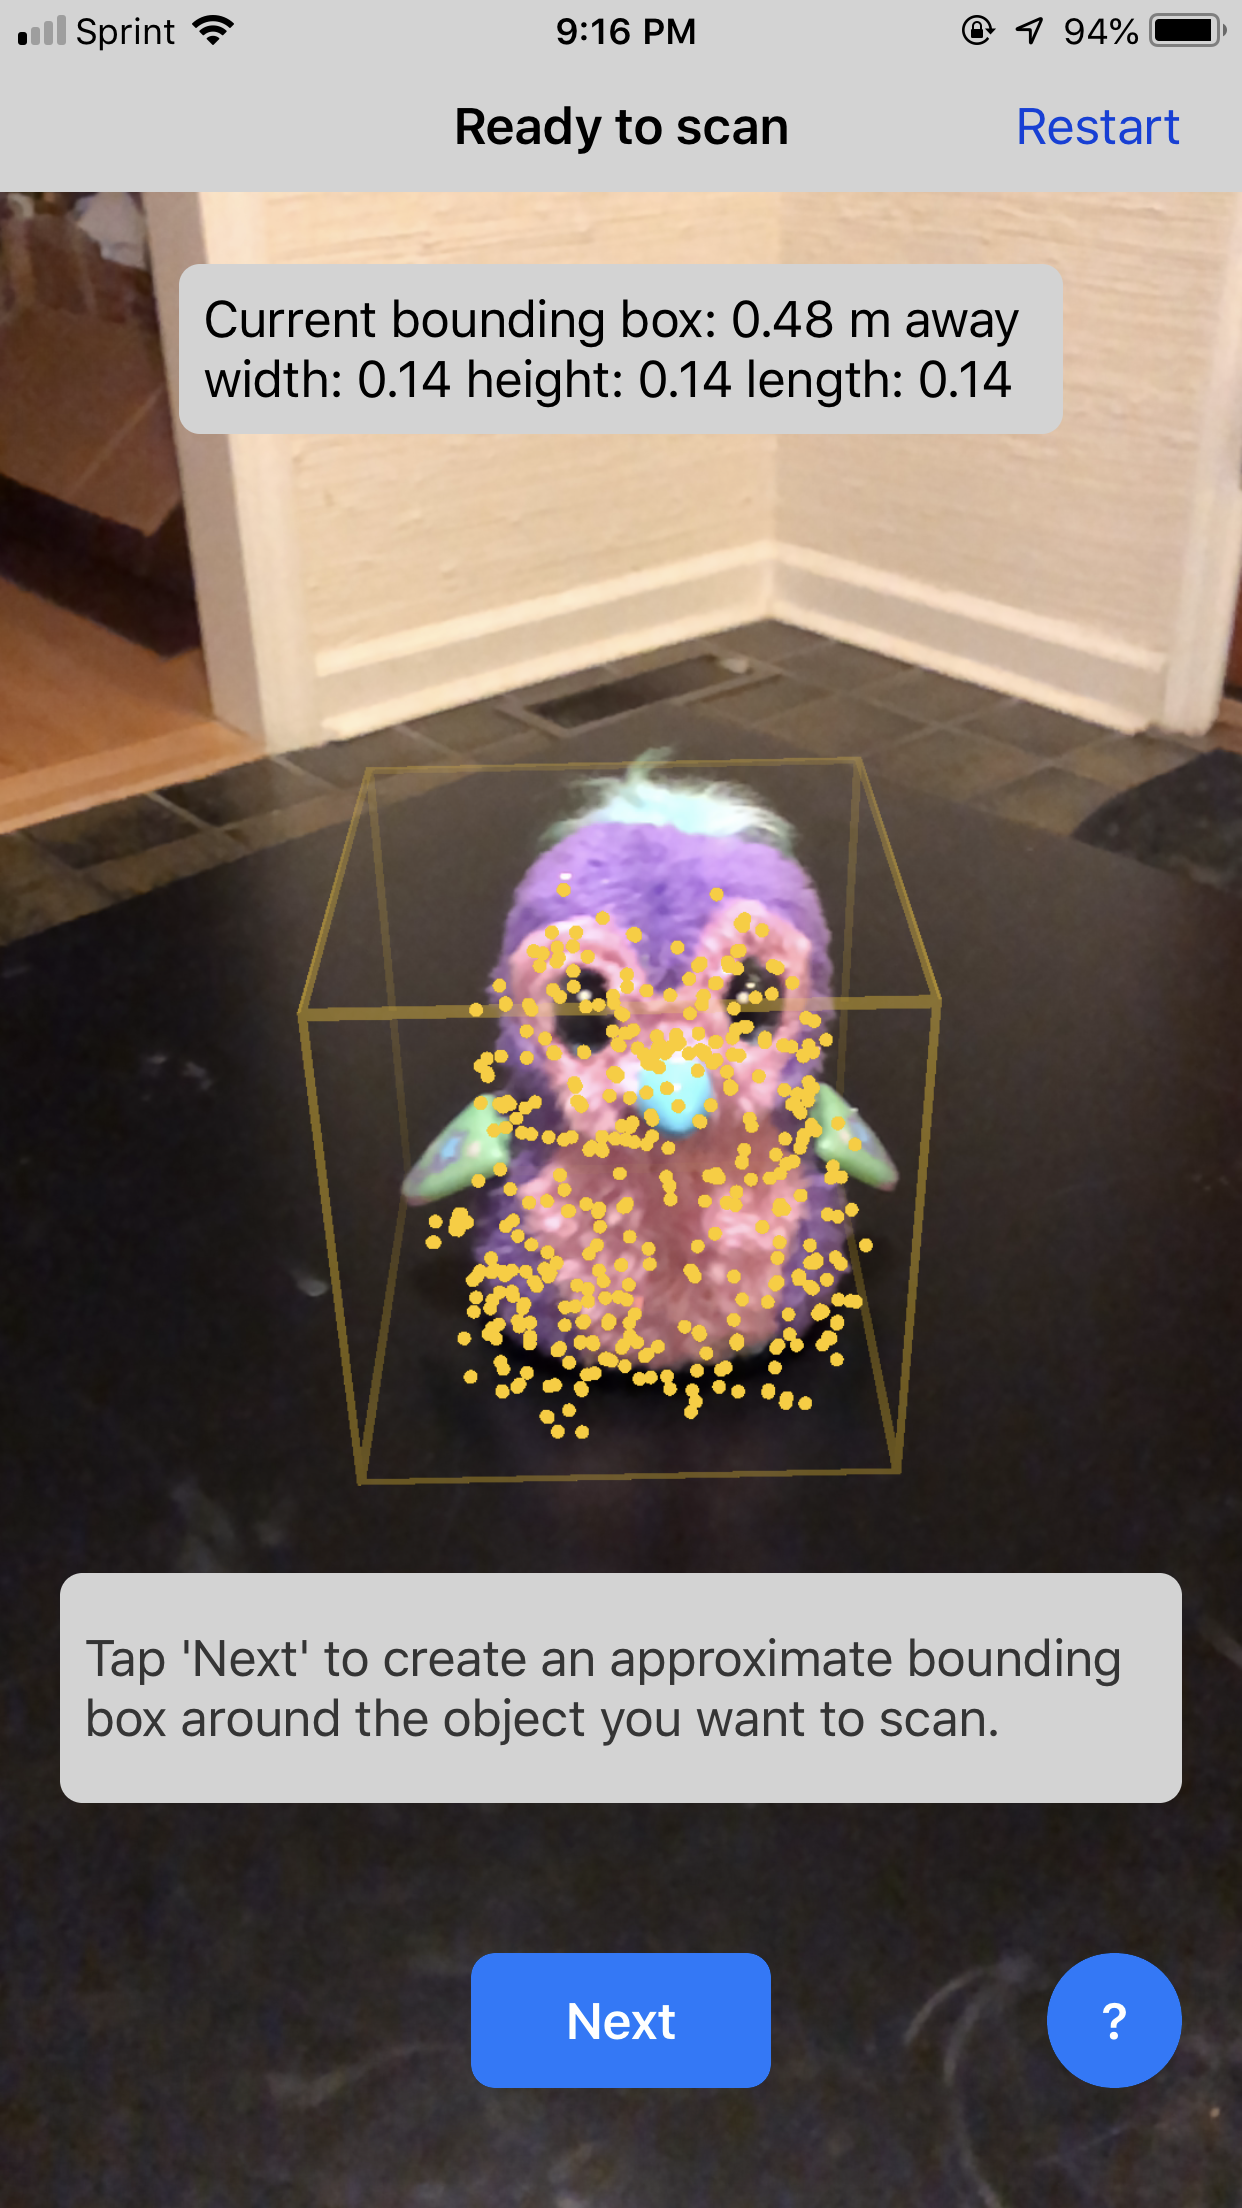
- Aim the phone’s camera at the object. A yellow box should appear around the object. Once the object is in the middle of the box, tap Next.

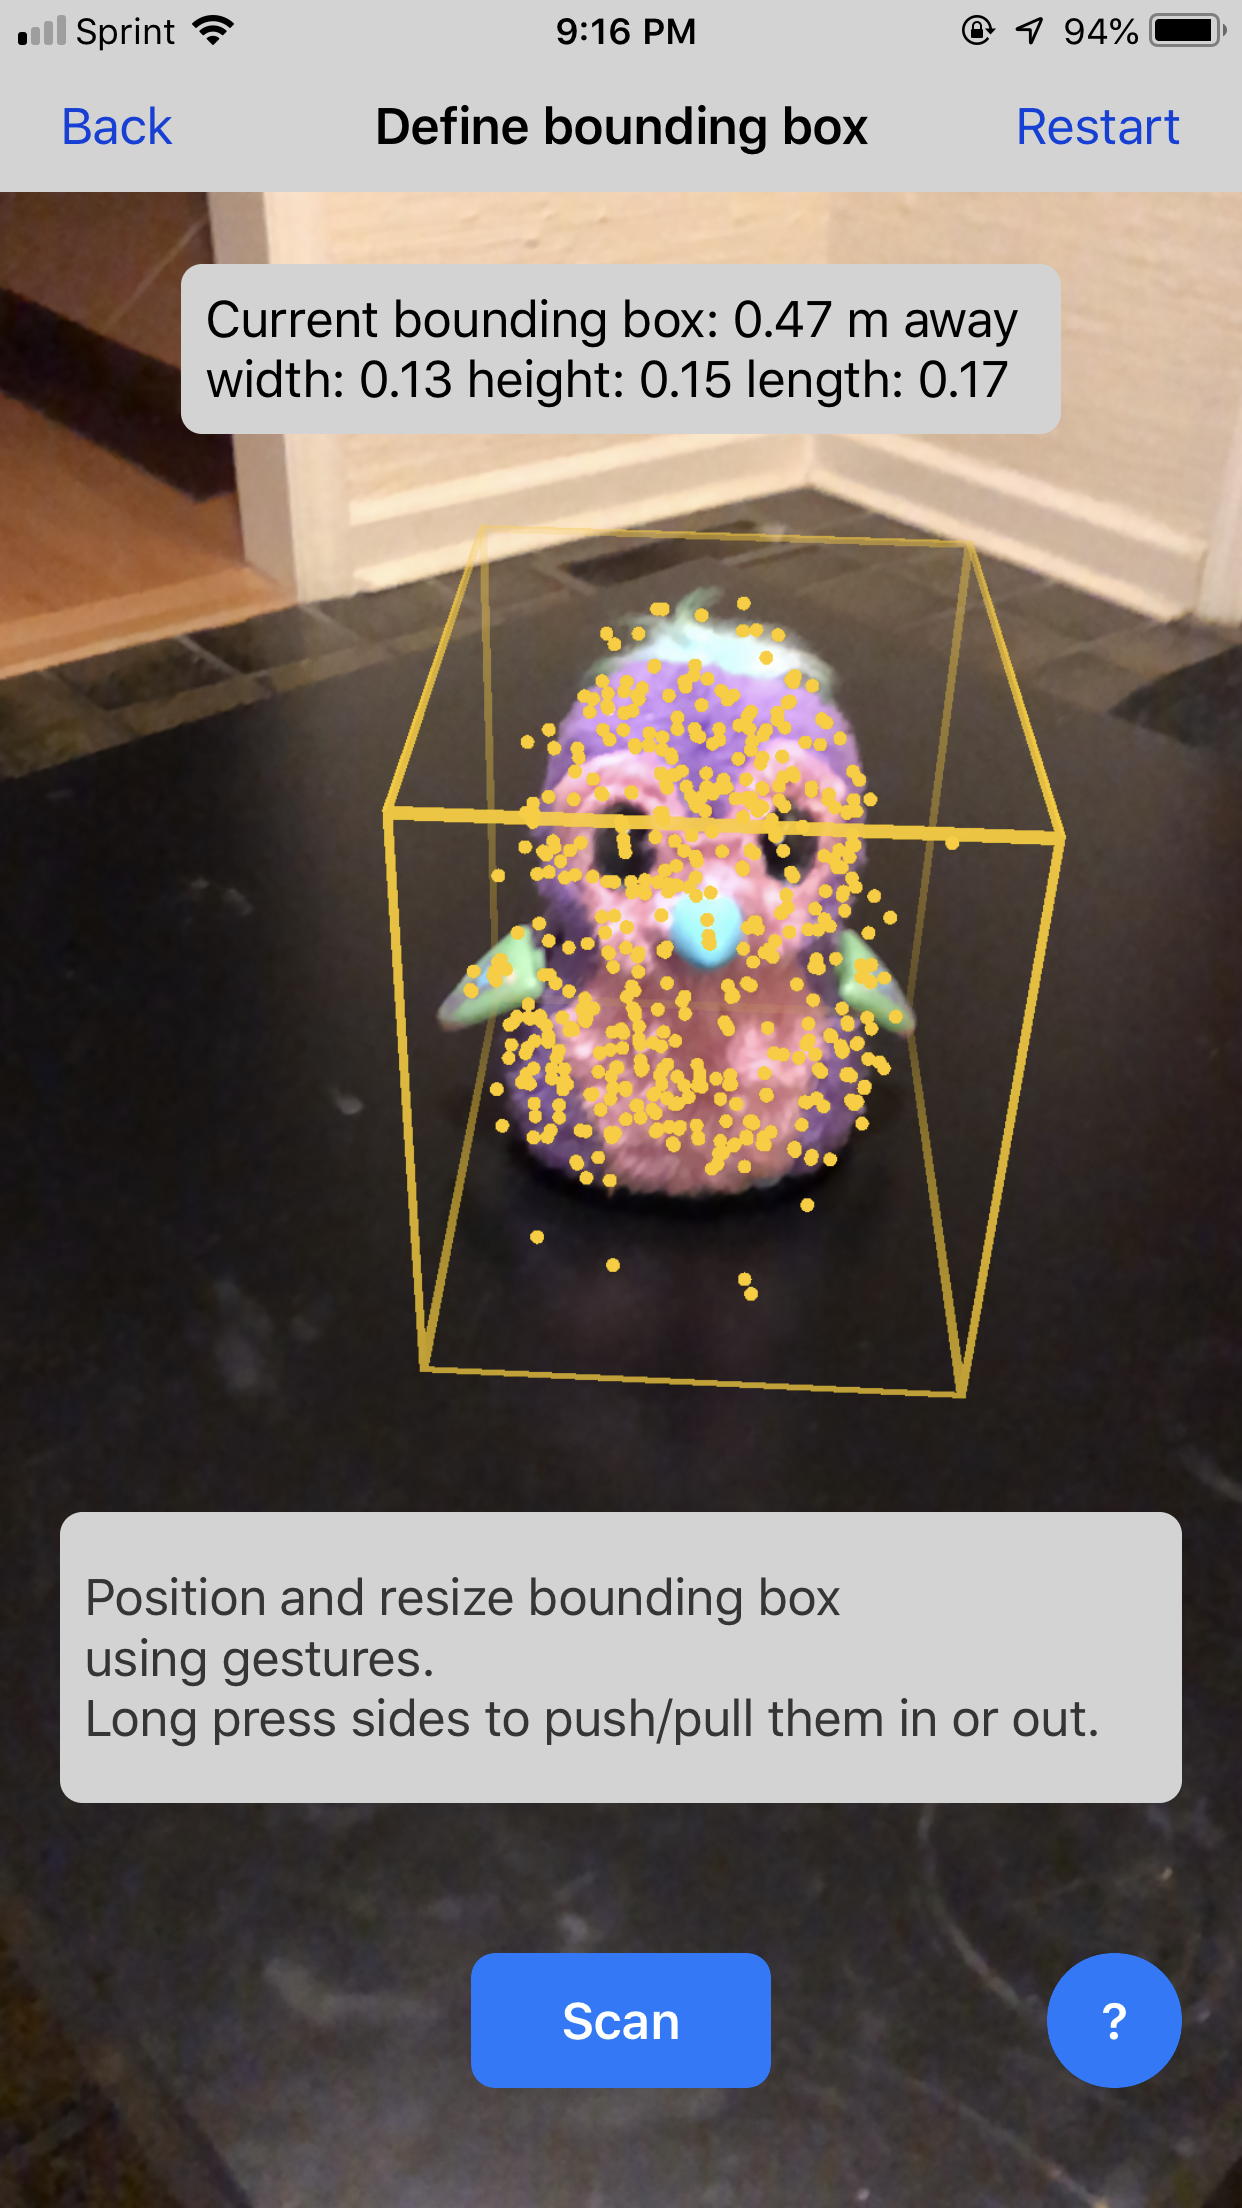
- Resize the bounding box by moving it around and long-pressing and dragging the edges. The box should contain just the object. Like the new Measure app, this scanner uses ARKit to measure the object’s real world size. Tap the Scan button once the object is in the middle.

- Walk around the object, aiming the phone at the object. Be sure to get at several angles, above and the sides, as well. The yellow box will fill in as the scan gets enough information to represent the object. Try to get as much covered as possible.

- The next step sets the anchor point. This point controls how the model’s node geometry interplays with the real world. For this tutorial, the exact position is not critical. Try to have it on the bottom plane of the object in its middle. Press Finish when you’re ready.

- Tap the Export button, and send the
.arobjectfile to yourself through AirDrop, file sharing or email.


Repeat this process for two more objects.
Importing the Reference Objects
Go back to Assets.xcassets and create a new AR Resource Group. Name it AR Objects.
Drag each of the .arobject files into this group. You’ll see a little photo preview of the object from when it was scanned. Rename the objects to match these dinosaur names: brachiosaurus, iguanodon and velociraptor.

Unlike images, you don’t have to specify the size since it was already measured by the object scanning process.
Looking for Objects
The next step is to set up a configuration to look for these objects. At the top of ViewController.swift, under the the imageConfiguration definition, add:
private var worldConfiguration: ARWorldTrackingConfiguration?
This creates a variable to store the world-tracking configuration. This configuration is necessary for object detection. Unlike image detection, there is no configuration just for objects.
Next, replace the body of setupObjectDetection() with:
worldConfiguration = ARWorldTrackingConfiguration()

guard let referenceObjects = ARReferenceObject.referenceObjects(
  inGroupNamed: "AR Objects", bundle: nil) else {
  fatalError("Missing expected asset catalog resources.")
}

worldConfiguration?.detectionObjects = referenceObjects
This creates an instance of ARWorldTrackingConfiguration. This configuration is the fullest-featured ARKit configuration. It can detect horizontal and vertical planes as well as objects. It uses the rear-facing camera along with all the motion sensors to compute a virtual representation of the real world.
After creating the configuration, you load the reference objects from the asset catalog and set the references as the detectionObjects for the configuration. Once detected, you’ll get the appropriate callbacks when ARKit adds their anchors to the scene.
In viewDidLoad change the last line to:
setupObjectDetection()
You just replaced the setup of image detection with the call to set up object detection.
To start the session with this new configuration, replace the contents of viewWillAppear(_:) with:
super.viewWillAppear(animated)
if let configuration = worldConfiguration {
  sceneView.debugOptions = .showFeaturePoints
  sceneView.session.run(configuration)
}
This starts the session with the new worldConfiguration.
You also activate the optional ARSCNDebugOptions.showFeaturePoints debug option. This places yellow dots on the screen for the feature points ARKit detects. This helps debugging when you get to running the app again. The more dots that show up on the object, the easier the detection will be.
Finding the Objects
As with image detection, when ARKit detects an object, it adds an anchor to the world map and a node to the scene.
Modify renderer(_:didAdd:for:) by replacing its contents with:
DispatchQueue.main.async { self.instructionLabel.isHidden = true }
if let imageAnchor = anchor as? ARImageAnchor {
  handleFoundImage(imageAnchor, node)
} else if let objectAnchor = anchor as? ARObjectAnchor {
  handleFoundObject(objectAnchor, node)
}
This keeps the previous handling of the image anchor but adds a check to see if the new anchor is an object anchor. If it’s an object anchor, that means an object was detected! You then hand off the node and anchor to the helper method.
Speaking of which, replace the contents of handleFoundObject(_:_:) with:
// 1
let name = objectAnchor.referenceObject.name!
print("You found a \(name) object")

// 2
if let facts = DinosaurFact.facts(for: name) {
  // 3
  let titleNode = createTitleNode(info: facts)
  node.addChildNode(titleNode)

  // 4
  let bullets = facts.facts.map { "• " + $0 }.joined(separator: "\n")

  // 5
  let factsNode = createInfoNode(facts: bullets)
  node.addChildNode(factsNode)
}
This code gathers information about the found object. The user can get extra information about the dinosaur represented by the object with the added text nodes. Taking a look at the code:
- The
referenceObject‘s name is set in the asset catalog and matches that dinosaur’s name. -
DinosaurFactis a helper type that describes each of the known dinosaurs. It has a handy list of coolfacts. - This helper function creates a text node with the dinosaur’s name and adds it to the scene. This text will look as if it’s floating above the object.
- This little string math prepends a bullet to each fact, combining them into a single, line-separated string.
SCNTextnodes can have multiple lines but require a singleStringinput. - This helper creates the text node, which will appear next to the object and adds it to the scene.