Swift Algorithm Club: Swift Depth First Search
Learn how to implement the depth-first search algorithm in Swift, in this step by step tutorial with downloadable sample code. By Vincent Ngo.
The Swift Algorithm Club is an open source project, where we as a community implement popular data structures and algorithms in Swift.
Every month, the Swift Algorithm Club team will feature a data structure or algorithm from the club in a tutorial format. If you want to learn more about algorithms and data structures, follow along with us!
In this tutorial you’ll walk through a popular search and pathfinding algorithm: depth-first search.
This tutorial assumes you have read our Swift Graphs with Adjacency Lists and Swift Stack Data Structure or have the equivalent knowledge.
If you have been following along with our tutorial series, be sure to check out our breadth first search tutorial; another Swift pathfinding algorithm.
Getting Started
Have ever you seen the movie “Honey, I Shrunk the Kids“?
Imagine yourself being shrunk down to the size of an ant. You fall into an ant nest, and have to find your way out. What strategy are you going to use?
One great algorithm for solving maze problems like this is the Depth-first search algorithm, first developed by Charles Pierre Trémaux.
In this algorithm, you explore a branch as far as possible until you reach the end of the branch. At that point, you backtrack (go back a step), and explore the next available branch, until you find a way out.
In this tutorial you will explore how the depth-first search algorithm works in Swift, and how it differs from Breadth-first search.
There are many use cases for depth-first search such as:
- Topological sorting
- Detecting a cycle
- Pathfinding
- Finding connected components in a sparse graph
- And many more!
Today you will gain an understanding of depth-first search in Swift through pathfinding.
Traversing Breadth-First Search vs Depth-First Search
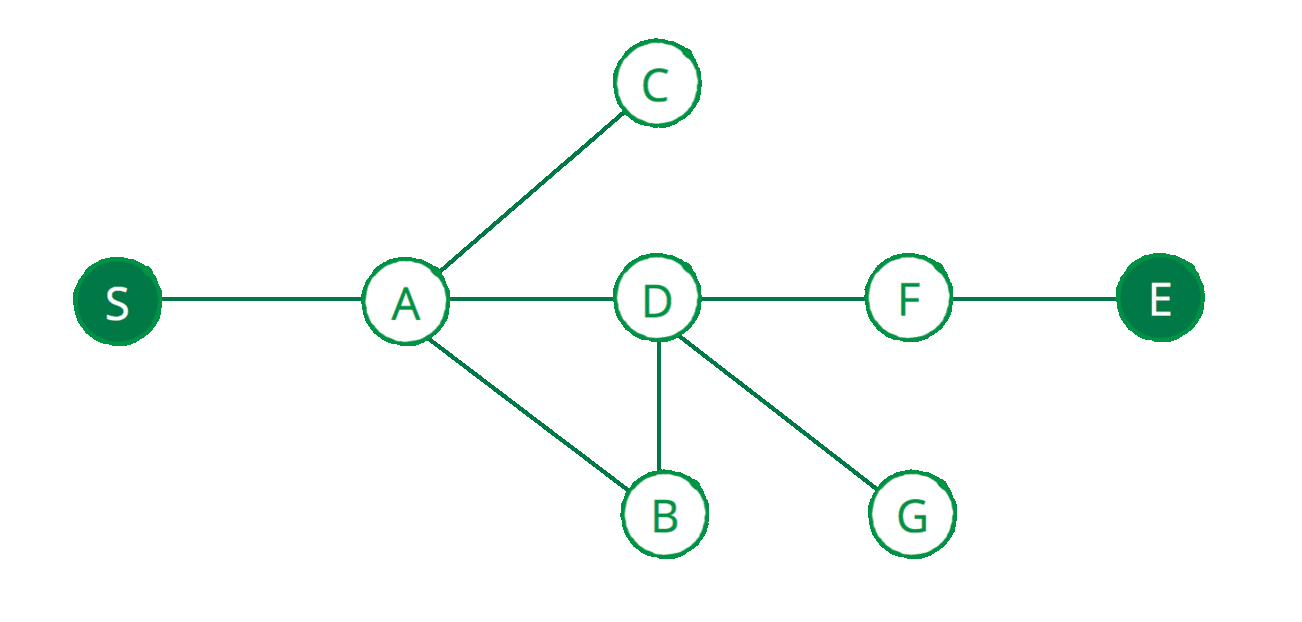
Imagine the graph below represents a maze, where S is the start location, and E is the end of the maze. Below shows a breadth-first search traversal of the maze.
On each vertex of the graph, breadth-first search visits every vertex’s immediate neighbors before going to the next. Hence the “breadth” of the traversal.
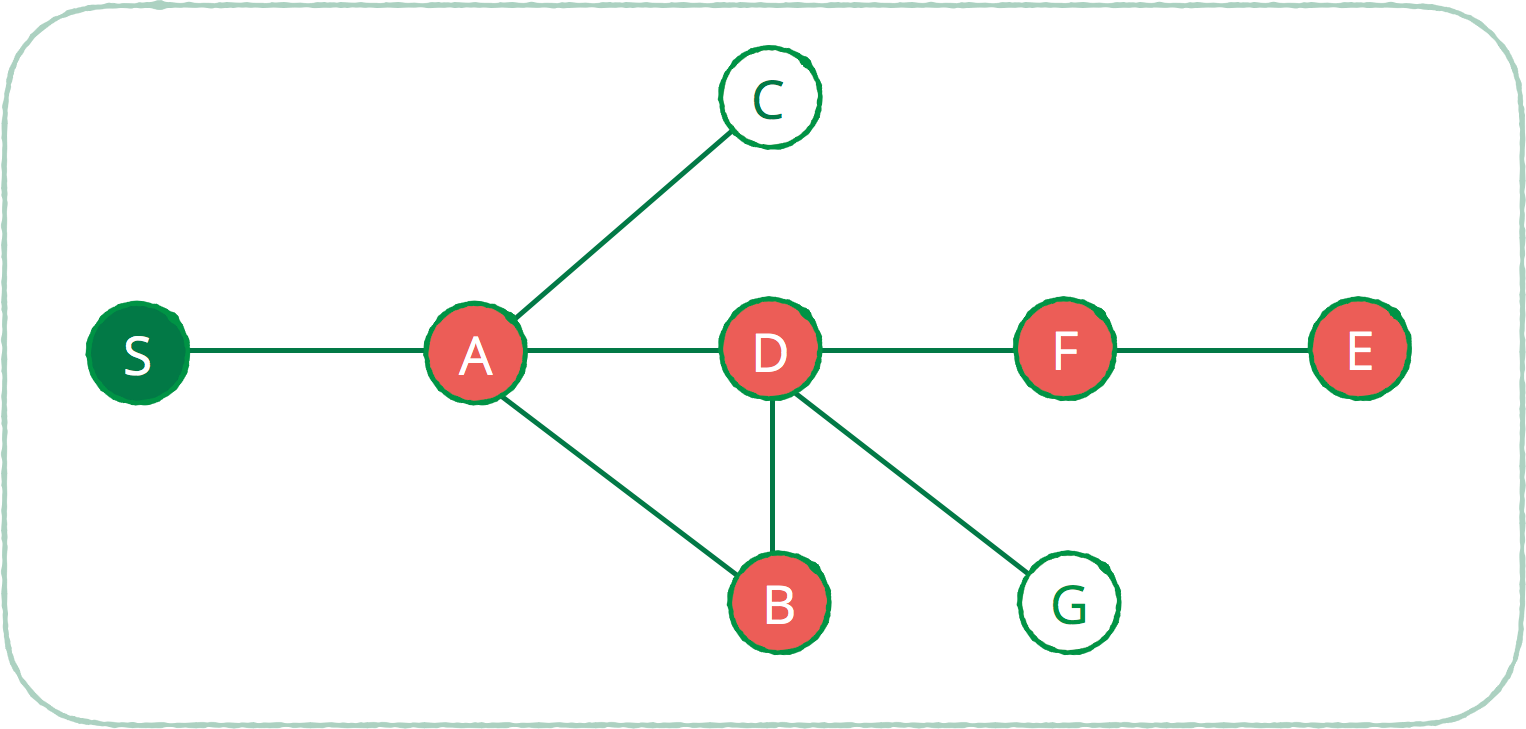
Next shows how depth-first search traverses the maze.

Assuming that the algorithm will always traverse the left side first before the right. Depth-first search will start exploring all the vertices on the left-most branch. If the end of the maze is not found, the algorithm will backtrack to the previous vertex, till it finds another path to explore.
For example once node D reaches node G, node G has no other neighbor, hence the backtrack to node D’s next available neighbor node F. Hence the “depth” of the traversal.
Implementing Depth-First Search
Let’s see what the depth-first search algorithm looks like in Swift.
Start by downloading the starter playground for this tutorial, which has the data structures for a Swift adjacency list and Swift stack included in the Sources group.
Included in the playgrounds is a sample graph used to test the implementation. If you don’t see the diagram, go to Editor > Show Raw Markup to enable it.
Question to Solve
Given a directed or undirected graph, use depth-first search to find a path between two vertices.
Example
Given the following graph, find a path from S to E:
The path should be S-A-B-D-F-E
Let’s start the implementation:
Open up the DepthFirstSearch playgrounds, and add the following:
func depthFirstSearch(from start: Vertex<String>, to end: Vertex<String>, graph: AdjacencyList<String>) -> Stack<Vertex<String>> { // 1
  var visited = Set<Vertex<String>>() // 2
  var stack = Stack<Vertex<String>>() // 3

  // TODO: More code here...

  return stack // 4
}
Let’s review the snippet above:
- Defines a function called
depthFirstSearch, where it takes a start vertex, an end vertex, and the graph you will traverse. - Creates a set to store all the vertices that have been visited. This is so we prevent infinite loops.
- Creates a stack to store a potential path from the start to end vertex.
- Once the depth-first search completes, the stack will contain the path.
After the TODO, add the following:
stack.push(start)
visited.insert(start)
This initiates the depth-first search by pushing the start node, and marking the start node as visited. Next, add the following code right after:
outer: while let vertex = stack.peek(), vertex != end { // 1

  guard let neighbors = graph.edges(from: vertex), neighbors.count > 0 else { // 2
    print("backtrack from \(vertex)")
    stack.pop()
    continue
  }

  for edge in neighbors { // 3
    if !visited.contains(edge.destination) {
      visited.insert(edge.destination)
      stack.push(edge.destination)
      print(stack.description)
      continue outer
    }
  }

  print("backtrack from \(vertex)") // 4
  stack.pop()
}
Let’s review section by section:
1. The outer loop.
outer: while let vertex = stack.peek(), vertex != end { }
The goal is to find a path from the start vertex to the end vertex. So while the stack is not empty, the path has not been found. So begin peeking into the stack’s top vertex, and as long as the vertex is not at the end, check the following:
2. Any neighbors?
guard let neighbors = graph.edges(from: vertex), neighbors.count > 0 else {
  print("backtrack from \(vertex)")
  stack.pop()
  continue
}
Check to see if the current vertex has any neighbors. If there are none, that means you reached a dead-end. So backtrack by popping the current vertex off the stack.
3. Yes, I have neighbors!
If the vertex has any edges, you are going to loop through each edge.
for edge in neighbors {
  if !visited.contains(edge.destination) { // 1
    visited.insert(edge.destination) // 2
    stack.push(edge.destination) // 3
    print(stack.description) // 4
    continue outer // 5
  }
}
Checking the following:
- As long as the neighboring vertex has not been visited.
- Mark the vertex as visited.
- Push the vertex on the stack. This means that this vertex is a potential candidate for the final path.
- Print the current path.
- Continue to the
outerwhile loop to branch off the vertex you just pushed. Restarting the whole process from before.
This is depth-first search in action, continuing from the left-most branch.