Dagger 2 Tutorial For Android: Advanced
In this tutorial, you’ll learn about the advanced concepts of Dagger. You’ll learn about component lifecycles, @Binds, and component builders and factories. By Massimo Carli.
Dagger is arguably the most used Dependency Injection, or DI, framework for Android. Many Android projects use Dagger to simplify building and providing dependencies across the app. It gives you the ability to create specific scopes, modules, and components, where each forms a piece of a puzzle: The dependency graph.
Unfortunately, Dagger can’t solve every problem, and it’s not easy to learn. It has many features you can use in many ways depending on the use case.
The trick here is to think of Dagger not as a DI framework but as a code generator tool that needs to know how to create instances of certain classes. Then you, as a developer, tell Dagger how to build and connect them.
As you may know, Dagger revolves around the use of annotations, which help it read and generate all the code it needs to work. All the different annotations are simply a way of telling Dagger what it doesn’t know to achieve its goal and create the code you otherwise would have to write yourself.
In this tutorial, you’ll learn:
- How to use
@Singletonand what it really means. - The concept of the lifecycle of a
@Component. - When and how to use
@Binds. - When to use
@Component.Builderand@Component.Factory.
Getting Started
Download and unzip the materials by clicking the Download Materials button at the top or bottom of this tutorial. Open the project using Android Studio 3.5 or greater and then run it. You should see something like this:
RwNews App
RwNews App
As you can see, it’s a basic app that displays a list of news items, allows the user to select one and displays its content. However, in this context, the app’s functionality isn’t as important as the internal works! This is why when building and running the app, you may not see visual changes, but the internal structure and performance will indeed be different! :]
Taking a Closer Look
If you look at the project structure in Android Studio, you’ll notice a classic MVP architectural pattern implementation with the definitions as in the following UML class diagram:
RwNews Architecture

RwNews Architecture
The diagram only displays the classes that are useful in terms of dependencies. It’s important to understand what kind of dependencies Dagger can manage. In the following diagram, you’ll see which dependencies you’ll provide through Dagger:
Main Dependencies
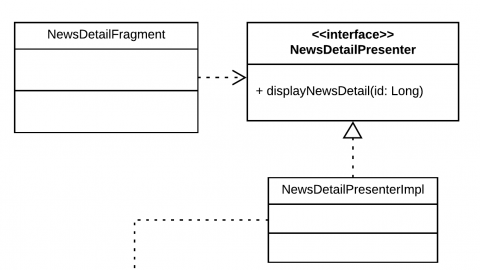
Main Dependencies
The dotted line with the open arrow represents the dependency between two definitions. The previous diagram shows that NewsDetailFragment depends on the NewsDetailPresenter. You can also say that NewsDetailFragment uses the NewsDetailPresenter.
Interface inheritance is a special type of dependency. It describes the relation between a class and one of the interfaces it implements.
In the previous diagram, you can see that the NewsDetailPresenterImpl is an implementation, or realization, of the NewsDetailPresenter. Futhermore, the same type of a relation occurs between the NewsListPresenterImpl and the NewsListPresenter.
Using interfaces can help you achieve abstraction since you can depend on the interface, rather than the concrete implementation. This allows you to change the implementation completely, while the external API stays the same.
You can also see that the NewsListFragment and NewsDetailFragment don’t depend directly on the NewsRepository but through a specific presenter implementation. With that in mind, the MemoryNewsRepository is the only concrete implementation of NewsRepository, so you’ll use it in both of the presenter implementations: NewsListPresenterImpl and NewsDetailPresenterImpl.
Finally, you can see that the full app depends on the common module containing some general-purpose classes and interfaces.
How Can Dagger Help?
This is a small project, but even now, organizing dependencies in a performant way might be difficult. At this point, it’s important to repeat what Dagger is: A tool for generating code to manage dependencies between different objects. To do this it needs to:
- Understand the dependency graph.
- Create instances of the dependencies and the end objects to inject.
- Execute the injection.
Understanding the Dependency Graph
The first step of setting up the Dependency Graph is to read out the structure of all the classes and dependencies you need to provide and use. Dagger does this first step using reflection during the build phase of the project. For instance, look at the signature of the constructor of the NewsDetailPresenterImpl:
class NewsDetailPresenterImpl(
  private val newsRepository: NewsRepository // HERE
) : BasePresenter<NewsModel, NewsDetailView>(),
  NewsDetailPresenter {
  - - -
}
You can see that the NewsDetailPresenterImpl needs a reference to an object of type NewsRepository. This means that to create an instance of NewsDetailPresenterImpl, you need an object of type NewsRepository: The former type depends on the latter. You’ll repeat the process for all classes and tell Dagger how to create a graph of dependencies.
What Object To Inject
To create an instance of the NewsDetailPresenterImpl class, Dagger needs to know how to create an object of the NewsRepository type. But it requires more information from you because this is an interface and you can’t simply instantiate it and use it. To accomplish the second task, you need to provide a @Module whose responsibility is to give Dagger the information about the specific class to instantiate for a specific type:
@Module
class AppModule {

  // 1
  @Provides
  fun provideNewsListPresenter(repo: NewsRepository): NewsListPresenter =
    NewsListPresenterImpl(repo)

  // 2
  @Provides
  fun provideNewsDetailPresenter(repo: NewsRepository): NewsDetailPresenter =
    NewsDetailPresenterImpl(repo)

  // 3
  @Provides
  fun provideRepository(): NewsRepository = MemoryNewsRepository()
}
With the previous code, you tell Dagger that:
- It should use a
NewsListPresenterImplwhen injecting aNewsListPresenterinstance. - The implementation for the
NewsDetailPresenteris aNewsDetailPresenterImplinstance. - You want to use a
MemoryNewsRepositoryas an implementation of theNewsRepository.
You’re actually doing more: You’re creating the instances of the required classes as return values of methods annotated with @Provides. What Dagger does for you is managing the parameter of type NewsRepository passing the appropriate reference in the component graph creation phase.