Universal Links: Make the Connection
Learn how to connect your iOS app with your website using Universal Links, so users can tap a link and go directly to the corresponding content in your app! By Owen L Brown.
Do you have a web site that shares content with an iOS app? Since iOS 9, you can connect them using universal links, meaning that users can now touch an HTTP link on an iPhone and be sent directly to your app!
In this tutorial, you’ll learn how to link an iOS app to a Heroku-hosted web site. Both the app and web site provide reference material for single board computers, so hardware-hobbyist freaks, rejoice! You’re in for a treat. :]
This tutorial assumes you have a basic understanding of iOS and Swift development. If you’re new to these, go through some of our other iOS and Swift tutorials first. Previous experience with Heroku and web development would be beneficial, but it isn’t strictly required.
Lastly, you must have a paid Apple developer account. A free account won’t work, unfortunately.
Because of these requirements, you won’t be able to fully try out universal links without having a real web site accessible via HTTPS and a real app on the App Store, but you can still gain experience with universal links by going through the process of setting everything up.
Because of these requirements, you won’t be able to fully try out universal links without having a real web site accessible via HTTPS and a real app on the App Store, but you can still gain experience with universal links by going through the process of setting everything up.
Getting Started
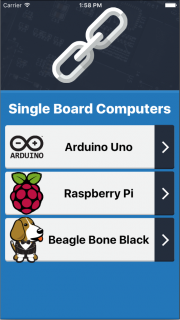
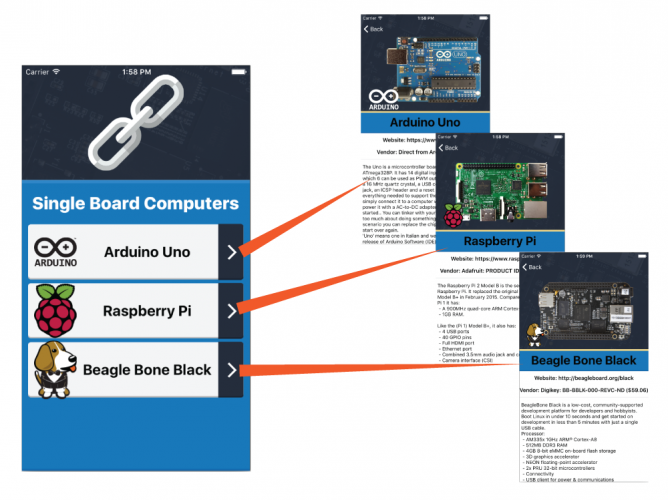
Start by downloading the materials you need using the Download Materials button at the top or bottom of this tutorial. Open the starter project, then build and run. You’ll see the app’s main view controller, ComputersController.
Main View
Main View
The app shows a few of the most popular single board computers on the market. Touch one of the rows to segue to the details view controller, ComputerDetailController. Here, you can see product-specific information, including the web site, vendor and pricing.
Navigating the Views
Navigating the Views
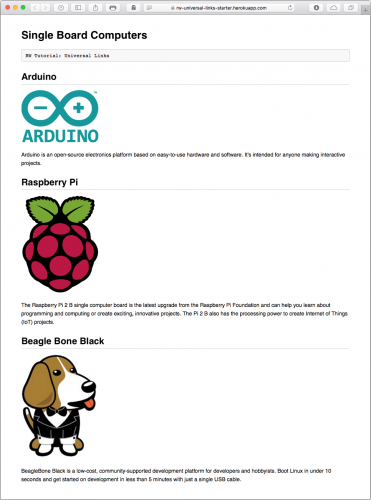
I’ve also created a basic web site with similar information. Check out the starter web site here.
Single Board Computers web site
Single Board Computers web site
Don’t fret the Heroku part: It’s just a quick way for you to access the demo web site for the tutorial. Though not required by this tutorial, you may optionally deploy the web site to your own Heroku account. If you want to do so, follow the instructions here.
Now that you’ve seen both the app and the web site, it’s time to dive into the code to connect them. The end goal: Whenever a user taps any of your web site links on an iOS device — such as https://rw-universal-links-starter.herokuapp.com/arduino.html — it will open in the app instead of Safari. As a final bit of polish, the app will even navigate directly to the specific computer detail controller.
To accomplish this, you need to do three things:
- Inform the app of the web site.
- Inform the web site of the app.
- Handle navigation within the app whenever the user taps a link.
There are a couple requirements for creating universal links. First, you must have “write access” to the linked web site, which must use HTTPS, and you must be able to upload a file to it. Second, you must own the associated app so that you can edit its provisioning profile “capabilities” to register the web site and be able to deploy it to the App Store.
For these reasons, you won’t be able to test the tutorial app. However, you’ll still go through the process to learn how it’s done.
Configuring the App
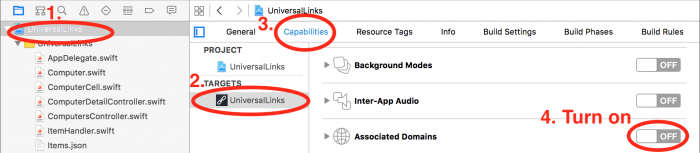
You first need to configure the app to handle universal links. Open the UniversalLinks.xcodeproj from the Starter folder and do the following:
- Select the UniversalLinks project.
- Select the UniversalLinks target.
- Select the Capabilities tab.
- Scroll to and turn ON Associated Domains.
Turn On Capabilities
Turn On Capabilities
You may get a prompt to Select a Development Team to Use for Provisioning. Select any paid Apple developer team that you’re on and press Select to continue.
If you see a prompt to Add an Apple ID Account, it means that you’re not currently signed in to any accounts. In this case, press the Add button and sign into a paid Apple developer team of which you’re a member.
It’s important that this be a paid account. If you use a free account, Xcode may consistently crash; this appears to be an Xcode bug.
You may also see an error message, in the Signing section of the general tab, saying “The app ID ‘com.razeware.UniversalLinks’ cannot be registered to your development team. Change your bundle identifier to a unique string to try again.” This is because the app identifier is already taken by the original tutorial app.
In your own app, make sure your app identifier is unique (following reverse domain name notation). For this tutorial app, however, it’s OK to simply ignore this message.
Next, press + and add the following domain: applinks:rw-universal-links-final.herokuapp.com. If you followed the instructions to launch your own Heroku app, then replace the string after the colon with the full domain name of your Heroku app.
Be sure to add the applinks prefix. You should now see the following:
Associated Domains
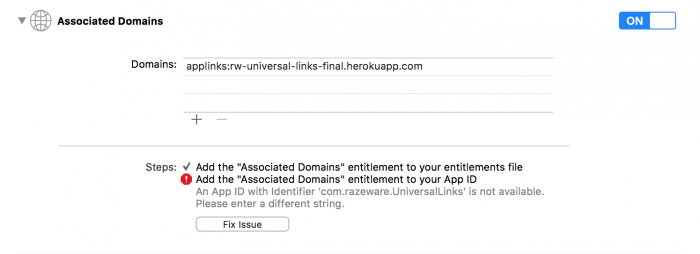
Associated Domains
The first step is complete! The app is now aware of the web site’s URL. Next, you’ll configure the web site.
Configuring the Web site
Now, you need to let the web site in on the “big secret.” To do this, create an apple-app-site-association file. This file isn’t new to the iOS world: It’s the same file used in iOS 8 for web credentials and Handoff. The format matches that of a JSON file, but it CANNOT have the .json extension. Don’t use any filename extension and, to preserve your debugging sanity, double-check that the file name matches exactly!

Create a new file called apple-app-site-association wherever you like, as long as its outside your app’s directory (e.g. your desktop works well), and add the following content:
{
  "applinks": {
    "apps": [],
    "details": [
    {
      "appID": "KFCNEC27GU.com.razeware.UniveralLinksTutorial",
      "paths": ["*"]
    }
    ]
  }
}
The applinks tag determines which apps are associated with the web site. Leave the apps value as an empty array. Inside the details tag is an array of dictionaries for linking appIDs and URL paths. For simplicity, you use the * wildcard character to associate all of this web site’s links with the UniversalLinks app. You can limit the paths value to specific folders or file names.
The appID consists of your team ID combined with the app’s bundle ID. The team ID listed above belongs to the Ray Wenderlich team, but you’ll need to use the identifier for your own account.
Apple assigned you a team ID when you created your Apple developer account. You can find it in the Apple developer center. Log into the web site, click on Membership, then look for Team ID in the Membership Information section.
Developer Account Summary
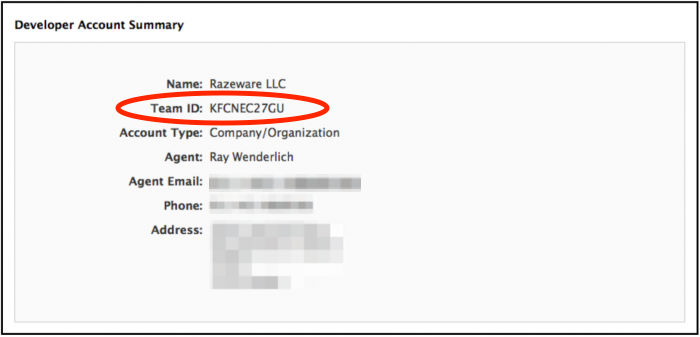
Developer Account Summary
You can find the app’s bundle ID via Xcode’s Targets ▸ UniversalLinks ▸ General tab:

Now that the apple-app-site-association is complete, it’s time to upload it to the web server.
Again, you must have “write access” to the web site to do this. For the sake of the tutorial, you can refer to the finished web site, which already contains this file.
If you want to ensure it is there, open http://rw-universal-links-final.herokuapp.com/apple-app-site-association. You’ll see that it matches the information shown above.
Great! The app knows about the web site, and the web site knows about the UniversalLinks app. It’s time for the final step: adding app logic to handle when a user taps a universal link.