State Pattern Using Unity
Learn all about the Finite State Machine design pattern in Unity. Then implement it to control the movement of your own character! By Najmm Shora.
While programming your in-game entities, there are cases where they need to behave differently under different conditions, which suggests an idea of a state.
But if you choose to employ a brute-force method, the code will quickly become an untangled mess with a lot of if-else conditions, nested and otherwise.
To solve this problem elegantly, you can utilize the State design pattern and that’s what this tutorial is all about!
In this tutorial, you’ll learn:
- The fundamentals of the State Pattern in Unity.
- What a finite state machine is and how to use it.
- How to implement these ideas to control a character’s movement.
Getting Started
Download the project materials by clicking the Download Materials button at the top or bottom of this tutorial. Extract the zip file and open the starter project in Unity.
The project includes several folders to help you get started. Within Assets/RW you’ll find: Animations, Materials, Models, Prefabs, Resources, Scenes, Scripts, and Sounds, each named according to the kind of assets they contain.
You’ll only work with Scenes and Scripts to complete this tutorial.
Go to RW/Scenes and open Main. In the Game view, you’ll see a hooded character in a medieval castle grounds.

Click Play and notice the Camera moves to bring the animated Character in frame. Right now, there are no interactions inside this little game. But that’s exactly what you’ll work on in this tutorial.
Exploring the Character
In the Hierarchy, select Character. Next, take a look at the Inspector. You’ll see a similarly named Component that contains the logic which controls the Character.
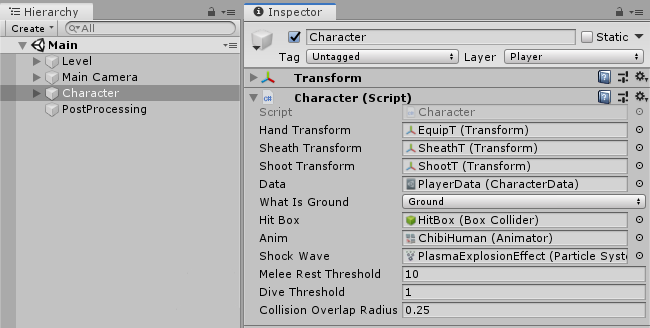
Open Character.cs from RW/Scripts.
There’s a lot going on there but you don’t need to worry about most of it. For now, take note of the following methods.
-
Move: It moves the character by accepting the float valuesspeedas the translation speed androtationSpeedas the angular speed. -
ResetMoveParams: This method resets the parameters used for movement animation and the angular velocity of the character. This is simply used for clean-up. -
SetAnimationBool: This sets a Bool type animation parameterparamtovalue. -
CheckCollisionOverlap: It accepts apointof typeVector3and returns aboolindicating if there are colliders around thepointwithin a defined radius. -
TriggerAnimation: It triggers the input animation parameterparam. -
ApplyImpulse: This applies an impulse force on the Character equal to theVector3input parameterforce.
You’ll use these methods in the following sections. For the purposes of this tutorial, you don’t need to worry about their inner workings.
Understanding State Machines
State machines are a concept in which a container stores the status of something at any given time. Then, given an input, it can provide an output based on the current state, transitioning to a new state in the process. State machines can be represented by a State Diagram. Preparing a state diagram will help you think about all the possible states of your system, and how you transition between them.
Finite State Machines
Finite state machines or FSMs are one of the four major families of automaton. Automatons are abstract models of simple machines. They’re studied under Automata Theory, a theoretical branch of computer science.
Simply put:
- An FSM consists of a finite number of states. At a given time only one such state is active.
- Each state defines which state it’ll transition to as an output, based on the sequence of inputs it receives.
- The output state becomes the new active state. In other words, a state transition occurs.

To understand this better, consider a character in a platformer game who’s standing on the ground. The character is in the Standing state. This would be its active state until you press a button to make the character jump.
The Standing state identifies the button press as a valid input and transitions to the Jumping state as an output.
Assume there are a fixed number of such movement states and the character can only be in one such state at a time. This is an example of an FSM.
Hierarchical State Machines
Consider a platformer game using FSM, in which several states share the same physics logic. For example, you can move and jump in both the Crouching and Standing states. In this case, several inputs result in the same behavior and output for two different states.
In a situation like this, it makes sense to have some kind of delegation to some other state for the shared or common behavior. Luckily, you can achieve this via hierarchical state machines.
In a hierarchical FSM, there are sub-states which delegate the unhandled inputs to their super-state. This in-turn elegantly reduces the size and complexity of the FSM while maintaining the logic.
The State Pattern
In their book, Design Patterns: Elements of Reusable Object-Oriented Software, Erich Gamma, Richard Helm, Ralph Johnson and John Vlissides — the Gang of Four, define the intent for the State pattern as follows:
“Allow an object to alter its behavior when its internal state changes. The object will appear to change its class.”
To understand this better, consider the following example:
- A script that accepts input for movement logic is attached to an in-game entity.
- This class maintains a current state variable which simply references an instance of a state class.
- The input delegates to this current state which handles it and produces the behavior defined within itself. It also handles the required state transitions.
Thus, due to the different states referenced by the current state variable over time, the same script class will seem to behave differently. This is the essence of the State pattern.
In this project, the aforementioned Character class is the one that will behave differently due to the various states. But, you want good behavior only! :]

In general, there are three key points for every state class which help define the overall behavior of the state:
- Entry: This is where you enter the state and do things you only need to do once when you first enter the state.
- Exit: Similar to the Entry, this is where you do any clean-ups you only need to do once before the state changes.
- Update Loop: This is where the core update logic, which executes in every frame, exists. You can divide this into multiple parts such as a loop for physics updates or a loop for handling input.
