SiriKit Tutorial for iOS
Learn how to connect your iOS app with Siri in this SiriKit tutorial for iOS so that users can interact with your app with their voice. By Richard Turton.
It turns out that integrating natural language processing into an app is quite a tricky problem to solve. You can’t just take whatever text Siri has decoded from the user’s speech, pass it as a string to the app and presto — you’re done! Well, you could, but imagine the number of possible ways your users around the world could talk to your app. Would you really want to write that code?
Think about the times you’ve used Siri. There’s usually a little conversation that happens between you and Siri; sometimes that conversation goes well, and sometimes it doesn’t. Either way, there’s a lot of first-party support work happening behind the scenes.
Before you start this SiriKit tutorial, some warnings: if you’ve ever been frustrated with Siri, how would you feel having to use Siri for every build and run? Then imagine that debugging was incredibly hard because you’re running in an app extension, and because Siri times out if you pause the debugger for too long. Also, imagine you have to build using a device, because Siri isn’t available on the simulator.
If that hasn’t scared you off, then:
“It’s time to get started.”
I’m not sure I understand.
“Start the tutorial.”
OK, here’s what I found on the web:
I’m just getting you warmed up. You’ll be seeing that sort of thing a lot.
Getting Started
SiriKit works using a set of domains, which represent related areas of functionality, such as Messaging.
Within each domain is a set of intents, which represent the specific tasks that the user can achieve using Siri. For example, within the Messaging domain, there are intents for sending a message, searching for messages and setting attributes on a message.
Each intent is represented by an INIntent subclass, and has associated with it a handler protocol and a specific INIntentResponse subclass for you to talk back to SiriKit.
Language processing in your app boils down to SiriKit deciding which intent and app the user is asking for, and your code checking that what the user is asking makes sense or can be done, and then doing it.
Would You Like to Ride in my Beautiful Balloon?
First, download the starter sample project here. The sample project for this SiriKit tutorial is WenderLoon, a ride-booking app like no other. The members of the Razeware team are floating above London in hot air balloons, waiting to (eventually) pick up passengers and take them to… well, wherever the wind is blowing. It’s not the most practical way to get around, but the journey is very relaxing. Unless Mic is driving. :]
Open up the sample project. Before you can start, you’ll need to amend the bundle identifier of the project so that Xcode can sort out your provisioning profiles. Using Siri needs entitlements, and you need to run it on a device, which means you need your own bundle ID.
Select the WenderLoon project in the project navigator, then select the WenderLoon target. Change the Bundle identifier from com.razeware.WenderLoon to something unique; I’d suggest replacing razeware with something random.

In the Signing section choose a development team.
Select the WenderLoonCore framework target and change the bundle identifier and select a development team there as well.
Connect a device running iOS 10 and build and run to confirm that everything is working:

You’ll see some balloons drifting somewhere over London. The app doesn’t do very much else — in fact, you’ll be doing the rest of your work in an extension.
Add a new target using the plus button at the bottom of the target list, or by choosing File\New\Target….
Choose the iOS/Application Extension/Intents Extension template.

On the next screen, enter RideRequestExtension for the product name. Don’t check the Include UI Extension box. If you’re prompted to activate a new scheme, say yes.
A new target and group have been added to your project. Find IntentHandler.swift in the RideRequestExtension group and replace the entire contents of the file with this:
import Intents

class IntentHandler: INExtension {

}
Like a lot of Apple template code, there’s a blizzard of nonsense in there that stops you from really understanding each piece. INExtension is the entry point for an Intents extension. It only has one job, which is to provide a handler object for the intent or intents that your app supports.
As mentioned earlier, each intent has an associated handler protocol which defines the methods needed for dealing with that particular intent.
Select the RideRequestExtension scheme then add a new file using File\NewFile…. Choose the Swift File template, name the file RideRequestHandler.swift and make sure it is in the RideRequestExtension group and RideRequestExtension target.
Add the following code to the new file:
import Intents

class RideRequestHandler:
  NSObject, INRequestRideIntentHandling {

}
INRequestRideIntentHandling is the protocol for handling the — you’ve guessed it — ride request intent. It only has one required method.
Add the following code:
func handle(requestRide intent: INRequestRideIntent,
            completion: @escaping (INRequestRideIntentResponse) -> Void) {
  let response = INRequestRideIntentResponse(
    code: .failureRequiringAppLaunchNoServiceInArea,
    userActivity: .none)
  completion(response)
}
This method fires when the user gets to the point where they are ready to book the ride. That’s a little ahead of where the rest of your code is, so at the moment it just returns a response with a failure code.
Switch back to IntentHandler.swift and add the following method:
override func handler(for intent: INIntent) -> Any? {
  if intent is INRequestRideIntent {
    return RideRequestHandler()
  }
  return .none
}
Here, you’re returning your new request handler object if the intent is of the correct type. The only type of intent you’ll be dealing with is the INRequestRideIntent. This has to be declared in another place as well, so that Siri knows it can direct requests to your app.
Open Info.plist inside the RideRequestExtension group and find the NSExtension dictionary. Inside there is an NSExtensionAttributes dictionary which contains an IntentsSupported array. The template is for a messages extension, which means the array contains some messaging intents which you don’t support.
Delete those intents and add in an INRequestRideIntent line:

There are a few more hoops to jump through before you can use Siri. First, you need to ask the user’s permission. Open AppDelegate.swift in the main WenderLoon group, and you’ll see a stub method called requestAuthorisation().
At the top of the file, import the Intents framework:
import Intents
Then replace the //TODO comment with this code:
INPreferences.requestSiriAuthorization { status in
  if status == .authorized {
    print("Hey, Siri!")
  } else {
    print("Nay, Siri!")
  }
}
Permission requests now come with usage strings which are displayed to the user when the dialog displays. Open Info.plist from the WenderLoon group and find the Privacy – Location… entry.
Add a new entry there, for Privacy – Siri Usage Description (it should autocomplete) and enter a usage string:
![]()
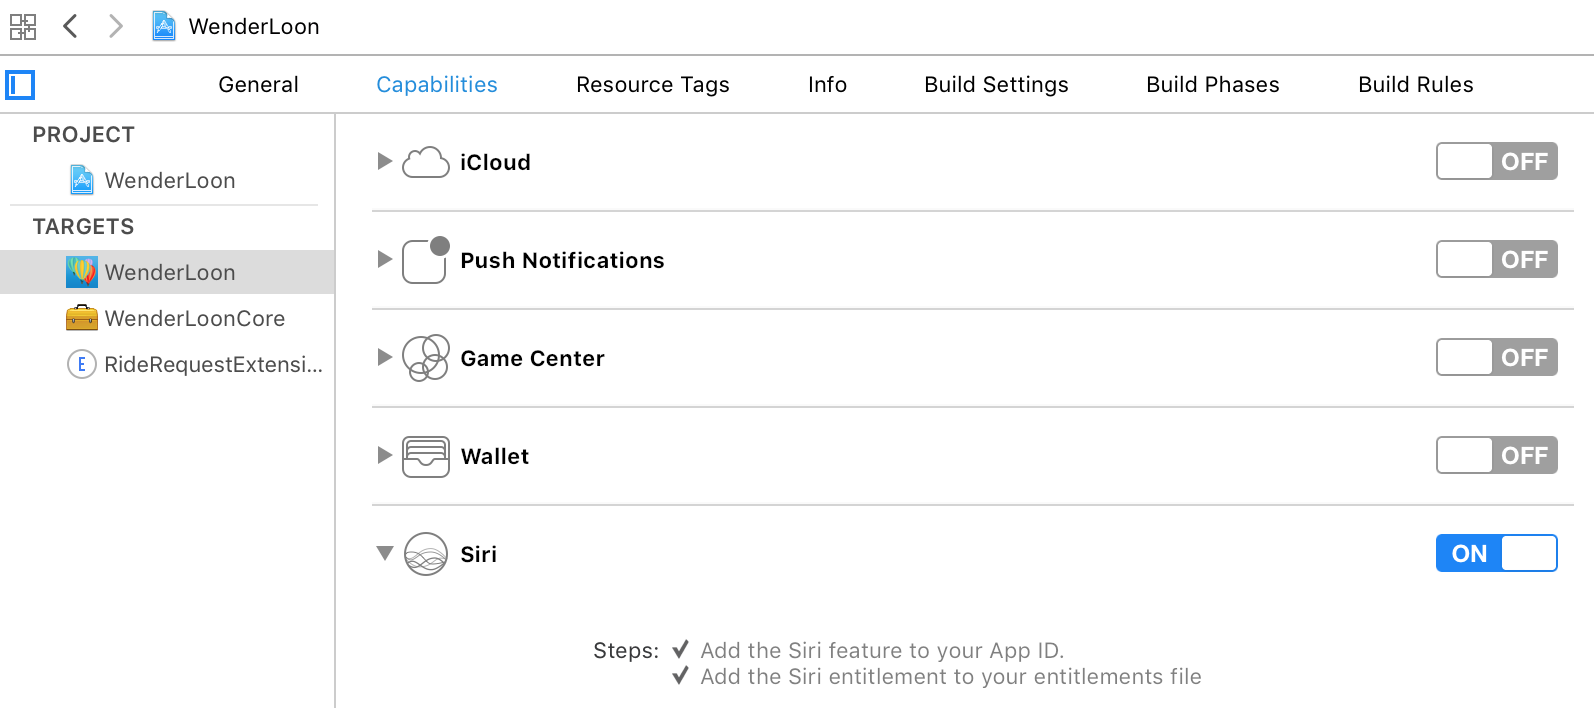
Finally, you need to add the Siri entitlement to the app. Select the project, then the WenderLoon target, then the Capabilities tab. Switch on Siri:
Here’s a summary of the steps required to add Siri to your app:
- Add an Intents extension
- Create appropriate handler objects
-
Return the handler objects in your
INExtensionsubclass - Declare the supported intents in the Info.plist of the extension
- Request the user’s permission to use Siri
- Add a Siri usage description to the app’s Info.plist
- Add the Siri entitlement to the app
After all that, select the WenderLoon scheme (not the extension) and build and run. You’ll get asked to enable Siri:

After all that effort, you really want to make sure you tap OK. If all works well, you should see “Hey, Siri!” printed in the console.
Now the real fun begins. Back in Xcode, change to the RideRequestExtension scheme. Build and run, and choose Siri from the list of applications. Siri will start on your device and you can start having the first of many fun conversations.
Try saying “Book a ride using WenderLoon from Heathrow airport”, and if Siri can understand you, you should see something like the following:
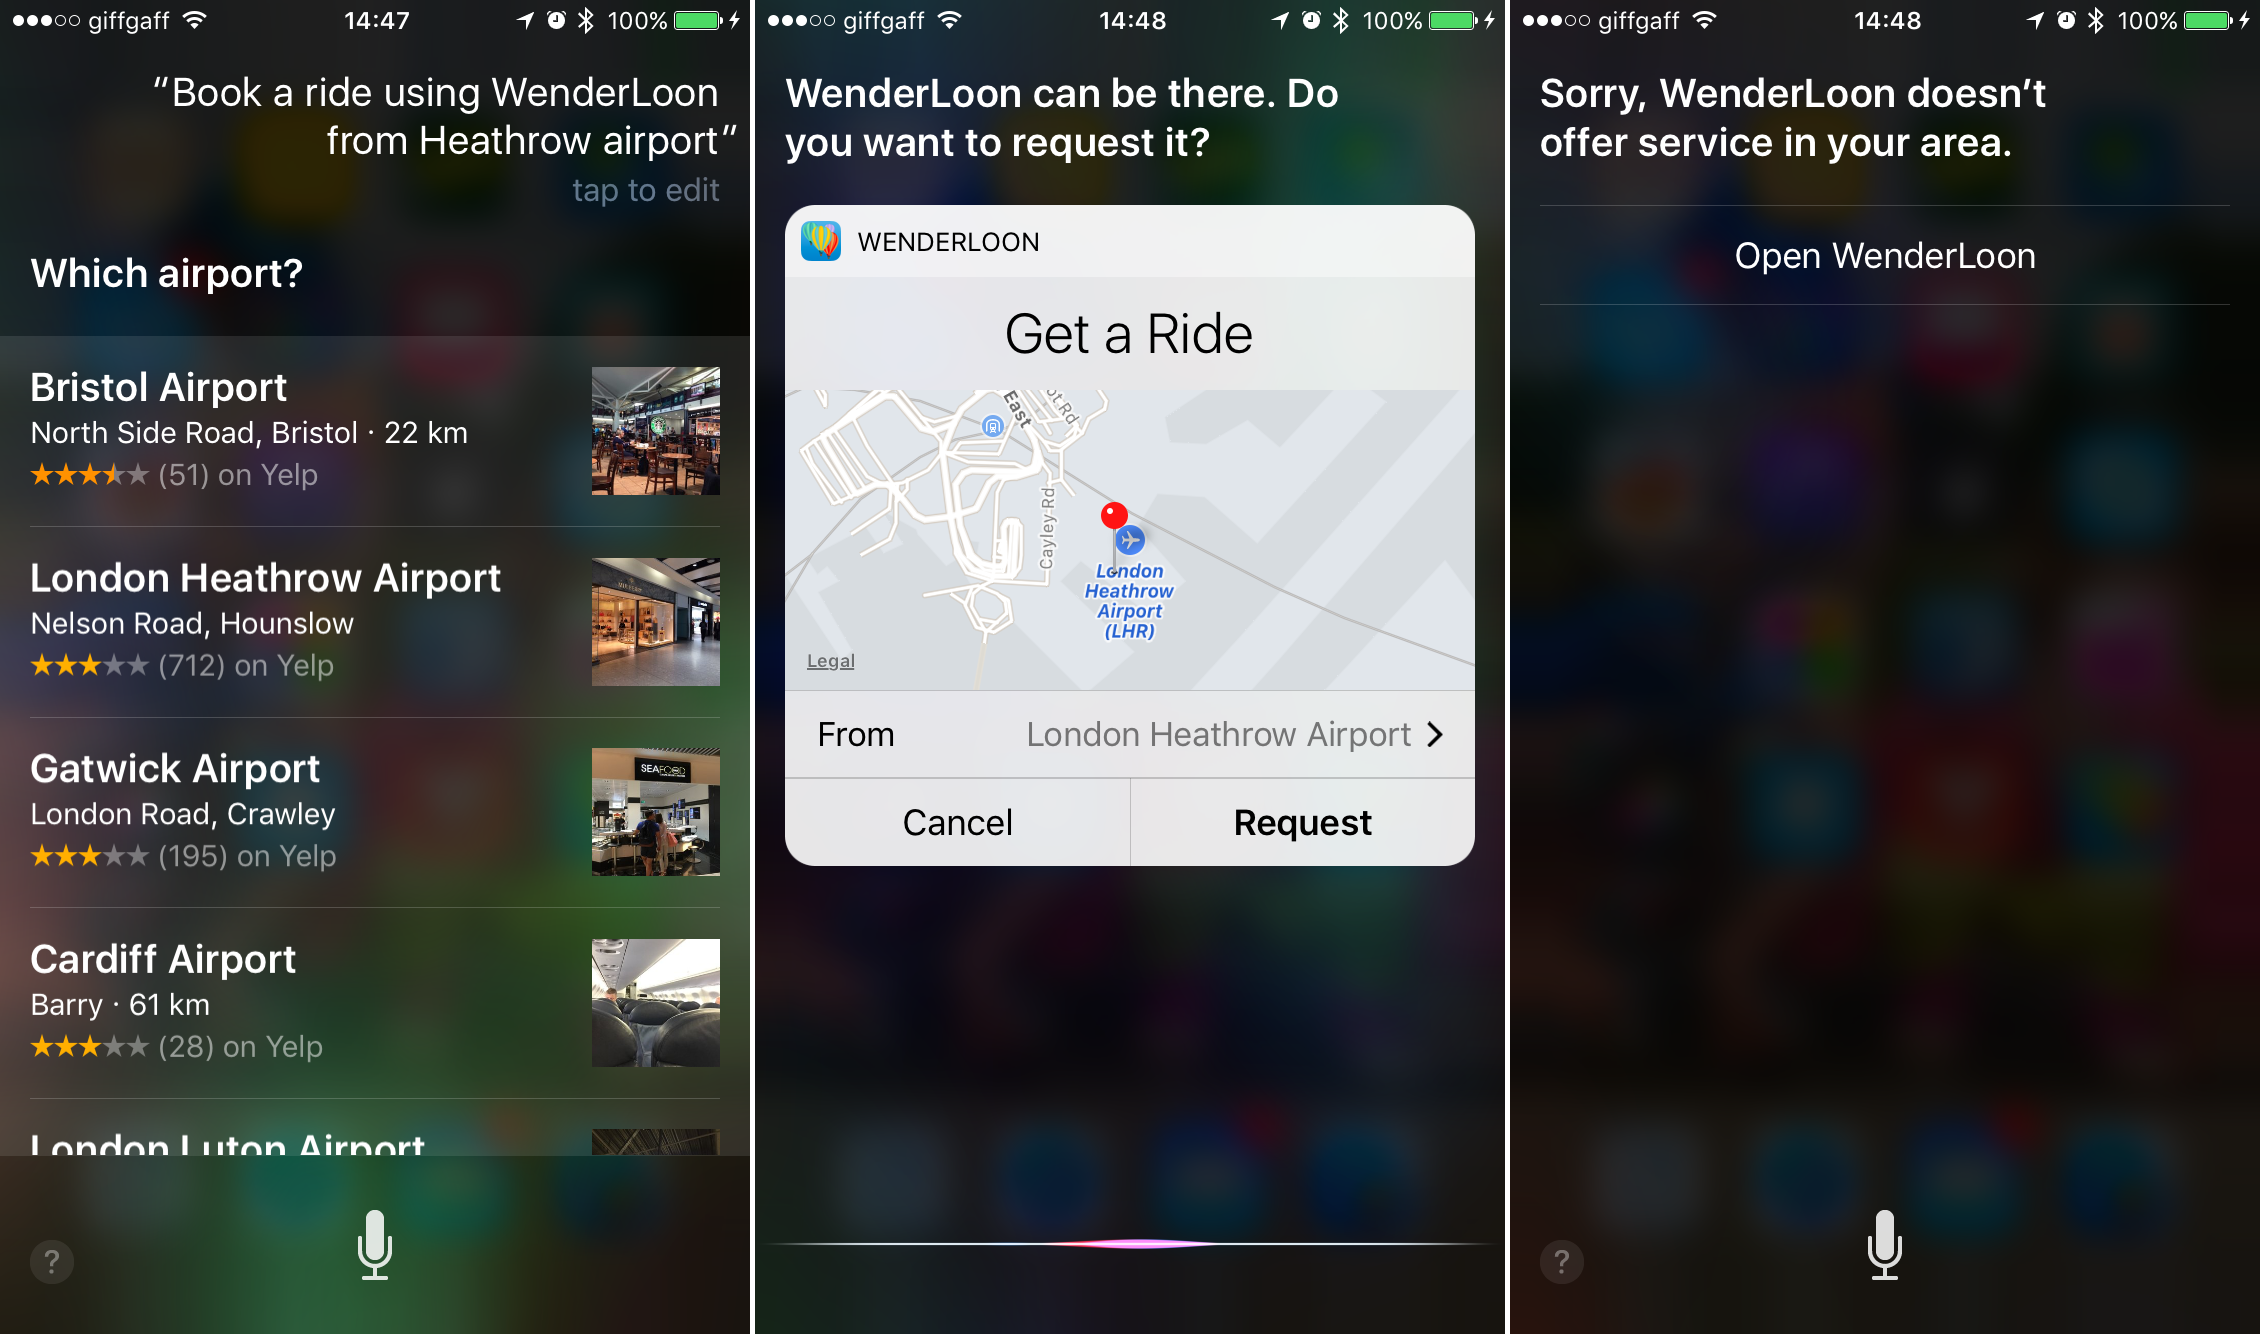
That’s the basic setup complete. Remember, at the moment you’re always returning a response saying that there’s no service in the area, which is what you can see above. In the next sections you’ll work through the detail of handling an intent properly.