Text Kit Tutorial: Getting Started
In this tutorial, you’ll learn how to use Text Kit in your iOS app to layout your text and create different visual styles. By Bill Morefield.
Implementing UITextView With a Custom Text Kit Stack
Instantiating UITextView from the storyboard editor automatically creates an instance of NSTextStorage, NSLayoutManager and NSTextContainer (i.e., the Text Kit stack) and exposes all three instances as read-only properties.
There is no way to change these from the storyboard editor, but you can create the UITextView and Text Kit stack programmatically.
Open Main.storyboard and locate the note editor view by expanding Detail Scene ▸ Detail ▸ View. Select Text View and delete this UITextView instance.
Next, open NoteEditorViewController.swift, remove the UITextView outlet from the class and replace it with the following property declarations:
var textView: UITextView!
var textStorage: SyntaxHighlightTextStorage!
These two properties are for your text view and the custom storage subclass.
Next, remove the following lines from viewDidLoad():
textView.text = note.contents
textView.font = UIFont.preferredFont(forTextStyle: .body)
Since you are no longer using the outlet for the text view and will be creating one manually instead, you can remove them safely.
Still working in NoteEditorViewController.swift, add the following method to the class:
func createTextView() {
  // 1
  let attrs = [NSAttributedString.Key.font: UIFont.preferredFont(forTextStyle: .body)]
  let attrString = NSAttributedString(string: note.contents, attributes: attrs)
  textStorage = SyntaxHighlightTextStorage()
  textStorage.append(attrString)

  let newTextViewRect = view.bounds

  // 2
  let layoutManager = NSLayoutManager()

  // 3
  let containerSize = CGSize(width: newTextViewRect.width,
                             height: .greatestFiniteMagnitude)
  let container = NSTextContainer(size: containerSize)
  container.widthTracksTextView = true
  layoutManager.addTextContainer(container)
  textStorage.addLayoutManager(layoutManager)

  // 4
  textView = UITextView(frame: newTextViewRect, textContainer: container)
  textView.delegate = self
  view.addSubview(textView)

  // 5
  textView.translatesAutoresizingMaskIntoConstraints = false
  NSLayoutConstraint.activate([
    textView.leadingAnchor.constraint(equalTo: view.leadingAnchor),
    textView.trailingAnchor.constraint(equalTo: view.trailingAnchor),
    textView.topAnchor.constraint(equalTo: view.topAnchor),
    textView.bottomAnchor.constraint(equalTo: view.bottomAnchor)
  ])
}
This is quite a lot of code. Consider each step in turn:
- Instantiate an instance of your custom text storage and initialize it with an attributed string holding the content of the note.
- Create a layout manager.
- Create a text container and associate it with the layout manager. Then, associate the layout manager with the text storage.
- Create the actual text view with your custom text container, set the delegate and add the text view as a subview.
- Set the Auto Layout constraints to make the text view the same size as the parent view.
At this point, the earlier diagram, and the relationship it shows between the four key classes (storage, layout manager, container and text view), should make more sense:
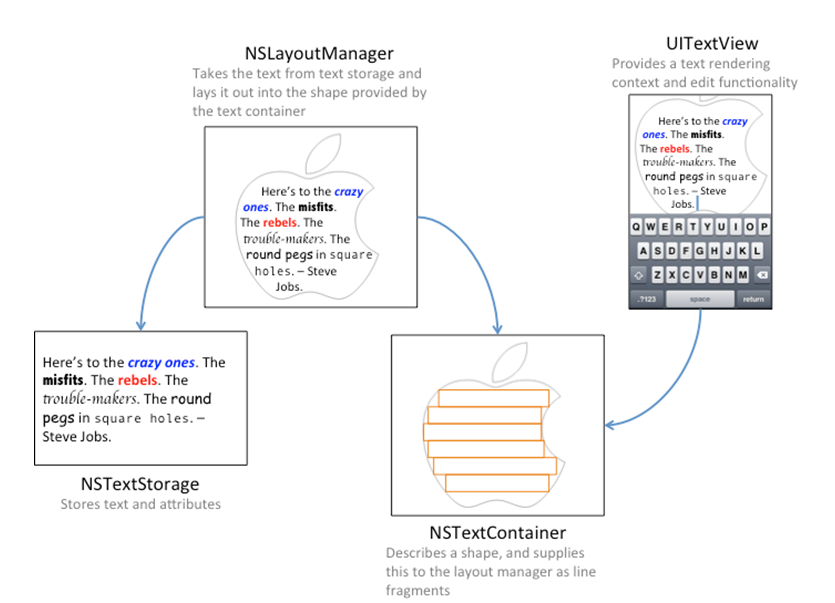
Note that the text container has a width that matches the view width, but has infinite height — or as close as .greatestFiniteMagnitude can come to infinity. This is enough to allow the UITextView to scroll and accommodate long passages of text.
Still working in NoteEditorViewController.swift, add the line below directly after the super.viewDidLoad() line in viewDidLoad():
createTextView()
Build and run your app. Open a note. Your custom text view is there and shows the text just like the original. Edit the text while keeping an eye on the Xcode console. You should see a flurry of log messages created as you type, as below:

This is the logging code from within SyntaxHighlightTextStorage to give you an indicator that your custom text handling code is being called.
The basic foundation of your text parser seems solid. Now, you’ll add the dynamic formatting!
Adding Dynamic Formatting
In this next step, you are going to modify your custom text storage to embolden text *surrounded by asterisks*.
Open SyntaxHighlightTextStorage.swift and add the following method:
func applyStylesToRange(searchRange: NSRange) {
  // 1
  let fontDescriptor = UIFontDescriptor.preferredFontDescriptor(withTextStyle: .body)
  let boldFontDescriptor = fontDescriptor.withSymbolicTraits(.traitBold)
  let boldFont = UIFont(descriptor: boldFontDescriptor!, size: 0)
  let normalFont = UIFont.preferredFont(forTextStyle: .body)

  // 2
  let regexStr = "(\\*\\w+(\\s\\w+)*\\*)"
  let regex = try! NSRegularExpression(pattern: regexStr)
  let boldAttributes = [NSAttributedString.Key.font: boldFont]
  let normalAttributes = [NSAttributedString.Key.font: normalFont]

  // 3
  regex.enumerateMatches(in: backingStore.string, range: searchRange) {
    match, flags, stop in
    if let matchRange = match?.range(at: 1) {
      addAttributes(boldAttributes, range: matchRange)
      // 4
      let maxRange = matchRange.location + matchRange.length
      if maxRange + 1 < length {
        addAttributes(normalAttributes, range: NSMakeRange(maxRange, 1))
      }
    }
  }
}
Here's what's this does:
- Create a bold and a normal font to format the text using font descriptors. Font descriptors help you avoid the use of hard-coded font strings to set font types and styles.
- Create a regular expression (or regex) that locates any text surrounded by asterisks. For example, in the string “iOS 8 is *awesome* isn't it?”, the regular expression stored in
regexStrabove will match and return the text “*awesome*”. - Enumerate the matches returned by the regular expression and apply the bold attribute to each one.
- Reset the text style of the character that follows the final asterisk in the matched string to “normal”. This ensures that any text added after the closing asterisk is not rendered in bold type.
UIFont.Now, add the following method:
func performReplacementsForRange(changedRange: NSRange) {
  var extendedRange =
    NSUnionRange(changedRange,
    NSString(string: backingStore.string)
      .lineRange(for: NSMakeRange(changedRange.location, 0)))
  extendedRange =
    NSUnionRange(changedRange,
    NSString(string: backingStore.string)
      .lineRange(for: NSMakeRange(NSMaxRange(changedRange), 0)))
  applyStylesToRange(searchRange: extendedRange)
}
The code above expands the range that your code inspects when attempting to match your bold formatting pattern. This is required because changedRange typically indicates a single character. lineRange(for:) extends that range to the entire line of text.
Finally, add the following method right after the code above:
override func processEditing() {
  performReplacementsForRange(changedRange: editedRange)
  super.processEditing()
}
processEditing() sends notifications to the layout manager when the text changes. It also serves as a convenient home for any post-editing logic.
Build and run your app. Type some text into a note and surround some of the text with asterisks. The text will be bold as shown in the screenshot below:

You’re likely thinking of all the other styles that you might add to your text.
Adding Further Styles
The basic principle of applying styles to delimited text is rather straightforward: Use a regex to find and replace the delimited string using applyStylesToRange(searchRange:) to set the desired style of the text.
Open SyntaxHighlightTextStorage.swift and add the following method to the class:
func createAttributesForFontStyle(
  _ style: UIFont.TextStyle,
  withTrait trait: UIFontDescriptor.SymbolicTraits
) -> [NSAttributedString.Key: Any] {
  let fontDescriptor = UIFontDescriptor.preferredFontDescriptor(withTextStyle: style)
  let descriptorWithTrait = fontDescriptor.withSymbolicTraits(trait)
  let font = UIFont(descriptor: descriptorWithTrait!, size: 0)
  return [.font: font]
}
This method applies the supplied font style to the body font. It provides a zero size to the UIFont(descriptor:, size:) constructor, which forces UIFont to return a size that matches the user’s current font size preferences.
Next, add the following property at the top of the class:
private var replacements: [String: [NSAttributedString.Key: Any]] = [:]
Now, add the following function to the end of the class:
func createHighlightPatterns() {
  let scriptFontDescriptor = UIFontDescriptor(fontAttributes: [.family: "Zapfino"])

  // 1
  let bodyFontDescriptor = UIFontDescriptor.preferredFontDescriptor(withTextStyle: .body)
  let bodyFontSize = bodyFontDescriptor.fontAttributes[.size] as! NSNumber
  let scriptFont = UIFont(descriptor: scriptFontDescriptor,
                          size: CGFloat(bodyFontSize.floatValue))

  // 2
  let boldAttributes = createAttributesForFontStyle(.body,  withTrait:.traitBold)
  let italicAttributes = createAttributesForFontStyle(.body,
                                                      withTrait:.traitItalic)
  let strikeThroughAttributes =  [NSAttributedString.Key.strikethroughStyle: 1]
  let scriptAttributes = [NSAttributedString.Key.font: scriptFont]
  let redTextAttributes = [NSAttributedString.Key.foregroundColor: UIColor.red]

  // 3
  replacements = [
    "(\\*\\w+(\\s\\w+)*\\*)": boldAttributes,
    "(_\\w+(\\s\\w+)*_)": italicAttributes,
    "([0-9]+\\.)\\s": boldAttributes,
    "(-\\w+(\\s\\w+)*-)": strikeThroughAttributes,
    "(~\\w+(\\s\\w+)*~)": scriptAttributes,
    "\\s([A-Z]{2,})\\s": redTextAttributes
  ]
}
Here’s what’s going on in this method:
- First, create a “script” style using Zapfino as the font. Font descriptors help determine the current preferred body font size. This ensures the script font also honors the user's preferred text size setting.
- Next, construct the attributes to apply to each matched style pattern. You’ll cover
createAttributesForFontStyle(withTrait:)in a moment. - Finally, create a dictionary that maps regular expressions to the attributes declared above.
If you’re not familiar with regular expressions, the dictionary above might look a bit strange. These expressions specify patterns that match the text you want to apply a style to. If you’d like to learn more about regular expressions, check out this NSRegularExpression tutorial and cheat sheet.
You'll also need to initialize the replacements dictionary. Add the following initializers to the SyntaxHighlightTextStorage class:
override init() {
  super.init()
  createHighlightPatterns()
}

required init?(coder aDecoder: NSCoder) {
  super.init(coder: aDecoder)
}
You're calling the plain initializer with no arguments in the rest of your project. The init(coder:) initializer is required to keep the compiler happy.
Finally, replace the implementation of applyStylesToRange(searchRange:) with the following:
func applyStylesToRange(searchRange: NSRange) {
  let normalAttrs =
    [NSAttributedString.Key.font: UIFont.preferredFont(forTextStyle: .body)]
  addAttributes(normalAttrs, range: searchRange)

  // iterate over each replacement
  for (pattern, attributes) in replacements {
    do {
      let regex = try NSRegularExpression(pattern: pattern)
      regex.enumerateMatches(in: backingStore.string, range: searchRange) {
        match, flags, stop in
        // apply the style
        if let matchRange = match?.range(at: 1) {
          print("Matched pattern: \(pattern)")
          addAttributes(attributes, range: matchRange)

          // reset the style to the original
          let maxRange = matchRange.location + matchRange.length
          if maxRange + 1 < length {
            addAttributes(normalAttrs, range: NSMakeRange(maxRange, 1))
          }
        }
      }
    }
    catch {
      print("An error occurred attempting to locate pattern: " +
            "\(error.localizedDescription)")
    }
  }
}
This method previously performed one regex search for bold text. Now, it iterates over the dictionary of regex matches and attributes since there are many text styles to look for. For each regex, it runs the search and applies the specified style to the matched pattern.
Note that the initialization of the NSRegularExpression can fail if the pattern has an error in it. You catch the resulting error from the failed compilation of the pattern and log it so that you can fix the pattern.
Build and run your app, and try out the new styles available to you:

Here's a slightly more challenging exercise. If you enter the text: "*This is not bold*" (without the quotes) into a note, you'll discover that it does not turn bold. In other words, if the selected text has multiple spaces between the words, there is no match.
Can you create a regular expression that will embolden that text? It's just a simple modification of the one already in the code.
[spoiler title=""](\\*\\w+(\\s+\\w+)*\\*) – try it out![/spoiler]
Your app is nearly complete, but there is one loose end to clean up.
If you try changing the Dynamic Type size after applying attributes, you’ll notice that the decorated strings don't respond to content size changed notifications since your custom implementation doesn’t yet support this action.