Improving Accessibility in Unity Games – Part 2
In Part 2 of Improving Accessibility in Unity games, you’ll add support for motor and cognitive disabilities and add some options to help guide players. By Mark Placzek.
More Fun With Subtitles
Dialog between multiple characters can be confusing if there’s no indication of who’s speaking. There are several ways to make the speaker clear, as you might have noticed if you’ve played any games yourself. For example, you could put the name of the speaker, or a thumbnail of the character, at the start of each subtitle.
You’ve already used a method that takes a string to instantiate a subtitle; all you need to do is add additional variables to further customize the generated subtitles.
Puzzley Dungeon doesn’t have multiple characters, but how about adding a little color to the subtitles to distinguish between information, closed captions and clues?
Adding Colors to the Subtitles
Open the GameManager.cs Script and find the PublishSubtitle method. Copy the entire method and paste it below where it currently is to duplicate it. In the duplicate, add a new argument to the method so that the method signature now looks like this:
public void PublishSubtitle(string textToPublish, Color subtitleTint)
At the bottom of the else statement, add the following line:
currentText.color = subtitleTint;
This lets you apply a new color to the text
Now, you’ll send a color from each method that asks for a subtitle.
In the HandleAudioDescription method in SettingsManager.cs, add a yellow color to the audio description by changing this line at the end:
gameManager.PublishSubtitle(subtitle);
To this:
gameManager.PublishSubtitle(subtitle, Color.yellow);
Similarly, find OnTriggerEnter in SubtitleTriggerScript and change:
gameManager.PublishSubtitle(clueText);
To the following:
gameManager.PublishSubtitle(clueText, Color.cyan);
Many parts of the project send information via subtitles. You’ll turn PublishSubtitle into an overloaded method by creating another method with the same signature as before. Then, all the other calls will still work without modification and can make the text white by default.
If you’re interested in method overloading in C#, and how it works, you can read more about it over here.
Add another PublishSubtitle method in GameManager.cs, above the original:
public void PublishSubtitle(string textToPublish)
{
    PublishSubtitle(textToPublish, Color.white);
}
Back in Unity, click Play, enable the audio description toggle and play through to see your changes.
Highlighting Interactables
Another subtle but worthwhile quality-of-life change is to let the user know when they hover the cursor over an object they can interact with. This is a simple change that can remove sticking points without dumbing down the gameplay.
There are many ways to accomplish this sort of effect. Changing the material to highlight the object would be one way, but you’ve already dabbled with adjusting the shader material of the gems, so you’re going to choose a different method.
Select the Canvas in the Hierarchy. At the top of the window, select Create ► UI ► Image to create a brand-new white square in the middle of your game UI.
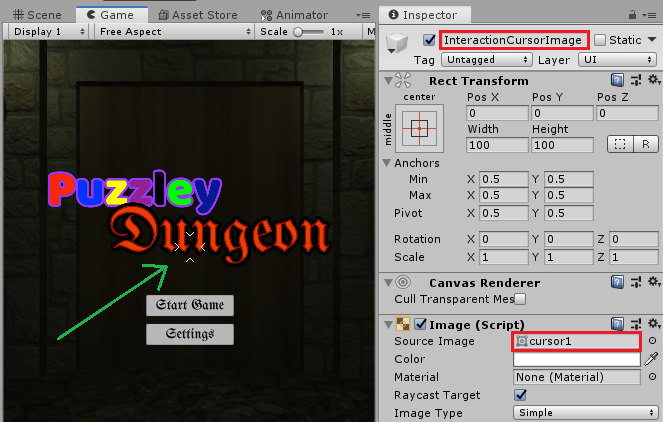
Using the Inspector, ensure that the Rect Transform component has it’s default zeroed out settings by right-clicking the component name in the Inspector and choosing Reset. Re-name the new object InteractionCursorImage.
As much as you love white squares, you don’t want to stop there. Add a Source Image to the Image component in the Inspector. In the Project view, navigate to the six cursor sprites in Assets/RW/Textures. Drag cursor1 over the Source Image slot.
Here is how the component in the Inspector, and the Game UI window should now look like:
OK, it’s animation time!
Animating Your Interactive Hints
In Unity, open the Animation window by selecting Window ► Animation ► Animation from the toolbar. This will open a new window with a timeline area on the right.
With InteractionCursorImage still selected in the Hierarchy, click the Create button in the Animation window’s timeline area. You’ll see a prompt to save a new animation.
Call the file InteractionCursorAnimation and navigate to Assets/RW/Animations to keep everything nice and neat. Click Save. This will do two things: It will create an animator for your InteractionCursor and create an animation clip.
In the Project view, Navigate to the six cursor sprites in Assets/RW/Textures again. Drag all six of them over the timeline in the Animator window.
This automatically creates a short animation with the selected frames. In the panel at the left of the Animation Window, adjust the Samples to 10 to slow down the animation. If you don’t see the Samples setting, you might need to enable it. Use the settings menu at the top right corner of the Animation window to Show Sample Rate in this case.
To preview the animation, click the Play button at the top of the Animation window. You’ll see the animated cursor in the Game view.
Once you’ve finished watching the animation, select the InteractionCursorImage in the Hierarchy. Then, in the Inspector, click the checkbox at the top to disable the GameObject, and therefore the animation so it’s not visible by default.
You already have a method that detects interactive objects in the Crosshair Ray component in RigidBodyFPSController/MainCamera. You’ll need to add some code to Update to swap out the cursor sprite with the animated one.
Switching Between the Regular and Animated Cursor
Open the CrosshairRay.cs script and add the following two public variables at the top of the class.
public GameObject cursorGameObject;
public GameObject interactionCursorGameObject;
Scroll down to the Update method. The first conditional in this method checks to see if the inventory screen is open. The second conditional uses a Raycast to detect an interactable. The result of this sets isInteractableHit to either true or false. Here is where you’ll change the cursor.
Under the line:
isInteractableHit = true;
Add the following:
cursorGameObject.SetActive(false);
interactionCursorGameObject.SetActive(true);
Then, under the line:
isInteractableHit = false;
Add the following:
cursorGameObject.SetActive(true);
interactionCursorGameObject.SetActive(false);
Back in Unity, wire up these public variables. Expose them in the Inspector by selecting RigidBodyFPSController/MainCamera in the Hierarchy. Drag CursorImage over Cursor Game Object and drag InterationCursorImage over Interaction Cursor Game Object.
And you’re done! Click Play and see your cursor update as you explore the dungeon.

Adjusting Your Subtitle Duration
Congratulations! You’ve reached the setup for the final setting control.
Whether you are a younger player, have a visual impairment or just need more time to read the subtitles, being able to adjust the subtitle duration is helpful for everyone.
If you haven’t enabled the SubtitleDurationSettingComponent when you set up keyboard navigation, find and select it in the Hierarchy under Canvas ▸ SettingsMenu ▸ SettingsPanel and enable it in the Inspector.
Open the SettingsManager.cs script and add the following two public variables at the top of the class:
public float subtitleDurationSelected;
public TextMeshProUGUI subtitleDurationLabel;
The first variable holds the value selected by the player and the second updates the ‘duration in seconds’ label to display the player’s selection.
Complete the SetSubtitleDuration method in the SettingsManager.cs script to set these values from the UI Slider when player’s interact with it in-game by adding the following code to the empty method:
subtitleDurationSelected = sliderValue;
subtitleDurationLabel.text = sliderValue.ToString() + " secs";
SaveSettings("SubtitleDuration", sliderValue);
This should be familiar by now. You save the slider value so other classes can access it, then convert the slider value to a string so you can apply the value back to the controller for the player to read.