Improving Accessibility in Unity Games – Part 2
In Part 2 of Improving Accessibility in Unity games, you’ll add support for motor and cognitive disabilities and add some options to help guide players. By Mark Placzek.
Rebinding Your Inventory Controls
Your next step is to create a rebind control for opening the inventory. This will be a button that displays the key to open the inventory. When the user presses it, they’ll be able to assign a new key to this task, which will then display on the button.

Expand the RebindKeyComponent in the Hierarchy and select Inventory. Inventory is an unusual name for a button, but the button’s name will be sent to the Settings Manager so it knows which control to rebind.
This makes it easy to duplicate the control for other keys you’d like to rebind without needing duplicate methods for each key. Now, in the Inspector, find and open the RebindHelper component (double-click it) to load the script in your IDE.
Add the following using statement to the top of RebindHelper:
using UnityEngine.UI;
This lets you use Unity’s UI namespace.
Next, add the following variables to the top of the class and Start to populate them (you can replace the existing Start method with the below code too):
//1
private string controlToRebindName;
//2
private Text buttonInstanceText;
//3
private SettingsManager settingsManager;

private void Start()
{
    controlToRebindName =  gameObject.name;
    buttonInstanceText = gameObject.GetComponentInChildren<Text>();
    settingsManager = GameObject.FindGameObjectWithTag("SettingsManager").GetComponent<SettingsManager>();
}
- This variable holds the name of the control to rebind, which it extracts from the name of the button GameObject. This means that if you duplicate this control for another binding, you only have to change the GameObject’s name. The Settings Manager receives the result so it knows which binding to change.
- This
Textvariable is the text in the button. You need to access this so that you can change it to display the newly-assigned keybinding. - This variable holds a reference to the Settings Manager.
Finally, add this last method:
public void RebindPressed()
{
    settingsManager.HandleRebindOfControl(controlToRebindName, buttonInstanceText);
}
The Rebind Helper sits between the rebind button and the Settings Manager to make sure the Settings Manager knows which control it needs to rebind. Head into the SettingsManager.cs script to add the rebind logic.
Adding the Rebind Logic
First, add these variables at the top of the class:
private Text controlToRebindText;
private string controlToRebind;
private bool isRebinding = false;
public Dictionary<string, KeyCode> buttonkeys = new Dictionary<string, KeyCode>();
The first two variables hold the information passed from the RebindHelper.
The SettingsManager uses Update to wait for a key press from the player. The isRebinding Boolean will make sure the code in Update only runs when the player tries to rebind a key.
Finally, the buttonkeys dictionary holds all your game’s custom keybindings. Right now, that’s only one button, but you could want to add more.
Finishing Up
You’ll want to track the isRebinding Boolean flag in Game Manager too. Open GameManager.cs and add the this variable to the top of the GameManager class:
public bool isRebinding = false;
Next, open SettingsManager.cs and complete the HandleRebindOfControl method that RebindHelper will call:
public void HandleRebindOfControl(string controlPressed, Text buttonInstanceText)
{
   controlToRebind = controlPressed;
   controlToRebindText = buttonInstanceText;
   isRebinding = true;
   gameManager.isRebinding = true;
}
Here, you set the variables so other methods can access them. You enable the code in the Update method (coming up) by setting isRebinding to true.
Add this code to the Update method:
if (isRebinding)
{
    //1
    if (Input.GetKeyDown(KeyCode.Return) || Input.GetKeyDown(KeyCode.Space))
    {
        return;
    }
    //2
    if (Input.anyKeyDown)
    {
        foreach (KeyCode keyCode in Enum.GetValues(typeof(KeyCode)))
        {
            if (Input.GetKeyDown(keyCode))
            {
                //3
                controlToRebindText.text = keyCode.ToString();
                HandleKeyBindChangefor(controlToRebind, keyCode);
                isRebinding = false;
                gameManager.isRebinding = false;
                break;
            }
        }
    }
}
Here’s what’s happening in this code:
- You don’t want to map the Space bar or Return key to another control since you’ll need them later, so you ignore these key presses.
- Sadly, there’s no “listen for the next key press and tell me what it is” function, so you need to iterate through all the keycodes in a
foreachloop. IfGetKeyDownmatches any of these keys, you know that was the one that the player pressed. - When you get a new keycode, a few things happen:
- The keycode is converted to a string and applied to the text field of the rebind button.
- You send the keycode to a new method, which you will create in a second, to actually apply the rebind.
- You stop looking for key presses in
Updateby settingisRebindingtofalse.
Applying the Rebinding
To actually apply the rebinding, you need to complete HandleKeyBindChangefor method by adding the following code:
buttonkeys[controlToRebind] = keyCode;
PlayerPrefs.SetString(controlToRebind, keyCode.ToString());
if (controlToRebind == "Inventory")
{
    gameManager.inventoryKeyCode = keyCode;
}
Here, the new keybind is saved in both the buttonkeys dictionary and PlayerPrefs.
The GameManager is responsible for watching for the player to open the inventory. So you need to tell the GameManager what the new key is.
When you enable rebinding, you don’t want the game to respond to button presses when it shouldn’t. This is the reason for adding the boolean isRebinding flag earlier.
In the Update method of the GameManager script, change this first line of code:
if (gameStarted && !isSettingsMenuOpen && Input.GetKeyDown(inventoryKeyCode))
To this:
if (gameStarted && !isRebinding && !isSettingsMenuOpen && Input.GetKeyDown(inventoryKeyCode))
The last thing to do is to enable the RebindPressed() method to be called when the Inventory Button is clicked in the UI. For this you’ll wire up the On Click event to the RebindPressed() method using the Unity editor.
In the Hierarchy, select the Inventory Button again. Using the Inspector, drag and drop the Button component onto the On Click () Runtime Only event field. Then, select the RebindHelper.RebindPressed item from the drop-down list.

Great, now you can take it for a test drive. Click Play and see if this works!
Go to the Settings Menu and tap the Rebind button. Nice! That works to rebind the the key now :]
Start the game, then tap “M.” Notice that “M” and not “I” now opens the Inventory. Additionally, tap the keyhole in the first dungeon door. The subtitle now also indicates the new keybinding.

Keyboard Navigation
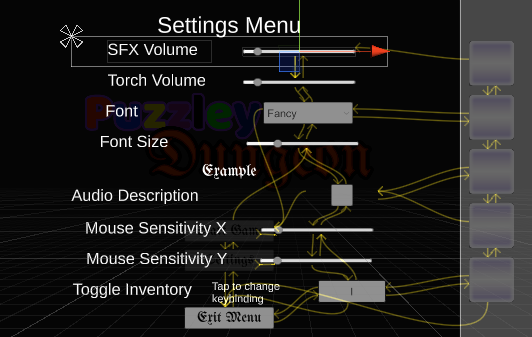
Unity’s new UI controls have some great built-in features, including the ability to navigate UI controls with the keyboard. However, the default navigation may not produce the behavior you want.
Switch to the Scene view in Unity and ensure you have selected the 2D view mode. In the Hierarchy, enable the SettingsMenu GameObject.
Click on any UI element (such as a Slider) and ensure you’ve selected Visualize in the Navigation section of the Inspector.

When using visualization mode in the Scene view, arrows appear to indicate how the change of focus is set up for the collection of UI controls as a group. This allows you to see which UI control will get focus next from any one other UI control.
Yay, Spaghetti!
Yay, Spaghetti!
As you see, the arrows dip in and out of different panels that are on- and off-screen. You need to ensure that navigation cycles intuitively, and only between elements that are currently on-screen.
Start with the StartMenu located in the Canvas in the Hierarchy. Automatic Navigation is dipping into the Inventory, which you don’t want.

Use the drop-down to expand the StartMenu in the Hierarchy to reveal the two buttons: StartButton and SettingsButton. You want to toggle between the two when you tap up or down on the keyboard.
Select StartButton so you can see how the navigation works. In the Inspector, look at the Button component and find Navigation. Use the drop-down to select Explicit only. You may need to deselect the others.
Now, four input boxes will appear. They allow you to drop other UI controls from the Hierarchy into each direction you can select.
- In the StartButton navigation, drag the SettingsButton from the Hierarchy over Select On Up and Select on Down.
- For SettingsButton, set the Navigation drop-down to Explicit and drag the StartButton over Select On Up and Select on Down.
The Visualize Navigation will update accordingly.
