Improving Accessibility in Unity Games – Part 2
In Part 2 of Improving Accessibility in Unity games, you’ll add support for motor and cognitive disabilities and add some options to help guide players. By Mark Placzek.
Fixing Navigation in Other Panels
Next, you need to adjust the navigation in three other panels:
- The EndMenu
- The Inventory and InventoryMenuSettingsButton
- The SettingsMenu.
The single-buttoned EndMenu is straightforward. Navigate to Canvas ▸ EndMenu ▸ RestartButton in the Hierarchy. In the Inspector, set the EndMenu button’s Navigation to None. Super easy!
The inventory is up next. You want to be able to scroll up and down through the inventory slots. Left and right taps should move you between the Settings button and the Inventory slots.
To implement this, go to the Hierarchy and expand Canvas ▸ Inventory to reveal the ItemSlots. Additionally, enable the InventoryMenuSettingsButton in Canvas. To make things a bit clearer to see in the Scene view, you may wish to also temporarily disable the StartMenu GameObject.
Now, Control-click on each of the ItemSlots and the InventoryMenuSettingsButton to select them all. Set their Navigation to Explicit only.
Then drag ItemSlot0 from the Hierarchy over Select On Right on the InventoryMenuSettingsButton.
Finally, for each ItemSlot, drag the ItemSlot above it to the Select On Up and the ItemSlot below it to Select On Down.
Your new Navigation arrows should look like this:

Finally, you’ll handle the SettingsMenu. Re-enable it to view the panel in the Scene view.
As with the ItemSlots, you only need to navigate up and down to the next and previous controls. You just need to find them all in the Hierarchy!
In the Hierarchy under SettingsMenu ▸ SettingsPanel enable the ButtonHoldToggleComponent and SubtitleDurationComponent GameObjects. You’ll work with these a little later.
In the Hierarchy, expand each SettingComponent in the SettingsPanel using their drop-down arrows. The actual UI controls you’ll need to connect are children of these SettingComponents.

You can see all these controls selected in the image above.
For each control, find the Navigation component in the Inspector and set it to Explicit. Drag the control above it from the Hierarchy into the Select On Up slot. Drag the control below it from the Hierarchy into the Select On Down slot.
If you’ve wired everything up correctly, the navigation should look like this:

Fantastic! You’re all done, right?!
Well, try it out, and no cheating… don’t touch that mouse! Click Play and try to navigate the menu and select one of the menu options… Hmm.
There’s one tiny issue… it doesn’t work

Unless one of the buttons is selected at the start, you can’t move around your options.
Here’s a walk-through of what you need to do to fix this:
- The Start button needs to be selected when the game starts.
- When you enter the inventory, the first slot needs to be selected.
- After the player presses the Settings button from either the Start Menu or the inventory screen, you need to select the UI Element at the top of the Settings menu.
- The Start Menu’s Settings button needs to be reselected when exiting the Settings Menu, if the player hasn’t started the game.
- Finally, the Restart button needs to be selected when the game ends.
The easiest way to accomplish this is to code the selection when the player activates each menu.
Coding the Selection for Each Menu
The GameManager can handle the initial selection of the Start Game button, and it also contains the logic for toggling the inventory. Add three public variables to the top of the class to hold the following controls:
public Button startGameButton;
public Button restartGameButton;
public Button firstInventorySlot;
Add the following to Start to select the start button when the game launches.
startGameButton.Select();
Now, move down to the ToggleInventoryScreen method. This is divided into an if and else statement, depending on whether the inventory screen is open or not.
The else statement handles opening the inventory. Add the following code to the top of the else statement:
firstInventorySlot.Select();
This ensures that the first slot is selected when the player opens the inventory.
Finally, move further down to the CompleteLevel method and add the following code.
restartGameButton.Select();
Now, you’ve made sure that the Restart Game button will be selected when the game ends.
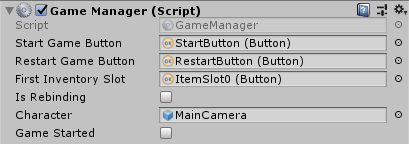
Nice! Now, return to Unity and populate the three public variables you created. Select the GameManager in the Hierarchy to expose the variables in the Inspector. From the Hierarchy:
- Drag Canvas ▸ StartMenu ▸ StartButton over startGameButton.
- Next, drag Canvas ▸ EndMenu ▸ RetartButton over restartGameButton.
- Finally, drag Canvas ▸ Inventory ▸ ItemSlot0 over the firstInventorySlot.
Your Game Manager component should now look like this:
Next up, the Settings Menu. The player uses one of two buttons to open this menu.
Open the SettingsManager.cs script and add the following new method:
public void SelectFirstUIElement()
{
    volumeSlider.Select();
}
You can add this method to the list of methods that execute when the player presses either of the Settings buttons.
In the Hierarchy, find and select the SettingsButton in Canvas ▸ StartMenu. In the Inspector, click the + button at the bottom of OnClick() to add a new method for the button to call.
Drag the SettingsManager from the Hierarchy over the input box and use the drop-down to select SettingsManager ► SelectFirstUIElement
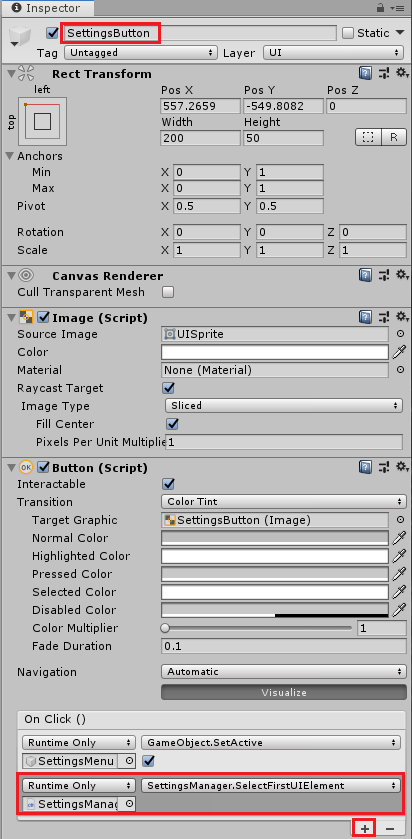
Repeat these steps with the other Settings button in the inventory screen: Canvas ▸ InventoryMenuSettingsButton.
Nice! You can now navigate the settings menu using only the keyboard when you enter it.
When you exit the settings, you’ll find yourself back at the Start Menu if the game has not started. You’ll need to reselect the Settings button on that screen to keep keyboard navigation possible.
Open the SettingsManager.cs script and add the following public variable at the top of the class:
public Button startMenuSettingsButton;
The Exit Menu button already calls a method in the SettingsManager called SettingsDidExitOrLoad.
Under this section of code:
if (gameManager.gameStarted)
{
    gameManager.ToggleInventoryScreen()
}
Add the following:
else
{
    startMenuSettingsButton.Select();
}
This is really simple. If the game has started, toggle the Inventory screen. Otherwise (if in the menu), the Start Menu Settings button is selected.
Back in Unity, select the SettingsManager in the Hierarchy. Wire up the startMenuSettingsButton by dragging Canvas ▸ StartMenu ▸ SettingsButton from the Hierarchy over the Start Menu Settings Button field in the Inspector.
Ok, head back into Unity and click Play. Now, see if you can complete the game with only the keyboard, and try adjusting some settings as well.
Wow, good work. You can now play the entire game using only one hand!

But… how about that lever? Repetitive strain injury setting in? That brings you to your next topic!