Room DB: Advanced Data Persistence
This tutorial introduces more advanced concepts for use with the Room persistence library, such as migration and indexing. By Lance Gleason.
Using the Room persistence library from Google allows you to add relational persistence to you app without the need to write a lot of boilerplate code. But once you have it in your app, you might need to do things like map relationships to other records, update your data schema and optimize your queries.
This tutorial introduces you to more advanced concepts when using Android’s Room database. If you haven’t gone through the Data Persistence With Room tutorial, you should head over there first in order to become familiar with the basic use of Room.
In this tutorial, you will add features to the List Master app, while learning about the following:
- Migrations for making changes to an existing data store.
- Foreign Keys to map relationships between entities.
- Indexes to make your queries faster.
Time to get started!
Note: This tutorial assumes that you have some experience developing Android apps. A few points to keep in mind:
- You use the Android RecyclerView to display lists. If you’ve never used them, or you need a refresher, the Android RecyclerView Tutorial with Kotlin is a great place to start.
- This tutorial utilizes Data Binding and Binding Adapters. Again, if you have never used these, or you need a refresher, you should take a look at the data binding documentation from the Android project pages, or check out our MVVM on Android course.
- The code snippets in this tutorial do not include the needed import statements. Use the key combination option+return on Mac — or Alt+Enter on PC — to resolve any missing dependencies as you work through your project.
Getting Started
Start by downloading the materials for this tutorial using the Downloand amterials button at the top or bottom of this tutorial. Unzip the file and start Android Studio 3.2.1 or later.
In the Welcome to Android Studio dialog, select Import project (Eclipse ADT, Gradle, etc.):

Choose the ListMaster directory of the starter project and click Open:

If you see a message to update the project’s Gradle plugin, since you’re using a later version of Android Studio, choose Update.
Check out the project for the List Master app, and you will see two packages for list categories and list items.
Build and run the app, and your app will allow you to click the + button. Add a Category Name and see it in a list:

Creating Migrations
While having categories is a good start, your categories will be a lot more useful if each one has a list of items. The only problem is that you’ve already released a version of the app. When you run your Room-enabled app the first time, it generates the database and schema with its tables and attributes, and it saves them to the app storage. Unfortunately, as is the case with most ORMs, that table generation mechanism doesn’t have the ability to update your current database to a new structure.
One way to deal with the situation could be to delete your old database, including its data, and have Room generate a new database. Unfortunately, your users have begun to save category data in the app and may not be happy if they have to re-enter their list of categories. You can use a migration to update the data structure while preserving the users’ data.
Just like a bird migrating to warmer climates in the winter, your database can migrate to a better place for your app as you add, delete and refine your data structure.
Before you start to create migrations, it’s important to have an exported version of the database schema before the change. This allows you to test the migration and to ensure that is works correctly. To enable that in a fresh project, it requires a change to your app level build.gradle file. Your starter project already has this.
In your project, open the build.gradle file with the (Module: app) annotation:

You will see a section that looks like this:
android {
  ...
  defaultConfig {
      ...
      javaCompileOptions {
          annotationProcessorOptions {
              arguments = ["room.schemaLocation":
                           "$projectDir/schemas".toString()]
          }
      }
  }
}
Next, compile the app by selecting the Build menu option, followed by Reduild Project. A version of the current schema will now be stored in the app/schemas/com.raywenderlich.listmater.AppDatabase folder of your project. In the Android Studio Project view, it shows up under your assets package:

Now that you have the first version of the database saved, it’s time to set up your new list item and migration. The ListCategory object is going to have a one-to-many relationship to your ListItem objects. When you’re done the relationship will look like this:
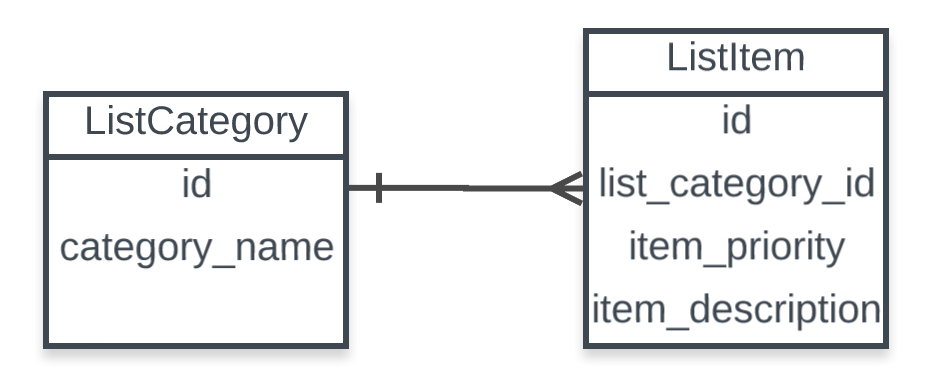
This means each ListCategory will have multiple ListItem objects and each ListItem will only be associated with one ListCategory object. ListItem will have the following fields:
- itemDescription: Contents of the list item.
- itemPriority: A priority for the item to assist in organizing the items.
- listCategoryId: A reference to the unique id of the category that the item is associated with for the relationship.
- id: The unique ID for the record in the database.
When you open up the ListItem object under the listitem package, you will see a data class with all of these fields.
Replace it with the following:
@Entity(
    tableName = "list_items",
    foreignKeys = [ForeignKey(
        entity = ListCategory::class,
        parentColumns = ["id"],
        childColumns = ["list_category_id"],
        onDelete = CASCADE)])
data class ListItem(
  @ColumnInfo(name = "item_description") var itemDescription: String,
  @ColumnInfo(name = "item_priority") var itemPriority: Int,
  @ColumnInfo(name = "list_category_id") var listCategoryId: Long,
  @ColumnInfo(name = "id") @PrimaryKey(autoGenerate = true) var id: Long = 0)
Most of the new annotations are similar to what are in your ListCategory but, in the @Entity annotation, you will notice that you’ve added a foreignKeys argument. A foreignKey is not a key to some secret place in another country, but rather an object that takes the following parameters to establish your one-to-many relationship:
-
entity: The entity that contains the foreign key. -
parentColumns: The column(s) of the parent entity object that contains the key. -
childColumns: The column(s) of the current entity, which is the child, that specified the parent key. -
onDelete: You are setting this toCASCADEmeaning that if a parent category is deleted, all of the children will be as well. It’s similar to going back in time and changing events so that the parent was never born and, as a result, the children would never be born because of the change in the space-time continuum. :]
Now, you are going to need to create a Dao for the ListItem entity. To do that, right-click on the listitem package. Select New ▸ Kotlin File/Class. Next, name it ListItemDao and press OK. Then paste in the following:
@Dao
interface ListItemDao {

  @Query("SELECT * FROM list_items")
  fun getAll(): LiveData<List<ListItem>>

  @Query("SELECT * FROM list_items WHERE list_category_id = :listCategoryId")
  fun getAllByListCategoryId(listCategoryId: Long): LiveData<List<ListItem>>

  @Insert
  fun insertAll(vararg listItems: ListItem)
}
The getAll() and insertAll() queries are performed the same way that they are for the ListCategory object in the Data Persistence with Room tutorial, with the addition of a LiveData object as the return value.
Note: If you’re new to the Android Architecture Components, you might be wondering that this LiveData object is. The short answer: It is an alternative to performing multiple query tasks in a background thread. You’ll see it in action here but, for a deeper dive, you can see the tutorial Android Architecture Components: Getting Started.
Note: If you’re new to the Android Architecture Components, you might be wondering that this LiveData object is. The short answer: It is an alternative to performing multiple query tasks in a background thread. You’ll see it in action here but, for a deeper dive, you can see the tutorial Android Architecture Components: Getting Started.
For the getAllByListCategory() query, there is a parameter named listCategoryId and a reference to it in the SQL statement with a : appended to the front of it. You are using this to pass a parameter to the SQL command in the Dao method. You add the parameter you want to pass to the function definition and then reference it in the SQL by appending : to it.
Now, it’s time to flap your wings by creating your migration. To do that, add a migrations package by right-clicking on your com.raywenderlich.listmaster package, selecting New ▸ Package. Next, enter migrations for the package name, and then press OK. Then, right-click on your migrations package, select New ▸ Kotlin File/Class. Give it a name of Migration1To2 and press OK. When the file opens, paste in the following:
@VisibleForTesting
class Migration1To2 : Migration(1, 2) {

  override fun migrate(database: SupportSQLiteDatabase) {
    database.execSQL("CREATE TABLE IF NOT EXISTS list_items" +
        "('item_description' TEXT NOT NULL, 'item_priority' INTEGER NOT NULL," +
        "'list_category_id' INTEGER NOT NULL, 'id' INTEGER NOT NULL, PRIMARY KEY(id)," +
        "FOREIGN KEY('list_category_id') REFERENCES list_categories('id') ON DELETE CASCADE)")
  }
}
This migration does two things:
- It extends the Migration class passing in the version of the database you are migrating from, 1, and the version of the database you are migrating to, 2.
- It overrides the migrate method and executes an SQL command to create the table that belongs with your ListItem class.
Note: You may have noticed a @VisibleForTesting annotation. As the name implies, this tells the compiler to make this component visible to your tests.
Note: You may have noticed a @VisibleForTesting annotation. As the name implies, this tells the compiler to make this component visible to your tests.
Finally, open the AppDatabase file and update the class to be the following:
//1
@Database(entities = [ListCategory::class, ListItem::class], version = 2)
abstract class AppDatabase : RoomDatabase() {

  abstract fun listCategoryDao(): ListCategoryDao
  //2
  abstract fun listItemDao(): ListItemDao

  companion object {
    //3
    @VisibleForTesting
    val MIGRATION_1_TO_2 = Migration1To2()
  }
}
You updated AppDatabase by adding the following features:
- Increased the version of your database to 2 and added
ListItem::classto the array of entities. - Added a reference to the
ListItemDao. - Exposed a reference to the migration method for testing.