Create ML Tutorial: Getting Started
In this Create ML tutorial, you’ll learn how to transfer your learning to Turi Create, and gain familiarity with machine learning toolsets and terminology. No math needed! By Audrey Tam.
Training & Validation Accuracy
When training finishes, the view displays Training and (sometimes) Validation accuracy metrics, with details in the debug area:
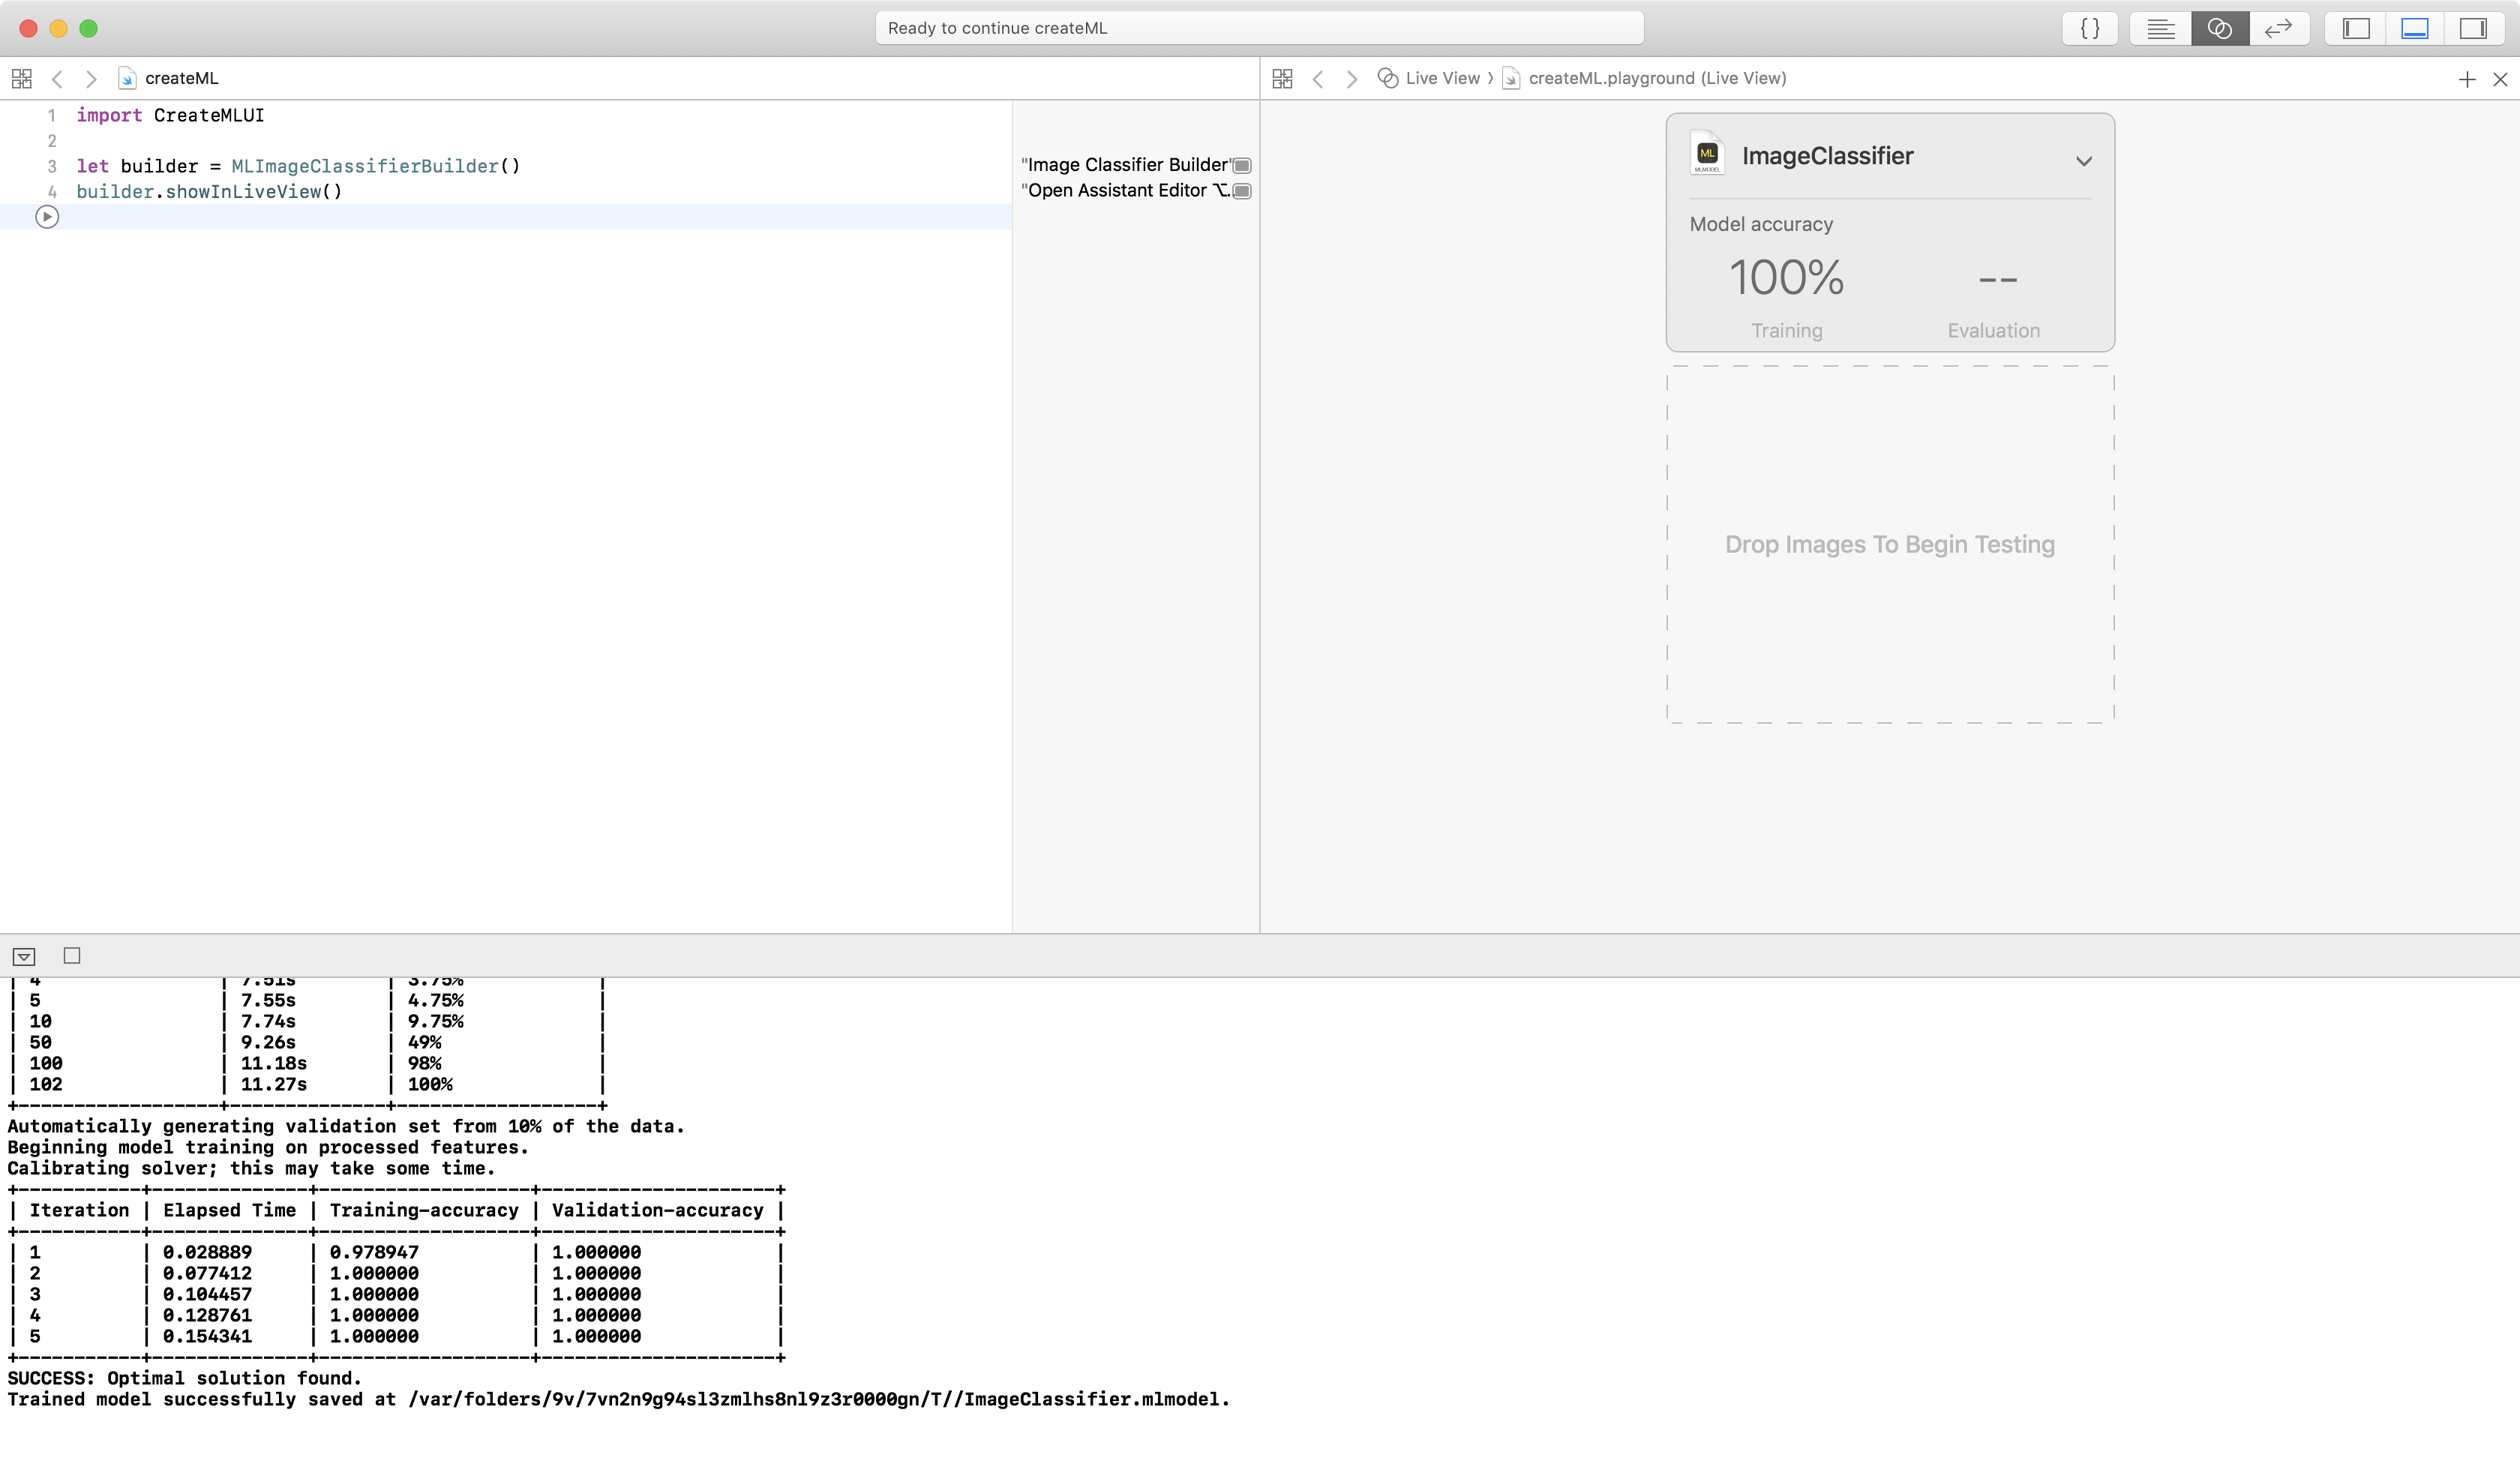
I got 100% training and validation accuracy! This time. Your mileage may vary, because the validation set is randomly chosen for each training session, so your validation set will be a different 10 images. There’s no way of knowing which images are chosen.
So what’s validation? And what do the accuracy figures mean?
Training accuracy is easy: Training involves guessing how much weight to give each feature to compute the answer. Because you labeled your images “Cat” or “Dog”, the training algorithm can check its answers and compute what percentage it got right. Then, it feeds the right-or-wrong information into the next iteration to refine the weights.
Validation accuracy is similar: Before training starts, a randomly chosen 10% of the dataset is split off to be validation data. Features are extracted and answers are computed with the same weights as the training dataset. But the results aren’t used directly for recomputing the weights. Their purpose is to prevent the model overfitting — getting fixated on a feature that doesn’t actually matter, like a background color or lighting. If validation accuracy is very different from training accuracy, the algorithm makes adjustments to itself. So the choice of validation images affects both the validation accuracy and the training accuracy. Turi Create lets you provide a fixed validation dataset if you’ve created one with similar characteristics to your testing data. And your testing dataset is a good representation of what your users will feed to your app.
Evaluation
The real question is: how well does the model classify images it didn’t train on?
The view prompts you to Drop Images to Begin Testing: drag the Pets-Testing folder onto the view. Very soon, the view displays Evaluation accuracy, with details in the debug area:
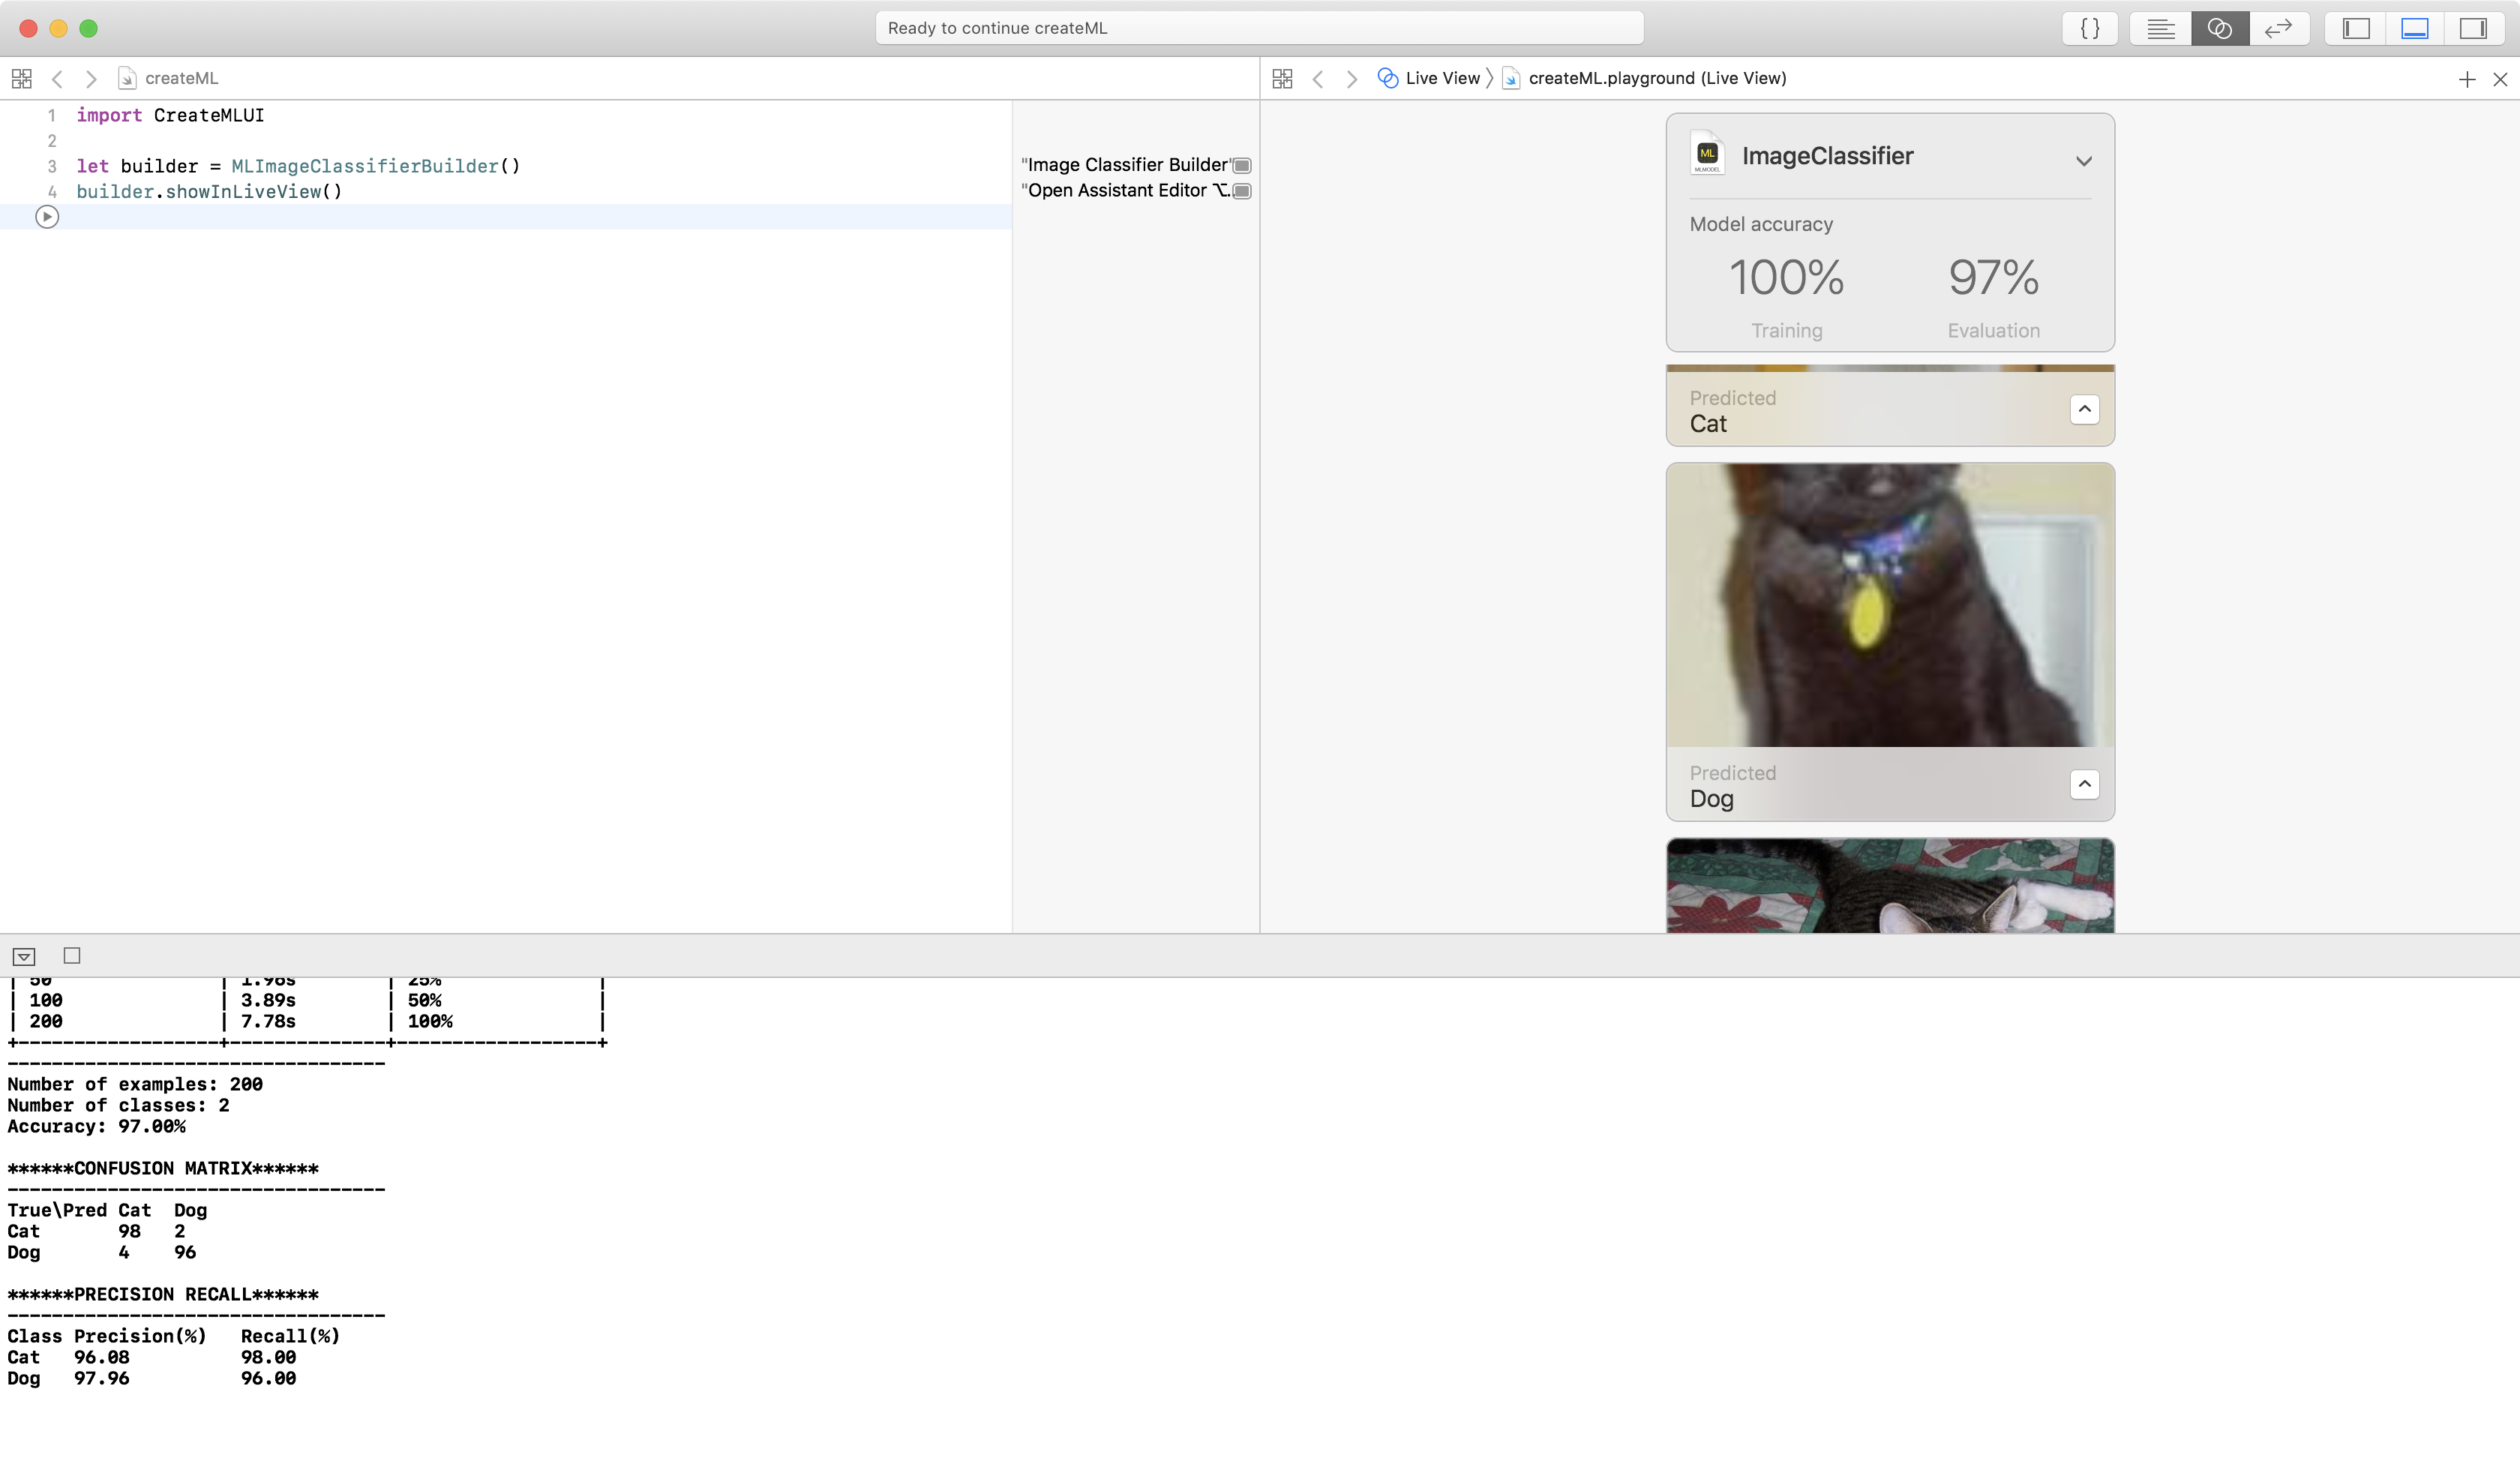
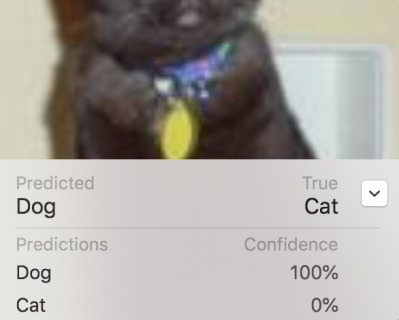
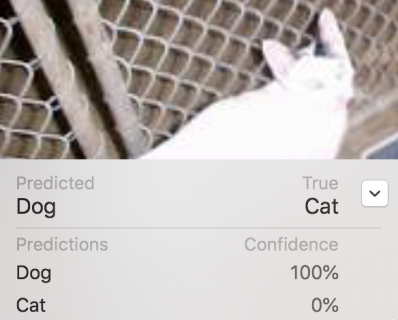
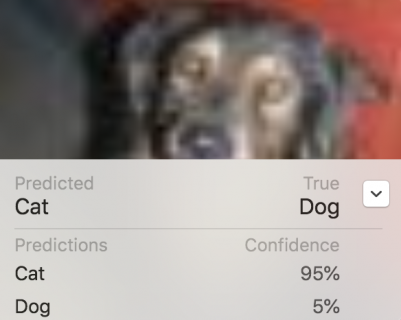
97% accuracy: the confusion matrix says two cat images were misclassified as dog, and four dog images were misclassified as cat. Scroll through the test images, to see which ones confused the model. There’s one in the screenshot above, and here’s the other confusing cat:

They’re pretty awful photos: one is blurry and too bright, the other is blurry with much of the head cropped off. The model resizes the images to 299×299, often cropping the edges, so the object you care about should ideally be centered in the image, but not too big or too small.
In the screenshot above, I clicked the disclosure button to see the confidence level: the model is 100% confident this cat is a dog! But scroll through the other images to see how the model gets it right for some pretty terrible images.
Improving Accuracy
The Pets-100 training dataset used only 50 of the 12,500 images for each class. Create ML makes it super easy to experiment with different data sets, to see whether more data improves accuracy.
Click the playground’s stop button, then click it again when it becomes a run button. This loads a new view, ready to accept training data.

Drag the Pets-1000 folder onto the view. Extracting features from 1000 images will take five to ten times longer than 100. While you’re waiting, here’s a summary of Apple’s helpful article Improving Your Model’s Accuracy, which gives specific advice for improving the different accuracy metrics.
Improving Training Accuracy
- Increase Max iterations for image classifiers. (This isn’t working in the first Xcode beta, but will work in the second beta.)
- Use different algorithms for text classifiers.
- Use different models for generic classifiers or regressors.

Improving Validation Accuracy
- Increase the amount of data: for image classifiers, you can augment your image data by flipping, rotating, shearing or changing the exposure of images. Here’s Apple’s illustration of data augmentation:

- Possible overfitting: reduce Max iterations. You probably don’t have to worry about this here, because my training run stopped when it was happy with the results, before reaching 10 iterations.
Improving Evaluation Accuracy
Make sure the diversity of characteristics of your training data match those of your testing data, and both sets are similar to the data your app users will feed to your model.
Back to the Playground
Training with 1000 images got 100% training accuracy, but only 96% validation accuracy, Again, YMMV — I’ve run this a few times, and sometimes get 99% validation accuracy.

Drag the Pets-Testing folder onto the view to evaluate this model; it gets 98.5% accuracy on the 200 test images!
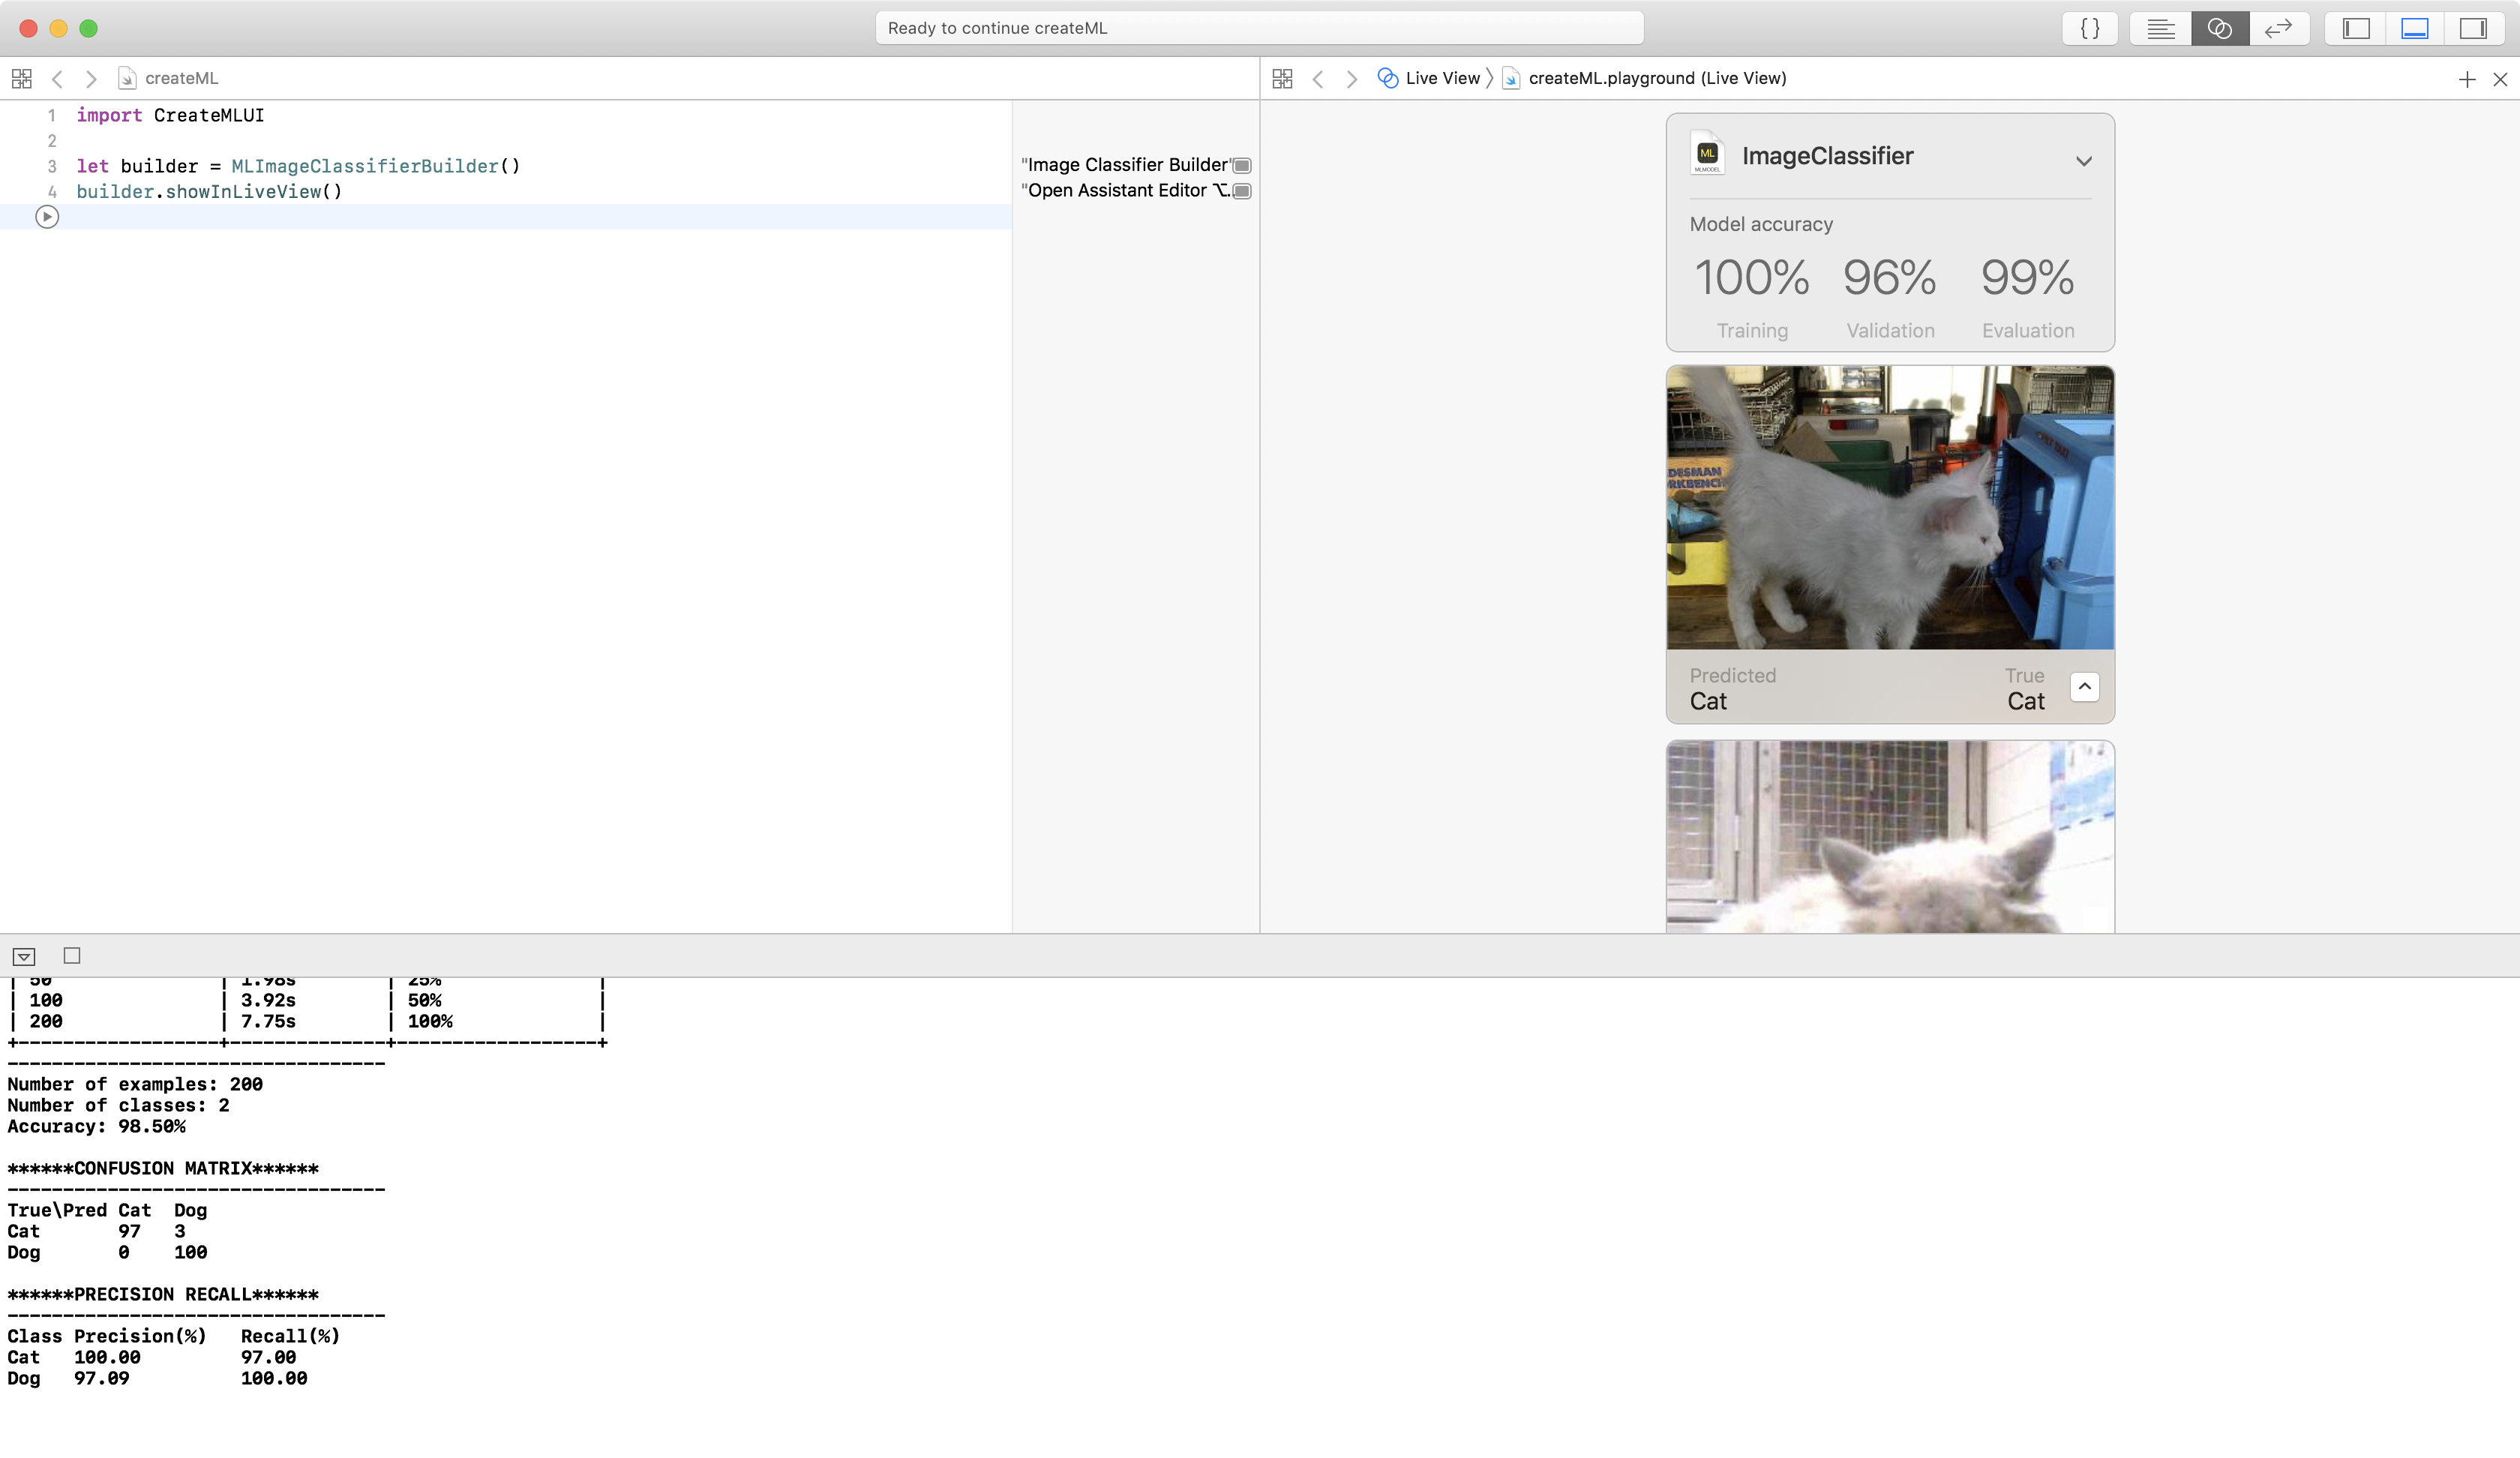
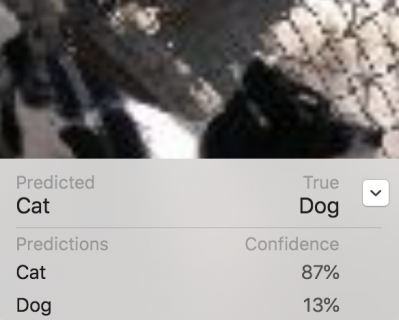
The confusion matrix says the model classified three of the cat images as dog. Actually, there are only the same two cats mislabelled as dogs — with 100% confidence!
Although the confusion matrix doesn’t say so, there are two dogs labelled as cats, but with lower confidence. They’re also blurry, with low contrast:
Probably the only way to further improve this model is to use more data, either by augmenting the 1000 images, or by adding more images from the full Kaggle dataset. Or by selecting your datasets more carefully to leave out really awful images that you don’t want your app to handle. Feel free to experiment! Remember it’s easy to do — the training just takes longer with larger datasets. I’ve run this with 5000 images: it took 32 minutes, and I got 99% for both training and validation accuracies … that time.
Increase Max Iterations?
The accuracy metrics for this example are actually pretty good — the underlying model probably already knows all about cats and dogs. But if you’re training for different classes, and getting low training accuracy, you’ll want to try increasing Max iterations to 20. At the time of writing this tutorial with the first Xcode beta, that’s not implemented. But here’s how you’d do it.
Stop and start the playground, then click the disclosure symbol next to ImageClassifier to show the options, change 10 to 20, and press Enter:

Click the disclosure symbol to hide the options, then open the options again to check Max iterations is still 20.
If you’re using Xcode beta 2 or later, drag your training folder onto the view to start training. This will take a little longer than the 10-iteration training session, but the feature extraction will take the same amount of time, and that’s the bulk of it.
fit instruction again actually starts where it left off. It’s actually possible to peer into Turi Create’s source code and pull out the lower-level code that extracts features from the images — the part that uses most of the time. Then, you can save the extracted features and reload them whenever you want to do more training iterations! Hopefully this motivates you to be more interested in Turi Create and perhaps also in Keras!