Gradle Tips and Tricks for Android
Learn some cool tricks for working with the Gradle build system, such as autocompletion, using build-time variables, and reducing build time! By Nishant Srivastava.
Inspecting the dependency graph
Testing Builds via Dry Run
Once done, click Reload dependencies:


Here you:
You can declare more variables here such as your minSdkVersion, targetSdkVersion, versionCode and even Android Gradle plugin version. Update the Dependencies.kt file to include all the version numbers and dependencies you need:
This is all you need to set up the whole dependency management system. You’ll use this now in your app module.
Open the app module’s build.gradle file, go to the dependencies block and replace the Kotlin stdlib dependency by typing Deps.ko. Wait for autocomplete to suggest kotlinStdLib to you:

Update the full dependencies block to be:
I’ll leave it for you as a challenge to use the other version numbers from Dependencies.kt. For example, the compileSdkVersion becomes:
Check out the final project if you run into any trouble.
Once you’re done, you can sync your project with Gradle and run the app. You will see the app runs successfully as before:

You now have autocompletion and code navigation (in Android Studio) for jumping to definitions enabled for your dependencies from any module. You only need to make the changes once in the Dependencies.kt file and it works across all modules.
It is pretty common to encounter conflicts when you move to a cross-module dependency management system like the one explained above. For example, one of your modules might transitively depend on a different version of a dependency but another module depends on another version of the same dependency. Having different versions of the same dependency can cause inconsistencies in the project.
You can use Gradle to define strategies around dependency resolution in the event of conflicts. For example, for forcing certain dependency versions, using substitutions, and conflict resolutions.
First, you set up the project to show version conflicts. Add the following code block after the dependencies block in the app module build.gradle file, replacing // TODO: Add Dependency Conflict Management block here:
Here you:
Add a new dependency to your app module build.gradle file:
Next, in Dependencies.kt change the version of support:appcompat-v7 specified in the support constant to 27.1.1 from 26.0.1. Sync the project with your Gradle files, and you will see that the project doesn’t compile and instead shows the below error:

Why did this happen? Because one of the dependencies depends on a different version of support:appcompat-v7 library.
To fix this conflict, update the resolutionStrategy block as below:
Here you:
What you have done is told Gradle to force the version the 26.0.1 for the support:support-annotations in all configurations.
Once these changes are added and Gradle is synced, there will be no more conflict errors! Great work at fixing them!
Run the app. You will see the app runs successfully as before:
For those of you who work with native C and C++ code in Android projects, you probably have been bundling the compiled native code and the native shared library for all platform types (armeabi-v7a, arm64-v8a, x86, x86_64) along with your generated .apk file, leading to huge .apk sizes.
What if I told you there is a simple trick to make your APK file smaller by only bundling compiled native code for only one platform type and then generating a different APK for each? Gradle makes it possible once again, via the splits block
The splits block is where you can configure different APK builds that each contains only code and resources for a supported screen density or ABI.
You can even split your APK based on the density of pixels and, with a little bit of Groovy magic, you can make sure each of these .apk files has a version that is dynamically generated.
To use splits, simply add the splits code block and two other items within the android block in your app module’s build.gradle file, replacing // TODO: Add .apk splits block here:
A line by line explanation is as follows:
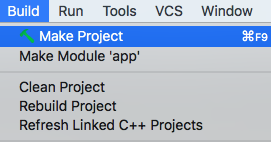
Once you have added this new code, sync the project with your Gradle files. Next, go to the Build top menu option and click MakeProject:
When the make process finishes, navigate to the app/build/outputs/apk/debug/ folder in your Project view to see the split .apk files by platform types:

Also, here are the size differences:

For a simple app like this, the size savings are small, but they can be more significant for larger projects.
Good job!
Often times, you will have a requirement in which you need to modify the behavior of your app based on the type of build. For example, for your debug build, you might want to enable logs but disable logging in your release builds, or simply use a different endpoint URL for a different build type.
You can use Gradle to handle these requirements pretty gracefully.
You are able to pass variables from your build to both Java and Kotlin code and to native code:
The Gradle plugin provides a feature called the buildConfigField, which, once declared inside build.gradle for a particular build type, is generated as static properties of the BuildConfig class. The BuildConfig class is a special class that is generated by Gradle at build time. It contains other information like version, version code, etc.
Give it a spin and declare your own variables. Add the code below to your debug build type, replacing // TODO: Declare debug specific buildConfigField and // TODO: Add app_type string resource here with value specific to debug type. Then define the equivalent for release block:
Here you:
Likewise, you can do this for other build types and modify the values.
Next, sync your project and Gradle files. You can now access the variables you defined in your build.gradle file, via the BuildConfig class file in your Java and Kotlin code.
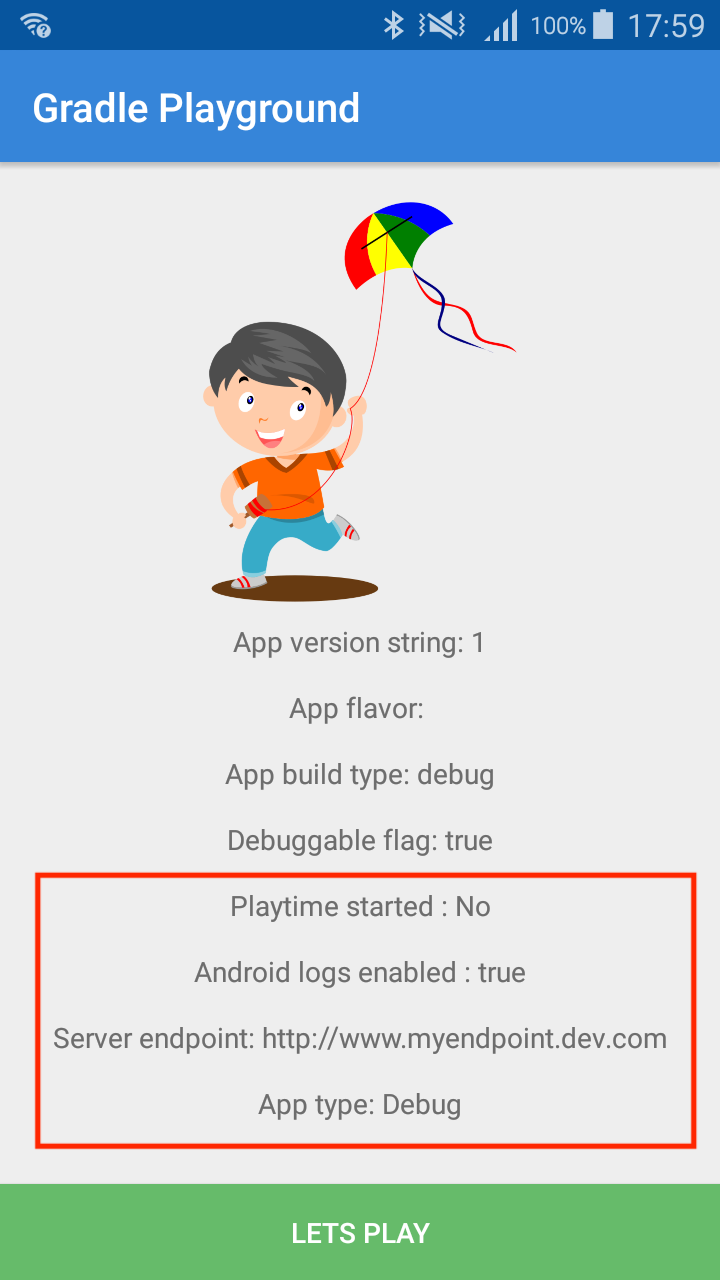
Navigate to your MainActivity.kt file and replace // TODO: Append custom defined build variables to the textToDisplay, inside btnLetsPlay.setOnClickListener lambda with:
Build and run the app. Click the Let’s Play button. You will see the following:
Accessing flags defined at build time from your native code — i.e., C/C++ code — is a bit tricky. To understand the process, you will need to understand how the native code is compiled.
Your native code is first passed to a compiler — i.e., gcc/clang — and then is passed on to the CMake tool, which adds other shared libraries to the classpath. So to be able to pass a flag to your native code, you need to pass an argument to the compiler first. To do that, Gradle provides the externalNativeBuild block.
Now, based on what kind of toolchain you are using to compile your native code, you can either have ndkBuild or cmake set up for you. In the current example, you are using the CMake toolchain.
The way you pass arguments to the compiler is defined in the help manual for the compiler (clang):
To pass values to your native code, you will use something like the following:
You can read more about these here.
Open your build.gradle file for the app module and add the below code under your build_type/externalNativeBuild/cmake, replacing // TODO: Declare flags to be passed to native code, where build_type can be any of your build types such as debug or release:
Sync the project with your Gradle files and navigate to app/src/main/cpp/native-lib.cpp via the Project view.
Inside native-lib.cpp, replace // TODO: Add LOGD statements to log flags set at build time with the following snippet:
Now, build and run your app. Next, and click the Let’s Play button. Open up Logcat

Enter Native in the filter box to see the values as read from your native code, the values of which were defined in your build.gradle file:

Wow, you are getting good at this! Great work!
This is a pretty common use case. You have multiple build types and you want to define the package name, version name and debuggable properties on each one differently. Gradle has a solution for you.
Add the following properties to your debug build types, replacing // TODO: Modify application id and version name and // TODO: setup debug flags:
A line-by-line explanation:
By modifying these in your build types, you can change the values accordingly per build type.
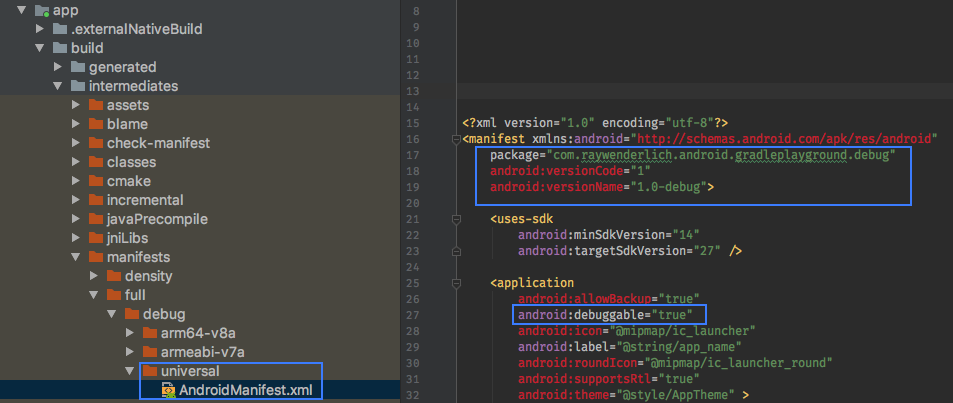
Now, sync your project and Gradle files, and navigate to app/build/intermediates/manifests/full/debug/universal/ via the Project view.
Next, open the AndroidManifest.xml file in this folder. This is the generated and merged manifest file for this build type. Here, you will see the changes in package name, version name and the debuggable flag being set in the manifest file:
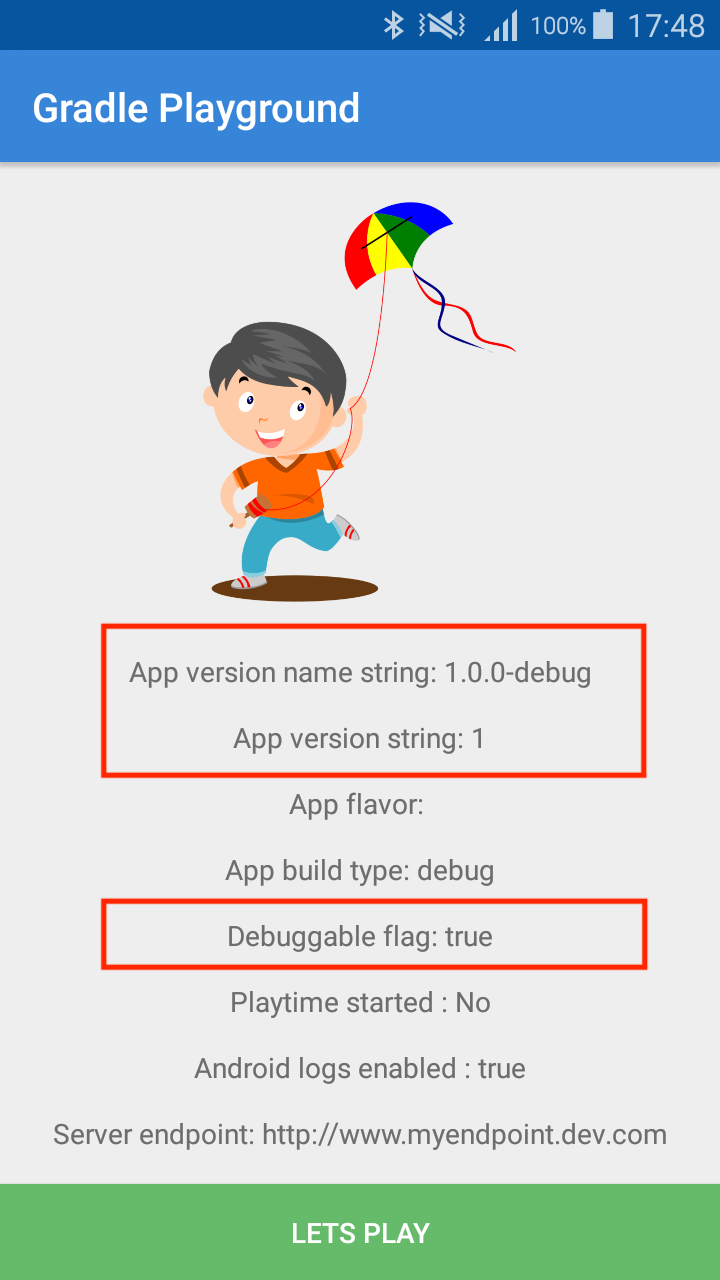
Also, if you build and run the app, then click the “Let’s Play” button, you can see the values in the text views inside the app:
If the build fails when you try to build and run the app, try cleaning the project by choosing Build ▸ Clean Project from the Android Studio menu.
If you have been working with Android for awhile, you are aware of huge build times that Android projects can sometimes have.
![]()
Yeah, sometimes it can get out of hand. :]
You can fix this and speed up your builds by tweaking your Gradle settings a little bit.
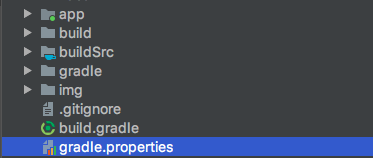
Navigate to the gradle.properties file of your project via the Project view:
Append the below flags for the Gradle build system:
Here’s an explanation, line-by-line:
With these settings enabled, your builds should be considerably faster. Build and run your app:

Apart from the first build, all subsequent builds should be faster than the last one; the build time for your app would be much reduced. That’s Gradle magic for you. Enjoy this huge time saver for playing more video games!
If you are on a slow network connection, your build times may suffer when Gradle attempts to use network resources to resolve dependencies. You can tell Gradle to avoid using network resources by using only the artifacts that it has cached locally.
To use Gradle offline mode:

After you have enabled offline mode, build and run your app. You will see your app up and running with a much faster build time.
If you’re building from the command line, pass the –offline option.
When using offline mode, if you add a new dependency to one of your modules, you’ll need to make sure your connected to a network and disable offline mode temporarily in order to sync the new dependency.
Often, you would like to have different versions of your Android app for different audiences, such as Free, Pro, Beta, etc. Gradle has a feature called Product Flavors, which represents different versions of your app that you may release to users.
Furthermore, you can define different package names and version names for these flavors. To do so, you add the following snippet within the android block inside your app/build.gradle file, replacing // TODO: Add Product Flavors block here:
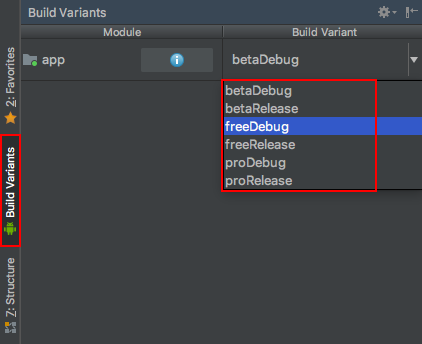
Product flavors, by default, combine with build types to generate Build Variants, which are nothing but combinations of your product flavor with build type, e.g., freeDebug, freeRelease, betaDebug, etc.
Now sync the project with your Gradle files. Open the BuildVariants tab in Android Studio and switch to the freeDebug variant:
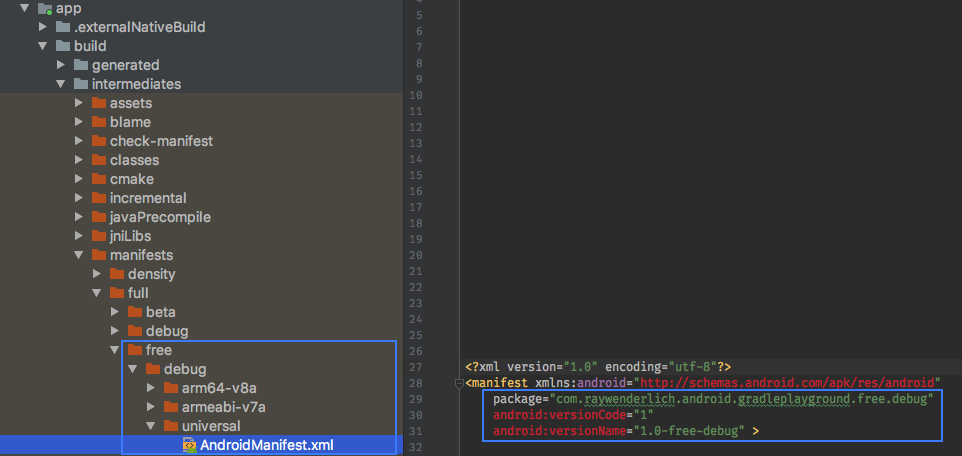
Check out the few changes that you added in your product flavors. Navigate to app/build/intermediates/manifests/full/free/debug/universal/ via the Project View and open AndroidManifest.xml. This is the generated and merged manifest file for freeDebug build variant. Here, you see the changes in package name and version name in the generated manifest file.
Note how the package name now has .free.debug appended and version name has -free-debug appended:
Now, build and run the app. Click the Let’s Play button. You will see:

Sometimes, you just want to inspect the dependency graph of your project. Gradle has just the right thing for you called the androidDependencies tasks. It generates a graph of all dependencies your project pulls in, even transitive ones.
First, open a Terminal:
![]()
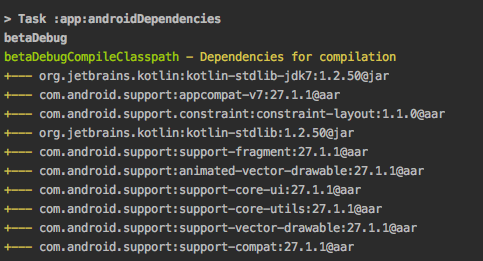
Now, execute the following in the Terminal, passing the androidDependencies task to the Gradle wrapper:
You will see the following output:
It is also possible to execute this Gradle task from the UI in Android Studio. Simply open the Gradle side tab on the right-hand side and navigate to your_project/Tasks/android/ and double-click androidDependencies. This will execute the task:

You will see the output in the Run window:

There are times when you may wish to see all the tasks that will be executed during the build, but you don’t want to execute them. This is a so-called dry run of your build. You can use the dry run of a build to see if the task dependencies are defined properly.
To execute this, from the Terminal, pass the –dry-run option to Gradle wrapper, as shown below:
You will see the build task execute successfully but that all the sub tasks are skipped. That is because you only wanted to dry run the particular task. You will see the following on a dry run execution:

Phew, that was a lot of stuff, but you really did make it through all the training! Now, you are a master in the art of Gradle-fu!
You can find the final project in the tutorial .zip file, which you can download using the Download materials button at the top and bottom of the tutorial.
Gradle is a solid and very customizable build automation system. It makes the life of developers so much better by handling a lot of the nuances around the build system in a graceful manner — making the build system a joy to work with.
Hopefully, after finishing this tutorial, you have a solid understanding of how you can leverage the powerful features provided by Gradle and the Android Studio Gradle plugin to make your development/build cycle more approachable and easier to work with.
If you want to learn more about working with Gradle for Android Development, checkout Google’s official documentation.
I hope you enjoyed this tutorial on exploring Gradle tips and tricks for Android Development. If you have any questions or comments, please join the forum discussion below!
-
Switch to Project view and right-click on your project root folder. Select New ▸ Directory:

-
Name your new directory buildSrc:

-
Once created, you will have a project directory structure like below:

-
Right-click on the created buildSrc folder and create a New ▸ File named build.gradle.kts:

-
Edit your build.gradle.kts file and add the kotlin-dsl plugin as shown below:
import org.gradle.kotlin.dsl.`kotlin-dsl` plugins { `kotlin-dsl` } - Next, right-click on the buildSrc folder and select New ▸ Directory. Enter src/main/java to create multiple nested folders:
- Once created, navigate to the buildSrc/src/main/java folder. Right-click on the java folder and select New ▸ File. Create a file named Dependencies.kt:
-
Now, edit the Dependencies.kt file and add Kotlin code to declare the dependencies and versions as constant immutable variables. To have a bit of separation, versions are declared inside a singleton named Versions and the dependency inclusion rule is declared inside a singleton named Deps:
// 1 object Versions { // 2 const val kotlin = "1.2.50" } // 3 object Deps { // 4 const val kotlinStdLib = "org.jetbrains.kotlin:kotlin-stdlib-jdk7:${Versions.kotlin}" }- Define an object (singleton in Kotlin) named Versions.
- Define a constant named kotlin and assign it a value that is the version of Kotlin language plugin you are using.
- Define another object named Deps.
- Define a constant named kotlinStdLib and assign it a value that is the string for the Kotlin standard library dependency. Note how the kotlinStdLib value can reference values from the Versions singleton.
object Versions {

  // Build Config
  const val minSDK = 14
  const val compileSDK = 27
  const val targetSDK = 27

  // App version
  const val appVersionCode = 1
  const val appVersionName = "1.0.0"

  // Plugins
  const val androidGradlePlugin = "3.1.3"

  // Kotlin
  const val kotlin = "1.2.50"

  // Support Lib
  // const val support = "27.1.1"
  // Comment above and uncomment below to cause conflict in dependency
  const val support = "26.0.1"
  const val constraintLayout = "1.1.0"

  // Testing
  const val junit = "4.12"
  const val espresso = "3.0.2"
  const val testRunner = "1.0.2"

}

object Deps {

  // Plugins
  const val androidGradlePlugin = "com.android.tools.build:gradle:${Versions.androidGradlePlugin}"

  // Kotlin
  const val kotlinStdLib = "org.jetbrains.kotlin:kotlin-stdlib-jdk7:${Versions.kotlin}"
  const val kotlinGradlePlugin = "org.jetbrains.kotlin:kotlin-gradle-plugin:${Versions.kotlin}"

  // Support Library
  const val appCompat = "com.android.support:appcompat-v7:${Versions.support}"
  const val supportAnnotations = "com.android.support:support-annotations:${Versions.support}"
  const val constraintLayout = "com.android.support.constraint:constraint-layout:${Versions.constraintLayout}"

  // Testing
  const val junit = "junit:junit:${Versions.junit}"
  const val espressoCore = "com.android.support.test.espresso:espresso-core:${Versions.espresso}"
  const val testRunner = "com.android.support.test:runner:${Versions.testRunner}"
}
// Replace this implementation "org.jetbrains.kotlin:kotlin-stdlib-jdk7:$kotlin_version" // With implementation Deps.kotlinStdLib
dependencies { implementation fileTree(dir: 'libs', include: ['*.jar']) // Kotlin implementation Deps.kotlinStdLib // Support Libraries implementation Deps.appCompat implementation Deps.constraintLayout // Testing testImplementation Deps.junit androidTestImplementation Deps.testRunner androidTestImplementation Deps.espressoCore }compileSdkVersion Versions.compileSDK
// 1 configurations.all { // 2 resolutionStrategy { // 3 failOnVersionConflict() } }- Declare the task that will monitor all configurations.
- Define the resolution strategy in case of conflicts.
- Fail eagerly on version conflict (includes transitive dependencies), e.g., multiple different versions of the same dependency (group and name are equal).
implementation "com.android.support:support-annotations:26.0.1"
configurations.all { resolutionStrategy { failOnVersionConflict() // 1 preferProjectModules() // 2 force 'com.android.support:support-annotations:26.0.1' // 3 forcedModules = ['com.android.support:support-annotations:26.0.1'] // 4 dependencySubstitution { substitute module('com.android.support:support-annotations:27.1.1') with module('com.android.support:support-annotations:26.0.1') } } }- Prefer modules that are part of this build (multi-project or composite build) over external modules.
- Force certain versions of dependencies (including transitive), append new forced modules.
- Force certain versions of dependencies (including transitive), replace existing forced modules with new ones.
- Add dependency substitution rules, e.g., replace one dependency with another.
Note: This property is incubating and may change in a future version of Gradle.
Note: From the official documentation:android { ... // Add this block splits { // 1 abi { // 2 enable true // 3 reset() // 4 include "armeabi-v7a", "arm64-v8a", "x86", "x86_64" // 5 universalApk true } // 6 density { // 7 enable false // 8 exclude "ldpi", "tvdpi", "xxxhdpi", "400dpi", "560dpi" } } // 9 project.ext.versionCodes = ['armeabi-v7a': 1, 'arm64-v8a': 2, 'x86': 3, 'x86_64': 4] // 10 android.applicationVariants.all { variant -> // assign different version code for each output variant.outputs.each { output -> output.versionCodeOverride = project.ext.versionCodes.get(output.getFilter(com.android.build.OutputFile.ABI), 0) * 100000 + android.defaultConfig.versionCode } } }- Configures multiple APKs based on ABI.
- Enables building multiple APKs.
- By default, all ABIs are included, so use reset() and include to specify the APKs you want.
- Specify a list of ABIs for which Gradle should create APKs.
- Specify that you want to also generate a universal APK that includes all ABIs.
- Configure multiple APKs based on screen density.
- Turn off density-based APKs; set to
trueto turn on. - Exclude these densities when building multiple density-based APKs.
- Map for the version code that gives each ABI a value.
- Iterate over all artifacts that are generated, and assign each with proper versioning.
buildTypes { ... debug { // 1 buildConfigField "String", "SERVER_ENDPOINT", '"http://www.myendpoint.dev.com"' buildConfigField "boolean", "ENABLE_LOGS", "true" buildConfigField "String", "PLAYTIME_STARTED", '"No"' // 2 resValue "string", "app_type", "Debug" } ... }- Define your
buildConfigFieldvariables and give them values. - Add a new generated resource, in particular, a string resource item generated at build time.
textToDisplay.append("Playtime started : ${BuildConfig.PLAYTIME_STARTED}").append("\n\n") textToDisplay.append("Android logs enabled : ${BuildConfig.ENABLE_LOGS}").append("\n\n") textToDisplay.append("Server endpoint: ${BuildConfig.SERVER_ENDPOINT}").append("\n\n") textToDisplay.append("App type: ${getString(R.string.app_type)}").append("\n\n")-D<macroname>=<value> Adds an implicit #define into the predefines buffer which is read before the source file is preprocessed.
// Use this to pass arguments to your C++ code: cppFlags.add("-D<macroname>=<value>") // Use this to pass arguments to your C code: cFlags.add("-D<macroname>=<value>")debug { ... externalNativeBuild { cmake { // Passed to your compiler i.e clang/gcc, hence available to your c/c++ code cppFlags.add("-DNDK_ENABLE_LOGS=true") cppFlags.add("-DNUMBER_OF_KIDS=3") } } }LOGI("Number of kids: %d", NUMBER_OF_KIDS); // Flag shown in logs would be as per: true == 1, false == 0 LOGW("Logs enabled: %d", NDK_ENABLE_LOGS);buildTypes { ... debug { // 1 applicationIdSuffix ".debug" // 2 versionNameSuffix "-debug" // 3 debuggable true // 4 jniDebuggable true // 5 renderscriptDebuggable false ... } ... }- The Application ID suffix is appended to the “base” application ID when calculating the final application ID for a variant.
- The Version name suffix is appended to the “base” version name when calculating the final version name for a variant.
- Set whether this build type should generate a debuggable APK.
- Set whether this build type is configured to generate an APK with debuggable Native code.
- Set whether the build type is configured to generate an APK with debuggable RenderScript.
# 1 org.gradle.jvmargs=-Xmx2048m # 2 org.gradle.daemon=true # 3 org.gradle.configureondemand=true # 4 org.gradle.parallel=true # 5 android.enableBuildCache=true # 6 org.gradle.caching=true
- Specifies the JVM arguments used for the Gradle Daemon. The setting is particularly useful for configuring JVM memory settings for build performance.
- -Xmx2048m: Increase the amount of memory allocated to the Gradle Daemon VM to 2 Gb.
- When set to
true, the Gradle Daemon is used to run the build. The default is true starting with Gradle v3.0. - For Gradle to know exactly how to build your app, the build system configures all modules in your project, and their dependencies, before every build — even if you are building and testing only a single module. This slows down the build process for large multi-module projects. Setting this field will make Gradle attempt to configure only necessary projects.
- When set to
true, this will force Gradle to execute tasks in parallel as long as those tasks are in different projects. - When set to
true, this will force Gradle to not run a task if its inputs and outputs are equivalent to what they were during its previous execution. - When set to
true, Gradle will reuse task outputs from any previous build, when possible.
- Open the Preferences window by clicking File ▸ Settings (on Mac, Android Studio ▸ Preferences).
- Search for “offline.”
- Check the Offline work checkbox and click Apply or OK.
$ ./gradlew build --offline
android{ ... // Add this block productFlavors { // Free Product Flavor free { applicationIdSuffix ".free" versionNameSuffix "-free" } // Beta Product Flavor beta { applicationIdSuffix ".beta" versionNameSuffix "-beta" } // Pro Product Flavor pro { applicationIdSuffix ".pro" } } ... }$ ./gradlew androidDependencies
$ ./gradlew build --dry-run

- -Xmx2048m: Increase the amount of memory allocated to the Gradle Daemon VM to 2 Gb.
- Define an object (singleton in Kotlin) named Versions.
- Define a constant named kotlin and assign it a value that is the version of Kotlin language plugin you are using.
- Define another object named Deps.
- Define a constant named kotlinStdLib and assign it a value that is the string for the Kotlin standard library dependency. Note how the kotlinStdLib value can reference values from the Versions singleton.
- Declare the task that will monitor all configurations.
- Define the resolution strategy in case of conflicts.
- Fail eagerly on version conflict (includes transitive dependencies), e.g., multiple different versions of the same dependency (group and name are equal).
- Prefer modules that are part of this build (multi-project or composite build) over external modules.
- Force certain versions of dependencies (including transitive), append new forced modules.
- Force certain versions of dependencies (including transitive), replace existing forced modules with new ones.
- Add dependency substitution rules, e.g., replace one dependency with another.
Note: This property is incubating and may change in a future version of Gradle.
- Configures multiple APKs based on ABI.
- Enables building multiple APKs.
- By default, all ABIs are included, so use reset() and include to specify the APKs you want.
- Specify a list of ABIs for which Gradle should create APKs.
- Specify that you want to also generate a universal APK that includes all ABIs.
- Configure multiple APKs based on screen density.
- Turn off density-based APKs; set to
trueto turn on. - Exclude these densities when building multiple density-based APKs.
- Map for the version code that gives each ABI a value.
- Iterate over all artifacts that are generated, and assign each with proper versioning.
- Define your
buildConfigFieldvariables and give them values. - Add a new generated resource, in particular, a string resource item generated at build time.
- The Application ID suffix is appended to the “base” application ID when calculating the final application ID for a variant.
- The Version name suffix is appended to the “base” version name when calculating the final version name for a variant.
- Set whether this build type should generate a debuggable APK.
- Set whether this build type is configured to generate an APK with debuggable Native code.
- Set whether the build type is configured to generate an APK with debuggable RenderScript.
- Specifies the JVM arguments used for the Gradle Daemon. The setting is particularly useful for configuring JVM memory settings for build performance.
- When set to
true, the Gradle Daemon is used to run the build. The default is true starting with Gradle v3.0. - For Gradle to know exactly how to build your app, the build system configures all modules in your project, and their dependencies, before every build — even if you are building and testing only a single module. This slows down the build process for large multi-module projects. Setting this field will make Gradle attempt to configure only necessary projects.
- When set to
true, this will force Gradle to execute tasks in parallel as long as those tasks are in different projects. - When set to
true, this will force Gradle to not run a task if its inputs and outputs are equivalent to what they were during its previous execution. - When set to
true, Gradle will reuse task outputs from any previous build, when possible.
- Open the Preferences window by clicking File ▸ Settings (on Mac, Android Studio ▸ Preferences).
- Search for “offline.”
- Check the Offline work checkbox and click Apply or OK.
import org.gradle.kotlin.dsl.`kotlin-dsl`
plugins {
`kotlin-dsl`
}
// 1
object Versions {
// 2
const val kotlin = "1.2.50"
}
// 3
object Deps {
// 4
const val kotlinStdLib = "org.jetbrains.kotlin:kotlin-stdlib-jdk7:${Versions.kotlin}"
}
object Versions {
// Build Config
const val minSDK = 14
const val compileSDK = 27
const val targetSDK = 27
// App version
const val appVersionCode = 1
const val appVersionName = "1.0.0"
// Plugins
const val androidGradlePlugin = "3.1.3"
// Kotlin
const val kotlin = "1.2.50"
// Support Lib
// const val support = "27.1.1"
// Comment above and uncomment below to cause conflict in dependency
const val support = "26.0.1"
const val constraintLayout = "1.1.0"
// Testing
const val junit = "4.12"
const val espresso = "3.0.2"
const val testRunner = "1.0.2"
}
object Deps {
// Plugins
const val androidGradlePlugin = "com.android.tools.build:gradle:${Versions.androidGradlePlugin}"
// Kotlin
const val kotlinStdLib = "org.jetbrains.kotlin:kotlin-stdlib-jdk7:${Versions.kotlin}"
const val kotlinGradlePlugin = "org.jetbrains.kotlin:kotlin-gradle-plugin:${Versions.kotlin}"
// Support Library
const val appCompat = "com.android.support:appcompat-v7:${Versions.support}"
const val supportAnnotations = "com.android.support:support-annotations:${Versions.support}"
const val constraintLayout = "com.android.support.constraint:constraint-layout:${Versions.constraintLayout}"
// Testing
const val junit = "junit:junit:${Versions.junit}"
const val espressoCore = "com.android.support.test.espresso:espresso-core:${Versions.espresso}"
const val testRunner = "com.android.support.test:runner:${Versions.testRunner}"
}
// Replace this
implementation "org.jetbrains.kotlin:kotlin-stdlib-jdk7:$kotlin_version"

// With
implementation Deps.kotlinStdLib
dependencies {
  implementation fileTree(dir: 'libs', include: ['*.jar'])

  // Kotlin
  implementation Deps.kotlinStdLib

  // Support Libraries
  implementation Deps.appCompat
  implementation Deps.constraintLayout

  // Testing
  testImplementation Deps.junit
  androidTestImplementation Deps.testRunner
  androidTestImplementation Deps.espressoCore
}
compileSdkVersion Versions.compileSDK
// 1
configurations.all {
  // 2
  resolutionStrategy {
    // 3
    failOnVersionConflict()
  }
}
implementation "com.android.support:support-annotations:26.0.1"
configurations.all {
  resolutionStrategy {
    failOnVersionConflict()

    // 1
    preferProjectModules()

    // 2
    force 'com.android.support:support-annotations:26.0.1'

    // 3
    forcedModules = ['com.android.support:support-annotations:26.0.1']

    // 4
    dependencySubstitution {
      substitute module('com.android.support:support-annotations:27.1.1') with module('com.android.support:support-annotations:26.0.1')
    }
  }
}
android {
  ...
  // Add this block
  splits {

    // 1
    abi {

      // 2
      enable true

      // 3
      reset()

      // 4
      include "armeabi-v7a", "arm64-v8a", "x86", "x86_64"

      // 5
      universalApk true
    }

    // 6
    density {

      // 7
      enable false

      // 8
      exclude "ldpi", "tvdpi", "xxxhdpi", "400dpi", "560dpi"
    }
  }

  // 9
  project.ext.versionCodes = ['armeabi-v7a': 1, 'arm64-v8a': 2, 'x86': 3, 'x86_64': 4]

  // 10
  android.applicationVariants.all { variant ->
    // assign different version code for each output
    variant.outputs.each { output ->
      output.versionCodeOverride =
          project.ext.versionCodes.get(output.getFilter(com.android.build.OutputFile.ABI), 0) *
              100000 +
              android.defaultConfig.versionCode
    }
  }
}
buildTypes {
    ...
    debug {
       // 1
       buildConfigField "String", "SERVER_ENDPOINT", '"http://www.myendpoint.dev.com"'
       buildConfigField "boolean", "ENABLE_LOGS", "true"
       buildConfigField "String", "PLAYTIME_STARTED", '"No"'

       // 2
       resValue "string", "app_type", "Debug"
    }
    ...
 }
textToDisplay.append("Playtime started : ${BuildConfig.PLAYTIME_STARTED}").append("\n\n")
textToDisplay.append("Android logs enabled : ${BuildConfig.ENABLE_LOGS}").append("\n\n")
textToDisplay.append("Server endpoint: ${BuildConfig.SERVER_ENDPOINT}").append("\n\n")
textToDisplay.append("App type: ${getString(R.string.app_type)}").append("\n\n")
-D<macroname>=<value>
  Adds an implicit #define into the predefines buffer which is read before the source file is preprocessed.
// Use this to pass arguments to your C++ code:
cppFlags.add("-D<macroname>=<value>")

// Use this to pass arguments to your C code:
cFlags.add("-D<macroname>=<value>")
debug {
  ...
  externalNativeBuild {
    cmake {
      // Passed to your compiler i.e clang/gcc, hence available to your c/c++ code
      cppFlags.add("-DNDK_ENABLE_LOGS=true")
      cppFlags.add("-DNUMBER_OF_KIDS=3")
    }
  }
}
 LOGI("Number of kids: %d", NUMBER_OF_KIDS);

 // Flag shown in logs would be as per: true == 1, false == 0
 LOGW("Logs enabled: %d", NDK_ENABLE_LOGS);
buildTypes {
    ...
    debug {
      // 1
      applicationIdSuffix ".debug"

      // 2
      versionNameSuffix "-debug"

      // 3
      debuggable true

      // 4
      jniDebuggable true

      // 5
      renderscriptDebuggable false
      ...
   }
   ...
}
# 1
org.gradle.jvmargs=-Xmx2048m

# 2
org.gradle.daemon=true

# 3
org.gradle.configureondemand=true

# 4
org.gradle.parallel=true

# 5
android.enableBuildCache=true

# 6
org.gradle.caching=true
$ ./gradlew build --offline
android{
  ...
  // Add this block
  productFlavors {
    // Free Product Flavor
    free {
      applicationIdSuffix ".free"
      versionNameSuffix "-free"
    }

    // Beta Product Flavor
    beta {
      applicationIdSuffix ".beta"
      versionNameSuffix "-beta"
    }

    // Pro Product Flavor
    pro {
      applicationIdSuffix ".pro"
    }
  }
  ...
}
$ ./gradlew androidDependencies
$ ./gradlew build --dry-run