AR Face Tracking Tutorial for iOS: Getting Started
In this tutorial, you’ll learn how to use AR Face Tracking to track your face using a TrueDepth camera, overlay emoji on your tracked face, and manipulate the emoji based on facial expressions you make. By Yono Mittlefehldt.
Sign up/Sign in
With a free Kodeco account you can download source code, track your progress, bookmark, personalise your learner profile and more!
Create accountAlready a member of Kodeco? Sign in
Sign up/Sign in
With a free Kodeco account you can download source code, track your progress, bookmark, personalise your learner profile and more!
Create accountAlready a member of Kodeco? Sign in
Sign up/Sign in
With a free Kodeco account you can download source code, track your progress, bookmark, personalise your learner profile and more!
Create accountAlready a member of Kodeco? Sign in
Contents
AR Face Tracking Tutorial for iOS: Getting Started
25 mins
Picture this. You have just eaten the most amazing Korean BBQ you’ve ever had and it’s time to take a selfie to commemorate the occasion. You whip out your iPhone, make your best duck-face and snap what you hope will be a selfie worthy of this meal. The pic comes out good — but it’s missing something. If only you could put an emoji over your eyes to really show how much you loved the BBQ. Too bad there isn’t an app that does something similar to this. An app that utilizes AR Face Tracking would be awesome.
Good news! You get to write an app that does that!
In this tutorial, you’ll learn how to:
- Use AR Face Tracking to track your face using a TrueDepth camera.
- Overlay emoji on your tracked face.
- Manipulate the emoji based on facial expressions you make.
Are you ready? Then pucker up those lips and fire up Xcode, because here you go!
Getting Started
For this tutorial, you’ll need an iPhone with a front-facing, TrueDepth camera. At the time of writing, this means an iPhone X, but who knows what the future may bring?
You may have already downloaded the materials for this tutorial using the Download Materials link at the top or bottom of this tutorial and noticed there is no starter project. That’s not a mistake. You’re going to be writing this app — Emoji Bling — from scratch!
Launch Xcode and create a new project based on the Single View App template and name it Emoji Bling.
The first thing you should do is to give the default ViewController
a better name. Select ViewController.swift in the Project navigator on the left.
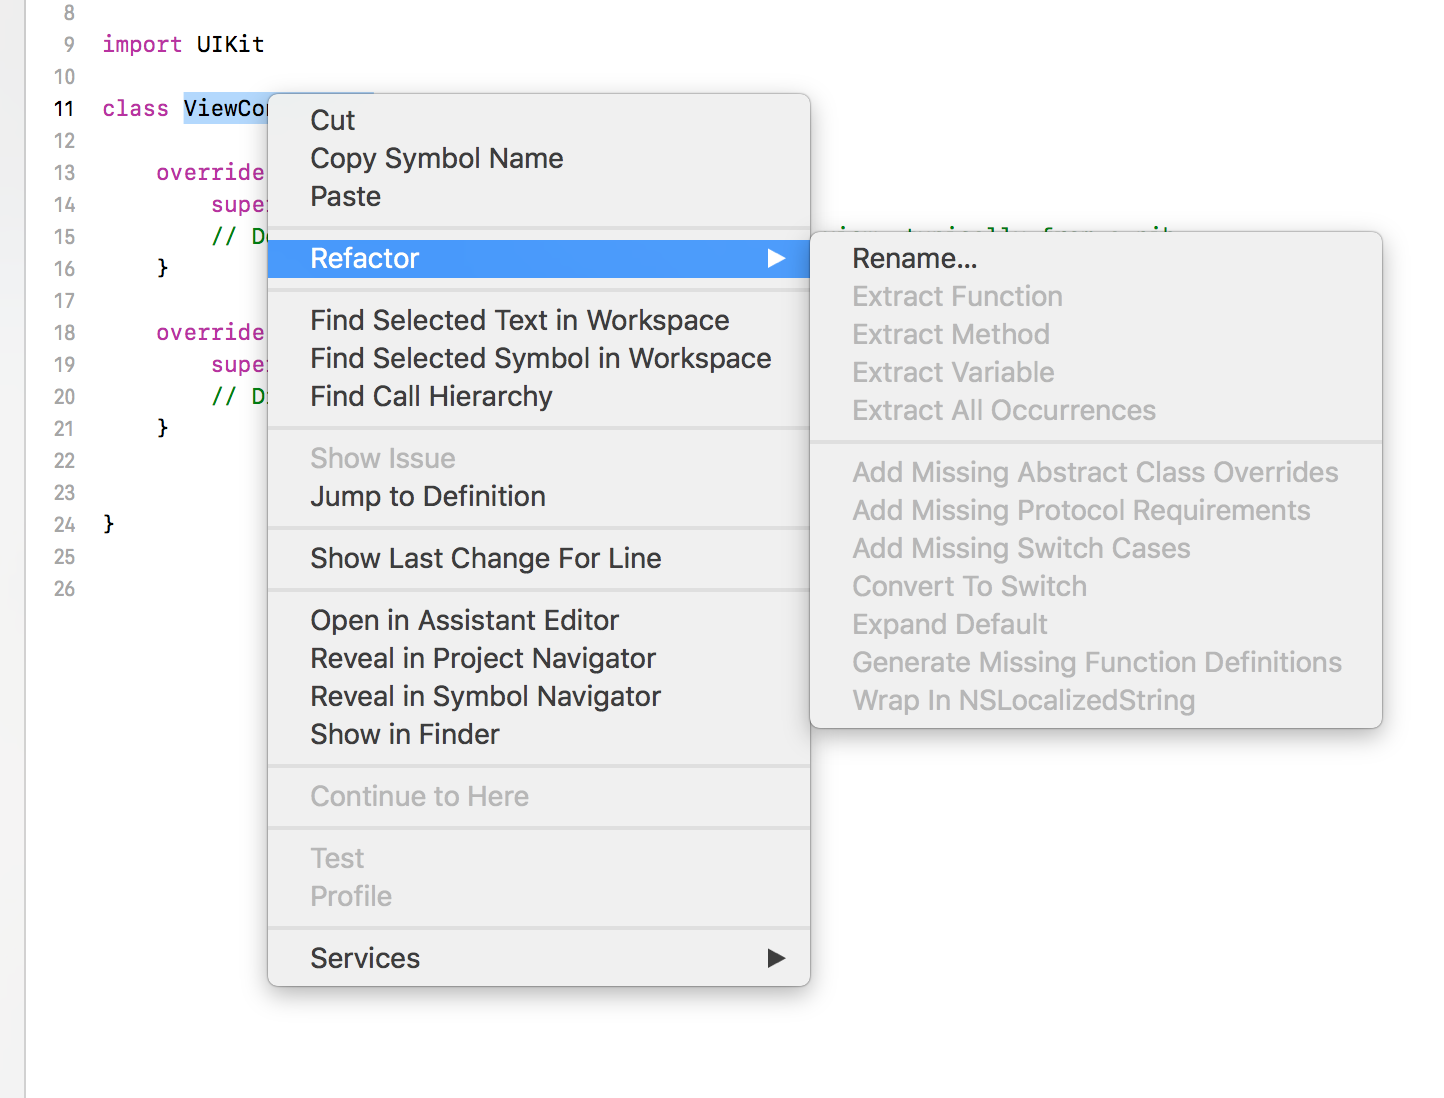
In the code that appears in the Standard editor, right-click on the name of the class, ViewController
, and select Refactor ▸ Rename from the context menu that pops up.
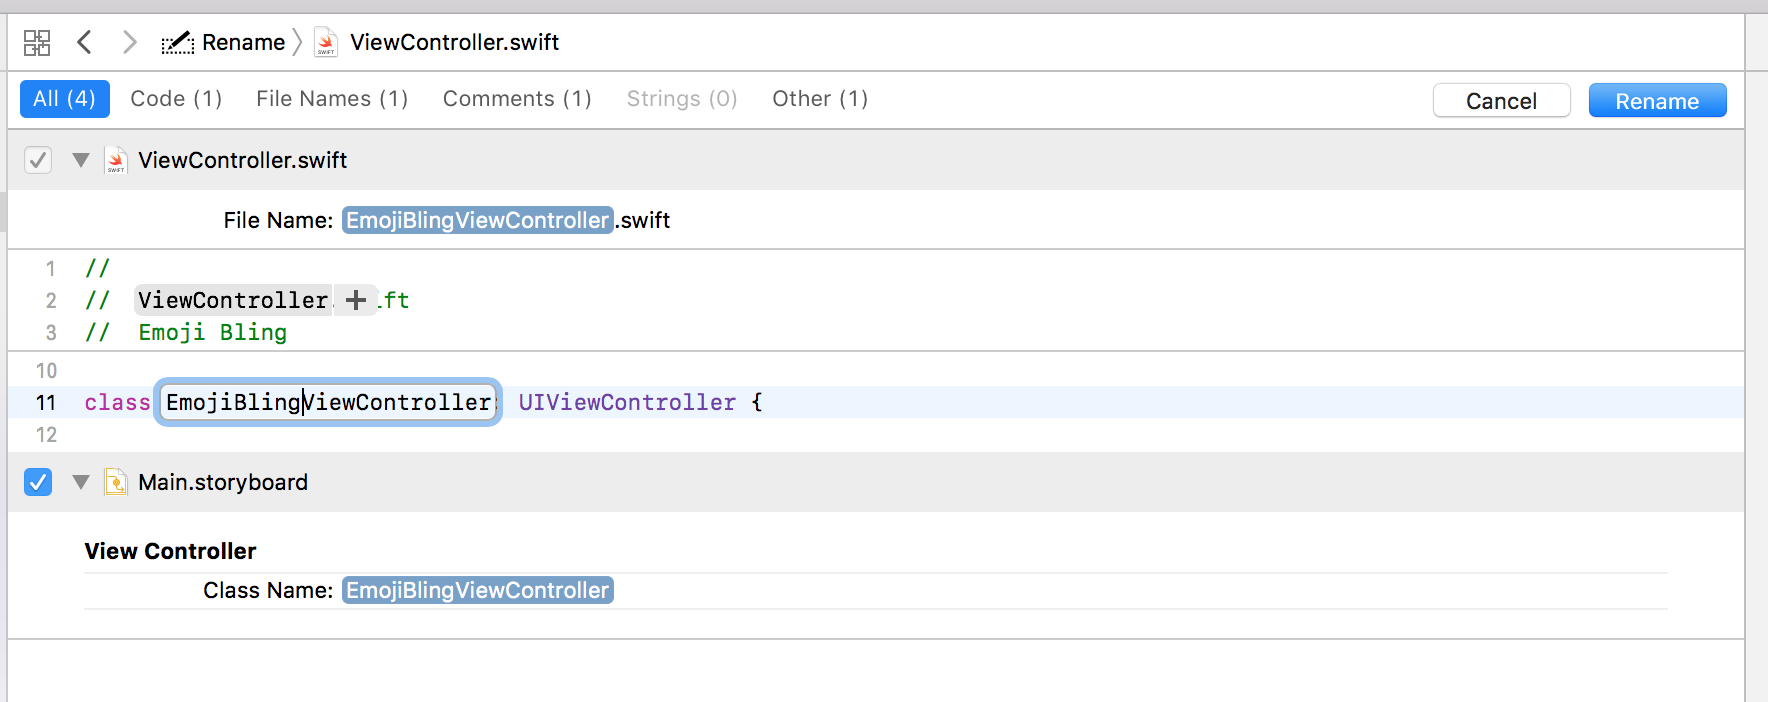
Change the name of the class to EmojiBlingViewController
and press Return or click the blue Rename button.
Since you’re already poking around EmojiBlingViewController.swift, go ahead and add the following import to the top:
import ARKit
You are, after all, making an augmented reality app, right?
Next, in Main.storyboard, with the top level View in the Emoji Bling View Controller selected, change the class to ARSCNView.
ARSCNView
is a special view for displaying augmented reality experiences using SceneKit content. It can show the camera feed and display SCNNode
s.
After changing the top level view to be an ARSCNView
, you want to create an IBOutlet
for the view in your EmojiBlingViewController
class.
To do this, bring up the Assistant editor by clicking on the button with the interlocking rings.
This should automatically bring up the contents of EmojiBlingViewController.swift in the Assistant editor. If not, you can Option-click on it in the Project navigator to display it there.
Now, Control-drag from the ARSCNView
in the storyboard to just below the EmojiBlingViewController
class definition in EmojiBlingViewController.swift and name the outlet sceneView
.
Before you can build and run, a little bit of code is needed to display the camera feed and start tracking your face.
In EmojiBlingViewController.swift, add the following functions to the EmojiBlingViewController
class:
override func viewWillAppear(_ animated: Bool) {
super.viewWillAppear(animated)
// 1
let configuration = ARFaceTrackingConfiguration()
// 2
sceneView.session.run(configuration)
}
override func viewWillDisappear(_ animated: Bool) {
super.viewWillDisappear(animated)
// 1
sceneView.session.pause()
}
Right before the view appears, you:
- Create a configuration to track a face.
- Run the face tracking configuration using the built in
ARSession
property of yourARSCNView
.
Before the view disappears, you make sure to:
- Pause the AR session.
There is a teensy, tiny problem with this code so far. ARFaceTrackingConfiguration
is only available for phones with a front-facing TrueDepth camera. You need to make sure you check for this before doing anything.
In the same file, add the following to the end of the viewDidLoad()
function, which should already be present:
guard ARFaceTrackingConfiguration.isSupported else {
fatalError("Face tracking is not supported on this device")
}
With this in place, you check to make sure that the device supports face tracking (i.e., has a front-facing TrueDepth camera), otherwise stop. This is not a graceful way to handle this, but as this app only does face tracking, anything else would be pointless!
Before you run your app, you also need to specify a reason for needing permission to use the camera in the Info.plist.
Select Info.plist in the Project navigator and add an entry with a key of Privacy - Camera Usage Description
. It should default to type String
. For the value, type EmojiBling needs access to your camera in order to track your face.
FINALLY. It’s time to build and run this puppy… er… app… appuppy?
When you do so, you should see your beautiful, smiling face staring right back at you.
OK, enough duck-facing around. You’ve got more work to do!
Face Anchors and Geometries
You’ve already seen ARFaceTrackingConfiguration
, which is used to configure the device to track your face using the TrueDepth camera. Cool.
But what else do you need to know about face tracking?
Three very important classes you’ll soon make use of are ARFaceAnchor
, ARFaceGeometry
and ARSCNFaceGeometry
.
ARFaceAnchor
inherits from ARAnchor
. If you’ve done anything with ARKit before, you know that ARAnchor
s are what make it so powerful and simple. They are positions in the real world tracked by ARKit, which do not move when you move your phone. ARFaceAnchor
s additionally include information about a face, such as topology and expression.
ARFaceGeometry
is pretty much what it sounds like. It’s a 3D description of a face including vertices
and textureCoordinates
.
ARSCNFaceGeometry
uses the data from an ARFaceGeometry
to create a SCNGeometry
, which can be used to create SceneKit nodes — basically, what you see on the screen.
OK, enough of that. Time to use some of these classes. Back to coding!
Adding a Mesh Mask
On the surface, it looks like you’ve only turned on the front-facing camera. However, what you don’t see is that your iPhone is already tracking your face. Creepy, little iPhone.
Wouldn’t it be nice to see what the iPhone is tracking? What a coincidence, because that’s exactly what you’re going to do next!
Add the following code after the closing brace for the EmojiBlingViewController
class definition:
// 1
extension EmojiBlingViewController: ARSCNViewDelegate {
// 2
func renderer(_ renderer: SCNSceneRenderer, nodeFor anchor: ARAnchor) -> SCNNode? {
// 3
guard let device = sceneView.device else {
return nil
}
// 4
let faceGeometry = ARSCNFaceGeometry(device: device)
// 5
let node = SCNNode(geometry: faceGeometry)
// 6
node.geometry?.firstMaterial?.fillMode = .lines
// 7
return node
}
}
In this code you:
- Declare that
EmojiBlingViewController
implements theARSCNViewDelegate
protocol. - Define the
renderer(_:nodeFor:)
method from the protocol. - Ensure the Metal device used for rendering is not nil.
- Create a face geometry to be rendered by the Metal device.
- Create a SceneKit node based on the face geometry.
- Set the fill mode for the node’s material to be just lines.
- Return the node.
ARSCNFaceGeometry
is only available in SceneKit views rendered using Metal, which is why you needed to pass in the Metal device during its initialization. Also, this code will only compile if you’re targetting real hardware; it will not compile if you target a simulator.
Before you can run this, you need to set this class to be the ARSCNView
‘s delegate.
At the end of the viewDidLoad()
function, add:
sceneView.delegate = self
OK, time for everyone’s favorite step. Build and run that app!
Updating the Mesh Mask
Did you notice how the mesh mask is a bit… static? Sure, when you move your head around, it tracks your facial position and moves along with it, but what happens when you blink or open your mouth? Nothing.
How disappointing.
Luckily, this is easy to fix. You just need to add another ARSCNViewDelegate
method!
At the end of your ARSCNViewDelegate
extension, add the following method:
// 1
func renderer(
_ renderer: SCNSceneRenderer,
didUpdate node: SCNNode,
for anchor: ARAnchor) {
// 2
guard let faceAnchor = anchor as? ARFaceAnchor,
let faceGeometry = node.geometry as? ARSCNFaceGeometry else {
return
}
// 3
faceGeometry.update(from: faceAnchor.geometry)
}
Here, you:
- Define the
didUpdate
version of therenderer(_:didUpdate:for:)
protocol method. - Ensure the anchor being updated is an
ARFaceAnchor
and that the node’s geometry is anARSCNFaceGeometry
. - Update the
ARSCNFaceGeometry
using theARFaceAnchor
’sARFaceGeometry
Now, when you build and run, you should see the mesh mask form and change to match your facial expressions.
Emoji Bling
If you haven’t already done so, go ahead and download the material for this tutorial via the button at the top or bottom of the tutorial.
Inside, you’ll find a folder called SuperUsefulCode with some Swift files. Drag them to your project just below EmojiBlingViewController.swift. Select Copy items if needed, Create groups, and make sure that the Emoji Bling target is selected
StringExtension.swift includes an extension to String
that can convert a String
to a UIImage
.
EmojiNode.swift contains a subclass of SCNNode
called EmojiNode
, which can render a String
. It takes an array of String
s and can cycle through them as desired.
Feel free to explore the two files, but a deep dive into how this code works is beyond the scope of this tutorial.
With that out of the way, it’s time to augment your nose. Not that there’s anything wrong with it. You’re already such a beautiful person. :]
At the top of your EmojiBlingViewController
class, define the following constants:
let noseOptions = ["👃", "🐽", "💧", " "]
The blank space at the end of the array is so that you have the option to clear out the nose job. Feel free to choose other nose options, if you want.
Next, add the following helper function to your EmojiBlingViewController
class:
func updateFeatures(for node: SCNNode, using anchor: ARFaceAnchor) {
// 1
let child = node.childNode(withName: "nose", recursively: false) as? EmojiNode
// 2
let vertices = [anchor.geometry.vertices[9]]
// 3
child?.updatePosition(for: vertices)
}
Here, you:
- Search
node
for a child whose name is “nose” and is of typeEmojiNode
- Get the vertex at index 9 from the
ARFaceGeometry
property of theARFaceAnchor
and put it into an array. - Use a member method of
EmojiNode
to update it’s position based on the vertex. ThisupdatePosition(for:)
method takes an array of vertices and sets the node’s position to their center.
ARFaceGeometry
has 1220 vertices in it and index 9 is on the nose. This works, for now, but you’ll briefly read later the dangers of using these index constants and what you can do about it.
It might seem silly to have a helper function to update a single node, but you will beef up this function later and rely heavily on it.
Now you just need to add an EmojiNode
to your face node. Add the following code just before the return
statement in your renderer(_:nodeFor:)
method:
// 1
node.geometry?.firstMaterial?.transparency = 0.0
// 2
let noseNode = EmojiNode(with: noseOptions)
// 3
noseNode.name = "nose"
// 4
node.addChildNode(noseNode)
// 5
updateFeatures(for: node, using: faceAnchor)
In this code, you:
- Hide the mesh mask by making it transparent.
- Create an
EmojiNode
using your defined nose options. - Name the nose node, so it can be found later.
- Add the nose node to the face node.
- Call your helper function that repositions facial features.
You’ll notice a compiler error because faceAnchor
is not defined. To fix this, change the guard
statement at the top of the same method to the following:
guard let faceAnchor = anchor as? ARFaceAnchor,
let device = sceneView.device else {
return nil
}
There is one more thing you should do before running your app. In renderer(_:didUpdate:for:)
, add a call to updateFeatures(for:using:)
just before the closing brace:
updateFeatures(for: node, using: faceAnchor)
This will ensure that, when you scrunch your face up or wiggle your nose, the emoji’s position will update along with your motions.
Now it’s time to build and run!
Changing the Bling
Now, that new nose is fine but maybe some days you feel like having a different nose?
You’re going to add code to cycle through your nose options when you tap on them.
Open Main.storyboard and find the Tap Gesture Recognizer. You can find that by opening the Object Library at the top right portion of your storyboard.
Drag this to the ARSCNView
in your View controller.
With Main.storyboard still open in the Standard editor, open EmojiBlingViewController.swift in the Assistant editor just like you did before. Now Control-drag from the Tap Gesture Recognizer to your main EmojiBlingViewController
class.
Release your mouse and add an Action named handleTap
with a type of UITapGestureRecognizer
.
Now, add the following code to your new handleTap(_:)
method:
// 1
let location = sender.location(in: sceneView)
// 2
let results = sceneView.hitTest(location, options: nil)
// 3
if let result = results.first,
let node = result.node as? EmojiNode {
// 4
node.next()
}
Here, you:
- Get the location of the tap within the
sceneView
. - Perform a hit test to get a list of nodes under the tap location.
- Get the first (top) node at the tap location and make sure it’s an
EmojiNode
. - Call the
next()
method to switch theEmojiNode
to the next option in the list you used, when you created it.
It is now time. The most wonderful time. Build and run time. Do it! When you tap on your emoji nose, it changes.
More Emoji Bling
With a newfound taste for emoji bling, it’s time to add the more bling.
At the top of of your EmojiBlingViewController
class, add the following constants just below the noseOptions
constant:
let eyeOptions = ["👁", "🌕", "🌟", "🔥", "⚽️", "🔎", " "]
let mouthOptions = ["👄", "👅", "❤️", " "]
let hatOptions = ["🎓", "🎩", "🧢", "⛑", "👒", " "]
Once again, feel free to choose a different emoji, if you so desire.
In your renderer(_:nodeFor:)
method, just above the call to updateFeatures(for:using:)
, add the rest of the child node definitions:
let leftEyeNode = EmojiNode(with: eyeOptions)
leftEyeNode.name = "leftEye"
leftEyeNode.rotation = SCNVector4(0, 1, 0, GLKMathDegreesToRadians(180.0))
node.addChildNode(leftEyeNode)
let rightEyeNode = EmojiNode(with: eyeOptions)
rightEyeNode.name = "rightEye"
node.addChildNode(rightEyeNode)
let mouthNode = EmojiNode(with: mouthOptions)
mouthNode.name = "mouth"
node.addChildNode(mouthNode)
let hatNode = EmojiNode(with: hatOptions)
hatNode.name = "hat"
node.addChildNode(hatNode)
These facial feature nodes are just like the noseNode
you already defined. The only thing that is slightly different is the line that sets the leftEyeNode.rotation
. This causes the node to rotate 180 degrees around the y-axis. Since the EmojiNode
s are visible from both sides, this basically mirrors the emoji for the left eye.
If you were to run the code now, you would notice that all the new emojis are at the center of your face and don’t rotate along with your face. This is because the updateFeatures(for:using:)
method only updates the nose so far. Everything else is placed at the origin of the head.
You should really fix that!
At the top of the file, add the following constants just below your hatOptions
:
let features = ["nose", "leftEye", "rightEye", "mouth", "hat"]
let featureIndices = [[9], [1064], [42], [24, 25], [20]]
features
is an array of the node names you gave to each feature and featureIndices
are the vertex indexes in the ARFaceGeometry
that correspond to those features (remember the magic numbers?).
You’ll notice that the “mouth” has two indexes associated with it. Since an open mouth is a hole in the mesh mask, the best way to position a mouth emoji is to average the position of the top and bottom lips.
ARFaceGeometry
has 1220 vertices, but what happens if Apple decides it wants a high resolution? Suddenly, these indexes may no longer correspond to what you expect. One possible, robust solution would be to use Apple’s Vision framework to initially detect facial features and map their locations to the nearest vertices on an ARFaceGeometry
Next, replace your current implementation of updateFeatures(for:using:)
with the following:
// 1
for (feature, indices) in zip(features, featureIndices) {
// 2
let child = node.childNode(withName: feature, recursively: false) as? EmojiNode
// 3
let vertices = indices.map { anchor.geometry.vertices[$0] }
// 4
child?.updatePosition(for: vertices)
}
This looks very similar, but there are some changes to go over. In this code, you:
- Loop through the
features
andfeatureIndexes
that you defined at the top of the class. - Find the the child node by the feature name and ensure it is an
EmojiNode
. - Map the array of indexes to an array of vertices using the
ARFaceGeometry
property of theARFaceAnchor
. - Update the child node’s position using these vertices.
Go a head and build and run your app. You know you want to.
Blend Shape Coefficients
ARFaceAnchor
contains more than just the geometry of the face. It also contains blend shape coefficients. Blend shape coefficients describe how much expression your face is showing. The coefficients range from 0.0 (no expression) to 1.0 (maximum expression).
For instance, the ARFaceAnchor.BlendShapeLocation.cheekPuff
coefficient would register 0.0
when your cheeks are relaxed and 1.0
when your cheeks are puffed out to the max like a blowfish! How… cheeky.
There are currently 52 blend shape coefficients available. Check them out in Apple’s official documentation.
Control Emoji With Your Face!
After reading the previous section on blend shape coefficients, did you wonder if you could use them to manipulate the emoji bling displayed on your face? The answer is yes. Yes, you can.
Left Eye Blink
In updateFeatures(for:using:)
, just before the closing brace of the for
loop, add the following code:
// 1
switch feature {
// 2
case "leftEye":
// 3
let scaleX = child?.scale.x ?? 1.0
// 4
let eyeBlinkValue = anchor.blendShapes[.eyeBlinkLeft]?.floatValue ?? 0.0
// 5
child?.scale = SCNVector3(scaleX, 1.0 - eyeBlinkValue, 1.0)
// 6
default:
break
}
Here, you:
- Use a
switch
statement on the feature name. - Implement the
case
forleftEye
. - Save off the x-scale of the node defaulting to 1.0.
- Get the blend shape coefficient for
eyeBlinkLeft
and default to 0.0 (unblinked) if it’s not found. - Modify the y-scale of the node based on the blend shape coefficient.
- Implement the default
case
to make theswitch
statement exhaustive.
Simple enough, right? Build and run!
Right Eye Blink
This will be very similar to the code for the left eye. Add the following case
to the same switch
statement:
case "rightEye":
let scaleX = child?.scale.x ?? 1.0
let eyeBlinkValue = anchor.blendShapes[.eyeBlinkRight]?.floatValue ?? 0.0
child?.scale = SCNVector3(scaleX, 1.0 - eyeBlinkValue, 1.0)
Build and run your app again, and you should be able to blink with both eyes!
Open Jaw
Currently, in the app, if you open your mouth, the mouth emoji stays between the lips, but no longer covers the mouth. It’s a bit odd, wouldn’t you say?
You are going to fix that problem now. Add the following case
to the same switch
statement:
case "mouth":
let jawOpenValue = anchor.blendShapes[.jawOpen]?.floatValue ?? 0.2
child?.scale = SCNVector3(1.0, 0.8 + jawOpenValue, 1.0)
Here you are using the jawOpen
blend shape, which is 0.0
for a closed jaw and 1.0
for an open jaw. Wait a second… can’t you have your jaw open but still close you mouth? True; however, the other option, mouthClose
, doesn’t seem to work as reliably. That’s why you’re using .jawOpen
.
Go ahead and build and run your app one last time, and marvel at your creation.
Where to Go From Here?
Wow, that was a lot of work! Congratulations are in order!
You’ve essentially learned how to turn facial expressions into input controls for an app. Put aside playing around with emoji for a second. How wild would it be to create an app in which facial expressions became shortcuts to productivity? Or how about game where blinking left and right causes the character to move and puffing out your cheeks causes the character to jump? No more tapping the screen like an animal!
If you want, you can download the final project using the Download Materials link at the top or bottom of this tutorial.
We hope you enjoyed this face-tracking tutorial. Feel free to tweet out screenshots of your amazing emoji bling creations!
Want to go even deeper into ARKit? You’re in luck. There’s a book for that!™ Check out ARKit by Tutorials, brought to you by your friendly neighborhood raywenderlich.com team.
If you have any questions or comments, please join the forum discussion below!