ARCore Sceneform SDK: Getting Started
In this tutorial, you’ll learn how to make augmented reality Android apps with ARCore using Sceneform. By Dario Coletto.
In 2017, Google unveiled ARCore, a platform for building augmented reality (AR) experiences on Android devices.
At that time, ARCore required developers to know either Unity or 3D graphics with OpenGL to create AR applications. You can see an example of this in our Getting Started With ARCore With Kotlin tutorial. Also at that time, the number of devices supported for ARcore was much smaller. Since then, the support for devices has grown, but developers still needed to grasp knowledge about OpenGL or Unity for developing AR applications.
At Google I/O 2018, Google announced Sceneform, a sort of “layer” on ARCore, which enables developers to create AR applications using knowledge of only the Android SDK and the Kotlin/Java language.
In this tutorial, you’re going to create an AR-based game, WhacARDroid, and, along the way, you’ll learn to develop AR apps using Sceneform.
Prerequisite: There’s a restricted number of devices capable of running ARCore. The complete list is available here.
Prerequisite: There’s a restricted number of devices capable of running ARCore. The complete list is available here.
Setting Up the Environment
Using a Real Device
To run an app that uses ARCore on a real device, you need to check if ARCore is supported. If it is, install the ARCore app from the Google Play Store. This app has no UI; it only contains support for what ARCore-based apps need to run.
Using an Emulator
Not every development machine can run an AR-enabled emulator supporting Sceneform. If you plan to run your app on an emulator, you must ensure that your machine supports OpenGL ES 3.1 or later. Moreover, the emulator must follow some rules:
– When creating it, you must choose a Pixel or Pixel 2 hardware profile.
– You must use Oreo: API Level 27: x86: Android 8.1 (Google APIs) system image.
– you must set the back camera to VirtualScene (Verify Configuration ▸ Show Advanced Settings ▸ Camera Back).
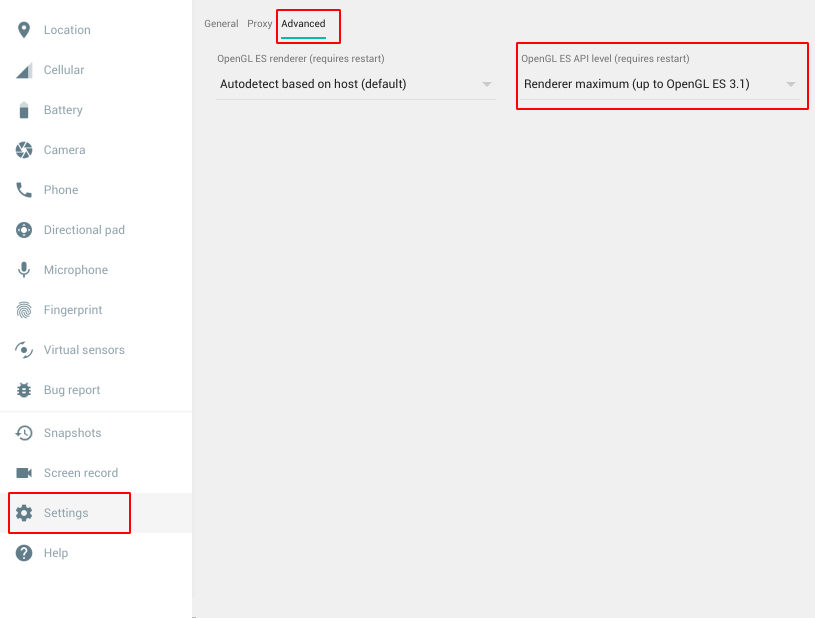
Once you’ve such an emulator set up, start the emulator and open its settings. Go to the Advanced tab and set OpenGL ES API level to Renderer maximum (up to OpenGL ES 3.1), then restart the emulator.
Now, you can check if your machine supports OpenGL ES 3.1 by filtering your Logcat for eglMakeCurrent. You should get something like this:
`com.google.android.gms.unstable D/EGL_emulation: eglMakeCurrent: 0xdffbd660: ver 3 1`
As you can see, the above emulator is using the version 3.1 of OpenGL, so it’ll be able to use Sceneform.
Getting the Sceneform Plugin
The Sceneform plugin is an Android Studio plugin used to import 3D models, convert them into Sceneform format, and preview them in Android Studio. Sceneform can handle OBJ, FBX, and glTF formats for 3D assets.
To get the plugin, open Android Studio, go to the Plugins settings (Windows/Linux: File ▸ Settings ▸ Plugins ▸ Browse Repositories, macOS: Android Studio ▸ Preferences ▸ Plugins), browse the plugin “Google Sceneform Tools” (as of now it’s beta) and install it. Then restart Android Studio.
To use the plugin, you will only need to add these lines to your app level build.gradle (these have already been added to the starter project that you will open below):
apply plugin: 'com.google.ar.sceneform.plugin'

sceneform.asset('sampledata/models/andy.obj', // Source Asset Path
        'default',                            // Material Path
        'sampledata/models/andy.sfa',         // .sfa Output Path
        'src/main/res/raw/andy')              // .sfb Output Path
For the sample project, you’re going to use a model provided by Google in its Sceneform samples.
Getting Started
Use the Download materials button at the top or bottom of this tutorial to download the starter project. Open the starter project in Android Studio 3.1.3 or later.
You can click the Run button and the starter project should run on your device or emulator.
You’ll first be prompted to provide camera permissions and, upon approving, you’ll see an image prompting you to move your phone around. This is needed to track the surface. Aiming the device at a flat surface and moving it a little bit, you should see a few points highlighted. When you see them, it means ARCore has detected the plane. ARCore does all these operations by itself, so you don’t need to worry about doing anything more.
Note: Light-colored planes may have trouble being detected.
Note: Light-colored planes may have trouble being detected.

If you see some white dots on your plane, congratulations — your app is working!
Now, you’ll create a simple yet funny AR version of the popular Whac-A-Mole game. For this game, you’ll hit as many 3D droids as you can and get a high score. Time to create WhacARDroid! :]
Creating 3D Objects
Sceneform provides three simple and similar ways to create a 3D object: from scratch, from a model or from an Android XML file. Building the model is asynchronous — the method returns a CompletableFuture — because instantiating a renderable is a heavy operation.
Making a 3D Object From Scratch
To create a 3D object from the ground up, you need to provide a Material. A material defines some physical aspect of the object you’re going to instantiate – its color, for example. With the code that follows, as an example, you’d create an opaque material with a red tint:
// The color object is from `com.google.ar.sceneform.rendering` package
var cubeRenderable: ModelRenderable? = null
MaterialFactory.makeOpaqueWithColor(this, Color(android.graphics.Color.BLUE))
        .thenAccept { material ->
          // This is async and will be called when the material has been created

          val size = Vector3(1F, 1F, 1F)
          val center = Vector3(0.5F, 0.5F, 0.5F)

          cubeRenderable = ShapeFactory.makeCube(size, center, material)
        }
Instantiating an Existing 3D Model
For your game, you need a droid to hit, so you’ll create one now.
Open MainActivity.kt and add a property representing your object, droidRenderable, then create the method initResources() that will instantiate all your resources and call it at the end of onCreate():
private var droidRenderable: ModelRenderable? = null

override fun onCreate(savedInstanceState: Bundle?) {
    ...
    initResources()
}

private fun initResources() {
  // Create a droid renderable (asynchronous operation,
  // result is delivered to `thenAccept` method)
  ModelRenderable.builder()
      .setSource(this, R.raw.andy)
      .build()
      .thenAccept { droidRenderable = it }
      .exceptionally { it.toast(this) }
}
Here, you’ve created a new ModelRenderable using R.raw.andy — an .sfb 3D model – as source; with the thenAccept method, you can get this model and assign its value to your property droidRenderable. Since you’re not 100% sure that everything will work as expected, you can add an exceptionally block that will be called when something goes wrong.