Yoga Tutorial: Using a Cross-Platform Layout Engine
Learn about Yoga, Facebook’s cross-platform layout engine that helps developers write more layout code in style akin to Flexbox By Christine Abernathy.
Your First Layout
Create a new Swift iPhone project with the Single View Application template named YogaTryout.
You’ll be creating your UI programmatically so you won’t need to use storyboards.
Open Info.plist and delete the Main storyboard file base name property. Then, set the Launch screen interface file base name value to an empty string. Finally, delete Main.storyboard and LaunchScreen.storyboard.
Open AppDelegate.swift and add the following to application(_:didFinishLaunchingWithOptions:) before the return statement:
window = UIWindow(frame: UIScreen.main.bounds)
window?.rootViewController = ViewController()
window?.backgroundColor = .white
window?.makeKeyAndVisible()
Build and run the app. You should see a blank white screen.
Close the Xcode project.
Open Terminal and enter the following command to install CocoaPods if you don’t already have it:
sudo gem install cocoapods
In Terminal, go to the directory where YogaTryout.xcodeproj is located. Create a file named Podfile and set its content to the following:
platform :ios, '10.3'

use_frameworks!

target 'YogaTryout' do
  pod 'YogaKit', '~> 1.5'
end
Run the following command in Terminal to install the YogaKit dependency:
pod install
You should see output similar to the following:
Analyzing dependencies
Downloading dependencies
Installing Yoga (1.5.0)
Installing YogaKit (1.5.0)
Generating Pods project
Integrating client project

[!] Please close any current Xcode sessions and use `YogaTryout.xcworkspace` for this project from now on.
Sending stats
Pod installation complete! There is 1 dependency from the Podfile and 2 total pods installed.
From this point onwards, you’ll be working with YogaTryout.xcworkspace.
Open YogaTryout.xcworkspace then build and run. You should still see a blank white screen.
Open ViewController.swift and add the following import:
import YogaKit
This imports the YogaKit framework.
Add the following to the end of viewDidLoad():
// 1
let contentView = UIView()
contentView.backgroundColor = .lightGray
// 2
contentView.configureLayout { (layout) in
  // 3
  layout.isEnabled = true
  // 4
  layout.flexDirection = .row
  layout.width = 320
  layout.height = 80
  layout.marginTop = 40
  layout.marginLeft = 10
}
view.addSubview(contentView)
// 5
contentView.yoga.applyLayout(preservingOrigin: true)
This code does the following:
- Creates a view and sets the background color.
- Sets up the layout configuration closure.
- Enables Yoga styling during this view’s layout.
- Sets various layout properties including the flex direction, frame size, and margin offsets.
- Calculates and applies the layout to
contentView.
Build and run the app on an iPhone 7 Plus simulator. You should see a gray box:

You may be scratching your head, wondering why you couldn’t have simply instantiated a UIView with the desired frame size and set its background color. Patience my child. The magic starts when you add child items to this initial container.
Add the following to viewDidLoad() just before the line that applies the layout to contentView:
let child1 = UIView()
child1.backgroundColor = .red
child1.configureLayout{ (layout)  in
  layout.isEnabled = true
  layout.width = 80
}
contentView.addSubview(child1)
This code adds an 80-pixel wide red box to contentView.
Now, add the following just after the previous code:
let child2 = UIView()
child2.backgroundColor = .blue
child2.configureLayout{ (layout)  in
  layout.isEnabled = true
  layout.width = 80
  layout.flexGrow = 1
}
contentView.addSubview(child2)
This adds a blue box to the container that’s 80 pixels wide but that’s allowed to grow to fill out any available space in the container. If this is starting to look familiar, it’s because you did something similar in jsFiddle.
Build and run. You should see the following:
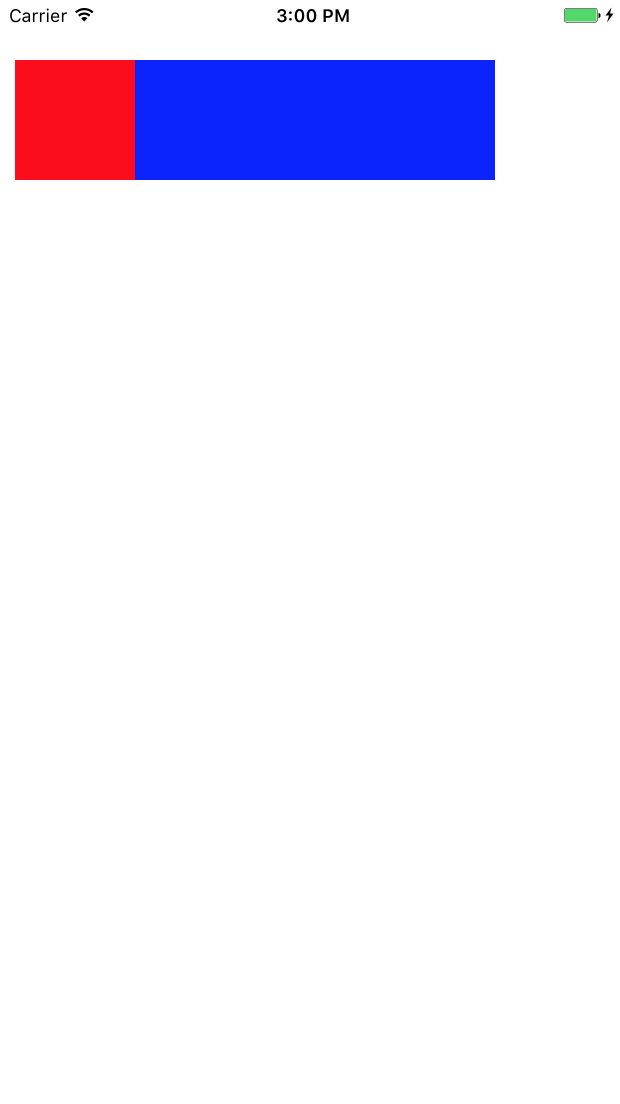
Now, add the following statement to the layout configuration block for contentView:
layout.padding = 10
This sets a padding for all the child items.
Add the following to child1‘s layout configuration block:
layout.marginRight = 10
This sets a right margin offset for the red box.
Finally, add the following to child2‘s layout configuration block:
layout.height = 20
layout.alignSelf = .center
This sets the height of the blue box and aligns it to the center of its parent container.
Build and run. You should see the following:

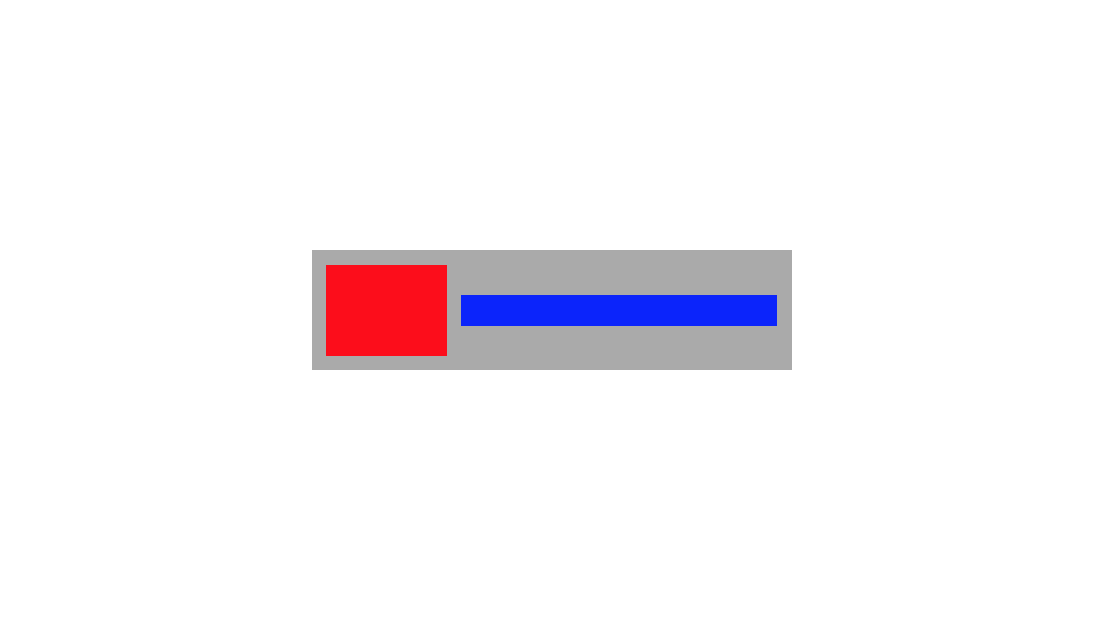
What if you want to center the entire gray box horizontally? Well, you can enable Yoga on contentView‘s parent view which is self.view.
Add the following to viewDidLoad(), right after the call to super:
view.configureLayout { (layout) in
  layout.isEnabled = true
  layout.width = YGValue(self.view.bounds.size.width)
  layout.height = YGValue(self.view.bounds.size.height)
  layout.alignItems = .center
}
This enables Yoga for the root view and configures the layout width and height based on the view bounds. alignItems configures the child items to be center-aligned horizontally. Remember that alignItems specifies how a container’s child items are aligned in the cross axis. This container has the default column flex direction. So the cross axis is in the horizontal direction.
Remove the layout.marginLeft assignment in contentView‘s layout configuration. It’s no longer needed as you’ll be centering this item through its parent container.
Finally, replace:
contentView.yoga.applyLayout(preservingOrigin: true)
With the following:
view.yoga.applyLayout(preservingOrigin: true)
This will calculate and apply the layout to self.view and its subviews which includes contentView.
Build and run. Note that the gray box is now centered horizontally:

Centering the gray box vertically on the screen is just as simple. Add the following to the layout configuration block for self.view:
layout.justifyContent = .center
Remove the layout.marginTop assignment in contentView‘s layout configuration. It won’t be needed since the parent is controlling the vertical alignment.
Build and run. You should now see the gray box center-aligned both horizontally and vertically:

Rotate the device to landscape mode. Uh-oh, you’ve lost your center:

Fortunately, there’s a way to get notified about device orientation changes to help resolve this.
Add the following method to the end of the class:
override func viewWillTransition(
  to size: CGSize,
  with coordinator: UIViewControllerTransitionCoordinator) {
  super.viewWillTransition(to: size, with: coordinator)
  // 1
  view.configureLayout{ (layout) in
    layout.width = YGValue(size.width)
    layout.height = YGValue(size.height)
  }
  // 2
  view.yoga.applyLayout(preservingOrigin: true)
}
The code does the following:
- Updates the layout configuration with the size of the new orientation. Note that only the affected properties are updated.
- Re-calculates and applies the layout.
Rotate the device back to portrait mode. Build and run the app. Rotate the device to landscape mode. The gray box should now be properly centered:
You can download the final tryout project here if you wish to compare with your code.
Granted, you’re probably mumbling under your breath about how you could have built this layout in less than three minutes with Interface Builder, including properly handling rotations:


You’ll want to give Yoga a fresh look when your layout starts to become more complicated than you’d like and things like embedded stack views are giving you fits.
On the other hand, you may have long abandoned Interface Builder for programmatic layout approaches like layout anchors or the Visual Format Language. If those are working for you, no need to change. Keep in mind that the Visual Format Language doesn’t support aspect ratios whereas Yoga does.
Yoga is also easier to grasp once you understand Flexbox. There are many resources where you can quickly try out Flexbox layouts before building them out on iOS with Yoga.