Oculus Go Overview
Facebook’s long-awaited VR headset, Oculus Go, is out and it’s almost affordable. The big question: Is it worth the money, or is it just another piece of tech destined for the attic? By Brian Moakley.
The Games
Out of the box, Oculus Go is said to feature over a thousand games. Oculus Go uses a custom Android OS specifically tailored for the hardware. This means that games developed using Gear VR work out-of-the-box with Oculus Go, which is evident because some games reference Gear VR device controls while failing to even mention the updated Oculus Go controls. In time, this will change as developers update their games but, for the meantime, early adopters have to get used to misleading instructions or prompts.
Purchasing games is done through the integreated app store. Once you’ve setup your account, it’s just a matter of searching the store, finding an app, and clicking the download button. Some cost money and you’ll quickly discover, like mobile, that the free apps aren’t really free.
My biggest gripe with the store is that apps with DLC are mentioned, but the store doesn’t list the DLC nor the DLC prices. You’ll never know whether a free app features a one time unlock or whether it will try to bleed you dry. Thankfully, it does features reviews to help you out.
Here are some of the games I played:
Coaster Combat

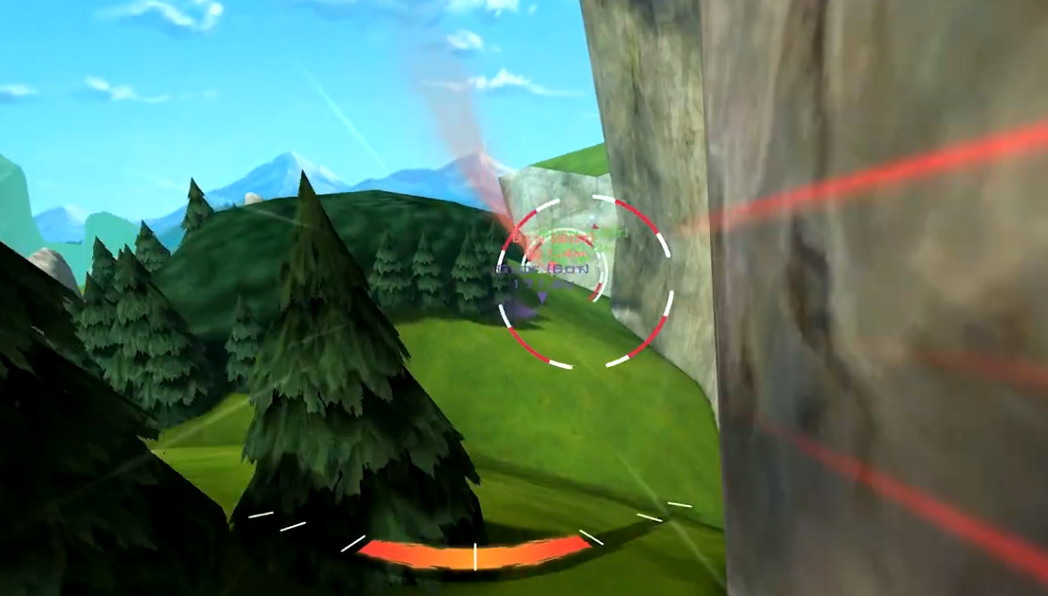
If you’re going to go on VR, you’re going to go on a few coaster rides. Them’s the rules. Coaster Combat is a fun twist on the genre in that you not only ride coasters (well, mine carts actually), but also shoot at targets and other riders. It’s an enjoyable version of a typical coaster game and the art style is well done. I did experience a bit of slow down, which is a little jarring, but overall, it was a fun experience. It gives you the feeling of motion of a rollercoaster with something to do (shooting targets) as opposed to being a passive experience.
Ultrawings

One of my bucket-list items in life is to earn my pilot’s license. Unfortunately, flying planes is expensive. Until the kiddos are through college, I can play Ultrawings instead. Granted, it’s a very simplified version of flying, but it really gives you the sense of movement. There’s nothing quite like banking your plane over the ocean and looking out the window. The simulated motion can be intense and you may feel a little sick. Thankfully, you can customize how much you see from your cockpit, minimizing the motion intensity.
Rush
Like Ultrawings, Rush features airplanes but, instead of flying them, you jump out of them. You essentially ride a wing suit through rings while avoiding cliffs, houses and other stationary objects. The game loop is fun, but it’s the lobby system that impressed me. You wait in a plane with other competitors and there are Nerf-like guns that fire suction darts. You basically shoot at each other and other targets with the guns. It’s really silly, but a fun way to get into a match.
Overtake: Traffic Racing

Being stuck in traffic, I often have daydreams of dodging and weaving without a single thought of safety. Overtake: Traffic Racing scratches that itch. The game puts you on a variety of maps where you must slalom through traffic to beat the clock or see how close you can get to other cars without hitting them. Out of all the games I’ve played, this one feels most like a traditional console game. This is probably due to the fact that movement is limited to just a few lanes and there’s not a lot of variation — you are always driving straight ahead. That said, the controls are tight and is fun to play.
Overtake Traffic Racing Store Page
Freebies
There are also loads of free games available. Some of these games feature in-app purchases like your typical mobile game, but others also have integrated ads. The ads are a real problem. Whereas you can just put down your phone when an ad pops up, in VR I feel like I’m forced to watch them. It’s an uncomfortable experience and not worth the price of admission.
Some games also require certain permissions: Accessing the file system or using your microphone, for example. One game even wanted to acccess my celluar data. These are clearly holdovers from the apps being ported to Oculus Go, but it still feels intrusive while also vague; with Facebook being under the microscope for all its privacy issues, it’d be nice of them to require better explanations for the requests.
Developing on the Oculus Go With Unity
The big question you may be wondering: “How’s the development?” It’s not too bad, in my estimation, although you are limited in several ways that you aren’t with some other devices:
- First, Oculus Go doesn’t have access to Google Play Services; it’s just not part of that environment.
- Next, since the device isn’t a smart phone, certain app behaviors, such as phone notifications, won’t appear on the device.
- The device doesn’t have access to a camera, since there isn’t one.
- The device also doesn’t have access to a head-mounted display (HMD) touchpad. The HMD touchpad is a touch-sensitive region on the side of the Gear VR headset that allows for interaction. In fact, some Oculus Go games even reference the surface in their instructions. It’s just not available for developers to use on Oculus Go because, like the camera, it’s not part with the headset.
Getting Started
After you’re set up to start developing, you’ll need to put your Oculus Go headset into developer mode, otherwise you won’t be able to test your games. You’ll do this from the main Oculus app on your phone. This is the same app you used to register headset. In the settings of the app, you select your paired Oculus Go headset, and then select More Settings. From that menu, select Developer Mode and then switch it to On.

At this point, you’ll be prompted to set up your developer account the Oculus webiste. This will require to fill out some information about your company. Once saved, you must return to the app and turn the developer mode on. If you don’t get the prompt, that means that your headset it ready to roll.
Now go ahead and make an amazing VR game. Or you can download one our VR apps from our existing tutorials. Don’t worry, we’ll wait. :]
Configuring Settings
With your game ready, you need to make a few tweaks to the settings.
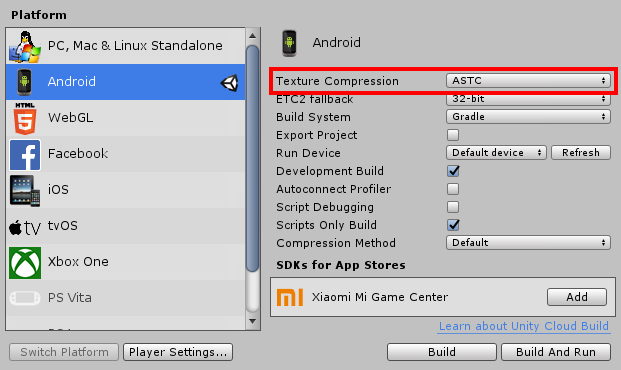
First, open the Build Settings and make sure your Unity project is using the Android platform. From the Build Settings menu, change Texture Compression to ASTC:
Next, click the Player Settings button and select the Android tab. First, you need to indicate that your game supports VR and you also need to select a VR SDK. You can find this in XR Settings. Simply click the Virtual Reality Supported checkbox and then click the plus sign under Virtual Reality SDKs. Make sure to select Oculus as the SDK:

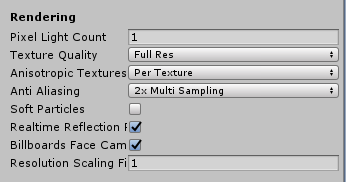
Now, for the Quality Settings. From the menu bar, select Edit ▸ Project Settings ▸ Quality. Oculus suggests the following settings:
Pixel Light Count: 1
Texture Quality: Full Res
Anisotropic Textures: Per Texture
Anti-Aliasing: 2x Multi Sampling
Soft Particles: Unchecked
Realtime Reflection Probes: Checked
Billboards Face Camera: Checked
To learn more about Unity and Oculus Go settings, check out the Building Mobile Applications guide from Oculus.
Signing Your App
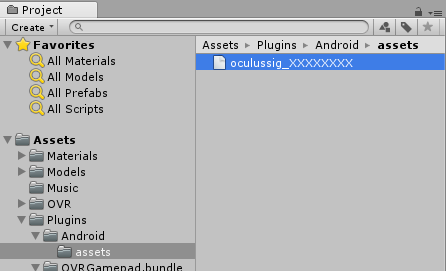
Believe it or not, you still have more configuring to do! Even though you’ve enabled developer mode from the Oculus app, you still need to sign your apps. Thankfully, this particular signing process is very easy. To get your certificate, head over to the OSIG Generator. Once you fill out the information about your headset, you’ll be provided with your certificate. You need to add it to your Unity project. In your Project window, add the certificate to the following location (case sensitive): Assets ▸ Plugins ▸ Android ▸ assets/
Sideloading Your Game
Finally, build your game and save the .apk file to your desktop. Being this is the first time you’ve used your headset for development, you need to sideload your game. You do this via the Android Debug Bridge (ADB), which is part of the Android SDK, which I mentioned earlier. You can find ADB in the Android ▸ SDK ▸ platform-tools subdirectory depending on where you installed the Android SDK. Also, you’ll need to access it via the command line. To sideload your .apk file, just run the command: adb install -r

You’ll receive a message saying that your device is unauthorized. Now, put on your headset and confirm that you’d like to use the device for developing. Make sure to check the USB Debugging option. Once confirmed, run the same ADB command to install your .apk file. It should copy the file with no issues and, once loaded, it will show up in your Oculus Go Library. Better still, you can now build and run inside of Unity and the game will automatically install on your headset. Huzzah!