Using Streaming Assets in Unity
Learn how to make a moddable game in Unity by utilizing streaming assets to dynamically load custom game assets at run-time. By Mark Placzek.
More than One Way to Skin a Tank
The other way to customize tanks is to let the user add new skins to streaming assets and let them select and apply them at runtime.
There's a ScrollView and a Skin Object prefab situated in the Pause menu that you can use for the UI.
The SkinObject prefab is customised using the texture and filename.
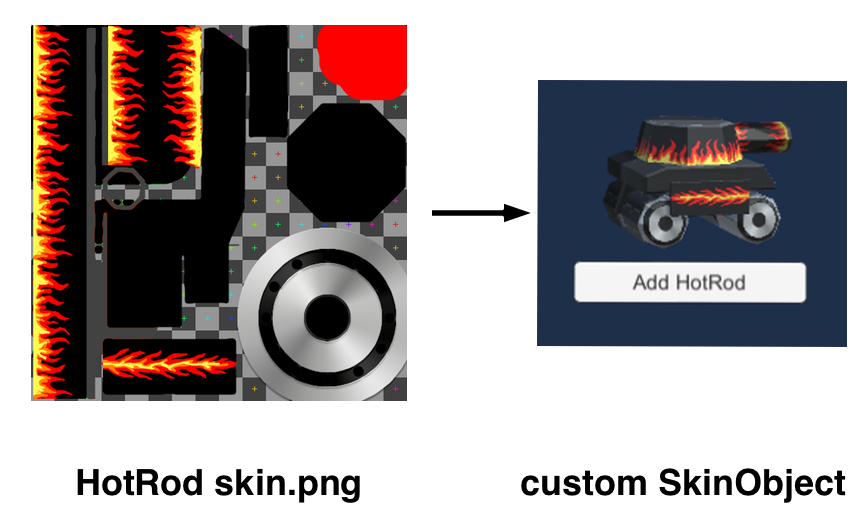
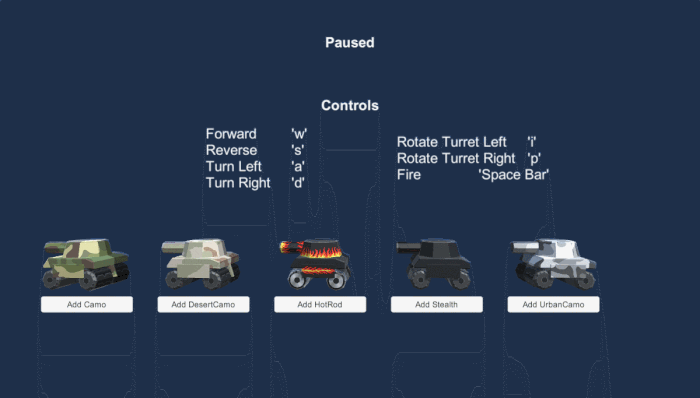
Each skin will be showcased by a tank, and a button will enable you to add it.
Some tank "skin" textures were included in the TankArenaAllAssets folder that you got along with the starter project download. Place them in the Project Window StreamingAssets folder now.
Head back to the Game Manager script to get this new feature working.
The skins and their names will be stored in Lists. Therefore, add the Generic namespace at the top of the Game Manager script;
using System.Collections.Generic;
Add the following variables under your other tank customization variables;
//1
public List<Texture2D> tankSkins;
public List<string> tankSkinNames;
//2
public GameObject skinContainer;
public GameObject skinObject;
//3
private bool skinMenuAssembled = false;
- When a skin is found, this adds the texture to the
tankSkinslist and its name to thetankSkinNameslist. - To instantiate a Skin Object in the ScrollView, you require a reference to both the prefab to instantiate and the container which will be its parent.
- Finally a Boolean is used to determine whether you have already processed and assembled the skin list in the ScrollView. This will be used to ensure this process is not repeated unnecessarily between level restarts.
As before, add another conditional to the start function:
else if (file.Name.Contains("skin"))
{
    StartCoroutine("LoadSkin", file);
}
Create a new coroutine to process the skin files:
IEnumerator LoadSkin(FileInfo skinFile)
{
    if (skinFile.Name.Contains("meta"))
    {
        yield break;
    }
    else
    {
        //1
        string skinFileWithoutExtension = Path.GetFileNameWithoutExtension(skinFile.ToString());
        string[] skinData = skinFileWithoutExtension.Split(" "[0]);
        string skinName = skinData[0];
        //2
        string wwwSkinPath = "file://" + skinFile.FullName.ToString();
        WWW www = new WWW(wwwSkinPath);
        yield return www;
        Texture2D newTankSkin = www.texture;
        tankSkins.Add(newTankSkin);
        tankSkinNames.Add(skinName);
    }
}
- The name of the skin is the first word in the filename.
- There may be multiple skin files to process. At this stage, the textures and the names are simply added to lists.
Note: For this tutorial, you simply throw up a loading screen for one second before gameplay starts as this is sufficient for demonstration purposes. For a real game, you may want to add a cool little cut scene if you expect a more involved loading stage, and perhaps a callback of some sort when loading is finally complete.
For this tutorial, you'll assume that when the loading screen dismisses, all of the streaming assets have been processed.
Add the following to the end of RemoveLoadingScreen():
if (!skinMenuAssembled)
{
    StartCoroutine("AssembleSkinMenu");
}
Create a new Coroutine and add the following code:
IEnumerator AssembleSkinMenu()
{
    skinMenuAssembled = true;
    int i = 0;
    //1
    foreach (Texture2D skinTexture in tankSkins)
    {
        GameObject currentSkinObject = Instantiate(skinObject, new Vector3(0, 0, 0), Quaternion.identity, skinContainer.transform);
        //2
        currentSkinObject.transform.localPosition = new Vector3(100 + (200 * i),-80,0);
        //3
        SkinManager currentSkinManager = currentSkinObject.GetComponent<SkinManager>();
        currentSkinManager.ConfigureSkin(tankSkinNames[i], i);
        ApplyTextureToTank(currentSkinManager.tankRenderer, tankSkins[i]);
        i++;
    }
    yield return null;
}
- The
foreachloop iterates throughtankSkins. For each item, you instantiate a Skin Object and add it to the content object in the ScrollView. - The position of the Skin Object in the Scrollview is offset depending on the index of the list. This ensures all of the skins are neatly spaced out in the view.
- You fetch the SkinManager script in Skin Object and pass it the skin's name and index in the list. You reuse
ApplyTextureToTank()to apply the custom skin to the Skin Object's tank.
Navigate to the Scripts folder in the Project Window and double click on SkinManager script to open it in your IDE.
ConfigureSkin() saves the index it was passed in a private variable and the button label is customized using the skin name.
When the player presses the button to apply a skin, ApplySkinTapped() sends the saved index back to ApplySkin() in the GameManager.
Finish off ApplySkin() at the bottom of the GameManager Script by adding the following code:
ApplyTextureToTank(tankRenderer, tankSkins[indexOfSkin]);
PlayerUI.SetActive(true);
pauseMenuCamera.SetActive(false);
isPaused = false;
Time.timeScale = 1.0f;
This extracts the relevant texture from the list and applies it to the players tank. You also remove the pause menu and resume gameplay.
Time to get this all hooked up!
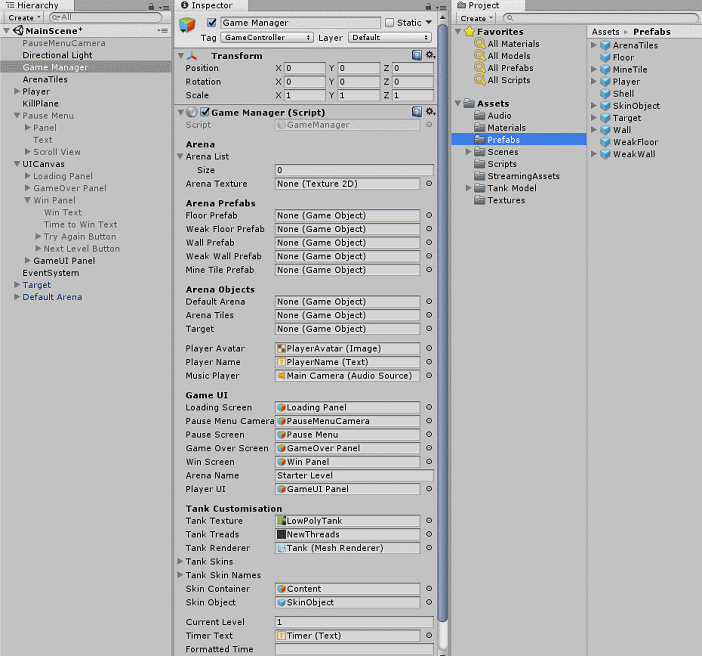
Tap on the Game Manager in the Hierarchy to reveal the Game Manager script in the Inspector. Drag the Skin Object prefab from the Project Window Prefabs folder to the public skinObject variable in the Inspector.
Type content in the Hierarchy search field to find the ScrollView’s content object without losing the Game Manager in the inspector (or tap the lock icon at the top right in the inspector view). Finally, drag the content object into the skinContainer variable.

Tap the play button and press Escape to pause the game. Tap a button and select a new skin for the tank:
Level Design, Now you are Playing with Power!
Okay, it's time to move on to custom level design and creation. Interestingly, you won't need more skills than you've already learned.
First, have a look at the anatomy of an arena so you can get a feel of how it will be constructed.
In the Hierarchy View, double-tap on the Default Arena Game Object to select it and bring it into view in the Scene View. The Arena is constructed from hundreds of tiles, and each tile type is a prefab from the Prefab folder in the Project View. You will use these prefabs to assemble a level in any combination or permutation you can imagine.
The other day I was sitting down with my kids and I asked them if they wanted to design a level for my upcoming tutorial. It went something like this:

Suffice to say I got the kids on the computer and they created two levels from their designs.
You can find these custom levels in the included starter download TankArenaAllAssets folder.
Have a look at the files, by using any image editor a fairly complex level can be constructed...
Now you will create your own custom level and write the code to load any of these levels up.
Open the image editor of your choice and create a new document/canvas 100 px X 100 px square.
Use a hard 1 px pencil tool or line tool to create objects using the following color scheme.
A 100 x 100 level created with any image editing package.

Use the cursor tool to get the x and y coordinates of where you would like the player to start and where the target tile should be.
Save the file as a png when you are finished using the following naming scheme.
arena <x coordinate of player start> <y coordinate of player start> <x coordinate of target> <y coordinate of target> <Name of your level>.png
Once you are happy with your design, add the file to the Project Window StreamingAssets folder.
Head back to the Game Manager. Above the class declaration, add the following code:
[System.Serializable]
public class Arena
{
    public string arenaFilePath;
    public int levelNumber;
    public string levelName;
    public float startX;
    public float startZ;
    public float targetX;
    public float targetZ;
}
This creates an Arena class, containing all of the variables necessary to accommodate the data extracted from an arena file. The Serializable property allows this class to be displayed in the inspector.
Add a new list to the GameManager that will hold all of the instances of the Arena class you create:
[Header("Arena")]
public List<Arena> arenaList = new List<Arena>();
Add the following additional public variables to the GameManager under the arenaList:
public Texture2D arenaTexture;

[Header("Arena Prefabs")]
public GameObject floorPrefab;
public GameObject weakFloorPrefab;
public GameObject wallPrefab;
public GameObject weakWallPrefab;
public GameObject mineTilePrefab;

[Header("Arena Objects")]
public GameObject defaultArena;
public GameObject arenaTiles;
public GameObject target;
[Space]
These variables comprise all of the building blocks for the level and serve as references to the player and the target object so you can customize their position. You also reference the defaultArena so we can remove it, and arenaTiles so that you have a container for new instantiated tiles.
Just like you did previously, add a new conditional statement to the start function:
else if (file.Name.Contains("Arena"))
{
    StartCoroutine("LoadArena", file);
}
Create a new coroutine named LoadArena():
IEnumerator LoadArena (FileInfo arenaFile)
{
    if (arenaFile.Name.Contains(".meta"))
    {
        yield break;
    }
    else
    {
        //1
        Arena arenaInstance = new Arena();

        string arenaFileWithoutExtension = Path.GetFileNameWithoutExtension(arenaFile.ToString());
        string[] arenaDataArray = arenaFileWithoutExtension.Split(" "[0]);
        arenaInstance.startX = int.Parse(arenaDataArray[1]);
        arenaInstance.startZ = int.Parse(arenaDataArray[2]);
        arenaInstance.targetX = int.Parse(arenaDataArray[3]);
        arenaInstance.targetZ = int.Parse(arenaDataArray[4]);
        //2
        string levelName = "";
        if (arenaDataArray.Length <= 5)
        {
            if (arenaList.Count != 0)
            {
                levelName = "Level " + (arenaList.Count + 1);
            }
            else
            {
                levelName = "Level 1";
            }
        }
        else
        {
            int i = 0;
            foreach (string stringFromDataArray in arenaDataArray)
            {
                if (i > 4)
                {
                    levelName = levelName + stringFromDataArray + " ";
                }
            i++;
            }
        }
        arenaInstance.levelName = levelName;
        //3
        arenaInstance.arenaFilePath = "file://" + arenaFile.FullName.ToString();
        //4
        arenaList.Add(arenaInstance);
    }
}
- Here you create a new instance of an Arena. As you've done before, the file name is split and used to populate the class variables.
- For the arena name, you test the number of items in the split file name. If it's less than 6, there is no level name and a default name is assigned based on the number of levels already loaded.
- The file path is saved with the arena instance so that the level can be loaded only when required.
- The fully populated arenaInstance is saved into the GameManagers list of arenas.
Back in Start(), add the following to load the first level (if one exists) once all of the files have been sent to their coroutines, right after the foreach loop:
if (arenaList.Count != 0 )
{
    //1
    Destroy(defaultArena);
    StartCoroutine("LoadLevel", arenaList[0]);
}
Add this final Coroutine to load an arena:
IEnumerator LoadLevel(Arena arenaToLoad)
{
    arenaName = arenaToLoad.levelName;
    //2
    loadingScreen.SetActive(true);
    gameOverScreen.SetActive(false);
    winScreen.SetActive(false);
    //3
    foreach (Transform child in arenaTiles.transform)
    {
        GameObject.Destroy(child.gameObject);
    }
    //4
    WWW www = new WWW(arenaToLoad.arenaFilePath);
    yield return www;
    arenaTexture = www.texture;
    Color[] arenaData = arenaTexture.GetPixels();
    //5
    int x = 0;
    foreach (Color color in arenaData)
    {
        int xPosition = ((x + 1) % 100);
        if (xPosition == 0)
        {
            xPosition = 100;
        }
        int zPosition = (x / 100) + 1;
        //6
        if (color.a < 0.1f)
        {
            GameObject.Instantiate(floorPrefab, new Vector3(xPosition / 1.0f, 0.0f, zPosition / 1.0f), Quaternion.Euler(90, 0, 0), arenaTiles.transform);
        }
        else
        {
            if (color.r > 0.9f && color.g > 0.9f && color.b < 0.1f)
            {
            }
            else if (color.r > 0.9f && color.g < 0.1f && color.b < 0.1f)
            {
                GameObject.Instantiate(mineTilePrefab, new Vector3(xPosition / 1.0f, 0.0f, zPosition / 1.0f), Quaternion.identity, arenaTiles.transform);
            }
            else if (color.r < 0.1f && color.g > 0.9f && color.b < 0.1f)
            {
                GameObject.Instantiate(weakWallPrefab, new Vector3(xPosition / 1.0f, 0.0f, zPosition / 1.0f), Quaternion.identity, arenaTiles.transform);
            }
            else if (color.r < 0.1f && color.g < 0.1f && color.b > 0.9f)
            {
                GameObject.Instantiate(weakFloorPrefab, new Vector3(xPosition / 1.0f, 0.0f, zPosition / 1.0f), Quaternion.identity, arenaTiles.transform);
            }
            else
            {
                GameObject.Instantiate(wallPrefab, new Vector3(xPosition / 1.0f, 0.0f, zPosition / 1.0f), Quaternion.identity, arenaTiles.transform);
            }
        }
        x++;
    }
    //7
    StartCoroutine("RemoveLoadingScreen");
    Time.timeScale = 1.0f;
    //8
    playerTank.transform.position = new Vector3(arenaToLoad.startX / 1.0f, 1.0f, (100 - arenaToLoad.startZ) / 1.0f);
    playerTank.transform.localRotation = Quaternion.Euler(0.0f, 0.0f, 0.0f);
    target.transform.position = new Vector3(arenaToLoad.targetX / 1.0f, 0.6f, (100 - arenaToLoad.targetZ) / 1.0f);
}
- I bet you have been looking forward to this.
Destroythe default arena! - Since this method could also be called when you complete a level, you reapply the loading screen and remove the win or game over screen.
- Remove any existing Arena tiles in the scene.
- You load the texture from the saved file path and
getPixelscaptures all of the pixel data. This process reduces the 2D 100 x 100 pixels image into a 1D list of color values. - Iterate over the list of pixel data. You use the index value to determine where the pixel would be in 2D space. The correct tile can then be instantiated in the correct position in the scene.
- The color value of the pixel will determine which tile you should instantiate. Since some image editors may bleed adjacent pixels, you include a small margin of error. The conditionals check the pixel’s color value and instantiate the applicable tile in the correct position.
- Once you've processed all the pixel data, call
RemoveLoadingScreen()to drop the screen after a second and resume gameplay. - Move the player’s tank and the target tile into their respective positions as recorded in their
Arenainstance.

You're almost there! Find the empty function StartNextLevel and add the following code:
//1
if (arenaList.Count >= currentLevel + 1)
{
    currentLevel++;
    StartCoroutine("LoadLevel", arenaList[currentLevel - 1]);
}
else
{
    SceneManager.LoadScene("MainScene");
}
//2
Rigidbody playerRB = playerTank.GetComponent<Rigidbody>();
playerRB.isKinematic = true;
playerRB.isKinematic = false;
- Once a level is completed, check to see if another level exists. If so, pass it to
LoadLevel(). Otherwise, reload the entire scene to start over at the first level. - There may be residual input applied to the tank when restarting or transitioning between levels. Toggle the player's Rigidbody from kinematic to non-kinematic to zero this out.
Now that StartNextLevel() is fleshed out a little, type "Next" into the Hierachy Window Searchbar in Unity. This should filter down to a single Game Object named Next Level Button. Click to select it, and in the inspector tick interactable under the Button component.
You now need to make a few code amendments to accommodate the fact that you can now have multiple levels (and not just the original starter level).
Replace SceneManager.LoadScene("MainScene"); in RestartLevel() with the following:
if (arenaList.Count != 0)
{
    StartCoroutine("LoadLevel", arenaList[currentLevel - 1]);
}
else
{
    SceneManager.LoadScene("MainScene");
}
This code ensures that instead of just loading the game scene with the default starter level on level restart, the LoadLevel() coroutine is called instead, which destroys the default arena, and replaces it with the content of the custom level that was loaded from streaming assets.
Also replace timerText.text = arenaName + " " + formattedTime; in UpdateTimerUI() with the following line:
timerText.text = arenaList[currentLevel-1].levelName + " " + formattedTime;
This bit of code will ensure that the level name text label in the game UI is updated with the custom level name.
Before you get excited and press Play, don't forget to connect up the prefab outlets in the inspector.
Select the Prefabs folder in the Project Window, and select the Game Manager in the Hierarchy Window. This should expose everything you need.
In the Inspector, you will find the variables for the prefab arena tiles under the Arena Prefabs heading. Each of these has an identically named prefab in the Prefabs folder in the Project Window. Drag each one from the Prefab folder to their respective variable.
Next, take a look at the Arena Objects header in the Inspector. These three GameObject variables are found in the Hierarchy Window. Drag the Target, Default Arena and ArenaTiles from the Hierarchy Window to their respective variables in the Inspector.
Click play and see your designs come to life!
