Using Streaming Assets in Unity
Learn how to make a moddable game in Unity by utilizing streaming assets to dynamically load custom game assets at run-time. By Mark Placzek.
How does a game gain traction and become a hit? There’s no secret recipe, but letting players take full control of the game and customize it to their liking with streaming assets is a powerful selling feature for sure.
In this tutorial, you’ll use the streaming assets directory under Unity to let your users customize the game’s UI, soundtrack, player model, and even create their own levels!
Along the way, you’ll learn:
- How the Streaming Assets directory works.
- How to load resources from the Streaming Assets directory at runtime.
- How to harness the data from files added by your users.
Note: You’ll need to be familiar with some basic C# and know how to work within the Unity 2017.1 development environment. If you need some assistance getting up to speed, check out the Unity tutorials on this site.
Note: You’ll need to be familiar with some basic C# and know how to work within the Unity 2017.1 development environment. If you need some assistance getting up to speed, check out the Unity tutorials on this site.
Getting Started
Download the starter project here, and unzip and open the TankArena_Starter project in Unity. Another folder called TankArenaAllAssets is included with some sample assets you can use later on in this tutorial.
Note: Credit goes to Eric, our venerable Unity Team Leader for the tank model. I’ve been dying for find a use for that tank! The royalty-free music later in the tutorial is from the excellent Bensound. Finally, thanks to my kids who helped create some of the custom content!
Note: Credit goes to Eric, our venerable Unity Team Leader for the tank model. I’ve been dying for find a use for that tank! The royalty-free music later in the tutorial is from the excellent Bensound. Finally, thanks to my kids who helped create some of the custom content!

Hit play and you’ll find yourself in a little tank in a little arena. Your goal is to proceed to the glimmering tower of light that constitutes the target tile. But be warned — there are a number of obstacles you need to avoid or destroy in order to reach your goal.
The game as it stands is a little “meh”, so you’ll add some on-demand assets to let the player customize the game and create some exciting levels.
Loading Resources at Runtime
There are several ways to serve up resources to Unity at runtime, and each method has its place in game development: asset bundles, resource folders, and streaming assets. Let’s look at each one in turn.
Asset Bundles
Asset bundles let you deliver content to your application outside of your Unity build. Generally, you’d host these files on a remote web server for users to access dynamically.
Why use asset bundles? When developing cross-platform games, you may need to create more than one texture or model to respect the limitations of the target platform. Asset bundles let you deliver the appropriate asset on a per-platform basis while keeping the initial game install size to a minimum.
Asset bundles can contain anything from individual assets to entire scenes, which also makes them ideal for delivering downloadable content (DLC) for your game.
Resource Folders
Unlike Asset bundles, resource folders are baked into the Unity Player as part of the game. You can do this by adding the required assets to a folder named Resources in your assets directory.
Resource folders are useful for loading assets at runtime that would not normally be part of the scene or associated with a GameObject. For example, an extremely rare event or hidden object that’s not seen often is not something you’d want to load 100% of the time.
Streaming Assets
Like Resource Folders, a Streaming Assets directory can be created by intuitively creating a folder named StreamingAssets in your project’s assets directory. Unlike Resource folders, this directory remains intact and accessible in the Unity player. This creates a unique access point for users to add their own files to the game.
Adding Streaming Assets
In the assets window, click on Create and add a new folder to your project. Rename the folder StreamingAssets.
Now click on File\Build Settings and ensure the Target Platform is correctly assigned to the platform you are working on. Click Build to build the player. Navigate to where you output the Unity player.
- On a PC, look in the accompanying folder titled <SaveName>_Data.
- On a Mac, right-click the player and click Show Package Contents. From the popup Finder window, navigate through Contents\Resources\Data.
Any file or folder you drop into there will be accessible to your game. Feel free to drop files directly into the StreamingAssets folder in your Project view so you can quickly test in the Editor as you go.
Adding your First Image
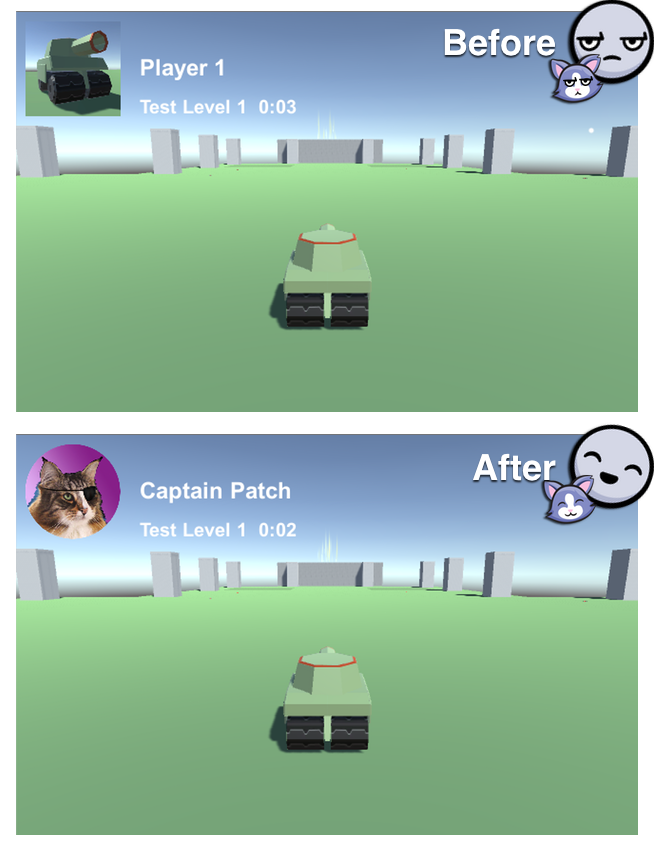
Who is going to step up the plate and take on TankArena? Is it you? Your pet? Your favorite soft toy when you were a kid? Grab a saved photo of them and drag it into the StreamingAssets directory you created in the Project Window. I chose my fearless cat Nando.
If you want to forgo collecting and/or creating a bunch of assets to import, feel free use the assets included in the starter project download under the TankArenaAllAssets folder. I’m sure Nando will not let you down either.
You need to rename your image asset for two reasons:
- The name must contain a specific key word so the game will know what to do with the image.
- The additional text in the file name will give you something to parse to give your hero a screen name.
Rename your image asset in the format “player1 <name>.png”. For example, I named my picture of Nando player1 Captain Patch.png.
Most of the files you add will have a similar format. They’ll have a tag to help identify them to the game, and subsequent text will enable you to add additional parameters to play with.
Loading your First Resource
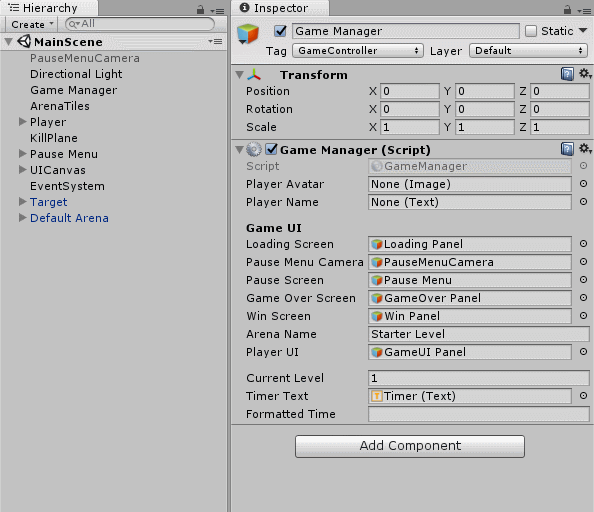
In the Project Window, navigate to Assets\Scripts and double click on the Game Manager Script to open it in the IDE of your choice.
Under the class declaration, add these public variables to reference the UI Game Objects you will customize:
public Image playerAvatar;
public Text playerName;
Before you add any code to find and access the files in your streaming assets directory, you will need to add the following to the top of your GameManager script:
using System.IO;
This adds support for files and directories and allows the reading and writing of files.
Add the following to Start() under playerTank = GameObject.FindGameObjectWithTag("Player");:
DirectoryInfo directoryInfo = new DirectoryInfo(Application.streamingAssetsPath);
print("Streaming Assets Path: " + Application.streamingAssetsPath);
FileInfo[] allFiles = directoryInfo.GetFiles("*.*");
The streaming assets directory resides in different locations depending on the platform. However, Application.streamingAssetsPath will always return the correct path. The entirely optional print statement will show you to see where your streamingAssetsPath points.
The final line creates an array containing all the files in the streaming assets directory. You will create a series of conditionals as you work through this tutorial to handle the files found.
To send the player’s image to be processed, add the following under the code you just added:
foreach (FileInfo file in allFiles)
{
    if (file.Name.Contains("player1"))
    {
        StartCoroutine("LoadPlayerUI", file);
    }
}
The foreach loop iterates through the files, and the conditional checks to see if the file name contains the key word “player1”. Once found, the file is passed to a Coroutine LoadPlayerUI() which you’ll add next:
IEnumerator LoadPlayerUI(FileInfo playerFile)
{
    //1
    if (playerFile.Name.Contains("meta"))
    {
        yield break;
    }
    //2
    else
    {
        string playerFileWithoutExtension = Path.GetFileNameWithoutExtension(playerFile.ToString());
        string[] playerNameData = playerFileWithoutExtension.Split(" "[0]);
        //3
        string tempPlayerName = "";
        int i = 0;
        foreach (string stringFromFileName in playerNameData)
        {
            if (i != 0)
            {
                tempPlayerName = tempPlayerName + stringFromFileName + " ";
            }
            i++;
        }
        //4
        string wwwPlayerFilePath = "file://" + playerFile.FullName.ToString();
        WWW www = new WWW(wwwPlayerFilePath);
        yield return www;
        //5
        playerAvatar.sprite = Sprite.Create(www.texture, new Rect(0, 0, www.texture.width, www.texture.height), new Vector2(0.5f, 0.5f));
        playerName.text = tempPlayerName;
    }
}
Why a Coroutine? Although loading this image will happen very quickly, you will soon be loading and manipulating many more files. A Coroutine runs off the main thread and will not interrupt the game loop.
On to the code:
- The conditional at the start of the function checks to ensure the file name does not contain meta. If so, the file is likely to be the Unity generated backup file and the function exits. This snippet will be repeated in subsequent file processing coroutines.
- The file name is saved without the extension and subsequently split into a string array containing the individual words.
- An empty string is created for the player’s name. The
foreachloop iterates through theplayerNameDataarray. Each item in the array except for the first one (player1) is concatenated to theplayerNamestring. - The full path of the file is needed to load a WWW Object.
yield returnensures execution of the function is delayed until the file is loaded. - A sprite is created with the loaded texture and applied to
playerAvatar.playerNameis populated using thetempPlayerNameyou constructed.
Before you hit that play button to see the fruits of your labor, remember to connect the playerAvatar and playerName to their respective Game Objects in Unity.
In the Unity Editor, select the Game Manager from the Hierarchy Window to expose the public variables in the inspector. Hold Alt and click on the disclosure triangle next to UICanvas in the Hierarchy Window. This should expand UICanvas and all of its children’s children.
Under the GameUIPanel drag PlayerAvatar and PlayerName to their identically named public variables on the Game Manager in the Inspector:
Press the play button and check out your new avatar and name label. Nice!
But wait! There is no way your awesome new avatar would jump into their tank without their own custom soundtrack, right? On to that next.