Flutter Text Rendering
Learn about how Flutter renders Text widgets and see how to make your own custom text widget. By Jonathan Sande.
Sign up/Sign in
With a free Kodeco account you can download source code, track your progress, bookmark, personalise your learner profile and more!
Create accountAlready a member of Kodeco? Sign in
Sign up/Sign in
With a free Kodeco account you can download source code, track your progress, bookmark, personalise your learner profile and more!
Create accountAlready a member of Kodeco? Sign in
Contents
Flutter Text Rendering
30 mins
- Getting Started
- A Journey Through the Framework
- Stepping in: The Text Widget
- Stepping Down: Text Rendering Objects
- Way Down: Flutter’s Text Engine
- Stepping Up Your Game: Building a Custom Text Widget
- Custom Render Object
- Calculating and Measuring Text Runs
- Laying Out Runs in Lines
- Setting the size
- Painting Text to the Canvas
- Where to Go From Here?
Have you ever ridden a camel over the silent Gobi or sipped tea in a nomad’s tent? Just click the link below to enjoy this once in a lifetime opportunity. This is a limited time offer so act now while tickets last!
Just kidding. :]
This isn’t a travel site, but I will be taking you on an exciting journey to an exotic corner of the Flutter framework: text rendering. It seems so simple at first glance. Just ABC, right? Yet untold complexities lie beneath.
By the end of this tutorial you’ll:
- See the relationship between widgets, elements, and render objects.
- Explore what lies behind the
Text
andRichText
widgets. - Make your own custom text widget.
Getting Started
Download the starter project by clicking the Download Materials button at the top or bottom of the page. This time I’m not kidding about clicking the link. Do you think you learn more by watching a travel show on TV or by actually getting on a plane and going there? Your best bet is to download the starter project and follow along.
A Journey Through the Framework
As a Flutter developer, you’re already quite familiar with stateless and stateful widgets, but they’re not the only ones. Today you’re going to learn a little about a third kind, RenderObjectWidget
, and the low level classes of the Flutter framework that support it.
The following diagram shows the Widget
subclasses, where the ones in blue are the ones I want to focus on most in this lesson.
RenderObjectWidget
is a blueprint. It holds the configuration information for RenderObject
, which does all the hard work of hit testing and painting the UI.
The following diagram shows some of the subclasses of RenderObject
. The most common one is RenderBox
, which defines a rectangular area of the screen to paint on. One of its many subclasses, RenderParagraph
, is what Flutter uses to paint text.
Guess what? In just a bit, you’re going to make your very own render paragraph from scratch. I know, I can’t wait either!
As you know, layouts in Flutter are made by composing widgets into trees. Behind the scenes there is a corresponding render object tree. But widgets and render objects don’t know how to interact with each other. Widgets can’t make a render object tree, and render objects don’t know when the widget tree changes.
That’s where elements come in. There is a corresponding element tree that has an Element
for every Widget
in the widget tree. The elements hold a reference to both the widgets and the corresponding render objects. They are the managers or intermediaries between the widgets and the render objects. Elements know when to create render objects, where to put them in a tree, how to update them when there are changes, and when to inflate (create) new elements from child widgets.
The following diagram shows the main Element
subclasses. Every widget has a corresponding element, so you’ll notice the similarity in names to the Widget
subclasses.
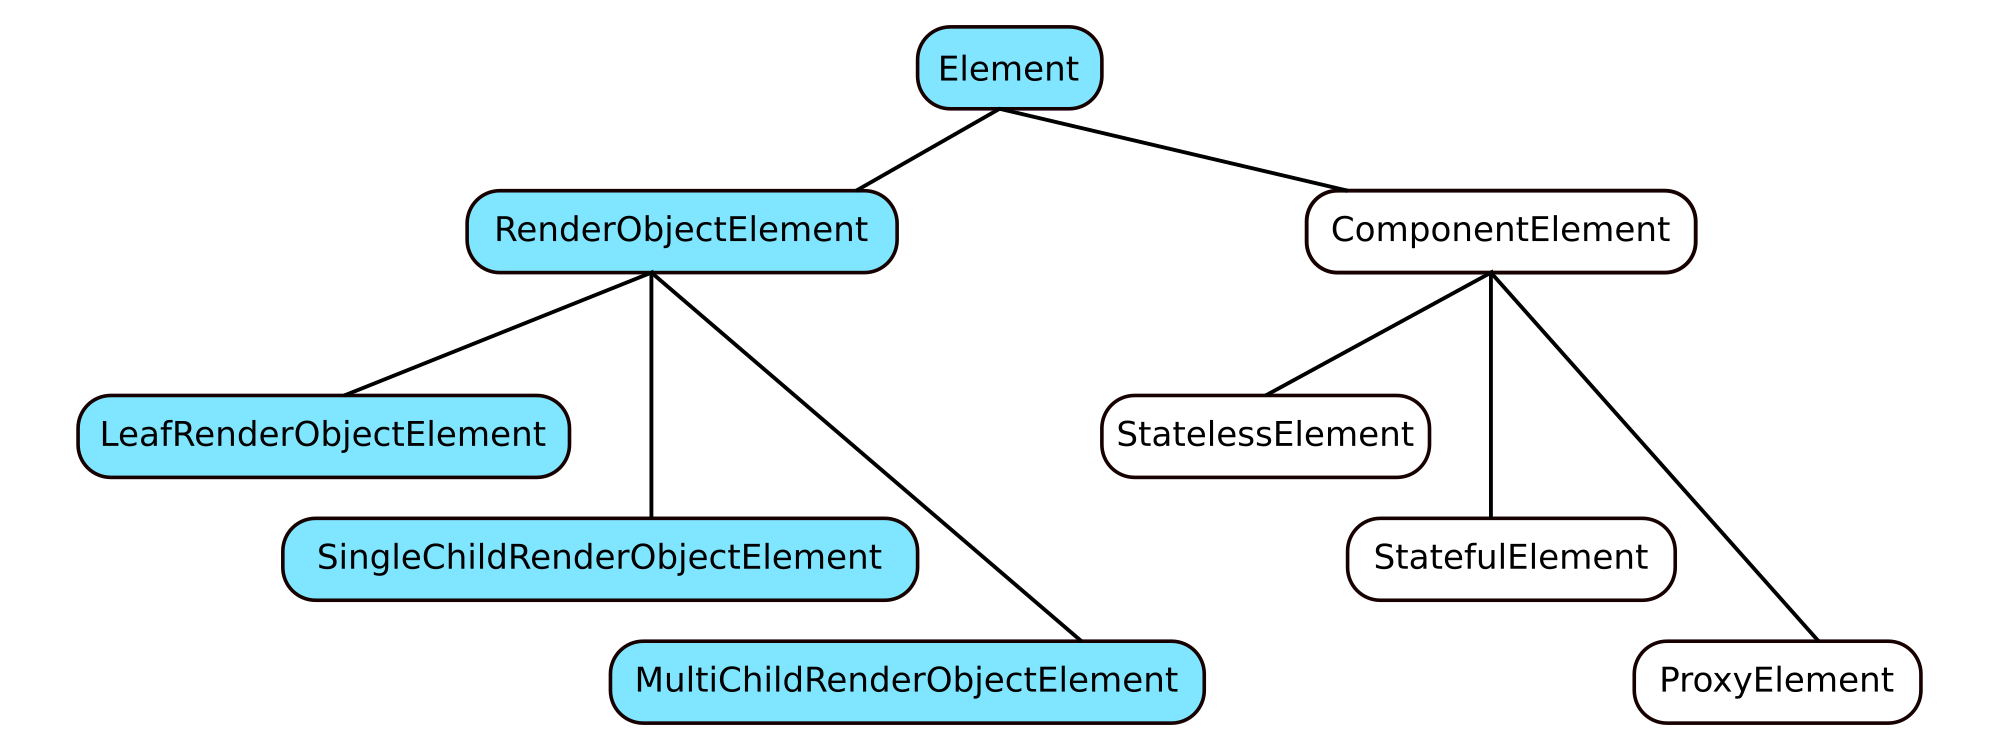
BuildContext
? That’s really just a nickname for Element
. Or to put it more technically, BuildContext
is an abstract class that Element
implements.The explanation above was my tour bus talk on the way to our destination. Let’s get out of the bus now and have a walk down to see a real-life example.
Stepping in: The Text Widget
You’re going to step into the Flutter source code now to see how widgets, elements, and render objects are actually used. You’ll follow a Text
widget all the way to the creation of its render object, that is, RenderParagraph
.
Don’t worry, I’ll stay with you all along the way.
Open your starter project in Android Studio 3.4 or later (with the Flutter plugin installed) and run it. You’ll need to first run flutter pub get
to get your project dependencies. In Android Studio, you can do so using the Get dependencies popup you see after opening the project.
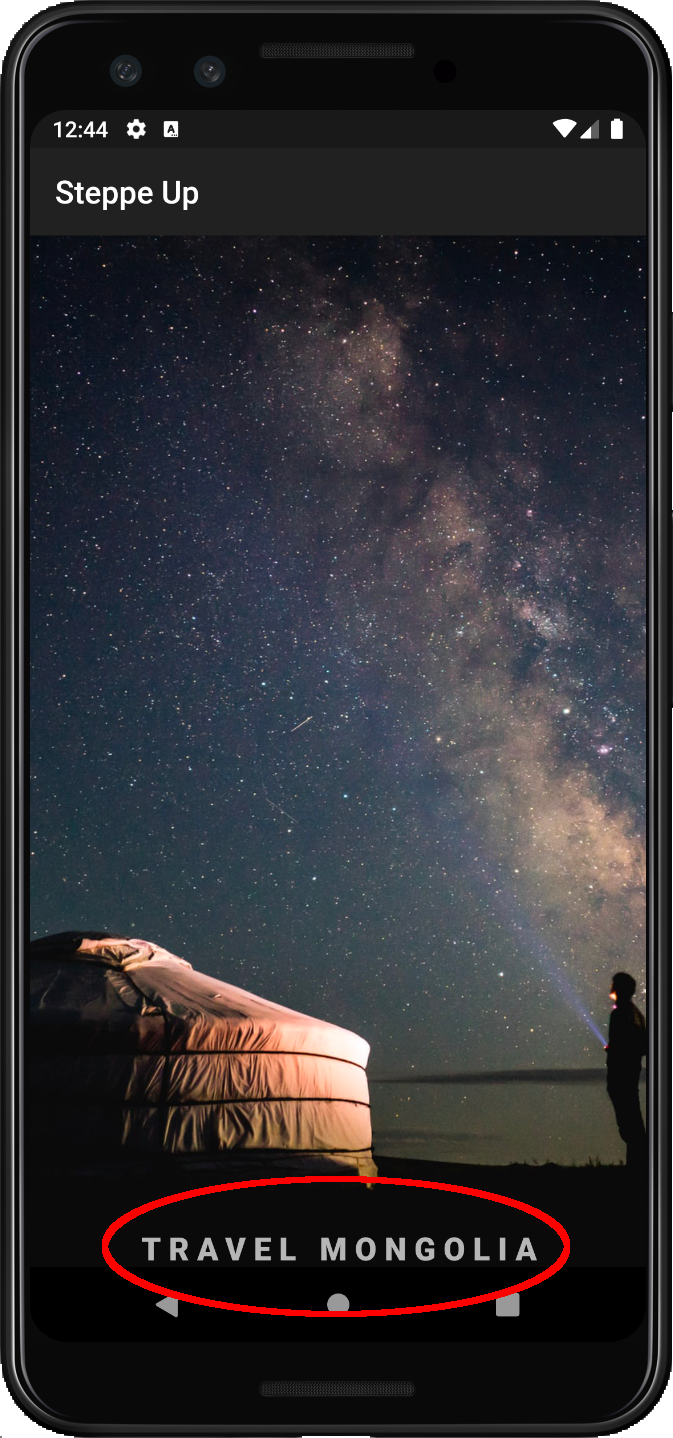
After running the app, you should see the welcome page of a travel app called Steppe Up with the text TRAVEL MONGOLIA at the bottom.
Stop the app now.
In lib/main.dart, scroll to the bottom and find the TODO: Start your journey here line:
child: Align(
alignment: Alignment.bottomCenter,
child: Text( // TODO: Start your journey here
Strings.travelMongolia,
The widget tree here has an Align
widget with a Text
widget child. As you step through the source code, you can refer to the diagram below:
Perform the following steps:
- Command-click (or Control-click on a PC) Text to go to the widget’s source code definition. Note that
Text
is a stateless widget. - Scroll down to the
build
method. What does the method return? Surprise! It’s aRichText
widget. It turns out thatText
is justRichText
in disguise. - Command-click RichText to go to its source code definition. Note that
RichText
is aMultiChildRenderObjectWidget
. Why multi-child? In previous versions of Flutter before 1.7, it actually used to be aLeafRenderObjectWidget
, which has no children, but nowRichText
supports inline widgets with widget spans. - Scroll down to the
createRenderObject
method. There it is. This is where it createsRenderParagraph
. - Add a breakpoint to the return RenderParagraph line.
- Run the app again in debug mode.
In Android Studio if you have the Debug and Variables tabs selected, you should see something similar to the following:
You should also have the following stack trace with these lines at the top. I added the widget or element type in parentheses. The numbers on the far right refer to the comments below.
RichText.createRenderObject (RichText) // 8
RenderObjectElement.mount (RichText) // 7
MultiChildRenderObjectElement.mount (RichText)
Element.inflateWidget (Text) // 6
Element.updateChild (Text)
ComponentElement.performRebuild (Text) // 5
Element.rebuild (Text)
ComponentElement._firstBuild (Text)
ComponentElement.mount (Text) // 4
Element.inflateWidget (Align) // 3
Element.updateChild (Align) // 2
SingleChildRenderObjectElement.mount (Align) // 1
Let’s follow how RenderParagraph
was created. You won’t click every line, but starting at the 12th line from the top:
- Click SingleChildRenderObjectElement.mount. You are in the element for the
Align
widget. In your layout the child ofAlign
is aText
widget. So thewidget.child
that is getting passed intoupdateChild
is theText
widget. - Click Element.updateChild. At the end of a long method your
Text
widget, callednewWidget
, is being passed intoinflateWidget
. - Click Element.inflateWidget. Inflating a widget means creating an element from it, as you can see happens with Element newChild = newWidget.createElement(). At this point you are still in the
Align
element, but you are about to step into themount
method of theText
element that was just inflated. - Click ComponentElement.mount. You are now in the
Text
element. Component elements (likeStatelessElement
) don’t create render objects directly, but they create other elements, which will eventually create render objects. - The next exciting thing is a few methods up the stack trace. Click ComponentElement.performRebuild. Find the built = build() line. That right there, folks, is where the
build
method of theText
widget gets called.StatelessElement
uses a setter to add a reference to itself as theBuildContext
argument. Thebuilt
variable is yourRichText
widget. - Click Element.inflateWidget. This time
newWidget
isRichText
, and it’s used to create aMultiChildRenderObjectElement
. You’re still in theText
element, but you’re about to step into themount
method of theRichText
element. - Click RenderObjectElement.mount. Will you look at that? What a beautiful sight: widget.createRenderObject(this). Finally, this is where
RenderParagraph
gets created. The argumentthis
is theMultiChildRenderObjectElement
that you are in. - Click RichText.createRenderObject. And here you are out the other side. Notice that the
MultiChildRenderObjectElement
was rebranded asBuildContext
.
Is anyone tired? Since you are at a breakpoint, why don’t you take a break and drink some water. There are still a lot of great things to see and do.
Stepping Down: Text Rendering Objects
You’ve seen diagrams of the Flutter architecture like this one:
What you did in the last section was at the Widgets layer. In this section you are going to step down into the Rendering, Painting, and Foundation layers. Even though you’re going deeper, things are actually simpler at the lower levels of the Flutter framework because there aren’t multiple trees to deal with.
Are you still at the breakpoint that you added? Command-click RenderParagraph to see what’s inside.
Take a few minutes to scroll up and down the RenderParagraph
class. Here are a few things to watch out for:
-
RenderParagraph
extendsRenderBox
. That means this render object is rectangular in shape and has some intrinsic width and height based on the content. For a render paragraph, the content is the text. - It handles hit testing. Hey, kids, no hitting each other! If you are going to hit something, hit
RenderParagraph
. It can take it. - The
performLayout
andpaint
methods are also interesting.
Did you notice that RenderParagraph
hands off its text painting work to something called TextPainter
? Find the definition of _textPainter near the top of the class. Let’s leave the Rendering layer and go down to the Painting layer. Command-click TextPainter.
Take a minute to view the scenery.
- There is an important member variable called
_paragraph
of typeui.Paragraph
. Theui
part is a common way to prefix classes that are from thedart:ui
library, the very lowest level of the Flutter framework. - The
layout
method is really interesting. You can’t instantiateParagraph
directly. You have to use aParagraphBuilder
class to do it. It takes a default paragraph style that applies to the whole paragraph. This can be further modified with styles that are included in theTextSpan
tree. CallingTextSpan.build()
adds those styles to theParagraphBuilder
object. - You can see that the
paint
method is pretty simple here.TextPainter
just hands the paragraph off to canvas.drawParagraph(). If you Control-click that, you’ll see that it calls paragraph._paint.
You’ve come to the Foundation layer of the Flutter framework. From within the TextPainter
class, Control-click the following two classes:
- ParagraphBuilder: It adds text and pushes and pops styles, but the actual work is handed off to the native layer.
- Paragraph: Not much to see here. Everything is handed down to the native layer.
Go ahead and stop the running app now.
Here is a diagram to summarize what you saw above:
Way Down: Flutter’s Text Engine
It can be a little scary leaving your homeland and going to a place where you can’t speak the native language. But it’s also adventurous. You’re going to leave the land of Dart and go visit the native text engine. They speak C and C++ down there. The good thing is that there are a lot of signs in English.
You can’t Command-click anymore in your IDE, but the code is all on GitHub as a part of the Flutter repository. The text engine is called LibTxt. Go there now at this link.
We’re not going to spend a long time here, but if you like exploring, have a look around the src
folder later. For now, though, let’s all go to the native class that Paragraph.dart passed its work off to: txt/paragraph_txt.cc. Click that link.
You may enjoy checking out the Layout
and Paint
methods in your free time, but for now scroll down just a little and take a look at the imports:
#include "flutter/fml/logging.h"
#include "font_collection.h"
#include "font_skia.h"
#include "minikin/FontLanguageListCache.h"
#include "minikin/GraphemeBreak.h"
#include "minikin/HbFontCache.h"
#include "minikin/LayoutUtils.h"
#include "minikin/LineBreaker.h"
#include "minikin/MinikinFont.h"
#include "third_party/skia/include/core/SkCanvas.h"
#include "third_party/skia/include/core/SkFont.h"
#include "third_party/skia/include/core/SkFontMetrics.h"
#include "third_party/skia/include/core/SkMaskFilter.h"
#include "third_party/skia/include/core/SkPaint.h"
#include "third_party/skia/include/core/SkTextBlob.h"
#include "third_party/skia/include/core/SkTypeface.h"
#include "third_party/skia/include/effects/SkDashPathEffect.h"
#include "third_party/skia/include/effects/SkDiscretePathEffect.h"
#include "unicode/ubidi.h"
#include "unicode/utf16.h"
From this you can learn (with a little digging) how LibTxt does its work. It is based on a number of other libraries. Here are a few interesting tidbits:
- Minikin does things like measuring and laying out the text.
- ICU helps Minikin with things like breaking text into lines.
- HarfBuzz helps Minikin with choosing the right glyph shapes from a font.
- Skia paints the text and text decorations on a canvas.
The more you look around, the more you realize how much is involved in correctly rendering text. I didn’t even have time to mention issues like interline spacing, grapheme clusters and bidi text.
You’ve journeyed way down into to the framework and text rendering engine. Now it’s time to step back up and put that knowledge to use.
Stepping Up Your Game: Building a Custom Text Widget
You’re going to do something now that you’ve probably never done before. You’re going to create a custom text widget, not by composition as you normally would, but by making a render object that draws text using the lowest levels of Flutter that are available to you.
Flutter wasn’t originally designed to allow developers to do custom text layout, but the Flutter team is responsive and willing to make changes. Keep an eye on this GitHub issue for progress updates on that.
The Steppe Up travel app is looking OK so far, but it would be nice to support the Mongolian script. Traditional Mongolian is unique. It’s written vertically. The standard Flutter text widgets support a horizontal layout, but we need a vertical layout where the lines wrap from right to left.
Custom Render Object
In order to focus on the low level text layout, I’ve included the widget, render object, and helper classes in the starter project.
Let me briefly explain what I did in case you want to make a different custom render object in the future.
-
vertical_text.dart: This is the
VerticalText
widget. I made it by starting with theRichText
source code. I stripped almost everything out and changed it toLeafRenderObjectWidget
, which has no children. It creates aRenderVerticalText
object. -
render_vertical_text.dart: I made this by stripping
RenderParagraph
way down and swapping the width and height measurements. It usesVerticalTextPainter
instead ofTextPainter
. -
vertical_text_painter.dart: I started with
TextPainter
and took out everything that I didn’t need. I also exchanged the width and height calculations and removed support for complex styling withTextSpan
trees. -
vertical_paragraph_constraints.dart: I used
height
for the constraint instead ofwidth
. -
vertical_paragraph_builder.dart: I started with ParagraphBuilder, removed everything I didn’t need, added default styling and made the
build
method returnVerticalParagraph
instead ofParagraph
. -
line_breaker.dart: This is a meant to be a substitute for the Minikin
LineBreaker
class, which is not exposed in Dart.
In the following sections you’ll finish making the VerticalParagraph
class by measuring the words, laying them out in lines, and painting them to the canvas.
Calculating and Measuring Text Runs
The text needs to line wrap. To do that you need to find appropriate places in the string where it’s OK to break lines. As I mentioned above, at the time of this writing Flutter does not expose the Minikin/ICU LineBreaker
class, but an acceptable substitute would be to break between a space and a word.
This is the app welcome string in Unicode:
ᠤᠷᠭᠡᠨ ᠠᠭᠤᠳᠠᠮ ᠲᠠᠯᠠ ᠨᠤᠲᠤᠭ ᠲᠤ ᠮᠢᠨᠢ ᠬᠦᠷᠦᠯᠴᠡᠨ ᠢᠷᠡᠭᠡᠷᠡᠢ
These are the possible break locations:
I’ll call the substrings between breaks “runs” of text. You’ll represent that with a TextRun
class, which you’ll make now.
In the lib/model folder, create a file called text_run.dart, and paste in the following code:
import 'dart:ui' as ui show Paragraph;
class TextRun {
TextRun(this.start, this.end, this.paragraph);
// 1
int start;
int end;
// 2
ui.Paragraph paragraph;
}
Explaining the comments:
- These are the indexes of the text run substring, where
start
is inclusive andend
is exclusive. - You’ll make a “paragraph” for each run so that you can get its measured size.
In dartui/vertical_paragraph.dart add the following code to VerticalParagraph, remembering to import TextRun
:
// 1
List<TextRun> _runs = [];
void _addRun(int start, int end) {
// 2
final builder = ui.ParagraphBuilder(_paragraphStyle)
..pushStyle(_textStyle)
..addText(_text.substring(start, end));
final paragraph = builder.build();
// 3
paragraph.layout(ui.ParagraphConstraints(width: double.infinity));
final run = TextRun(start, end, paragraph);
_runs.add(run);
}
These items are worthy of mention:
- You’ll store every word in the string separately.
- Add the style and text before building the paragraph.
- You must call
layout
before you can get the measurements. I set thewidth
constraint toinfinity
to make sure that this run is only one line.
Then in the _calculateRuns method add the following:
// 1
if (_runs.isNotEmpty) {
return;
}
// 2
final breaker = LineBreaker();
breaker.text = _text;
final int breakCount = breaker.computeBreaks();
final breaks = breaker.breaks;
// 3
int start = 0;
int end;
for (int i = 0; i < breakCount; i++) {
end = breaks[i];
_addRun(start, end);
start = end;
}
// 4
end = _text.length;
if (start < end) {
_addRun(start, end);
}
Explaining each section:
- No need to recalculate the runs if it has already been done.
- This is the simple line breaker class I included in the
util
folder. Thebreaks
variable is a list of index locations where breaks could occur, in this case between a space and non-space character. - Create a run from the text between each break.
- Catch the last word of the string.
Test out what you have done so far. You don't have enough to show anything on the screen yet, but add a print statement at the end of the _layout method.
print("There are ${_runs.length} runs.");
Run the app normally. You should see the following printout in the Run console:
There are 8 runs.
Good. That's what you would expect:
Laying Out Runs in Lines
Now you need to see how many of those runs you can fit per line. Let's say the maximum length of the line can be as long as the green bar in the image below:
You can see that the first three runs will fit, but the fourth needs to go on a new line.
To do this programmatically you need to know how long each run is. Thankfully that information is stored in the paragraph
property of TextRun
.
You're going to make a class to save information about each line. In the lib/model folder, create a file called line_info.dart. Paste in the following code:
import 'dart:ui';
class LineInfo {
LineInfo(this.textRunStart, this.textRunEnd, this.bounds);
// 1
int textRunStart;
int textRunEnd;
// 2
Rect bounds;
}
Commenting on the properties:
- These indexes tell you the range of runs that are included in this line.
- This is the pixel size of this line. You could have used
TextBox
instead, which includes text direction (left-to-right or right-to-left). This app doesn't use bidi text, though, so a simpleRect
will suffice.
Back in dartui/vertical_paragraph.dart, in the VerticalParagraph class, add the following code, remembering to import LineInfo
:
// 1
List<LineInfo> _lines = [];
// 2
void _addLine(int start, int end, double width, double height) {
final bounds = Rect.fromLTRB(0, 0, width, height);
final LineInfo lineInfo = LineInfo(start, end, bounds);
_lines.add(lineInfo);
}
Going over both parts:
- The length of this list will be the number of lines.
- At this point you haven't rotated anything, so
width
andheight
refer to the horizontal orientation.
Then in the _calculateLineBreaks method add the following:
// 1
if (_runs.isEmpty) {
return;
}
// 2
if (_lines.isNotEmpty) {
_lines.clear();
}
// 3
int start = 0;
int end;
double lineWidth = 0;
double lineHeight = 0;
for (int i = 0; i < _runs.length; i++) {
end = i;
final run = _runs[i];
// 4
final runWidth = run.paragraph.maxIntrinsicWidth;
final runHeight = run.paragraph.height;
// 5
if (lineWidth + runWidth > maxLineLength) {
_addLine(start, end, lineWidth, lineHeight);
start = end;
lineWidth = runWidth;
lineHeight = runHeight;
} else {
lineWidth += runWidth;
// 6
lineHeight = math.max(lineHeight, run.paragraph.height);
}
}
// 7
end = _runs.length;
if (start < end) {
_addLine(start, end, lineWidth, lineHeight);
}
Explaining the different parts in order:
- This method must be called after runs are calculated.
- It's OK to relayout the lines with a different constraint.
- Loop through each run checking the measurements.
-
Paragraph
also has awidth
parameter, but it's the constraint width, not the measured width. Since you passed indouble.infinity
as the constraint, the width is infinity. UsingmaxIntrinsicWidth
orlongestLine
will give you the measured width of the run. See this link for more. - Find the sum of the widths. If it exceeds the max length, then start a new line.
- Currently the height is always the same, but in the future if you use different styles for each run, taking the max will allow everything to fit.
- Add any final runs as the last line.
Test out what you have done so far by adding another print statement at the end of the _layout method:
print("There are ${_lines.length} lines.");
Do a hot restart (or restart the app if needed). You should see:
There are 3 lines.
This is what you would expect because in main.dart the VerticalText
widget has a constraint of 300 logical pixels, which is the approximate length of the green bar:
Setting the size
The system wants to know the size of the widget, but you didn't have enough information before. Now that you've measured the lines, though, you can calculate the size.
Add the following code to the _calculateWidth method in your VerticalParagraph class:
double sum = 0;
for (LineInfo line in _lines) {
sum += line.bounds.height;
}
_width = sum;
Why do I say to add the heights to get the width? Well, width
is a value that you expose to the outside world. Outside users are thinking of rotated (vertical) lines. The height
variable, on the other hand, is what you are using internally for the non-rotated (horizontal) lines.
The intrinsic height is how tall the widget would like to be if it had as much room as it wanted. Add the following code to the _calculateIntrinsicHeight method:
double sum = 0;
double maxRunWidth = 0;
for (TextRun run in _runs) {
final width = run.paragraph.maxIntrinsicWidth;
maxRunWidth = math.max(width, maxRunWidth);
sum += width;
}
// 1
_minIntrinsicHeight = maxRunWidth;
// 2
_maxIntrinsicHeight = sum;
The numbered comments are explained here:
- As before, height and width are mixed because of the rotation. You don't want any word to be clipped, so the minimum height the widget would like to be is the length of the longest run.
- If the widget laid everything out in one long vertical line, this is how tall it would like to be.
Add the following to the end of the _layout method:
print("width=$width height=$height");
print("min=$minIntrinsicHeight max=$maxIntrinsicHeight");
Restart the app. You should see something similar to this:
width=123.0 height=300.0
min=126.1953125 max=722.234375
The min and max intrinsic heights are what you would expect if the line were vertical:
Painting Text to the Canvas
You're almost done. All that's left is painting the runs. Copy the following code into the draw method:
canvas.save();
// 1
canvas.translate(offset.dx, offset.dy);
// 2
canvas.rotate(math.pi / 2);
for (LineInfo line in _lines) {
// 3
canvas.translate(0, -line.bounds.height);
// 4
double dx = 0;
for (int i = line.textRunStart; i < line.textRunEnd; i++) {
// 5
canvas.drawParagraph(_runs[i].paragraph, Offset(dx, 0));
dx += _runs[i].paragraph.longestLine;
}
}
canvas.restore();
Explaining the parts in order:
- Move to the start location.
- Rotate the canvas 90 degrees. The old top is now on the right.
- Move to where the line should start. The
y
value is negative so this moves up each new line, that is, to the right on the rotated canvas. - Draw each run (word) one at a time.
- The offset is the start location of the run on the line.
Here is an image showing the order of how the text runs are drawn in the three lines:
Run the app one more time.
Tadaa! The beautiful vertical script adds the perfect touch to our travel app.
Where to Go From Here?
You can download the completed project using the Download Materials button at the top or bottom of this tutorial.
If you've stuck it out this far, it shows that you're a hardy traveler in the world of text rendering. You've come a long way. But just like a casual tourist to a foreign culture, a short trip can only scratch the surface of what lies beneath. In this last section I will give you some guidance of where to travel next.
Suggested Improvements
There are many ways the vertical text widget could be improved to make it more generally usable. Here are a few:
- Handle new line characters.
- Support
TextSpan
trees with substring styling, differentiating aVerticalText
widget from aVerticalRichText
widget. - Add hit testing and semantics.
- Emojis and CJK characters should have the correct orientation.
- Research what it would take to make a vertical
TextField
with text selection and a blinking cursor.
I'm going to be working on these things in future. Feel free to watch my progress or participate here.
Further Study
Read the source code with its comments. I'm being serious. Start here:
For YouTube videos, I recommend:
And I found these articles to be especially good:
- The Engine architecture
- Flutter’s Rendering Engine: A Tutorial
- Everything you need to know about tree data structures
- Android’s Font Renderer
- Inside Flutter
I hope you've enjoyed this tutorial on text rendering in Flutter. I'd love to hear your comments or questions in the forum discussion below.