Clean Architecture Tutorial for Android: Getting Started

In this tutorial, you’ll learn how to use Clean Architecture on Android to build robust, flexible and maintainable applications. By Ivan Kušt.

Leave a rating/review
Download materials
Save for later
Share

Are you looking for a good architecture for complex Android projects? Have you heard about Clean Architecture but don’t know what all the fuss is about?

In this tutorial you’ll learn the basics of Clean Architecture, including:

  • Why it’s important to use architecture patterns in software
  • What Clean Architecture is
  • What SOLID principles of development are
  • When to use Clean Architecture and SOLID principles
  • How to implement Clean Architecture on Android
Note: This tutorial assumes you know the basics of Android development with Kotlin. If you’re new to Kotlin, check out our Kotlin introduction tutorial. If you’re completely new to Android development, read through our Beginning Android Development tutorials to familiarize yourself with the basics.

Getting Started

There has always been an open debate, on which architectural pattern to use on Android. Since the early days, you got the feeling that things weren’t right, the way they were set up. This, in turn, caused a lot of people to struggle with architecture in general.

However, for quite a long time, there have been talks about writing your applications in a clean way. Furthermore, one of the most influential persons in the global programmer community, Robert C. Martin, also known as Uncle Bob, has written a book, specifically on this topic.

Because the Clean architecture can be used in any application and platform, not just Android, it’s very informative to understand the idea behind it, and why it’s a good solution, for most problems we find nowadays, as programmers. With that in mind, in this tutorial, you’ll learn how to use the Clean architecture pattern to build a Majestic Reader app, a simple PDF reader.

To get started, download the Majestic Reader project using the Download Materials button at the top or bottom of this tutorial. Open the project in Android Studio 3.2 or later by selecting Open an existing Android Studio project on the Android Studio welcome screen:

In case something goes wrong, due to sync issues, simply press the Gradle sync button, and everything should be fine! Finally, build and run the project. You should see that the main screen of the app is currently empty:

The app consists of two screens:

  • A list of PDF documents in your library.
  • A PDF document reader.

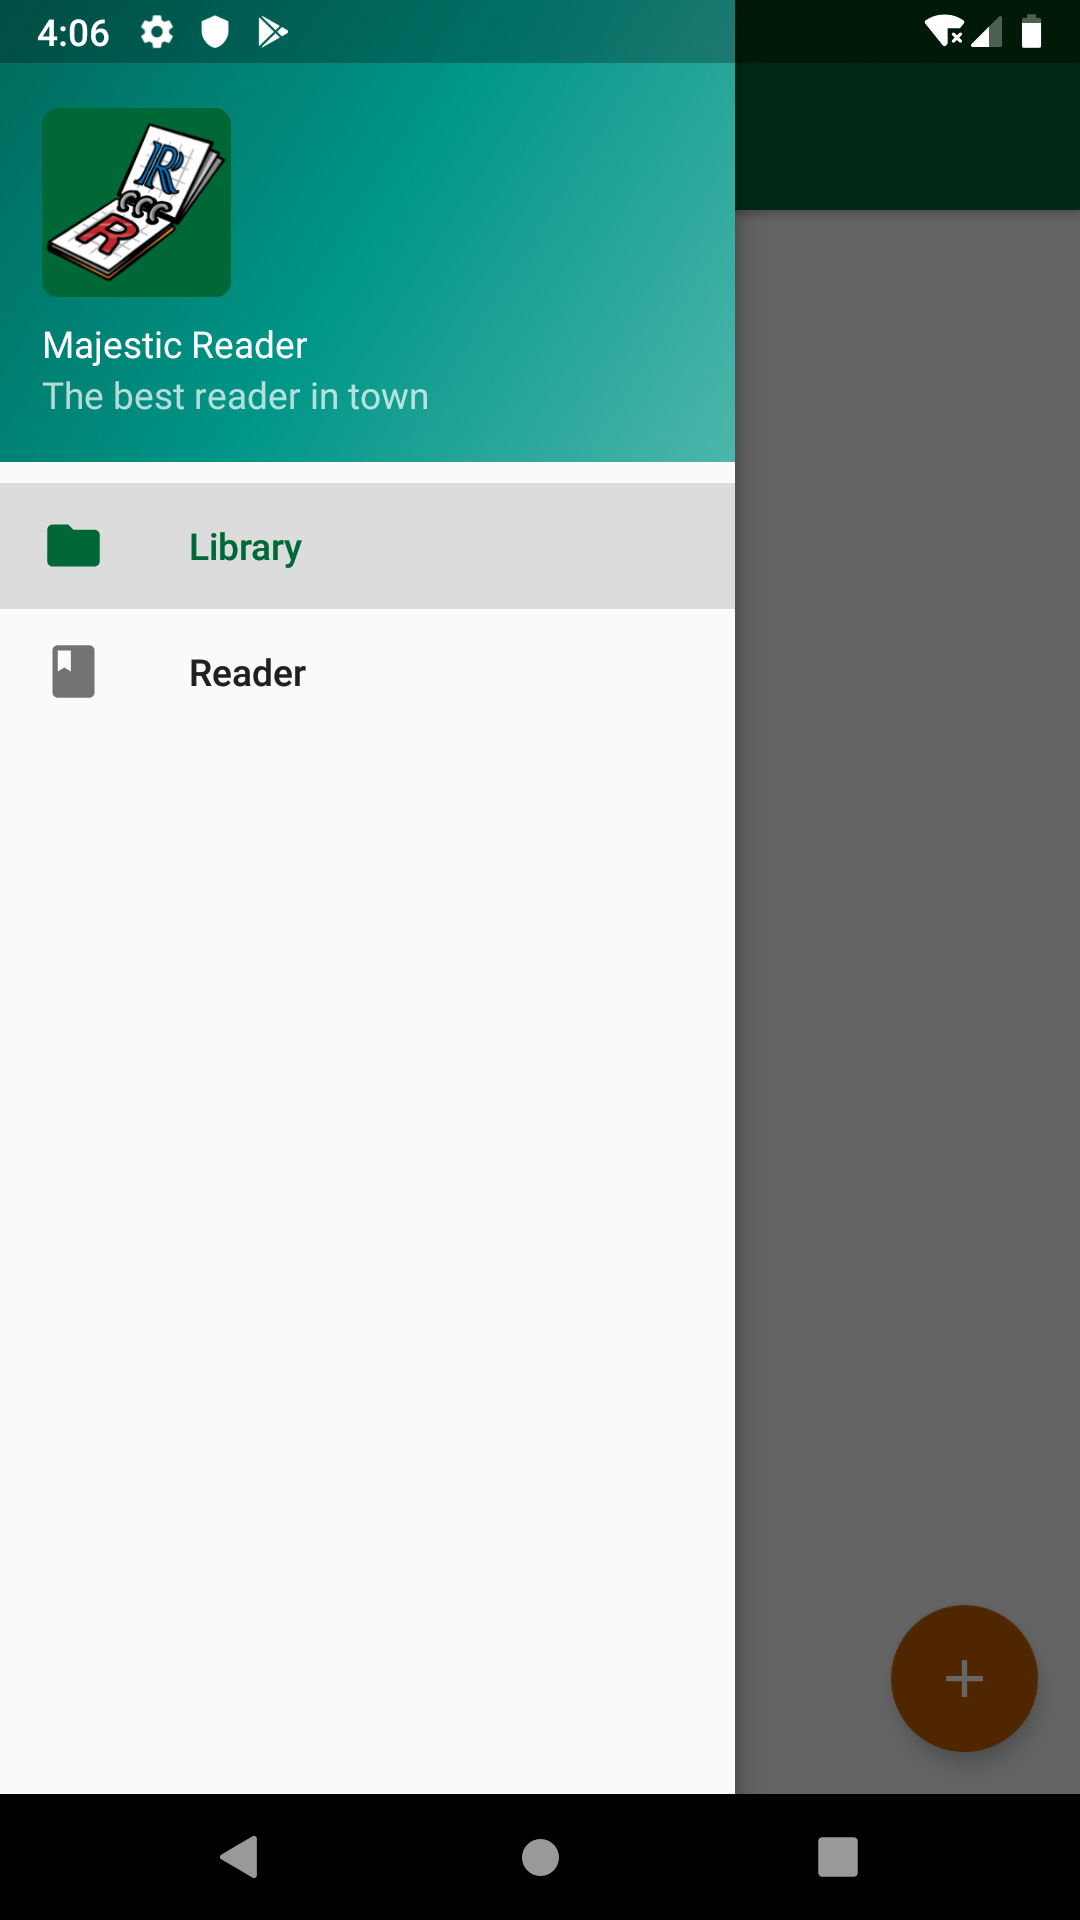
Currently, those are dummy screens. Your job is to implement library and reader functionality using Clean Architecture.

Clean Architecture

You might be wondering: Why should I use an architecture? I’m better than that. Well, bear with me.

Why Architecture Is Important

All architectures have one common goal — to manage the complexity of your application. You may not need to worry about it on a smaller project, but it becomes a lifesaver on larger ones.

How does Clean Architecture approach the problem?

You might have seen this graph already:

The circles represent different levels of software in your app. There are two key things to note:

  • The center circle is the most abstract, and the outer circle is the most concrete. This is called the Abstraction Principle. The Abstraction Principle specifies that inner circles should contain business logic, and outer circles should contain implementation details.
  • Another principle of Clean Architecture is the Dependency Rule. This rule specifies that each circle can depend only on the nearest inward circle — this is what makes the architecture work.

The outer circle represents the concrete mechanisms that are specific to the platform such as networking and database access. Moving inward, each circle is more abstract and higher-level. The center circle is the most abstract and contains business logic, which doesn’t rely on the platform or the framework you’re using.

Additional benefits of using an architecture when structuring app code include:

  • Parts of the code get decoupled, and easier to reuse and test.
  • There’s a method to the madness. When someone else works on your code, they can learn the app’s architecture and will understand it better.

SOLID Principles

Five design principles make software design more understandable, flexible and maintainable. Those principles are:

  • Single Responsibility: Each software component should have only one reason to change – one responsibility.
  • Open-closed: You should be able to extend the behavior of a component, without breaking its usage, or modifying its extensions.
  • Liskov Substitution: If you have a class of one type, and any subclasses of that class, you should be able to represent the base class usage with the subclass, without breaking the app.
  • Interface Segregation: It’s better to have many smaller interfaces than a large one, to prevent the class from implementing the methods that it doesn’t need.
  • Dependency Inversion: Components should depend on abstractions rather than concrete implementations. Also higher level modules shouldn’t depend on lower level modules.

Clean Architecture maximizes the use of these principles.

Layers of Clean Architecture

There are different opinions about how many layers Clean Architecture should have. The architecture doesn’t define exact layers but instead lays out the foundation. The idea is that you adapt the number of layers to your needs.

To keep things simple, you’ll use five layers:

  • Presentation: A layer that interacts with the UI.
  • Use cases: Sometimes called interactors. Defines actions the user can trigger.
  • Domain: Contains the business logic of the app.
  • Data: Abstract definition of all the data sources.
  • Framework: Implements interaction with the Android SDK and provides concrete implementations for the data layer.

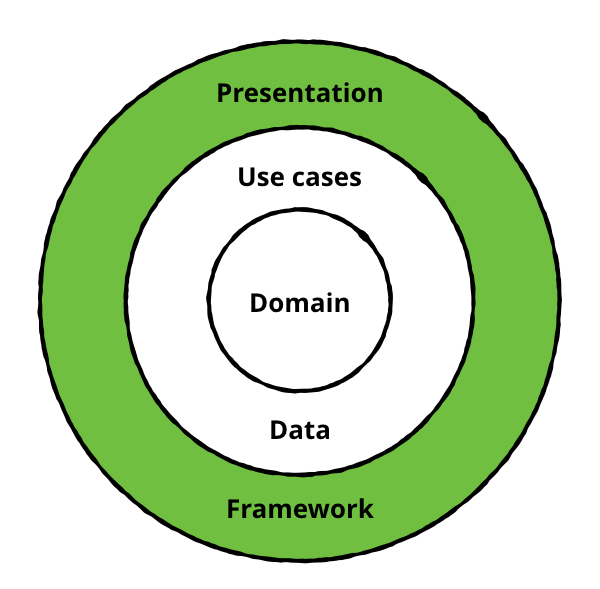
Layers marked green depend on Android SDK.

Project Structure

Since Clean architecture can be applied anywhere, it’s important to know how you’ll implement it on Android.

You’ll split the project into two modules:

  • The existing app module.
  • A new core module that will hold all the code that doesn’t depend on Android SDK.

The following graph shows communication between the layers and how they are arranged in modules:

The app module is already there, so start by creating a core module.

Right click on MajesticReader in Project explorer and select New ▸ Module or select File ▸ New ▸ New Module.

In the wizard, select Java library and click “Next”.

Under Library name, type core.

Click on the Edit button next to the Java package name field and type in com.raywenderlich.android.majesticreader. Then, click Done.

Ignore Java Class Name and click on Finish.

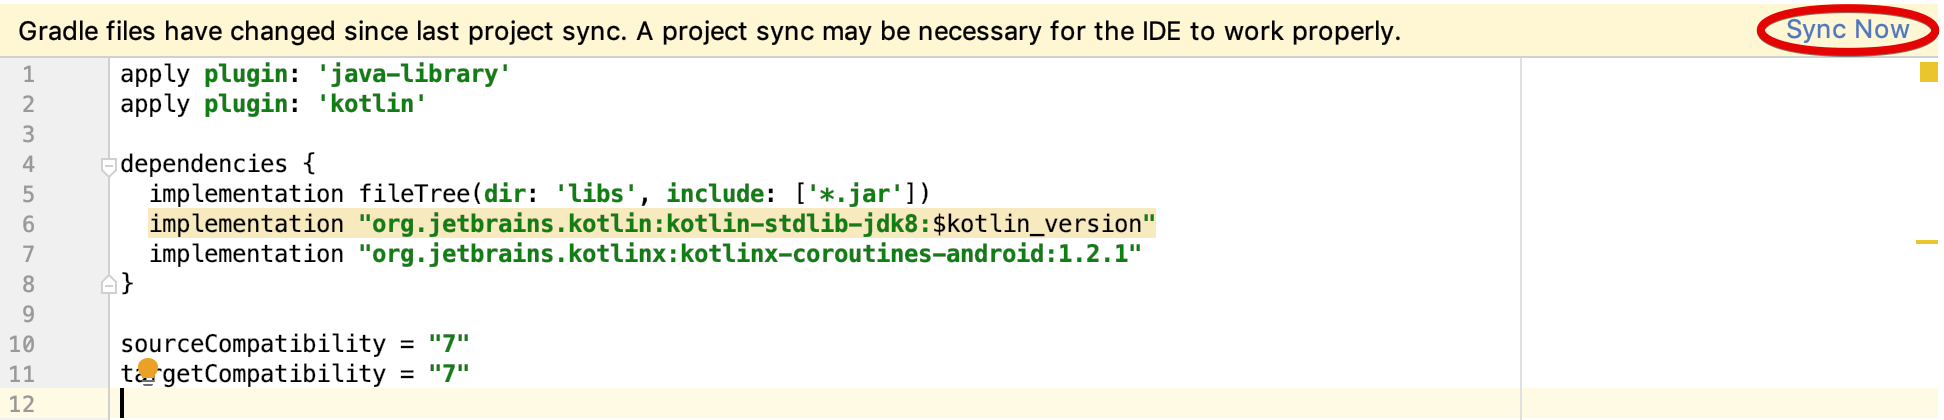
Wait for the gradle to sync. Then, open build.gradle in the core module and add the following after the first apply plugin line:

apply plugin: 'kotlin'

In the dependencies section, add two more dependencies:

implementation "org.jetbrains.kotlin:kotlin-stdlib-jdk8:$kotlin_version"
implementation "org.jetbrains.kotlinx:kotlinx-coroutines-android:1.2.1"

Next, reference the core module from the app module.

Open build.gradle in the app module and add the following line under the dependencies block:

implementation project(':core')

Click Sync Now in the top-right corner on the message strip and wait for the Gradle to sync.

Next, select com.raywenderlich.adroid.majesticreader in the core module. Right-click and select New ▸ Package

Type in domain for the name of the new package.

Repeat the process and create two more packages: data and interactors.

Feel free to delete the Java class created by the new module wizard. Now, you have to implement each of the layers independently. :]

The Data and Business Logic Layers

You’ll work your way from the centermost abstract layers to the outer, more concrete layers.

The Domain Layer

The Domain layer contains all the models and business rules of your app.

Move the Bookmark and Document models provided in the starter project to the core module. Select Bookmark and Document files from app module and drag them to the com.raywenderlich.android.majesticreader.domain package in the core module. You’ll see a dialog:

Click on Refactor to finish the process.

The Data Layer

This layer provides abstract definitions for accessing data sources like a database or the internet. You’ll use Repository pattern in this layer.

The main purpose of the repository pattern is to abstract away the concrete implementation of data access. To achieve this, you’ll add one interface and one class for each model:

  • DataSource interface: The interface that the Framework layer must implement.
  • Repository class: Provides methods for accessing the data that delegate to DataSource.

Using the repository pattern is a good example of the Dependency Inversion Principle because:

  • A Data layer which is of a higher, more abstract level doesn’t depend on a framework, lower-level layer.
  • The repository is an abstraction of Data Access and it does not depend on details. It depends on abstraction.

Adding Repositories

Select com.raywenderlich.android.majesticreader.data in the core module. Add a new Kotlin file by right-clicking and selecting New ▸ Kotlin File/Class.

Type BookmarkDataSource in the dialog.

Click Finish. Open the new file and paste the following code after the first line:

import com.raywenderlich.android.majesticreader.domain.Bookmark
import com.raywenderlich.android.majesticreader.domain.Document

interface BookmarkDataSource {

  suspend fun add(document: Document, bookmark: Bookmark)

  suspend fun read(document: Document): List<Bookmark>

  suspend fun remove(document: Document, bookmark: Bookmark)
}

You’ll use this interface to provide the Bookmark data access from the Framework layer.

Repeat the process and add another interface named DocumentDataSource:

import com.raywenderlich.android.majesticreader.domain.Document

interface DocumentDataSource {

  suspend fun add(document: Document)

  suspend fun readAll(): List<Document>

  suspend fun remove(document: Document)
}

Repeat the process and add the last data source named OpenDocumentDataSource:

import com.raywenderlich.android.majesticreader.domain.Document

interface OpenDocumentDataSource {

  fun setOpenDocument(document: Document)

  fun getOpenDocument(): Document
}

This data source will take care of storing and retrieving the currently opened PDF document. Next, add a new Kotlin file named BookmarkRepository to the same package and copy and paste the following code:

import com.raywenderlich.android.majesticreader.domain.Bookmark
import com.raywenderlich.android.majesticreader.domain.Document

class BookmarkRepository(private val dataSource: BookmarkDataSource) {
  suspend fun addBookmark(document: Document, bookmark: Bookmark) =
    dataSource.add(document, bookmark)

  suspend fun getBookmarks(document: Document) = dataSource.read(document)

  suspend fun removeBookmark(document: Document, bookmark: Bookmark) =
    dataSource.remove(document, bookmark)	
} 

This is the Repository that you’ll use to add, remove and fetch stored bookmarks in the app. Note that you mark all the methods with the suspend modifier. This allows you to use coroutine-powered mechanisms in Room, for simpler threading.

Note: If you want to know more about Coroutines check out the official Kotlin documentation or our Kotlin Coroutines book!

As an exercise, try adding DocumentRepository.

[spoiler title=”DocumentRepository”]

import com.raywenderlich.android.majesticreader.domain.Document

class DocumentRepository(
    private val documentDataSource: DocumentDataSource,
    private val openDocumentDataSource: OpenDocumentDataSource) {

  suspend fun addDocument(document: Document) = documentDataSource.add(document)	

  suspend fun getDocuments() = documentDataSource.readAll()
  
  suspend fun removeDocument(document: Document) = documentDataSource.remove(document)

  fun setOpenDocument(document: Document) = openDocumentDataSource.setOpenDocument(document)	

  fun getOpenDocument() = openDocumentDataSource.getOpenDocument()
}

[/spoiler]

The Use Cases Layer

This layer converts and passes user actions, also known as use cases, to inner layers of the application.

Majestic Reader has two key functionalities:

  • Showing and managing a list of documents in a library.
  • Enabling the user to open a document and manage bookmarks in it.

From that, you can list the actions users should be able to perform:

  • Adding a bookmark to a currently open document.
  • Removing a bookmark from a currently open document.
  • Getting all bookmarks for currently open documents.
  • Adding a new document to the library.
  • Removing a document from the library.
  • Getting documents in the library.
  • Setting currently opened documents.
  • Getting currently opened documents.

Your next task is to create a class that represents each use case.

Create a new Kotlin file named AddBookmark in com.raywenderlich.android.majesticreader.interactors. Add the following code after the package statement:

import com.raywenderlich.android.majesticreader.data.BookmarkRepository
import com.raywenderlich.android.majesticreader.domain.Bookmark
import com.raywenderlich.android.majesticreader.domain.Document

class AddBookmark(private val bookmarkRepository: BookmarkRepository) {
  suspend operator fun invoke(document: Document, bookmark: Bookmark) =
      bookmarkRepository.addBookmark(document, bookmark)
}

Each use case class has only one function that invokes the use case. For convenience, you’re overloading the invoke operator. This enables you to simplify the function call on AddBookmark instance to addBookmark() instead of addBookmark.invoke().

Note: For more details on overloading operators, see the official Kotlin documentation .

Adding The Remaining Use Cases

Repeat this procedure and add the classes for the remaining actions:

  • AddDocument
    [spoiler title=”AddDocument”]
    import com.raywenderlich.android.majesticreader.data.DocumentRepository
    import com.raywenderlich.android.majesticreader.domain.Document
    
    class AddDocument(private val documentRepository: DocumentRepository) {
      suspend operator fun invoke(document: Document) = documentRepository.addDocument(document)
    }
    

    [/spoiler]

  • GetBookmarks
    [spoiler title=”AddDocument”]
    import com.raywenderlich.android.majesticreader.data.BookmarkRepository
    import com.raywenderlich.android.majesticreader.domain.Document
    
    class GetBookmarks(private val bookmarkRepository: BookmarkRepository) {
    
      suspend operator fun invoke(document: Document) = bookmarkRepository.getBookmarks(document)
    }
    

    [/spoiler]

  • GetDocuments
    [spoiler title=”GetDocuments”]
    import com.raywenderlich.android.majesticreader.data.DocumentRepository
    
    class GetDocuments(private val documentRepository: DocumentRepository) {
      suspend operator fun invoke() = documentRepository.getDocuments()
    }
    

    [/spoiler]

  • GetOpenDocument
    [spoiler title=”GetOpenDocument”]
    import com.raywenderlich.android.majesticreader.data.DocumentRepository
    
    class GetOpenDocument(private val documentRepository: DocumentRepository) {
      operator fun invoke() = documentRepository.getOpenDocument()
    }
    

    [/spoiler]

  • RemoveBookmark
    [spoiler title=”RemoveBookmark”]
    import com.raywenderlich.android.majesticreader.data.BookmarkRepository
    import com.raywenderlich.android.majesticreader.domain.Bookmark
    import com.raywenderlich.android.majesticreader.domain.Document
    
    class RemoveBookmark(private val bookmarksRepository: BookmarkRepository) {
      suspend operator fun invoke(document: Document, bookmark: Bookmark) = bookmarksRepository
          .removeBookmark(document, bookmark)
    }
    

    [/spoiler]

  • RemoveDocument
    [spoiler title=”RemoveDocument”]
    import com.raywenderlich.android.majesticreader.data.DocumentRepository
    import com.raywenderlich.android.majesticreader.domain.Document
    
    class RemoveDocument(private val documentRepository: DocumentRepository) {
      suspend operator fun invoke(document: Document) = documentRepository.removeDocument(document)
    }
    

    [/spoiler]

  • SetOpenDocument
    [spoiler title=”SetOpenDocument”]
    import com.raywenderlich.android.majesticreader.data.DocumentRepository
    import com.raywenderlich.android.majesticreader.domain.Document
    
    class SetOpenDocument(private val documentRepository: DocumentRepository) {
      operator fun invoke(document: Document) = documentRepository.setOpenDocument(document)
    }
    

    [/spoiler]

Framework and UI

This concludes the implementation of the three inner layers in the core module. You’re now ready to move on to remaining layers: Framework and Presentation. Both of those layers depend on Android SDK, so you’ll place them in the app module.

The Framework Layer

The Framework layer holds implementations of interfaces defined in the Data layer.
Your next task is to provide implementations of Data source interfaces from the Data layer. Start with OpenDocumentDataSource. It will store the currently open document in memory and is the simplest one.

Create a new file in app module in com.raywenderlich.android.majesticreader.framework named InMemoryOpenDocumentDataSource. Paste the following after the first line:

import com.raywenderlich.android.majesticreader.data.OpenDocumentDataSource
import com.raywenderlich.android.majesticreader.domain.Document

class InMemoryOpenDocumentDataSource : OpenDocumentDataSource {

  private var openDocument: Document = Document.EMPTY

  override fun setOpenDocument(document: Document) {
    openDocument = document
  }

  override fun getOpenDocument() = openDocument 
}

This is an implementation of OpenDocumentDataSource from the Data layer. Currently, the open document is stored in memory, so the implementation is pretty straightforward.

Adding Remaining Data Sources

You will use the remaining data sources to delegate and persist data in the database, using the Room library. The classes required for persisting Bookmarks and Document via Room are in the db subpackage.

Note: for more information on Room, check our Room tutorial .

Create a new Kotlin file named RoomBookmarkDataSource in framework. Add the following code in the new file:

import android.content.Context
import com.raywenderlich.android.majesticreader.data.BookmarkDataSource
import com.raywenderlich.android.majesticreader.domain.Bookmark
import com.raywenderlich.android.majesticreader.domain.Document
import com.raywenderlich.android.majesticreader.framework.db.BookmarkEntity
import com.raywenderlich.android.majesticreader.framework.db.MajesticReaderDatabase

class RoomBookmarkDataSource(context: Context) : BookmarkDataSource {

  // 1
  private val bookmarkDao = MajesticReaderDatabase.getInstance(context).bookmarkDao()

  // 2
  override suspend fun add(document: Document, bookmark: Bookmark) = 
    bookmarkDao.addBookmark(BookmarkEntity(
      documentUri = document.url,
      page = bookmark.page
    ))

  override suspend fun read(document: Document): List<Bookmark> = bookmarkDao
      .getBookmarks(document.url).map { Bookmark(it.id, it.page) }

  override suspend fun remove(document: Document, bookmark: Bookmark) =
    bookmarkDao.removeBookmark(
        BookmarkEntity(id = bookmark.id, documentUri = document.url, page = bookmark.page)
    )
}

Here’s what the code is doing, step by step:

  1. Use MajesticReaderDatabase to get an instance of BookmarkDao and store it in local field.
  2. Call add, read and remove methods from Room implementation.

Create a new Kotlin file named RoomDocumentDataSource in framework. Add the following code in the new file:

import android.content.Context
import com.raywenderlich.android.majesticreader.data.DocumentDataSource
import com.raywenderlich.android.majesticreader.domain.Document
import com.raywenderlich.android.majesticreader.framework.db.DocumentEntity
import com.raywenderlich.android.majesticreader.framework.db.MajesticReaderDatabase

class RoomDocumentDataSource(val context: Context) : DocumentDataSource {

  private val documentDao = MajesticReaderDatabase.getInstance(context).documentDao()

  override suspend fun add(document: Document) {
    val details = FileUtil.getDocumentDetails(context, document.url)
    documentDao.addDocument(
        DocumentEntity(document.url, details.name, details.size, details.thumbnail)
    )
  }

  override suspend fun readAll(): List<Document> = documentDao.getDocuments().map {
    Document(
        it.uri,
        it.title,
        it.size,
        it.thumbnailUri
    )
  }

  override suspend fun remove(document: Document) = documentDao.removeDocument(
      DocumentEntity(document.url, document.name, document.size, document.thumbnail)
  )
}

Now, what’s left to do is to connect all the dots, and display the data.

The Presentation Layer

This layer contains the User Interface-related code. This layer is in the same circle as the framework layer, so you can depend on its classes.

Using MVVM

You’ll be using the MVVM pattern in this layer because it’s supported by Android Jetpack. Note that it doesn’t matter which pattern you use for this layer and you are free to use what suits your needs best, be it MVP, MVI or something else.

For a quick introduction, here’s a diagram:

MVVM pattern consists of three components:

  • View: responsible for drawing the UI to the user
  • Model: Contains business logic and data.
  • ViewModel: Acts as a bridge between data and UI.
Note: For more information about MVVM, check out official documentation and our tutorial!

In Clean Architecture, instead of relying on Models, you’ll communicate with Interactors from the Use Case layer.

This layer contains the user interface related code, powered by Android Jetpack! :]

Providing Sources

Before moving on to implementing the presentation layer, you need a way to provide the Data sources to the data layer. You should usually do this using dependency injection. It is the process of separating provider functions or factories for dependencies, and their usage. This makes your classes cleaner, as they don’t create dependencies in their constructors.

Note: To fully leverage Clean Architecture you can use a dependency injection framework like Dagger 2 or Koin.

To keep things simple you’ll manually implement an easy way to provide dependencies to your ViewModels.

First, replace the empty Interactors class in the framework namespace with the data class that holds all interactors:

import com.raywenderlich.android.majesticreader.interactors.*

data class Interactors(
    val addBookmark: AddBookmark,
    val getBookmarks: GetBookmarks,
    val deleteBookmark: RemoveBookmark,
    val addDocument: AddDocument,
    val getDocuments: GetDocuments,
    val removeDocument: RemoveDocument,
    val getOpenDocument: GetOpenDocument,
    val setOpenDocument: SetOpenDocument
)

You’ll use it to access interactors from ViewModels.

Open MajesticReaderApplication and replace onCreate() with the following, making sure you add all the necessary imports:

override fun onCreate() {
  super.onCreate()

  val bookmarkRepository = BookmarkRepository(RoomBookmarkDataSource(this))
  val documentRepository = DocumentRepository(
      RoomDocumentDataSource(this),
      InMemoryOpenDocumentDataSource()
  )

  MajesticViewModelFactory.inject(
      this,
      Interactors(
          AddBookmark(bookmarkRepository),
          GetBookmarks(bookmarkRepository),
          RemoveBookmark(bookmarkRepository),
          AddDocument(documentRepository),
          GetDocuments(documentRepository),
          RemoveDocument(documentRepository),
          GetOpenDocument(documentRepository),
          SetOpenDocument(documentRepository)
      )
  )
}

This injects all the dependencies into MajesticViewModelFactory. It creates ViewModels in the app and passes interactor dependencies to them.

Note: For more details on ViewModel factories, check the official documentation .

That concludes everything required for dependency injection. Now back to the Presentation layer.

Implementing MVVM

Open LibraryViewModel.kt in com.raywenderlich.android.majesticreader.presentation.library.
The ViewModel contains functions for loading the list of documents and adding a new one to the list. It serves as a connection between the UI and the interactors, or use cases.

First, replace loadDocuments() with the following:

fun loadDocuments() {
  GlobalScope.launch {	
    documents.postValue(interactors.getDocuments())
  }
}

This fetches the list of documents from the library using the GetDocuments interactor, from within a coroutine, which you start by calling launch(). Once done, you post the result to the documents LiveData.

Note: You shouldn’t rely on GlobalScope often, in your code, but for the sake of simplicity, you will use it in this project.

Next, for addDocument(), you want to additionally call loadDocuments() after adding a new Document:

fun addDocument(uri: Uri) {
  GlobalScope.launch {	  
    withContext(Dispatchers.IO) {	
      interactors.addDocument(Document(uri.toString(), "", 0, ""))
    }
    loadDocuments()
  }
}

To add a new document, you first launch a coroutine, as before, then use withContext(), to move the database insert to an IO-optimized thread, and suspending until insertion completes. In the end, you load the documents again, to update the list.

Finally, setOpenDocument() calls the appropriate interactor:

fun setOpenDocument(document: Document) {
  interactors.setOpenDocument(document)
}

Now build and run the app. You can now add new documents to the library. At last, you can bear the fruits of your labor! :]

Tap the floating action button. You’ll see a screen for picking a document from your storage. After you add a document, you’ll see it on the list.

There is one more screen left — the reader screen.

Reading Documents

Open ReaderViewModel in com.raywenderlich.android.majesticreader.presentation.reader. There are a few places marked with // TODO comments that you’ll add code to.

Here’s an outline of the ReaderViewModel with functions that ReaderFragment will call on user actions:

  • openDocument(): Opens the PDF document.
  • openBookmark(): Navigates to the given bookmark in the document.
  • openPage(): Opens a given page in the document.
  • nextPage(): Navigates to the next page.
  • previousPage(): Navigates to the previous page.
  • toggleBookmark(): Adds or removes the current page from document bookmarks.
  • toggleInLibrary(): Adds or removes the open document from the library.

ReaderFragment will get a Document to display as an argument when it’s created.

Look for the first // TODO comment in ReaderViewModel. Add the following code in its place:

addSource(document) { document ->
  GlobalScope.launch {
    postValue(interactors.getBookmarks(document))
  }
}

This will change the value of bookmarks each time you change the document. It will fill with up to date bookmarks, which you get from the interactors, within a coroutine. Your bookmarks field should now look like the following:

val bookmarks = MediatorLiveData<List<Bookmark>>().apply {
  addSource(document) { document ->
    GlobalScope.launch {
      postValue(interactors.getBookmarks(document))
    }
  }
}

The document holds the document parsed from Fragment arguments. bookmarks holds the list of bookmarks in the current document. ReaderFragment will subscribe to it to get the list of available bookmarks.

Rendering PDFs

To render the PDF document pages, use the PdfRenderer, which is available in Android SDK since API level 21.

Note: Fore more info on PdfRenderer check the official documentation .

currentPage holds the reference to PdfRenderer.Page that you currently display, if any. renderer holds a reference to the PdfRenderer used for rendering the document. Each time you change the document‘s internal value, you create a new instance of PdfRenderer for the document and store in the renderer.

hasPreviousPage and hasNextPage rely on currentPage. They use LiveData transformations. hasPreviousPage returns true if the index of currentPage is larger than zero. hasNextPage returns true if the index of currentPage is less than the page count minus one – if the user hasn’t reached the end. This data then dictates how the UI should appear and behave, in the ReaderFragment.

Note: For more details on LiveData transformations, see the official documentation .

Adding the Library Functionality

isCurrentPageBookmarked() returns true if a bookmark for the currently shown page exists. Find isInLibrary(). It should return true if the open document is already in the library. Replace it with:

private suspend fun isInLibrary(document: Document) = 
    interactors.getDocuments().any { it.url == document.url }

This will use GetDocuments to get a list of all documents in the library and check if it contains one that matches the currently open document. Since this is a suspend function, change the isInLibrary LiveData code to the following:

val isInLibrary: MediatorLiveData<Boolean> = MediatorLiveData<Boolean>().apply {
  addSource(document) { document -> GlobalScope.launch { postValue(isInLibrary(document)) } }
}

In the end, the LiveData relations are really simple. isBookmarked relies on isCurrentPageBookmarked() – it will be true if there is a bookmark for the current page. Every time document, currentPage or bookmarks change, isBookmarked will receive an update and change, as well.

Look for the next // TODO comment in loadArguments().
Put the following code in its place:

// 1
currentPage.apply {
  addSource(renderer) { renderer -> 
    GlobalScope.launch {
      val document = document.value

      if (document != null) {	
        val bookmarks = interactors.getBookmarks(document).lastOrNull()?.page ?: 0
        postValue(renderer.openPage(bookmarks))	
      }
    }
  }
}

// 2
val documentFromArguments = arguments.get(DOCUMENT_ARG) as Document? ?: Document.EMPTY

// 3
val lastOpenDocument = interactors.getOpenDocument()

// 4
document.value = when {
  documentFromArguments != Document.EMPTY -> documentFromArguments
  documentFromArguments == Document.EMPTY && lastOpenDocument != Document.EMPTY -> lastOpenDocument
  else -> Document.EMPTY
}

// 5
document.value?.let { interactors.setOpenDocument(it) }

Here’s what the above code is doing, step by step.

  1. Initializes currentPage to be set to the first page or first bookmarked page if it exists.
  2. Gets Document passed to ReaderFragment.
  3. Gets the last document that was opened from GetOpenDocument.
  4. Sets the value of document to the one passed to ReaderFragment or falls back to lastOpenDocument if nothing was passed.
  5. Sets the new open document by calling SetOpenDocument.

Opening and Bookmarking Documents

Next, you’ll implement openDocument(). Replace it with the following code:

fun openDocument(uri: Uri) {
  document.value = Document(uri.toString(), "", 0, "")
  document.value?.let { interactors.setOpenDocument(it) }
}

This creates a new Document that represents the document that was just open and passes it to SetOpenDocument.

Next, implement toggleBookmark(). Replace it with the following:

fun toggleBookmark() {
  val currentPage = currentPage.value?.index ?: return
  val document = document.value ?: return
  val bookmark = bookmarks.value?.firstOrNull { it.page == currentPage }

  GlobalScope.launch {
    if (bookmark == null) {
      interactors.addBookmark(document, Bookmark(page = currentPage))
    } else {
      interactors.deleteBookmark(document, bookmark)
    }

    bookmarks.postValue(interactors.getBookmarks(document))
  }
}

In this function, you either delete or add a bookmark, depending on if it’s already in your database, and then you update the bookmarks, to refresh the UI.

Finally, implement toggleInLibrary(). Replace it with the following:

fun toggleInLibrary() {
  val document = document.value ?: return

  GlobalScope.launch {	
    if (isInLibrary.value == true) {
      interactors.removeDocument(document)
    } else {
      interactors.addDocument(document)
    }
  
    isInLibrary.postValue(isInLibrary(document))
  }
}

Now build and run the app. Now you can open the document from your library by tapping it! :]

Conclusion

That’s it! You have a working PDF reader, and you’ve mastered Clean Architecture on Android! Congratulations!

Here’s a graph that gives an overview of Clean Architecture in combination with MVVM:

The three most important things to remember are:

  • The communication between layers: Only outer layers can depend on inner layers.
  • The number of layers is arbitrary: Customize it to your needs.
  • Things become more abstract in inner circles.

Pros of using Clean Architecture:

  • Code is more decoupled and testable.
  • You can replace the framework and presentation layers and port your app to a different platform.
  • It’s easier to maintain the project and add new features.

Cons of using Clean Architecture:

  • You’ll have to write more code, but it pays off.
  • You have to learn and understand Clean Architecture to work on the project.

When to Use Clean Architecture

It’s important to note that Clean architecture isn’t a silver bullet solution, but can be general, for any platform. You should decide, based on the project if it suits your needs. For example, if your project is big and complex, has a lot of business logic – then the Clean architecture brings clear benefits. On the other hand, for smaller and simpler projects those benefits might not be worth it – you’ll just end up writing more code and adding some complexity with all the layers, investing more time along the way.

Where to Go From Here?

For more practice, check out this article on MVVM and Data Binding and Uncle Bob’s article on Clean architecture.

I hope you’ve enjoyed this tutorial on Clean Architecture. And if you have any comments or questions, please join the forum discussion below!