Core Graphics Tutorial: Arcs and Paths

In this tutorial, you’ll learn how to draw arcs and paths. In particular, you’ll enhance each footer of a grouped table view by adding a neat arc on the bottom, a linear gradient and a shadow that fits the curve of the arc. All of that by using the power of Core Graphics! By Lorenzo Boaro.

Leave a rating/review
Download materials
Save for later
Share
Update note: Lorenzo Boaro updated this tutorial for iOS 12, Xcode 10 and Swift 4.2. Ray Wenderlich wrote the original.

Welcome back to another tutorial in our Core Graphics tutorial series! This series covers how to get started with Core Graphics. Core Graphics is a two-dimensional drawing engine with path-based drawing that helps you to create rich UIs.

In this tutorial, you’ll learn how to draw arcs and paths. In particular, you’ll enhance each footer of a grouped table view by adding a neat arc on the bottom, a linear gradient and a shadow that fits the curve of the arc. All of that by using the power of Core Graphics!

Getting Started

For this tutorial, you’ll use LearningAgenda, an iOS app that lists the tutorials you want to learn and the ones you’ve already learned.

Start by downloading the starter project using the Download Materials button at the top or bottom of this tutorial. Once downloaded, open LearningAgenda.xcodeproj in Xcode.

To keep you focused, the starter project has everything unrelated to arcs and paths already set up for you.

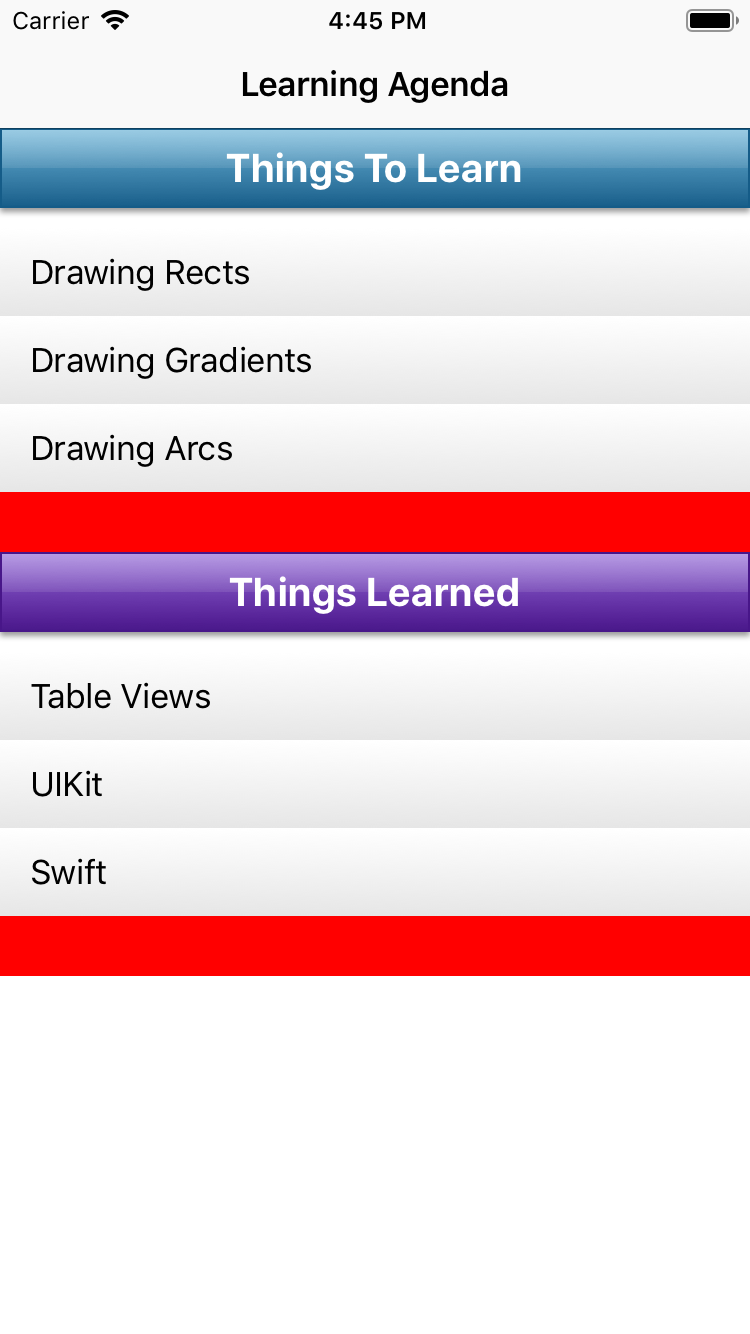
Build and run the app, and you’ll see the following initial screen:

Initial build of the app

As you can see, there is a grouped table consisting of two sections, each with a title and three rows. All the work you’re going to do here will create arced footers below each section.

Enhancing the Footer

Before taking on your challenge, you need to create and set up a custom footer that will behave as the placeholder for your future work.

To create the class for your shiny new footer, right-click the LearningAgenda folder and select New File. Next, choose Swift File and name the file CustomFooter.swift.

Switch over to CustomFooter.swift file and replace its content with the following code:

import UIKit

class CustomFooter: UIView {
  override init(frame: CGRect) {
    super.init(frame: frame)
    
    isOpaque = true
    backgroundColor = .clear
  }
  
  required init?(coder aDecoder: NSCoder) {
    fatalError("init(coder:) has not been implemented")
  }

  override func draw(_ rect: CGRect) {
    let context = UIGraphicsGetCurrentContext()!
    
    UIColor.red.setFill()
    context.fill(bounds)
  }
}

Here, you override init(frame:) to set isOpaquetrue. You also set the background color to clear.

Note: The isOpaque property should not be used when the view is fully or partially transparent. Otherwise, the results could be unpredictable.

You also override init?(coder:) since it’s mandatory, but you don’t provide any implementation since you will not create your custom footer in Interface Builder.

draw(_:) provides a custom rect content using Core Graphics. You set red as the fill color to cover the entire bounds of the footer itself.

Now, open TutorialsViewController.swift and add the following two methods to the UITableViewDelegate extension at the bottom of the file:

func tableView(_ tableView: UITableView, heightForFooterInSection section: Int) -> CGFloat {
  return 30
}
  
func tableView(_ tableView: UITableView, viewForFooterInSection section: Int) -> UIView? {
  return CustomFooter()
}

The above methods combine to form a custom footer of 30 points in height.

Build and run the project and, if all works well, you should see the following:

Custom red footer

Back to Business

OK, now that you have a placeholder view in place, it’s time to pretty it up. But first, here’s an idea of what you’re going for.

Arced footer to build

Note the following about the image above:

  • The footer has a neat arc on the bottom.
  • A gradient, from light gray to darker gray, is applied to the footer.
  • A shadow fits the curve of the arc.

The Math Behind Arcs

An arc is a curved line that represents a part of a circle. In your case, the arc you want for the bottom of the footer is the top bit of a very large circle, with a very large radius, from a certain start angle to a certain end angle.

Diagram of the circle your arc is part of

So how do you describe this arc to Core Graphics? Well, the API that you’re going to use is called addArc(center:radius:startAngle:endAngle:clockwise:), an instance method of CGContext. The method expects the following five inputs:

  • The center point of the circle.
  • The radius of the circle.
  • The starting point of the line to draw, also know as the start angle.
  • The ending point of the line to draw, also known as the end angle.
  • The direction in which the arc is created.

But darn it, you don’t know any of that, so what in the world are you supposed to do?!

Frustrated

That is where some simple math comes to the rescue. You can actually calculate all of that from what you do know!

The first thing you know is the size of the bounding box for where you want to draw the arc:

Diagram of the rect in which your arc will be drawn

The second thing you know is an interesting math theorem called the Intersecting Chord Theorem. Basically, this theorem states that, if you draw two intersecting chords in a circle, the product of the line segments of the first chord will be equal to the product of the segments of the second chord. Remember, a chord is a line that connects two points in a circle.

Diagram of the Intersecting Chord Theorem

Note: If you want to understand why that is, visit the link above — it has a cool little JavaScript demo you can play with.

Armed with these two bits of knowledge, look what happens if you draw two chords like the following:

Diagram of the lines you'll draw to figure out the radius

So, draw one line connecting the bottom points of your arc rect and another line from the top of the arc down to the bottom of the circle.

If you do that, you know a, b, and c, which lets you figure out d.

So d would be: (a * b) / c. Substituting that out, it’s:

// Just substituting...
let d = ((arcRectWidth / 2) * (arcRectWidth / 2)) / (arcRectHeight);
// Or more simply...
let d = pow(arcRectWidth, 2) / (4 * arcRectHeight);

And now that you know c and d, you can calculate the radius with the following formula: (c + d) / 2:

// Just substituting...
let radius = (arcRectHeight + (pow(arcRectWidth, 2) / (4 * arcRectHeight))) / 2;
// Or more simply...
let radius = (arcRectHeight / 2) + (pow(arcRectWidth, 2) / (8 * arcRectHeight));

Nice! Now that you know the radius, you can get the center by simply subtracting the radius from the center point of your shadow rect:

let arcCenter = CGPoint(arcRectTopMiddleX, arcRectTopMiddleY - radius)

Once you know the center point, radius and arc rect, you can compute the start and end angles with a bit of trigonometry:

Diagram of how to figure out the start and end angles from the radius.

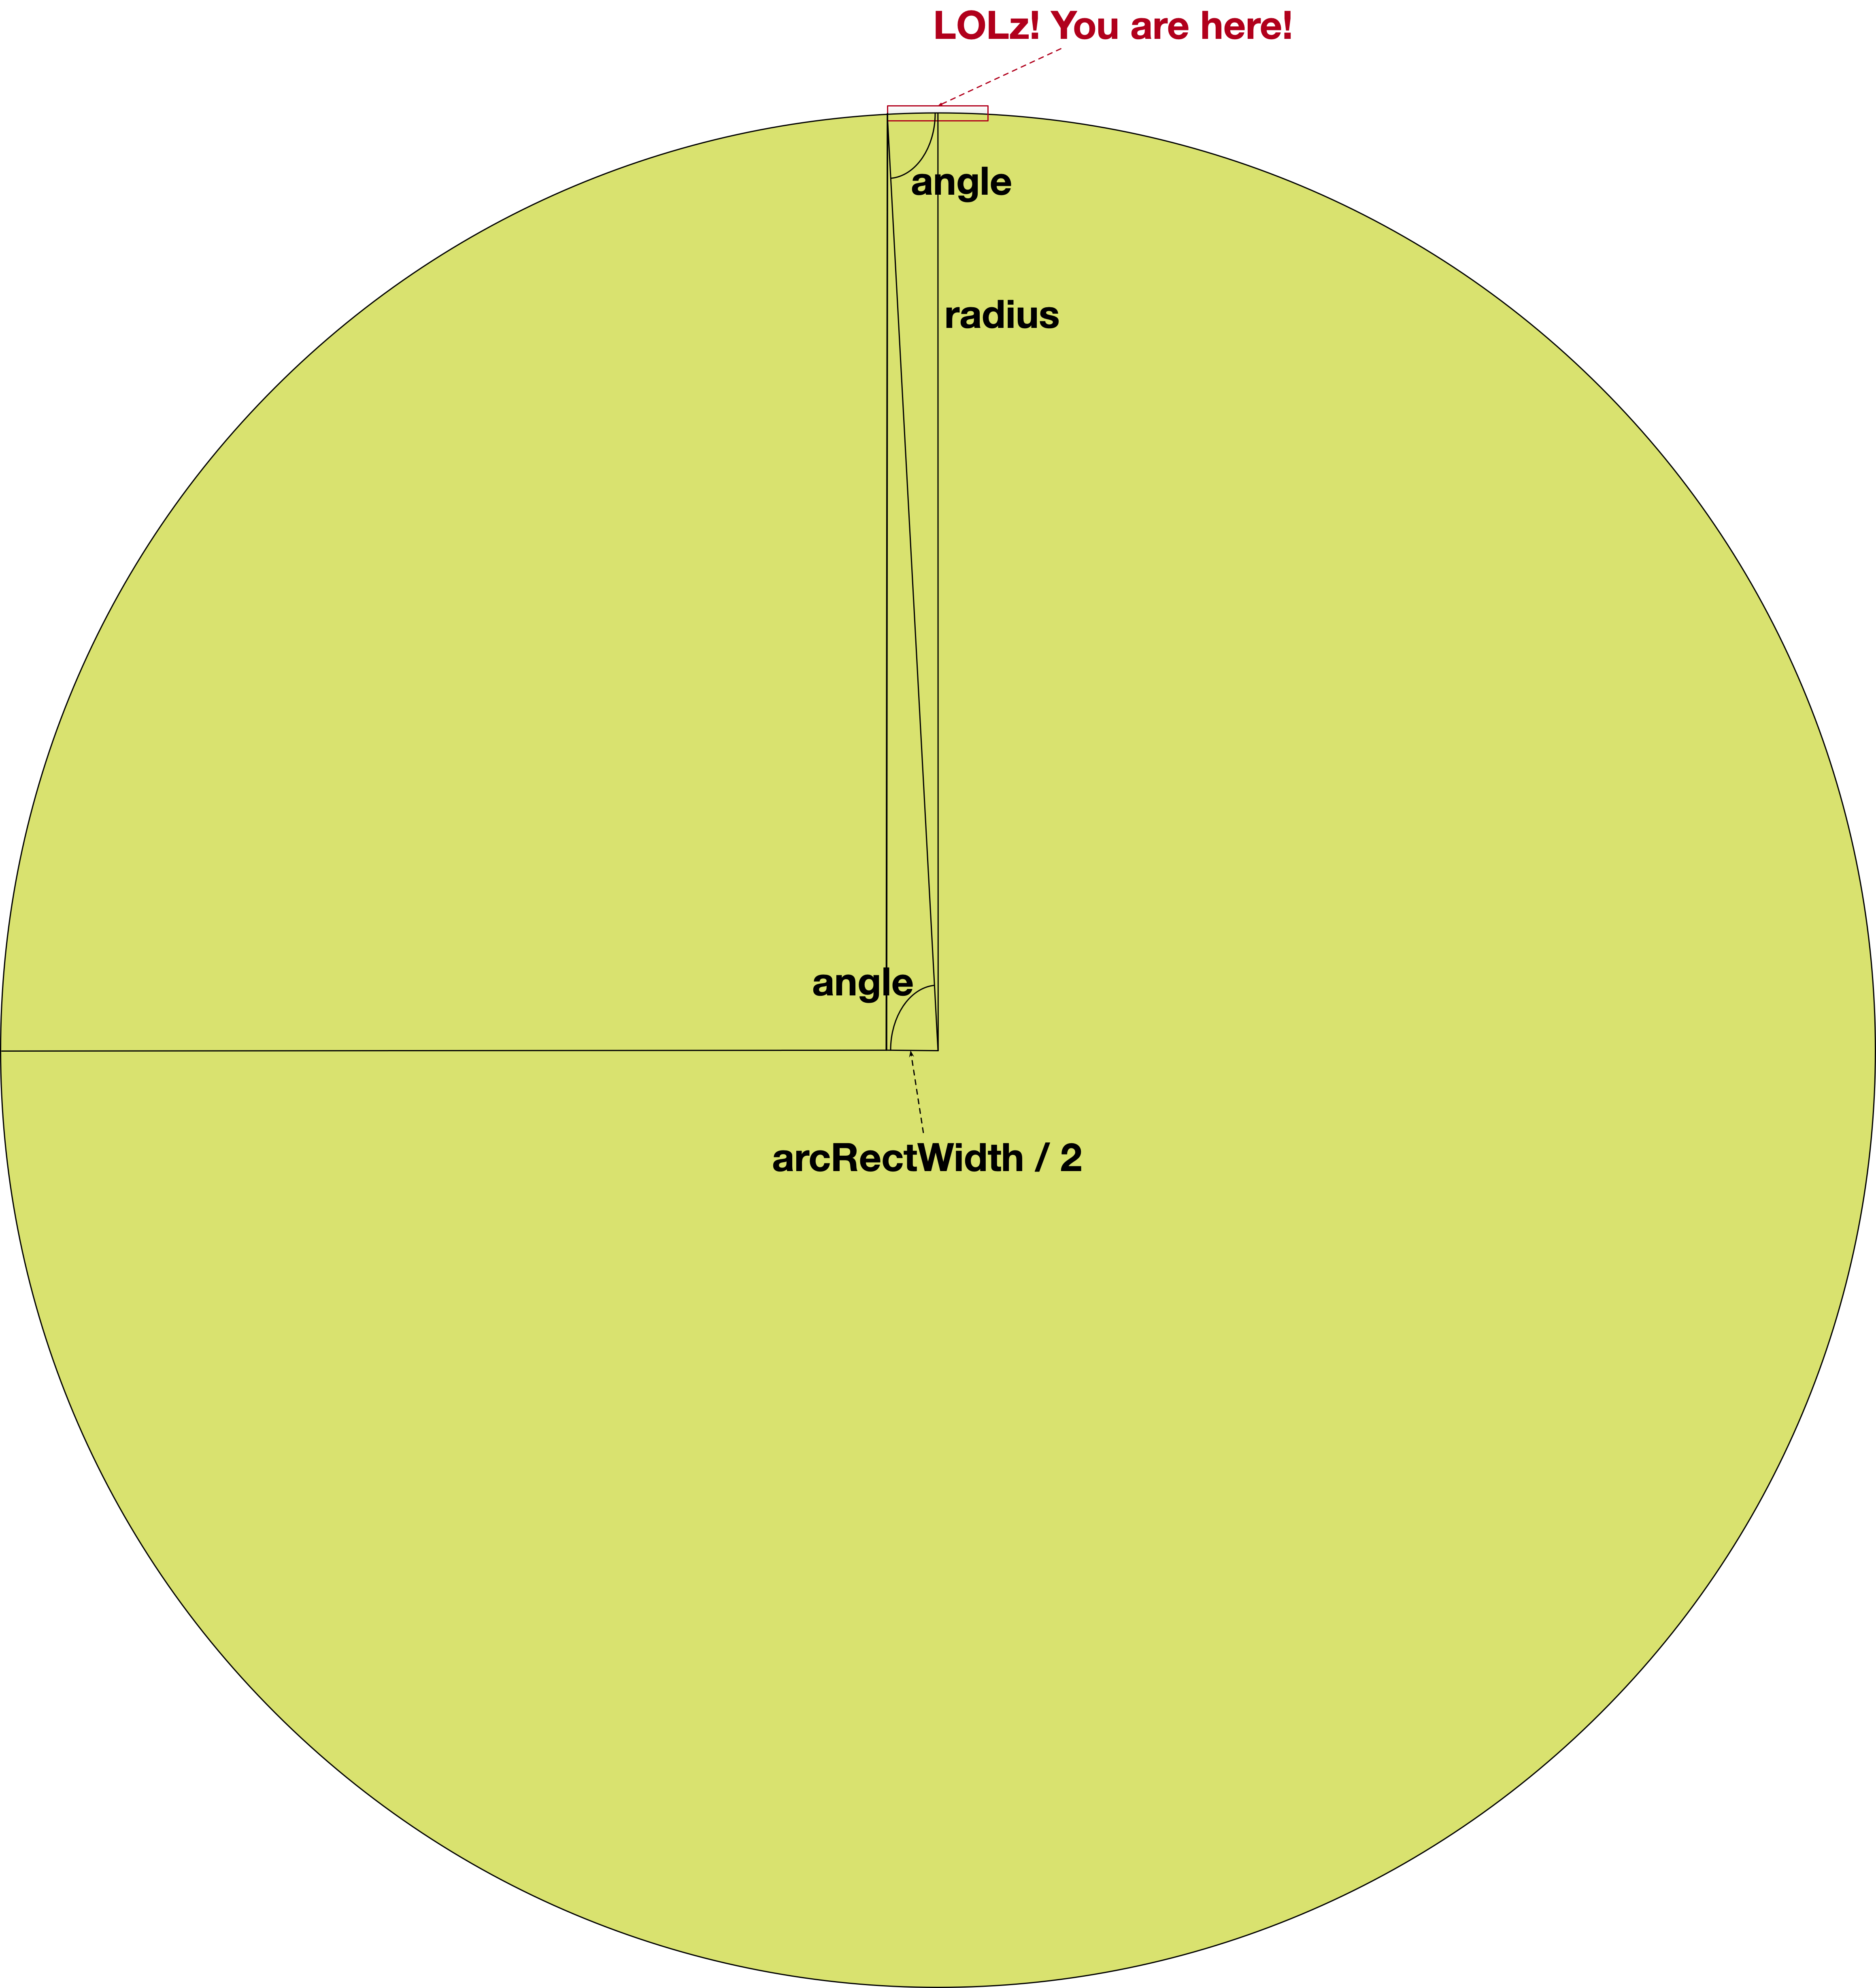
You’ll start by figuring out the angle shown in the diagram, here. If you remember SOHCAHTOA, you might recall the cosine of an angle equals the length of the adjacent edge of the triangle divided by the length of the hypotenuse.

In other words, cosine(angle) = (arcRectWidth / 2) / radius. So, to get the angle, you simply take the arc-cosine, which is the inverse of the cosine:

let angle = acos((arcRectWidth / 2) / radius)

And now that you know that angle, getting the start and end angles should be rather simple:

Diagram of how to figure out the start and end angles.

Nice! Now that you understand how, you can put it all together as a function.

Note: By the way, there’s actually an even easier way to draw an arc like this using the addArc(tangent1End:tangent2End:radius:) method available in CGContext type.

Drawing Arcs and Creating Paths

The first thing you add is a way to convert degrees to radians. To do it, you’ll use the Foundation Units and Measurements APIs introduced by Apple in iOS 10 and macOS 10.12.

Note: The Foundation framework provides a robust way to work with and represent physical quantities. Other than angles, it provides several built-in unit types like speed, duration, etc.

Open Extensions.swift and paste the following code at the end of the file:

typealias Angle = Measurement<UnitAngle>

extension Measurement where UnitType == UnitAngle {  
  init(degrees: Double) {
    self.init(value: degrees, unit: .degrees)
  }

  func toRadians() -> Double {
    return converted(to: .radians).value
  }
}

In the code above, you define an extension on the Measurement type restricting its usage to angle units. init(degrees:) only works with angles in terms of degrees. toRadians() allows you to convert degrees to radiants.

Note: The conversion from degrees to radians, and vice versa, can also be performed using the formula radians = degrees * π / 180.

Remaining in Extensions.swift file, find the extension block for CGContext. Before its last curly brace, paste the following code:

static func createArcPathFromBottom(
  of rect: CGRect, 
  arcHeight: CGFloat, 
  startAngle: Angle, 
  endAngle: Angle
) -> CGPath {
  // 1
  let arcRect = CGRect(
    x: rect.origin.x, 
    y: rect.origin.y + rect.height, 
    width: rect.width, 
    height: arcHeight)
  
  // 2
  let arcRadius = (arcRect.height / 2) + pow(arcRect.width, 2) / (8 * arcRect.height)
  let arcCenter = CGPoint(
    x: arcRect.origin.x + arcRect.width / 2, 
    y: arcRect.origin.y + arcRadius)    
  let angle = acos(arcRect.width / (2 * arcRadius))
  let startAngle = CGFloat(startAngle.toRadians()) + angle
  let endAngle = CGFloat(endAngle.toRadians()) - angle
  
  let path = CGMutablePath()
  // 3
  path.addArc(
    center: arcCenter, 
    radius: arcRadius, 
    startAngle: startAngle, 
    endAngle: endAngle, 
    clockwise: false)
  path.addLine(to: CGPoint(x: rect.maxX, y: rect.minY))
  path.addLine(to: CGPoint(x: rect.minX, y: rect.minY))
  path.addLine(to: CGPoint(x: rect.minY, y: rect.maxY))
  // 4
  return path.copy()!
}

There’s quite a bit going on here, so this is how it breaks down:

  1. This function takes a rectangle of the entire area and a float of how big the arc should be. Remember, the arc should be at the bottom of the rectangle. You calculate arcRect given those two values.
  2. Then, you figure out the radius, center, start and end angles with the math discussed above.
  3. Next, you create the path. The path will consist of the arc and the lines around the edges of the rectangle above the arc.
  4. Finally, you return immutable copy of the path. You don’t want the path to be modified from outside the function.
Note: Unlike the other functions available in CGContext extension, createArcPathFromBottom(of:arcHeight:startAngle:endAngle:) returns a CGPath. This is because the path will be reused many times. More on that later.

Now that you have a helper method to draw arcs in place, it’s time to replace your rectangular footer with your new curvy, arced one.

Open CustomFooter.swift and replace draw(_:) with the following code:

override func draw(_ rect: CGRect) { 
  let context = UIGraphicsGetCurrentContext()!
  
  let footerRect = CGRect(
    x: bounds.origin.x, 
    y: bounds.origin.y, 
    width: bounds.width, 
    height: bounds.height)
  
  var arcRect = footerRect
  arcRect.size.height = 8
  
  context.saveGState()
  let arcPath = CGContext.createArcPathFromBottom(
    of: arcRect, 
    arcHeight: 4, 
    startAngle: Angle(degrees: 180), 
    endAngle: Angle(degrees: 360))
  context.addPath(arcPath)
  context.clip()

  context.drawLinearGradient(
    rect: footerRect, 
    startColor: .rwLightGray, 
    endColor: .rwDarkGray)
  context.restoreGState()
}

After the customary Core Graphics setup, you create a bounding box for the entire footer area and the area where you want the arc to be.

Then, you get the arc path by calling createArcPathFromBottom(of:arcHeight:startAngle:endAngle:), the static method you just wrote. You can then add the path to your context and clip to that path.

All further drawing will be restricted to that path. Then, you can use drawLinearGradient(rect:startColor:endColor:) found in Extensions.swift to draw a gradient from light gray to darker gray.

Again, build and run the app. If all works correctly, you should see the following screen:

Intermediate build of the app

Looks decent, but you need to polish it up a bit more.

Clipping, Paths and the Even-Odd Rule

In CustomFooter.swift add the following to the bottom of draw(_:):

context.addRect(footerRect)
context.addPath(arcPath)
context.clip(using: .evenOdd)
context.addPath(arcPath)
context.setShadow(
  offset: CGSize(width: 0, height: 2), 
  blur: 3, 
  color: UIColor.rwShadow.cgColor)
context.fillPath()

OK, there’s a new, and very important, concept going on here.

To draw a shadow, you enable shadow drawing, then fill a path. Core Graphics will then fill the path and also draw the appropriate shadow underneath.

But you’ve already filled the path with a gradient, so you don’t want to overwrite that area with a color.

Well, that sounds like a job for clipping! You can set up clipping so that Core Graphics will only draw in the portion outside the footer area. Then, you can tell it to fill the footer area and draw the shadow. Since its clipped, the footer area fill will be ignored, but the shadow will show through.

But you don’t have a path for this — the only path you have is for the footer area, not the outside.

You can easily get a path for the outside based on the inside through a neat ability of Core Graphics. You simply add more than one path to the context and then add clipping using a specific rule provided by Core Graphics.

When you add more than one path to a context, Core Graphics needs some way to determine which points should and shouldn’t be filled. For example, you could have a donut shape where the outside is filled but the inside is empty, or a donut-hole shape where the inside is filled but the outside is empty.

You can specify different algorithms to let Core Graphics know how to handle this. The algorithm you’ll use in this tutorial is EO, or even-odd.

In EO, for any given point, Core Graphics will draw a line from that point to the outside of the drawing area. If that line crosses an odd number of points, it will be filled. If it crosses an even number of points, it will not be filled.

Here’s a diagram showing this from the Quartz2D Programming Guide:

Even odd rule

So, by calling the EO variant, you’re telling Core Graphics that, even though you’ve added two paths to the context, it should treat it as one path following the EO rule. So, the outside part, which is the entire footer rect, should be filled, but the inner part, which is the arc path, should not. You tell Core Graphics to clip to that path and only draw in the outside area.

Once you have the clipping area set up, you add the path for the arc, set up the shadow and fill the arc. Of course, since it’s clipped, nothing will actually be filled, but the shadow will still be drawn in the outside area!

Build and run the project and, if all goes well, you should now see a shadow underneath the footer:

Final build of the app

Congratulations! You’ve created custom table view footers using Core Graphics!

Where to Go From Here?

You can download the completed version of the project using the Download Materials button at the top or the bottom of this tutorial.

By following this tutorial, you’ve learned how to create arcs and paths. Now you’ll be able to apply these concepts directly to your apps!

If you want to learn more about Core Graphics have a look at Quartz 2D Programming Guide.

In the meantime, if you have any questions or comments, please join the forum discussion below!