Advanced PostgreSQL With Vapor
Learn to use advanced PostgreSQL functionalities, joining tables, views, indexes and full-text search in your Vapor server app. By Mahdi Bahrami.
The majority of applications today have some data they need to store in a database. Relational SQL databases like PostgreSQL are the most popular form of databases. They come with valuable features and commands that make using and managing data much easier.
In this tutorial, you’ll work on a sample project called Recruiter, which handles relations between a person and their company. You’ll learn how to use:
- Joins to join tables together.
- Views to simplify using multiple tables together and more.
- Full-text search to search text documents.
- Indexes for a significant performance boost when using operators.
- Xcode 13.2, Swift 5.5 and macOS Monterey (or newer versions).
- Familiarity with Fluent. If you don’t know the basics of Fluent, read Using Fluent and Persisting Models in Vapor to get started.
- Docker. If you don’t have Docker yet, visit Docker install for Mac.
- A REST client such as Postman or Insomnia.
- A database client that supports PostgreSQL, such as Postico.
Getting Started
Download the starter project by clicking the Download Materials button at the top or bottom of this tutorial.
Open the starter project. You’ll see a variety of files and folders:

Open CreateCompany or CreatePerson. You’ll see two migrations in each file: one for creating the table and one for seeding the table with some initial values. The seeding uses two JSON files available under the Resources folder. These files contain the information of 50 companies and 100,000 people. These initial values will help demonstrate text-search and the usefulness of indexes.
Make sure Docker is running, then open the Terminal and copy-paste the following to start a new PostgreSQL database named recruiter:
docker run --name recruiter -e POSTGRES_DB=vapor_database \
  -e POSTGRES_USER=vapor_username -e POSTGRES_PASSWORD=vapor_password \
  -p 5432:5432 -d postgres
Don’t forget to set the custom working directory to the project’s directory. If you’re unfamiliar with how to do that, look at this section of Vapor’s official documentation.
Build and run Recruiter using the shortcut Command-R or the top-left Play button. The first run might take up to a minute because it’s adding information on 100,000 people to the person table by the SeedPerson migration.
You’ll eventually see a NOTICE indicating Recruiter’s successful run on address http://127.0.0.1:8080:

Joining Tables
Open MainController.swift and look at getAllEmployees(_:):
func getAllEmployees(_ req: Request) async throws -> [Person] {
  try await Person
    .query(on: req.db)
    .filter(\.$company.$id != nil)
    .with(\.$company)
    .all()
}
This function finds all Persons that have a company and returns them.
Try it to get a better feel for how employed Persons appear. Build and run Recruiter, and open your preferred REST client. Send a GET request to the URL http://localhost:8080/employees/all, which will trigger the getAllEmployees(_:) function. You’ll receive a lot of people:

In the code, two lines can be optimized:
.filter(\.$company.$id != nil)
.with(\.$company)
In these two lines, you filter out people who don’t have a company, by eager-loading each Person‘s Company. Remember that in this function, you only want people who have a company and are already employed.
with(_:) eager-loads other Models that have a relation with the Model you’re querying. Although this is convenient, it comes with a disadvantage. with(_:) queries all Persons, then does another query to retrieve their companies. That means it uses two queries instead of one, which is sub-optimal.
Using Joins
SQL Joins have a similar purpose to with(_:): joining tables related to each other but using only one query. Although it has with(_:), Fluent supports using Joins, too. Replace getAllEmployees(_:) with the following implementation, which uses Joins:
func getAllEmployees(_ req: Request) async throws -> [Person] {
  // 1
  let employees = try await Person
    .query(on: req.db)
     // 2
    .join(parent: \.$company, method: .inner)
    .all()

  // 3
  for employee in employees {
    employee.$company.value = try employee.joined(Company.self)
  }

  // 4
  return employees
}
In the code above, you:
- Load all employees.
- Use
join(parent: \.$company, method: .inner)to join eachPersonwith theirCompany. - Iterate over each employee and set the company’s value using
joined(_:). You need to set the company’s value using$company.valuebecause Fluent doesn’t allow direct mutation of the value of a relation. - Return the employees.
Note that using any of the join() functions, unlike with(_:), does not automatically set the related field’s value. Here, this means the company is loaded in Person‘s storage and can be retrieved using joined(_:), but a Person‘s company still needs to be manually populated.
But what is method: .inner doing in .join(parent: \.$company, method: .inner)?
You might have noticed that .filter(\.$company.$id != nil) has been removed from the new function, which uses joins. That’s exactly what method: .inner does.
Different Types of Joins
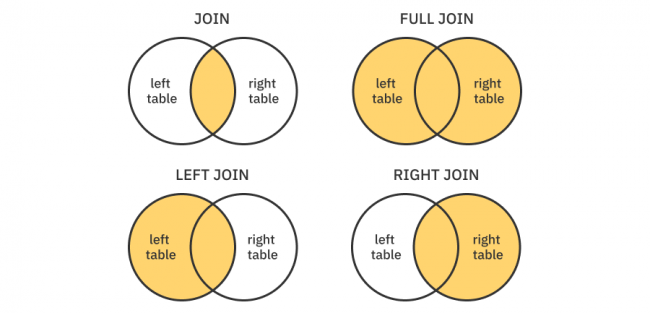
To improve your understanding, it’s time to go through the four Join methods PostgreSQL supports:
If you were to use left join, it would mean you’d have all the Persons, regardless of whether they have a company. If the Person had a company, the result would contain the company; if the Person didn’t have a company, they would still be in the result.
-
Inner: Joins two tables only if rows for both the primary table and joined table are available.
In your case, this will load all the people with their company only if the person has a company. This is exactly why you don’t need.filter(\.$company.$id != nil)anymore: Inner join handles that for you. -
Left: Includes all primary table rows and adds the joined table rows if available.
If you were to use left join, it would mean you’d have all the
Persons, regardless of whether they have a company. If thePersonhad a company, the result would contain the company; if thePersondidn’t have a company, they would still be in the result. -
Right: This method is the opposite of the left method. It includes all the joined table rows and adds the primary ones if available.
In this context, it means you would query all theCompanys alongside thePersons who have aCompany. However, this won’t work out nicely because you’re using Fluent. You only get aPersonobject with the query ingetAllEmployees(_:), and you won’t have access to anyCompanythat doesn’t have a relatedPerson. - Full: The full join includes all rows of both the primary and the joined table. If two rows in each table are related, PostgreSQL returns them together as a single row. If rows don’t have a corresponding row in the other table, they will still be in the result, just alone.
The different types of joins in SQL
The different types of joins in SQL
Right now, you only need to retrieve employees in one function. But employees are an important part of your app, and you’ll soon need them in many more places. Needing to write the same query repeatedly just to get all the employees will become a bit redundant. In the next section, you’ll learn how to use PostgreSQL’s Views to simplify frequently used queries in a SQL-native way.