Hack an Android App: Finding Forensic Artifacts
In this Android tutorial, you’ll learn the basics of forensic analysis by hacking into devices and extracting data from private files and databases. By Kolin Stürt.
Extracting Data From the Emulator
Now that you have access to the file system of a device, it’s time to extract the data. Build and run the app in the emulator, then go ahead and make a report.
On the report screen, fill in the details and tap the SEND REPORT button. In Android Studio, select View ▸ Tool Windows ▸ Device File Explorer then choose Emulator Pixel_XL_API_Q in the drop-down:
–

Here are some locations where Android keeps important data:
- All apps store user data in the /data/data directory.
- You can find a list of apps on the device at /data/system/packages.list.
- You can see when you last used an app at /data/system/package-usage.list.
- The OS stores Wi-Fi connection information, such as a list of access points, at /data/misc/wifi/wpa_supplicant.conf.
WhatsApp stores their messages in /databases/msgstore.db. Forensic companies take advantage of that to backup the database and recover messages.
Knowing where apps store information also makes it easy to look for artifacts or to undelete data. In the case of WhatsApp, forensic examiners have been able to recover deleted messages that their users thought were gone for good.
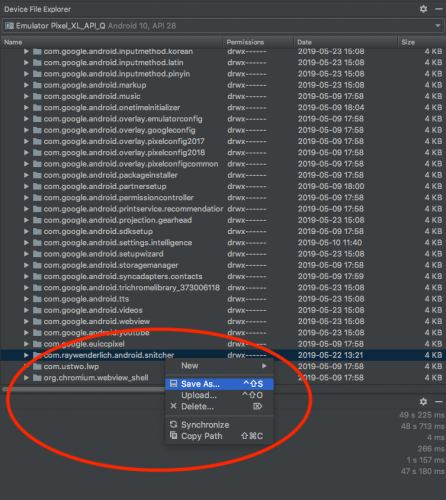
To try your hand at saving Snitcher’s data to your device, navigate to /data/data. You’ll see a list of all the packages:

Find the com.raywenderlich.android.snitcher entry:

Right click on it and choose Save As…:
Save the file to a location on your computer and open it to view its contents. You’ll see important directories such as:
- shared_prefs
- files
- databases
Examining SharedPreferences
Open the MyPrefs.xml file inside the shared_prefs folder. You’ll notice at least one entry with a timestamp. Score!
Timestamps are very important to any kind of forensic or criminal investigation, since they give you evidence of the user doing something at a particular time!
Examining Other Files
Now, select the users.dat file in the files directory.
Android serializes objects in a specific record format, but you can still search for strings using the strings utility, which is already included in Mac and Linux.
In the terminal, type strings and a space followed by the path to the users.dat file. After you press space, you can drag the users.dat file into the terminal window to populate the path. Press enter and you’ll get an output of items.
If you are using Windows, you can download the strings utility.
Upon looking at the output, you’ll see extrat followed by nameq and passwordq. You can use that order to deduce that you’re looking at the extra info about each account, followed by a login name and password!

There are a few other tools that you can use to help extract data:
- A hex and text viewer comes in handy to search unknown file types for information and patterns.
- A live data imaging tool that may be helpful is dd. You’ll find it at /system/bin.
- To extract the current memory state of the device, check out LiME.
In the movies, forensic investigators show up to crime scenes drinking martinis and leaping from trains while fighting villains. In reality, forensic investigators spend much of their time peering into a text viewer. You could still try leaping from trains while peering into a text viewer. :]
Next, navigate to the databases folder. It looks like there are some files in there; here’s how to examine them.
Analyzing Databases
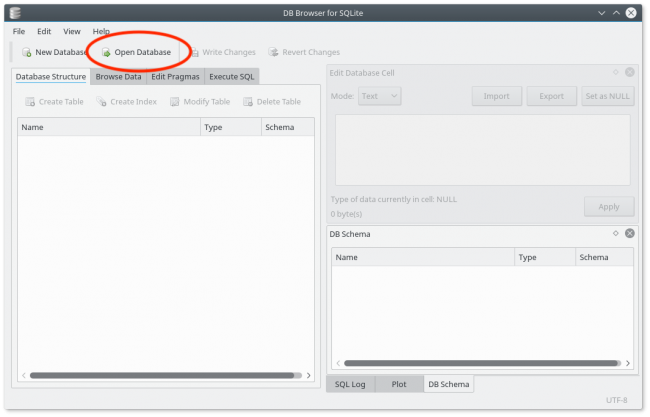
Now that you’ve downloaded the database files, head over to the sqlitebrowser homepage.
Click the download button at the top of the page. Choose your OS, download the file and install the program. Launch DB Browser and choose the Open Database button at the top:
In the folder you downloaded via the Device File Explorer, choose the reports-db file from the databases directory.
If it doesn’t show up in the list, choose All files from the Filter option at the bottom. If there’s no reports-db file, look for the reports-master-db file:

Assuming everything worked, you should see the database tables show up in the Database Structure tab. Click the Browse Data tab:

Now click the Table selector right under the tab and choose reports:

You’ll see all the secret reports!
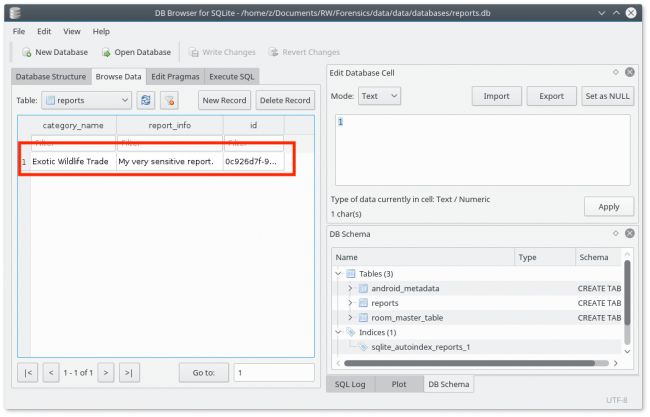
This is an example of why you should never store the user’s sensitive information in plaintext. A much better solution is to encrypt the data before you store it.
![]()
Recovering Deleted Data
The data you’ve recovered so far exists inside a saved SQLite block. For SQLite, there are unallocated blocks and free blocks. When you delete something from the database, SQLite doesn’t overwrite the block immediately. Instead, it simply marks the block as free. To read that data block, you’d use a hex viewer that also displays ASCII to search for keywords that may still be present.
Experts call the process of finding and extracting data when you don’t have access to the file structure file carving. Sometimes, searching for a particular string of content helps. Other times, you’d look for the header of a known file format.
For example, say you’re searching deleted data for images. In the JPEG format, the first two bytes and last two bytes are always FF D8 and FF D9. So searching for those headers can help you identify the images.
Here are a few more details about recovering deleted data:
- There’s some valuable information about SQLite file carving here.
- Scalpel is an open-sourced data carving tool.
- DiskDigger is an automated undelete tool available for Android. It scans the device for photos, documents, music and videos.
- An example of a commercial tool for viewing and undeleting SQLite records is sqliteviewer.
Reverse Engineering
So now you’ve looked at all the user data inside the app, but the investigation doesn’t stop there. You can get a lot of information by analyzing the app itself. This includes the code and files Android Studio bundles with the APK.
When you build your app, Android Studio produces an APK file. This is like a zip file that has a structure of Java’s jar archives. Inside the archive are resources along with a DEX file. DEX stands for Dalvik Executable.
When Android Studio compiles your app, it puts the code into that DEX file and names it classes.dex. It contains bytecode, an intermediary set of instructions that a Java Virtual Machine (JVM) runs or that ART (the Android Runtime) later converts to native code. So what are JVM and ART?
Apps run on a Java Virtual Machine. Traditionally on Android, the JVM was Dalvik. In recent years, Android has replaced Dalvik with ART for performance reasons. ART converts the DEX into native code by running the Dex2Oat tool to create a native ELF binary.
So now you’re thinking, because this is a Kotlin app, reverse engineering it must be complex.
But the good news is that like Java, Kotlin is a JVM language. While Kotlin has its own syntax, the kotlinc compiler transforms the code into a DEX file that contains Java bytecode. Because kotlinc compiles Kotlin to the same bytecode as Java, most of the reverse engineering tools are the same as for apps built in Java!
So now you’re thinking — enough theory already. Show me an example!