Creating Local Notifications in Flutter
Learn how to create cross-platform local notifications in Flutter using the flutter_local_notifications package. By Ken Lee.
Adding Cancel Notification to PomodoroTimer
Now, you can add the cancel function to the PomodoroTimer discard action. Open lib/widget/pomodoro_timer.dart and modify the contents of onButtonClicked to the following:
if (_state == PomodoroState.beingWork) {
  enterAtWork();
} else if (_state == PomodoroState.atWork) {
  // Discard
  // #1
  LocalNoticeService().cancelAllNotification();
    _endAtWork(false);
} else if (_state == PomodoroState.beginRest) {
    enterAtRest();
} else if (_state == PomodoroState.atRest) {
  // Discard
  // #2
  LocalNoticeService().cancelAllNotification();
  _endAtRest();
}
Here’s the explanation of the above logic:
-
onButtonClicked()is the handler of the button click event for START WORK, START REST and DISCARD. - Block
#1is the state during the work session and the action here is to discard the work session. - Similar to discarding the work session, block
#2is the button handler to discard the rest session. - You added
LocalNoticeService().cancelAllNotification()to cancel the notification.
Hot reload the app and test to see whether or not the notifications have been canceled. Tap START WORK to start a work session, tap DISCARD to discard it, then wait for five seconds to confirm that the notification doesn’t show. Do the same for the ‘start rest’ notification too.
Customizing the Notification Sound
Notification sound is a good way to make your notifications unique from other applications. Besides, different sounds help users to distinguish notifications for different purposes. For example, in the PomoTimer, you can define different sounds for ‘work completed’ and ‘rest ended’ to help users know whether it’s time for work or rest.
Unlike setting the textual message, the setup for notification sounds for iOS and Android are different. The supporting sound file formats of those platforms are different too.
Setting the Sound for iOS
There are three steps you can follow to customize the sound for iOS:
- Modify
LocalNoticeServiceto support sound for iOS. - Add the sound files to the iOS project.
- Define the sound file in the
addNotification()method.
First, open lib/local_notice_service.dart and add requestSoundPermission: true to IOSInitializationSettings() in setup(). After adding, the iosSetting variable definition should be the same as below:
const iosSetting = IOSInitializationSettings(requestSoundPermission: true);
This will request permission to play sound on iOS.
Next, modify iosDetail in addNotification() to look like this:
final iosDetail = sound == ''
    ? null
    : IOSNotificationDetails(presentSound: true, sound: sound);
What you added enables the app to play the given sound file with the notification.
However, you need to add that sound file to the iOS Xcode project before you can play it. To add it, you need to open ios/Runner.xcworkspace with Xcode. You can type the commands below in your VS Code terminal to open it in Xcode:
cd ./ios
open Runner.xcworkspace
Then, select Runner in the Project Navigator, right-click, and select Add Files to Runner:

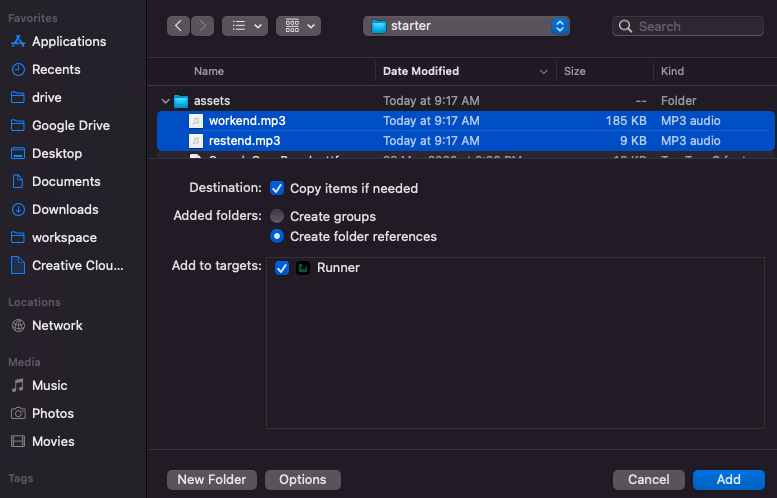
In the file dialog, select workend.mp3 and restend.mp3 in the assets folder. Then click Add in the lower right area:
Lastly, open lib/widget/pomodoro_timer.dart and modify LocalNoticeService().addNotification() for enterAtWork and enterAtRest to contain the sound argument as follows:
// In enterAtWork()
LocalNoticeService().addNotification(
  'Work Complete',
  "Let's take some rest",
  _endTime,
  sound: 'workend.mp3', //Add this
  channel: 'work-end',
);

// In enterAtRest()
LocalNoticeService().addNotification(
  'Rest Complete',
  'Let start to work',
  _endTime,
  sound: 'restend.mp3', //Add this
  channel: 'rest-end',
);
Build and run the app; you should see that the notification sound works for iOS.
Setting the Sound for Android
There are also three steps to set the sound for the Android platform:
- Modify
LocalNoticeServiceto support sound for Android. - Prepare the sound files in the Android resource folder.
- Define the sound file in
addNotification().
Open lib/local_notice_service.dart and modify androidDetail in addNotification() as follows:
// #1
var soundFile = sound.replaceAll('.mp3', '');

// #2
final notificationSound =
    sound == '' ? null : RawResourceAndroidNotificationSound(soundFile);
// #3
final androidDetail = AndroidNotificationDetails(
  channel,
  channel,
  playSound: true,
  sound: notificationSound
);
Here’s the highlight of the above:
- Remove the sound file extension to locate the corresponding resource.
-
RawResourceAndroidNotificationSounddescribes the location of the sound file. - Set
playSoundtotruein theandroidDetaildefinition. This enables playing the file.
The second part is to prepare the sound files. For Android, simply copy the sound files: workend.mp3 and restend.mp3 in the assets folder to the Android raw resource folder located at android/app/src/main/res/raw.
Since you’ve defined which sound to play in addNotification() when implementing the iOS part, you don’t need to do anything else on the PomodoroTimer widget.
Build and run the app. Notification sounds should be working for both Android and iOS now. Congratulations. :]
To clarify, ensure the notification settings for Android and iOS are like these:
<
To clarify, ensure the notification settings for Android and iOS are like these:
<
Notification Sound File Formats
When adding notification sounds, it’s important to consider the format of the file.
For iOS, the supported sound file formats are wav, mp3, aiff, and caf. Also, the duration of the sound should be less than 30 seconds. If the duration is longer than that, iOS will play the default sound instead.
On the other hand, the supported file formats on Android include wav, mp3, m4a and ogg.
Since you’re developing for both iOS and Android, you need to make sure the sound file’s format is wav or mp3 and that the duration is less than 30 seconds.
Where to Go From Here?
You can download the completed project files by clicking Download Materials at the top or bottom of the tutorial.
In this tutorial, you learned how to integrate local notifications into a Flutter app using flutter_local_notifications.
Since the local notification plugin is based on the Native SDK from iOS and Android, it’s good for you to learn about the native platform SDKs. You can check out the following articles and documents to learn more:
- Raywenderlich Local Notification Reference
- iOS Local Notification Reference
- Android Local Notification Reference
We hope you enjoyed this tutorial. If you have any questions or comments, please join the forum discussion below!