Runtime Mesh Manipulation With Unity
One of the benefits of using Unity as your game development platform is its powerful 3D engine. In this tutorial, you’ll get an introduction to the world of 3D objects and mesh manipulation. By Sean Duffy.
Cloning a Mesh
When you’re working with a 3D mesh with a custom editor in Edit mode, it is easy to accidentally overwrite Unity’s default mesh — that is, the built-in Sphere, Cube, Cylinder and so on. If that happens, you’ll need to restart Unity.

To avoid this, you’ll clone the mesh before making any changes to it in Edit mode.
Open MeshStudy.cs. This script inherits from MonoBehaviour, so its Start will not run in Edit mode. Luckily, that’s easy to fix!
In MeshStudy, above the class declaration, add the following:
[ExecuteInEditMode]
When a class has this attribute, its Start will fire in both Play mode and Edit mode. Now that you’ve added it, you can instantiate and clone your mesh object before changing anything.
Add the following code to InitMesh:
meshFilter = GetComponent<MeshFilter>();
originalMesh = meshFilter.sharedMesh; //1
clonedMesh = new Mesh(); //2

clonedMesh.name = "clone";
clonedMesh.vertices = originalMesh.vertices;
clonedMesh.triangles = originalMesh.triangles;
clonedMesh.normals = originalMesh.normals;
clonedMesh.uv = originalMesh.uv;
meshFilter.mesh = clonedMesh;  //3

vertices = clonedMesh.vertices; //4
triangles = clonedMesh.triangles;
isCloned = true; //5
Debug.Log("Init & Cloned");
Here’s what’s happening:
- Grabs whatever mesh you’ve originally assigned in
MeshFilter. - Creates a new mesh instance called
clonedMeshand sets its properties by copying the first mesh. - Assigns the copied mesh back to the mesh filter.
- Updates local variables, which you’ll need later.
- Sets
isClonedtotrue; you’ll reference this later.
Save the file and return to Unity. The console should show the message “Init & Cloned”.
Select Cube in the Hierarchy and look at the Inspector. The Mesh Filter will show a mesh named clone. Great! This means you have cloned the mesh successfully.

But notice there’s no new Mesh asset in your project — the cloned mesh only lives in Unity’s memory right now, and it will disappear if you close the scene. You’ll learn how to save a Mesh later.
Resetting a Mesh
For now, you want to give yourself an easy way to reset your mesh so you can play around without fear. Go back to MeshInspector.cs.
OnInspectorGUI lets you customize the Inspector for your object with extra GUI elements and logic. In OnInspectorGUI, find the comment //draw reset button and replace it with the following:
if (GUILayout.Button("Reset")) //1
{
    mesh.Reset(); //2
}
- This code draws a Reset button in the Inspector. The draw function returns
truewhen it’s pressed. - When pressed, the button calls
Resetin MeshStudy.cs.
Save the file and return to MeshStudy.cs. Add the following to Reset:
if (clonedMesh != null && originalMesh != null) //1
{
    clonedMesh.vertices = originalMesh.vertices; //2
    clonedMesh.triangles = originalMesh.triangles;
    clonedMesh.normals = originalMesh.normals;
    clonedMesh.uv = originalMesh.uv;
    meshFilter.mesh = clonedMesh; //3

    vertices = clonedMesh.vertices; //4
    triangles = clonedMesh.triangles;
}
Here’s what this code does step-by-step:
- Checks that both the original mesh and the clone mesh exist, in case the object’s mesh filter doesn’t have any data in it.
- Resets all the properties of
clonedMeshto those of the original mesh. - Assigns
clonedMeshback to the Mesh Filter component. - Updates local variables.
Save the file and return to Unity.
In the Inspector, click on the Test Edit button to mess with the cube’s mesh, then press the Reset button to restore it.

Understanding Vertices and Triangles With Unity
As you saw earlier, a mesh consists of vertices connected by edges to form triangles. Triangles define the basic shape of the object.
For example, the group triangles[0], triangles[1], triangles[2] represents one triangle, the group triangles[3], triangles[4], triangles[5] represents the next triangle and so on.
So, in a simple Quad mesh that consists of four vertices and two triangles, the Quad’s mesh data would be:

- It stores vertices as an array of
Vector3. - It stores triangles as an array of integers. Each integer is the index of one of the vertices in the verts array, and each group of three consecutive integers represents one triangle.
For example, the group
triangles[0], triangles[1], triangles[2]represents one triangle, the grouptriangles[3], triangles[4], triangles[5]represents the next triangle and so on.
Mesh class keeps track of vertices and triangles with two arrays:
- It stores vertices as an array of
Vector3. - It stores triangles as an array of integers. Each integer is the index of one of the vertices in the verts array, and each group of three consecutive integers represents one triangle.
For example, the group
triangles[0], triangles[1], triangles[2]represents one triangle, the grouptriangles[3], triangles[4], triangles[5]represents the next triangle and so on.
So, in a simple Quad mesh that consists of four vertices and two triangles, the Quad’s mesh data would be:
Visualizing Vertices
It will be easier to see how this works if you can draw and move around the vertices on a mesh with handles. Handles are tools for working with objects in the Scene view, like the draggable sphere for the Rotate tool. Now, you’re going to write your own handle!
In MeshInspector.cs, look for EditMesh and add the following:
handleTransform = mesh.transform; //1
handleRotation = Tools.pivotRotation == PivotRotation.Local ?
    handleTransform.rotation : Quaternion.identity; //2
for (int i = 0; i < mesh.vertices.Length; i++) //3
{
    ShowPoint(i);
}
- Gets the mesh's transform, which you'll need to know where to draw the vertices in world space.
- Gets the current pivot Rotation mode, to draw the handle the same way as everything else in the scene.
- Loops through the mesh's vertices and draws dots with
ShowPoint.
In ShowPoint, replace the //draw dot comment with:
Vector3 point = handleTransform.TransformPoint(mesh.vertices[index]); //1
Handles.color = Color.blue;
point = Handles.FreeMoveHandle(point, handleRotation, mesh.handleSize,
    Vector3.zero, Handles.DotHandleCap); //2
- This line converts the vertex's local position into world space.
- Draws the dot using the
Handlesutility class.
Handles.FreeMoveHandle makes an unconstrained movement handle, which you will use in the next section to enable dragging the points around.
Save the file and return to Unity.
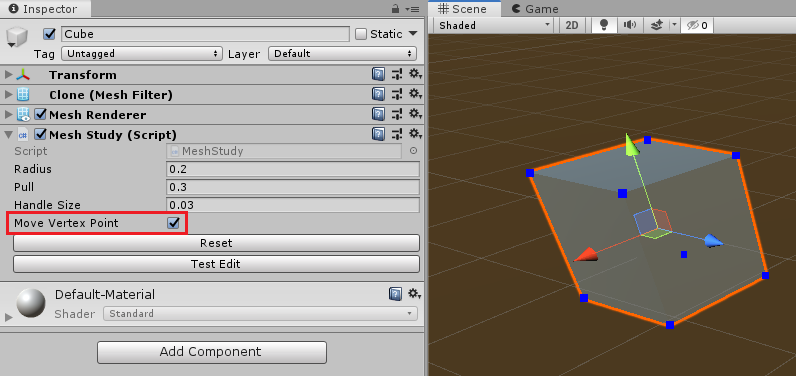
Check the Cube's MeshInspector and make sure that you've checked Move Vertex Point.
You should now see the vertices of the mesh marked with blue dots on screen. Try attaching the script to other 3D objects and see the results for yourself! :]