Drag and Drop Tutorial for iOS
In this drag and drop tutorial you will build drag and drop support into UICollectionViews and between two separate iOS apps. By Christine Abernathy.
Sign up/Sign in
With a free Kodeco account you can download source code, track your progress, bookmark, personalise your learner profile and more!
Create accountAlready a member of Kodeco? Sign in
Sign up/Sign in
With a free Kodeco account you can download source code, track your progress, bookmark, personalise your learner profile and more!
Create accountAlready a member of Kodeco? Sign in
Sign up/Sign in
With a free Kodeco account you can download source code, track your progress, bookmark, personalise your learner profile and more!
Create accountAlready a member of Kodeco? Sign in
Contents
Drag and Drop Tutorial for iOS
30 mins
- Getting Started
- Drag and Drop Overview
- Adding Drag Support
- Adding Drop Support
- Responding to Drops
- Drag and Drop in the Same App
- Follow My Moves
- Optimizing the Drop Experience
- Using In-Memory Data
- Moving Items Across Collection Views
- Are You My App?
- Adding a Placeholder
- Multiple Data Representations
- Reading and Writing Geocaches
- Back to My App
- Adding Drag Support to a Custom View
- Adding Drop Support to a Custom View
- Where to Go From Here?
Apple introduced drag and drop functionality in iOS 11, allowing users to drag items from one screen location to another. On iPhone, drag and drop is only available within an app, whereas on iPads, it’s also available across apps. This is really handy for doing things like quickly adding images from Photos into an email.
In this tutorial, you’ll explore drag and drop by building upon CacheManager, two apps for managing geocaches:
CacheMaker organizes geocaches in a Kanban board of in-progress and completed items. CacheEditor allows users to edit the details of a geocache brought over from CacheMaker. You’ll implement these management features by adding drag and drop support to both apps.
Getting Started
Use the Download Materials button at the top or bottom of this tutorial to download the starter project. Open CacheManager.xcworkspace in Xcode and select CacheMaker as the active scheme:
Build and run CacheMaker. You should see two collection views with the first containing geocaches for in-progress work:
Try dragging a geocache from the in-progress lane to the completed lane:
Your goal in this first part of the tutorial is to get this working. Later on, you’ll unlock the ability to drag and drop geocaches to and from the CacheEditor companion app.
Take a look at the key CacheMaker files in Xcode:
- CachesDataSource.swift: Represents the data source for a collection view of geocaches.
- CachesViewController.swift: Displays the Kanban board for the geocaches.
These are the files you’ll be working with to add the desired functionality.
Drag and Drop Overview
When you drag items from a source app, a drag activity begins and the system creates a drag session. The source app sets up a drag item to represent the underlying data when the drag activity starts. Dropping the items in a destination app ends the drag activity.
Drag items are wrapped in an item provider which describes the data types the source app can deliver. When the items are dropped, the destination app asks for the items in the format it can consume.
Apple automatically supports drag and drop in text views and text fields. It also provides specialized APIs for table views and collection views. You can add drag and drop to custom views as well.
In this tutorial, you’ll explore drag and drop in collection views and custom views.
Adding Drag Support
Go to CachesDataSource.swift and add the following extension to the end of the file:
extension CachesDataSource {
func dragItems(for indexPath: IndexPath) -> [UIDragItem] {
let geocache = geocaches[indexPath.item]
let itemProvider = NSItemProvider(object: geocache.name as NSString)
let dragItem = UIDragItem(itemProvider: itemProvider)
return [dragItem]
}
}
Here you create an item provider from the NSString
representation of the geocache name. You then return an array of one drag item which wraps this item provider.
Next, open CachesViewController.swift and add the following to the end of the file:
extension CachesViewController: UICollectionViewDragDelegate {
func collectionView(_ collectionView: UICollectionView,
itemsForBeginning session: UIDragSession,
at indexPath: IndexPath) -> [UIDragItem] {
let dataSource = dataSourceForCollectionView(collectionView)
return dataSource.dragItems(for: indexPath)
}
}
You adopt UICollectionViewDragDelegate
and implement the required method that’s called when a drag activity starts. Your implementation gets the data source for the collection view, then returns the corresponding drag items for the selected item.
Add the following to viewDidLoad()
after the collection view delegate assignment:
collectionView.dragDelegate = self
This makes the view controller the drag delegate.
Build and run the app. Tap and hold on a collection view cell representing a geocache. The tapped cell should rise up allowing you to drag it around:
Note that although you can drag an item around, you can’t drop it anywhere. Attempting to do so simply drops it back where it started.
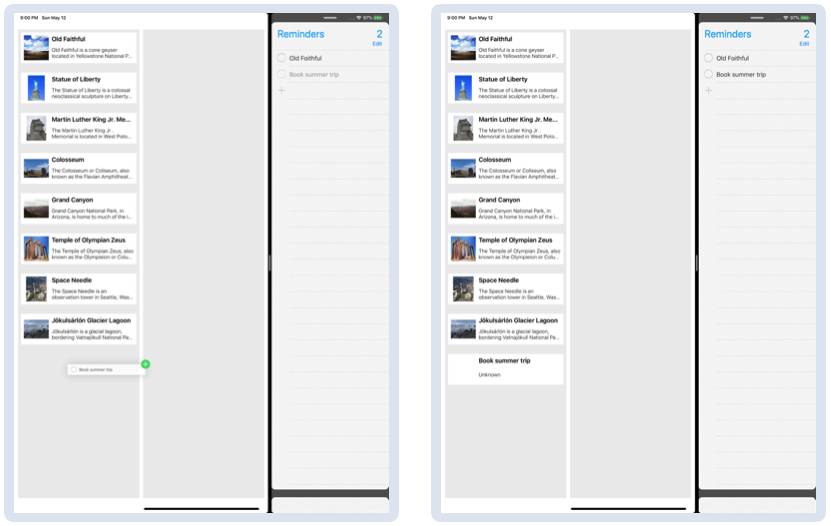
Open Reminders in Split View next to CacheMaker. You should be able to drag a geocache and drop it into Reminders:
Reminders can accept the exported NSString
representation of the geocache name and use it to create a new reminder.
Now try dragging any text from Reminders into CacheMaker. Nothing happens. That’s because you haven’t added drop support to CacheMaker. You’re going to tackle this next.
Adding Drop Support
Go to CachesDataSource.swift and add the following to the CachesDataSource
extension:
func addGeocache(_ newGeocache: Geocache, at index: Int) {
geocaches.insert(newGeocache, at: index)
}
This adds a new geocache to the data source.
Switch over to CachesViewController.swift and add the following protocol extension to the end:
extension CachesViewController: UICollectionViewDropDelegate {
func collectionView(
_ collectionView: UICollectionView,
performDropWith coordinator: UICollectionViewDropCoordinator) {
// 1
let dataSource = dataSourceForCollectionView(collectionView)
// 2
let destinationIndexPath =
IndexPath(item: collectionView.numberOfItems(inSection: 0), section: 0)
// 3
let item = coordinator.items[0]
// 4
switch coordinator.proposal.operation
{
case .copy:
print("Copying...")
let itemProvider = item.dragItem.itemProvider
// 5
itemProvider.loadObject(ofClass: NSString.self) { string, error in
if let string = string as? String {
// 6
let geocache = Geocache(
name: string, summary: "Unknown", latitude: 0.0, longitude: 0.0)
// 7
dataSource.addGeocache(geocache, at: destinationIndexPath.item)
// 8
DispatchQueue.main.async {
collectionView.insertItems(at: [destinationIndexPath])
}
}
}
default:
return
}
}
}
Here you adopt the UICollectionViewDropDelegate
protocol. You then implement the required method that’s called when the user ends a drag activity. Your implementation:
- Gets the data source for the collection view.
- Sets the end of the collection view as the item drop destination.
- Selects the first drag item.
- Checks how you propose to handle the drop.
- Asynchronously fetches the dragged item’s data.
- Creates a new geocache with a name based on the incoming string data.
- Adds the new geocache to the data source.
- Inserts the new item in the collection view. You invoke this on the main thread since the data fetching completion block runs on an internal queue.
Responding to Drops
Add the following to the end of the UICollectionViewDropDelegate
extension:
func collectionView(
_ collectionView: UICollectionView,
dropSessionDidUpdate session: UIDropSession,
withDestinationIndexPath destinationIndexPath: IndexPath?
) -> UICollectionViewDropProposal {
if session.localDragSession != nil {
return UICollectionViewDropProposal(operation: .forbidden)
} else {
return UICollectionViewDropProposal(
operation: .copy,
intent: .insertAtDestinationIndexPath)
}
}
You specify the response to an item being dragged. This includes providing visual feedback to the user.
The code here forbids drag-and-drops within the app. It proposes copy operations for items dropped from another app.
Add the following to viewDidLoad()
after the drag delegate is assigned:
collectionView.dropDelegate = self
This sets the view controller as the drop delegate.
Build and run the app. With Reminders in Split View, verify that you can drag a reminder into the in-progress collection view:
If you try to drop into the middle of the list, you’ll see it only adds to the end of the list. You’ll improve this later.
Try dragging and dropping a geocache inside the app. Verify that you get a visual cue that this is disallowed:
That isn’t ideal, so you’ll work on it next.
Drag and Drop in the Same App
Still in CachesViewController.swift, go to collectionView(_:dropSessionDidUpdate:withDestinationIndexPath:)
and replace the forbidden return statement with this code:
guard session.items.count == 1 else {
return UICollectionViewDropProposal(operation: .cancel)
}
if collectionView.hasActiveDrag {
return UICollectionViewDropProposal(operation: .move,
intent: .insertAtDestinationIndexPath)
} else {
return UICollectionViewDropProposal(operation: .copy,
intent: .insertAtDestinationIndexPath)
}
If more than one item is selected, the code cancels the drop. For the single drop item you propose a move if you’re within the same collection view. Otherwise, you propose a copy.
In CachesDataSource.swift, add the following method to the extension:
func moveGeocache(at sourceIndex: Int, to destinationIndex: Int) {
guard sourceIndex != destinationIndex else { return }
let geocache = geocaches[sourceIndex]
geocaches.remove(at: sourceIndex)
geocaches.insert(geocache, at: destinationIndex)
}
This repositions a geocache in the data source.
Head back to CachesViewController.swift and in collectionView(_:performDropWith:)
replace the destinationIndexPath
assignment with the following:
let destinationIndexPath: IndexPath
if let indexPath = coordinator.destinationIndexPath {
destinationIndexPath = indexPath
} else {
destinationIndexPath = IndexPath(
item: collectionView.numberOfItems(inSection: 0),
section: 0)
}
Here, you check for an index path specifying where to insert the item. If none is found, the item inserts at the end of the collection view.
Add the following right before the .copy
case:
case .move:
print("Moving...")
// 1
if let sourceIndexPath = item.sourceIndexPath {
// 2
collectionView.performBatchUpdates({
dataSource.moveGeocache(
at: sourceIndexPath.item,
to: destinationIndexPath.item)
collectionView.deleteItems(at: [sourceIndexPath])
collectionView.insertItems(at: [destinationIndexPath])
})
// 3
coordinator.drop(item.dragItem, toItemAt: destinationIndexPath)
}
This block of code:
- Gets the source index path which you should have access to for drag and drops within the same collection view.
- Performs batch updates to move the geocache in the data source and collection view.
- Animates the insertion of the dragged geocache in the collection view.
Follow My Moves
Build and run the app. Verify that dragging and dropping a geocache across collection views creates a copy and logs the copy message:
Test that you can also move a geocache within the same collection view and see the move message logged:
You might have noticed some inefficiencies when dragging and dropping across collection views. You’re working in the same app yet you’re creating a low fidelity copy of the object. Not to mention, you’re creating a copy!
Surely, you can do better.
Optimizing the Drop Experience
You can make a few optimizations to improve the drop implementation and experience.
Using In-Memory Data
You should take advantage of your access to the full geocache structure in the same app.
Go to CachesDataSource.swift. Add the following to dragItems(for:)
, directly before the return statement:
dragItem.localObject = geocache
You assign the geocache to the drag item property. This enables faster item retrieval later.
Go to CachesViewController.swift. In collectionView(_:performDropWith:)
, replace the code inside the .copy
case with the following:
if let geocache = item.dragItem.localObject as? Geocache {
print("Copying from same app...")
dataSource.addGeocache(geocache, at: destinationIndexPath.item)
DispatchQueue.main.async {
collectionView.insertItems(at: [destinationIndexPath])
}
} else {
print("Copying from different app...")
let itemProvider = item.dragItem.itemProvider
itemProvider.loadObject(ofClass: NSString.self) { string, error in
if let string = string as? String {
let geocache = Geocache(
name: string, summary: "Unknown", latitude: 0.0, longitude: 0.0)
dataSource.addGeocache(geocache, at: destinationIndexPath.item)
DispatchQueue.main.async {
collectionView.insertItems(at: [destinationIndexPath])
}
}
}
}
Here, the code that handles items dropped from a different app hasn’t changed. For items copied from the same app, you get the saved geocache from localObject
and use it to create a new geocache.
Build and run the app. Verify that dragging and dropping across collections views now replicates the geocache structure:
Moving Items Across Collection Views
You now have a better representation of the geocache. That’s great, but you really should move the geocache across collection views instead of copying it.
Still in CachesViewController.swift, replace the collectionView(_:dropSessionDidUpdate:withDestinationIndexPath:)
implementation with the following:
guard session.localDragSession != nil else {
return UICollectionViewDropProposal(
operation: .copy,
intent: .insertAtDestinationIndexPath)
}
guard session.items.count == 1 else {
return UICollectionViewDropProposal(operation: .cancel)
}
return UICollectionViewDropProposal(
operation: .move,
intent: .insertAtDestinationIndexPath)
You now handle drops within the same app as move operations.
Go to File ▸ New ▸ File… and choose the iOS ▸ Source ▸ Swift File template. Click Next. Name the file CacheDragCoordinator.swift and click Create.
Add the following at the end of the file:
class CacheDragCoordinator {
let sourceIndexPath: IndexPath
var dragCompleted = false
var isReordering = false
init(sourceIndexPath: IndexPath) {
self.sourceIndexPath = sourceIndexPath
}
}
You’ve created a class to coordinate drag-and-drops within the same app. Here you set up properties to track:
- Where the drag starts.
- When it’s completed.
- If the collection view items should be reordered after the drop.
Switch to CachesDataSource.swift and add the following method to the extension:
func deleteGeocache(at index: Int) {
geocaches.remove(at: index)
}
This method removes a geocache at the specified index. You’ll use this helper method when reordering collection view items.
Go to CachesViewController.swift. Add the following to collectionView(_:itemsForBeginning:at)
, directly before the return statement:
let dragCoordinator = CacheDragCoordinator(sourceIndexPath: indexPath)
session.localContext = dragCoordinator
Here, you initialize a drag coordinator with the starting index path. You then add this object to the drag session property that stores custom data. This data is only visible to apps where the drag activity starts.
Are You My App?
Find collectionView(_:performDropWith:)
. Replace the code inside the .copy
case with the following:
print("Copying from different app...")
let itemProvider = item.dragItem.itemProvider
itemProvider.loadObject(ofClass: NSString.self) { string, error in
if let string = string as? String {
let geocache = Geocache(
name: string, summary: "Unknown", latitude: 0.0, longitude: 0.0)
dataSource.addGeocache(geocache, at: destinationIndexPath.item)
DispatchQueue.main.async {
collectionView.insertItems(at: [destinationIndexPath])
}
}
}
You’ve simplified the copy path to only handle drops from a different app.
Replace the code inside the .move
case with the following:
// 1
guard let dragCoordinator =
coordinator.session.localDragSession?.localContext as? CacheDragCoordinator
else { return }
// 2
if let sourceIndexPath = item.sourceIndexPath {
print("Moving within the same collection view...")
// 3
dragCoordinator.isReordering = true
// 4
collectionView.performBatchUpdates({
dataSource.moveGeocache(at: sourceIndexPath.item, to: destinationIndexPath.item)
collectionView.deleteItems(at: [sourceIndexPath])
collectionView.insertItems(at: [destinationIndexPath])
})
} else {
print("Moving between collection views...")
// 5
dragCoordinator.isReordering = false
// 6
if let geocache = item.dragItem.localObject as? Geocache {
collectionView.performBatchUpdates({
dataSource.addGeocache(geocache, at: destinationIndexPath.item)
collectionView.insertItems(at: [destinationIndexPath])
})
}
}
// 7
dragCoordinator.dragCompleted = true
// 8
coordinator.drop(item.dragItem, toItemAt: destinationIndexPath)
Here’s a step-by-step breakdown of the what’s going on:
- Get the drag coordinator.
- Check if the source index path for the drag item is set. This means the drag and drop is in the same collection view.
- Inform the drag coordinator that the collection view will be reordered.
- Perform batch updates to move the geocache in the data source and in the collection view.
- Note that the collection view is not going to be reordered.
- Retrieve the locally stored geocache. Add it to the data source and insert it into the collection view.
- Let the drag coordinator know that the drag finished.
- Animate the insertion of the dragged geocache in the collection view.
Add the following method to your UICollectionViewDragDelegate
extension:
func collectionView(_ collectionView: UICollectionView,
dragSessionDidEnd session: UIDragSession) {
// 1
guard
let dragCoordinator = session.localContext as? CacheDragCoordinator,
dragCoordinator.dragCompleted == true,
dragCoordinator.isReordering == false
else {
return
}
// 2
let dataSource = dataSourceForCollectionView(collectionView)
let sourceIndexPath = dragCoordinator.sourceIndexPath
// 3
collectionView.performBatchUpdates({
dataSource.deleteGeocache(at: sourceIndexPath.item)
collectionView.deleteItems(at: [sourceIndexPath])
})
}
This method is called when either the drag is aborted or the item is dropped. Here’s what the code does:
- Check the drag coordinator. If the drop is complete and the collection view isn’t being reordered, it proceeds.
- Get the data source and source index path to prepare for the updates.
- Perform batch updates to delete the geocache from the data source and the collection view. Recall that you previously added the same geocache to the drop destination. This takes care of removing it from the drag source.
Build and run the app. Verify that moving across collection views actually moves the item and prints Moving between collection views...
in the console:
Adding a Placeholder
Fetching items from an external app and loading them in the destination app could take time. It’s good practice to provide visual feedback to the user such as showing a placeholder.
Replace the .copy
case in collectionView(_:performDropWith:)
with the following:
print("Copying from different app...")
// 1
let placeholder = UICollectionViewDropPlaceholder(
insertionIndexPath: destinationIndexPath, reuseIdentifier: "CacheCell")
// 2
placeholder.cellUpdateHandler = { cell in
if let cell = cell as? CacheCell {
cell.cacheNameLabel.text = "Loading..."
cell.cacheSummaryLabel.text = ""
cell.cacheImageView.image = nil
}
}
// 3
let context = coordinator.drop(item.dragItem, to: placeholder)
let itemProvider = item.dragItem.itemProvider
itemProvider.loadObject(ofClass: NSString.self) { string, error in
if let string = string as? String {
let geocache = Geocache(
name: string, summary: "Unknown", latitude: 0.0, longitude: 0.0)
// 4
DispatchQueue.main.async {
context.commitInsertion(dataSourceUpdates: {_ in
dataSource.addGeocache(geocache, at: destinationIndexPath.item)
})
}
}
}
This is what’s going on:
- Create a placeholder cell for the new content.
- Define the block that configures the placeholder cell.
- Insert the placeholder into the collection view.
- Commit the insertion to exchange the placeholder with the final cell.
Build and run the app. Drag and drop an item from Reminders. Note the brief appearance of the placeholder text as you drop the item into a collection view:
Multiple Data Representations
You can configure the types of data that you can deliver to a destination app or consume from a source app.
When you create an item provider using init(object:)
, the object you pass in must conform to NSItemProviderWriting
. Adopting the protocol includes specifying the uniform type identifiers (UTIs) for the data you can export and handling the export for each data representation.
For example, you may want to export a string representation of your geocache for apps that only take in strings. Or you might want to export an image representation for photo apps. For apps under your control that use geocaches, you may want to export the full data model.
To properly consume dropped items and turn them into geocaches, your data model should adopt NSItemProviderReading
. You then implement protocol methods to specify which data representations you can consume. You’ll also implement them to specify how to coerce the incoming data based on what the source app sends.
Thus far, you’ve worked with strings when dragging and dropping geocaches between apps. NSString
automatically supports NSItemProviderWriting
and NSItemProviderReading
so you didn’t have to write any special code.
To handle multiple data types, you’ll change the geocache data model. You’ll find this in the Geocache project, which is part of the Xcode workspace you have open..
In the Geocache project, open Geocache.swift and add the following after the Foundation
import:
import MobileCoreServices
You need this framework to use predefined UTIs such as those representing PNGs.
Add the following right after your last import:
public let geocacheTypeId = "com.razeware.geocache"
You create a custom string identifier that will represent a geocache.
Reading and Writing Geocaches
Add the following extension to the end of the file:
extension Geocache: NSItemProviderWriting {
// 1
public static var writableTypeIdentifiersForItemProvider: [String] {
return [geocacheTypeId,
kUTTypePNG as String,
kUTTypePlainText as String]
}
// 2
public func loadData(
withTypeIdentifier typeIdentifier: String,
forItemProviderCompletionHandler completionHandler:
@escaping (Data?, Error?) -> Void)
-> Progress? {
if typeIdentifier == kUTTypePNG as String {
// 3
if let image = image {
completionHandler(image, nil)
} else {
completionHandler(nil, nil)
}
} else if typeIdentifier == kUTTypePlainText as String {
// 4
completionHandler(name.data(using: .utf8), nil)
} else if typeIdentifier == geocacheTypeId {
// 5
do {
let archiver = NSKeyedArchiver(requiringSecureCoding: false)
try archiver.encodeEncodable(self, forKey: NSKeyedArchiveRootObjectKey)
archiver.finishEncoding()
let data = archiver.encodedData
completionHandler(data, nil)
} catch {
completionHandler(nil, nil)
}
}
return nil
}
}
Here you conform to NSItemProviderWriting
and do the following:
- Specify the data representations you can deliver to the destination app. You want to return a string array ordered from the highest fidelity version of the object to the lowest.
- Implement the method for delivering data to the destination app when requested. The system calls this when an item is dropped and passes in the appropriate type identifier.
- Return the geocache’s image in the completion handler if a PNG identifier is passed in.
- Return the geocache’s name in the completion handler if a text identifier is passed in.
- If the custom geocache type identifier is passed in, return a data object corresponding to the entire geocache.
Now, add the following enum right after geocacheTypeId
is assigned:
enum EncodingError: Error {
case invalidData
}
You’ll use this to return an error code when there are problems reading in data.
Next, add the following to the end of the file:
extension Geocache: NSItemProviderReading {
// 1
public static var readableTypeIdentifiersForItemProvider: [String] {
return [geocacheTypeId,
kUTTypePlainText as String]
}
// 2
public static func object(withItemProviderData data: Data,
typeIdentifier: String) throws -> Self {
if typeIdentifier == kUTTypePlainText as String {
// 3
guard let name = String(data: data, encoding: .utf8) else {
throw EncodingError.invalidData
}
return self.init(
name: name,
summary: "Unknown",
latitude: 0.0,
longitude: 0.0)
} else if typeIdentifier == geocacheTypeId {
// 4
do {
let unarchiver = try NSKeyedUnarchiver(forReadingFrom: data)
guard let geocache =
try unarchiver.decodeTopLevelDecodable(
Geocache.self, forKey: NSKeyedArchiveRootObjectKey) else {
throw EncodingError.invalidData
}
return self.init(geocache)
} catch {
throw EncodingError.invalidData
}
} else {
throw EncodingError.invalidData
}
}
}
Here you conform to NSItemProviderReading
to specify how to handle incoming data. This is what’s going on:
- Specify the types of incoming data the model can consume. The UTIs listed here represent a geocache and text.
- Implement the required protocol method for importing data given a type identifier.
- For a text identifier, create a new geocache with the name based on the incoming text and placeholder information.
- For the geocache identifier, decode the incoming data and use it to create a full geocache model.
Errors or unrecognized type identifiers throw the error you defined before.
Back to My App
Change the active scheme to Geocache and build the project. Then change the active scheme back to CacheMaker.
In CacheMaker, go to CachesDataSource.swift and inside dragItems(for:)
change the itemProvider
assignment to:
let itemProvider = NSItemProvider(object: geocache)
Here you can initialize your item provider with a geocache since your model adopts NSItemProviderWriting
to properly export data.
Open CachesViewController.swift and find collectionView(_:performDropWith:)
. In the .copy
case, replace the item provider’s loadObject
call with the following:
itemProvider.loadObject(ofClass: Geocache.self) { geocache, _ in
if let geocache = geocache as? Geocache {
DispatchQueue.main.async {
context.commitInsertion(dataSourceUpdates: {_ in
dataSource.addGeocache(geocache, at: destinationIndexPath.item)
})
}
}
}
You’ve modified the drop handler to load objects of type Geocache
. The completion block now returns a geocache that you can use directly.
Build and run the app. Place Reminders in Split View if necessary. Check that dragging and dropping items between Reminders and CacheMaker works as before:
Bring Photos in Split View to replace Reminders. Drag a geocache from your in-progress lane and drop it into Photos to verify that you can export an image representation of the geocache:
You can test the full data model export path with a temporary hack. Go to CachesViewController.swift and in collectionView(_:dropSessionDidUpdate:withDestinationIndexPath:)
replace the line that returns the move operation with the following:
return UICollectionViewDropProposal(
operation: .copy,
intent: .insertAtDestinationIndexPath)
You’re configuring drag-and-drops within the same app as copy operations. This triggers the code that should export and import the full data model.
Build and run the app. Test that moving an item within the app makes a proper copy of the geocache:
Revert your temporary hack in collectionView(_:dropSessionDidUpdate:withDestinationIndexPath:)
so that in-app drag-and-drops executes a move operation:
return UICollectionViewDropProposal(
operation: .move,
intent: .insertAtDestinationIndexPath)
Build and run the app to get back to pre-hack conditions.
Adding Drag Support to a Custom View
You’ve seen how to add drag and drop support to collection views. Adding this support to table views follows a similar process.
You can also add drag and drop functionality to custom views. The basic steps involve:
- Adding an interaction object to the custom view.
- Implementing the protocol methods in the interaction delegate to provide or to consume data.
It’s time to introduce CacheEditor, your companion app for editing geocaches. Change the active scheme to CacheEditor. Build and run the app then rotate the device to landscape mode:
View CacheMaker in Split View, placing it to the left of CacheEditor. Resize the Split View so both apps take up about half the width:
Try dragging a geocache from CacheEditor into CacheMaker. You’re in for a frustrating experience, my friend.
You’ll be working with one key file in CacheEditor, CacheDetailViewController.swift, which displays geocache details. Open that file and add the following code to the end:
// MARK: - UIDragInteractionDelegate
extension CacheDetailViewController: UIDragInteractionDelegate {
func dragInteraction(
_ interaction: UIDragInteraction,
itemsForBeginning session: UIDragSession)
-> [UIDragItem] {
let itemProvider = NSItemProvider(object: geocache)
let dragItem = UIDragItem(itemProvider: itemProvider)
return [ dragItem ]
}
}
Here, you adopt UIDragInteractionDelegate
and implement the method that’s called when a drag activity starts. The code should look similar to what you’ve seen in CacheMaker. You return drag items with a geocache as the item provider.
Add the following to viewDidLoad()
right after the call to super
:
view.addInteraction(UIDragInteraction(delegate: self))
Here, you create a drag interaction with the view controller as the delegate. You then add the interaction to the view.
Build and run CacheEditor. Verify that you can now drag a geocache from CacheEditor and drop it into CacheMaker:
Try dragging a geocache from CacheMaker into CacheEditor. While the drag starts, it doesn’t drop. That’s your next mission.
Adding Drop Support to a Custom View
Still in CacheDetailViewController.swift, add the following to the end of the file:
// MARK: - UIDropInteractionDelegate
extension CacheDetailViewController : UIDropInteractionDelegate {
func dropInteraction(
_ interaction: UIDropInteraction,
canHandle session: UIDropSession)
-> Bool {
return session.canLoadObjects(ofClass: Geocache.self)
}
func dropInteraction(
_ interaction: UIDropInteraction,
sessionDidUpdate session: UIDropSession)
-> UIDropProposal {
return UIDropProposal(operation: .copy)
}
func dropInteraction(
_ interaction: UIDropInteraction,
performDrop session: UIDropSession) {
session.loadObjects(ofClass: Geocache.self) { items in
if let geocaches = items as? [Geocache],
let geocache = geocaches.first {
self.geocache = geocache
self.configureView()
}
}
}
}
Here, you adopt UIDropInteractionDelegate
and implement the optional methods to track and properly handle drops.
The first method restricts drops to apps that pass in a Geocache
object.
The second method returns a copy operation as the proposed method to handle drops. This method is called when the user drags an item over the drop interaction’s view. Even though this protocol method is optional, you need to implement it to accept drops.
The last protocol method is called when the drop gesture is completed. You grab the item provider from the session and start the data fetch. Then, you load in the first geocache and update the view.
Next, add this code to viewDidLoad()
after the drag interaction setup:
view.addInteraction(UIDropInteraction(delegate: self))
With this, you create a drop interaction and set the view controller as the delegate. You then add the interaction to the view.
Build and run the app. Verify that you can drop a geocache into CacheEditor:
With very few lines of code, you’ve added drag and drop support to a custom view.
Where to Go From Here?
Congratulations! You’ve used drag and drop to make the geocache management sample apps functional.
Use the Download Materials button at the top or bottom of this tutorial to download the final project.
You should now be able to add drag and drop to supercharge many in-app and cross-app experiences. Check out the Drag and Drop in Table and Collection Views and Drag and Drop with Multiple Data Representations and Custom Views video tutorials for additional tips and to see how to add this functionality to table views.
I hope you enjoyed this tutorial. If you have any comments or questions, please join the forum discussion below!