SwiftUI Testing With ViewInspector for iOS
Learn how to use the ViewInspector framework to write UI tests for SwiftUI apps. By Warren Burton.
Traversing the View Tree
In this section, you’ll learn how to control search direction as you write your tests.
Trees are a structure you’ll come across frequently in your programming life. A SwiftUI view is a tree of views and modifiers.
Consider the structure of RecipeListView:

You used variations on find to locate views in RecipeListView. All those versions of find call into a base function:
func find<T>(
  _ viewType: T.Type,
  relation: ViewSearch.Relation = .child,
  traversal: ViewSearch.Traversal = .breadthFirst,
  skipFound: Int = 0,
  where condition: (InspectableView<T>) throws -> Bool = { _ in true }
) throws -> InspectableView<T> where T: KnownViewType
The third argument, traversal, controls the direction of search, so by default find always uses a .breadthFirst search:

The search pattern looks for a match by moving across the node’s children before descending farther down the tree.
The other option available to you is .depthFirst, where the search moves all the way to the end of a branch before progressing to the next child:

Now, you’ll make a demo to show why you might need to use this in your own code. In the project navigator, select the folder StepByStepTests and create a new Unit Test Case Class file called TraversalTests.swift.

Delete everything in TraversalTests.swift and replace with this code:
import XCTest
import SwiftUI
import ViewInspector
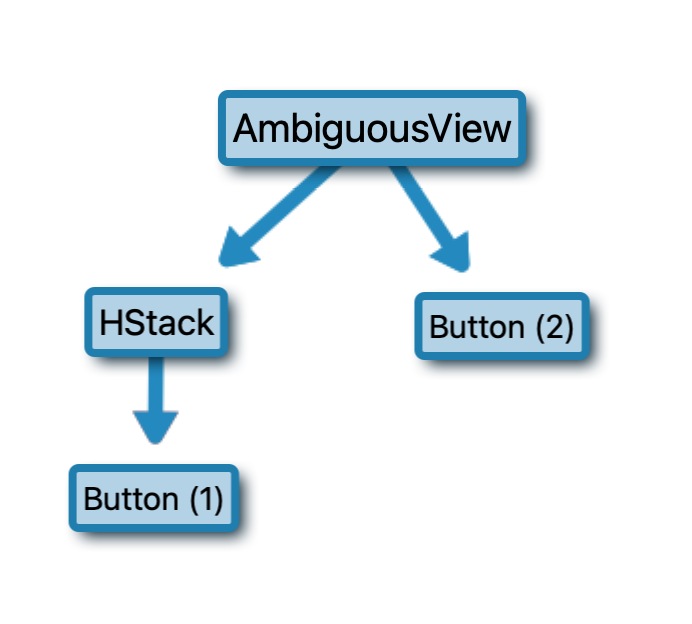
struct AmbiguousView: View, Inspectable {
var body: some View {
VStack {
HStack {
Button("Ray") {}
.id(1)
}
Button("Ray") {}
.id(2)
}
}
}
class TraversalTests: XCTestCase {
func testBreadthFirst() throws {
let view = AmbiguousView()
let button = try view.inspect().find(button: "Ray")
XCTAssertEqual(try button.id(), 2)
}
}
AmbiguousView has two buttons called “Ray”. The id value allows you to check which one you found:
Build and test, and you’ll see your test passes:

The Button with an id of 2 is the first match because find, as a default, does a .breadthFirst search, or in other words: It walks across the tree before descending.
Now, you’ll learn how to use find to locate the button inside the HStack. Add this test to TraversalTests:
func testDepthFirst() throws {
  let view = AmbiguousView()
  let button = try view.inspect().find(
    ViewType.Button.self,
    traversal: .depthFirst
  ) { button in
    // 1
    let text = try button.find(text: "Ray")
    // 2
    return (try? text.find(ViewType.Button.self, relation: .parent)) != nil
  }
  XCTAssertEqual(try button.id(), 1)
}
Here, you use the base find method to specify a .depthFirst traversal. You locate a Button that has Text that matches “Ray” and also that Text has a parent that’s a Button. Without the second clause, you could match on a “Ray” that isn’t the label for the button.
Build and test one last time to prove your test works:

How fortunate! :]
Where to Go From Here?
You can download the finished project using the Download Materials link at the top or bottom of the tutorial.
You’ve seen how to test the attributes of a view and interact with a view during its test lifetime, but this tutorial only dips into the potential for testing with ViewInspector. ViewInspector also has support for gestures and view modifiers. The documentation includes examples for many different test scenarios.
What you decide to test in your project can be a fuzzy decision based on how your app works. In this tutorial, you’ve tested styles, labels and navigation destinations. You want to avoid making your tests too easy to break, so try to base the tests on specific use cases rather than layout choices, such as:
- The test “Add Step” button should be inside a
VStack, which is inside anHStackis a test that won’t have much value because you’re testing a specific layout that might change during normal development. - The test “Add Step” button action should add one step to the data model is a user-focused test that will help you ensure your UX doesn’t get broken.
Remember: A developer like you made and supports ViewInspector. If you need support, be nice and treat them as you’d like to be treated. If you’d like to contribute, then submit a PR to the repository or even buy them a cup of coffee.
We hope you enjoyed this tutorial, and if you have any questions or comments, please join the forum discussion below!