Getting Started With the VIP Clean Architecture Pattern
In this tutorial, you’ll learn how to utilize the VIP clean architecture pattern to develop apps for Apple platforms while building a SwiftUI for ordering an ice cream. By Danijela Vrzan.
The VIP architectural pattern is one of the least known patterns in iOS development compared to MVVM, MVC or VIPER. You’re reading that correctly; VIP isn’t VIPER.
They’re different implementations of the Uncle Bob’s Clean Architecture pattern.
VIPER’s creators wanted to name it VIP. But they didn’t want developers to read it as Very Important Architecture, so they named it VIPER instead.
What does VIP stand for then? View – Interactor – Presenter.
The VIP architecture for writing clean Swift code was introduced by Raymond Law. He created a clean-swift website where you can read about how to use VIP pattern in UIKit.
In this tutorial, you’ll build an ice cream maker app called Scoops&Scones using the VIP architecture in SwiftUI. The UI is already set up, so you can focus on building the logic and making the app work.
By the end of this tutorial, your app should look like this:

Follow along and you’ll start making ice cream in no time!
Getting Started
Download the project materials by clicking Download Materials at the top or bottom of the tutorial. Open the project inside the starter folder. Then, build and run.

There’s not much you can do with the app at the moment. Tapping “Select a cone or cup” navigates to an empty view, and the other fields are inactive until you choose one. You’ll add the necessary logic and start making ice cream by the end of this tutorial. :]
In Xcode, look at the files already set up:
- icecream.json contains your app’s data.
-
ContentView launches your app’s main view
CreateIceCreamView. - In the Models group, you have two files: IceCream will hold the data parsed from the json and IceCreamDataStore will hold the data for displaying on the view.
-
CreateIceCreamView is your app’s main
View, and it’s where the VIP cycle starts. - The Extensions and UI Components groups contain helper files. You won’t be directly working with those files.
Before you start making ice cream, you’ll learn more about the VIP pattern.
What Is VIP?
VIP is an architectural pattern like MVC, MVP or MVVM. Its main difference is the clear logic separation between its components. VIP was created to fix MVC, or Massive View Controllers, a common problem in UIKit apps where View Controllers become the main object where code is kept and they become Massive in that most if not all of your logic is kept within them. This can also cause problems when testing your code.
VIPER already existed, but its implementation was a bit too complex and didn’t allow you to use segues.
The VIP pattern is a unidirectional architectural pattern. You might have already heard of some others, such as Redux, Flux or Model-View-Intent (MVI). These patterns focus on reactive UIs and state management.
Unidirectional patterns share one property: Their components are all interconnected and aren’t designed to mix. Each has its own clear responsibility.
Look at this diagram:

Each letter in VIP stands for one component: View, Interactor and Presenter.
- The View is your app’s UI. This corresponds to a SwiftUI
View. It sends requests to the interactor every time the user interacts with the UI. - The Interactor handles your app’s business logic, such as fetching data from the network or saving data in a database. When the view requests something, the interactor does the processing and sends the result as a response to the presenter.
- The Presenter handles the presentation logic. It formats the received data into view models suitable for display and then passes it to the view.
You’ll see how following this approach leads your code to fall into place logically. Each component has a single responsibility, and there’s no confusion regarding what goes where.
You might even know where to look when you review your code six months later. :]
VIP vs VIPER
VIP and VIPER have the same basic components, but the data flow is different. Although VIP follows a unidirectional approach, VIPER has a bidirectional flow that starts with the presenter.

In VIPER, the presenter directs data between the view and the interactor. The view and interactor don’t talk with each other.
Now that you know how VIP works, you’ll put that knowledge into practice and build an app. But before you start writing any code, look at how to structure your files and groups in Xcode.
Code organization is one of the features of VIP architecture.
Structuring Your Files in Xcode
In Xcode, look at your project’s structure:
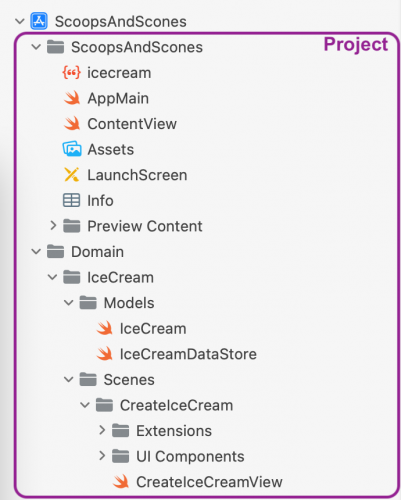
ScoopsAndScones is the root group of your project. Inside, you have a json file, AppMain, ContentView, other resources and a Domain group:

Domain contains all your app’s domains or use-cases. In this case, IceCream is the only domain you have. If you wanted to expand the app by adding Cookies, for example, it would become another domain of your app.
The IceCream group comprises Models and Scenes:

Models contains your domain’s model that you use across the scenes and isn’t tied to any specific scene. Each scene will have its scene-specific model that you’ll add later.
Scenes contains all the scenes for your domain. A scene normally is a single screen or collection of screens for a feature. ScoopsAndScones has a single scene called CreateIceCream.
Now it’s time to start building your app’s logic.
Building Your App Logic
As already mentioned, your app has a single scene called CreateIceCream. You’ll start building your app logic by adding Model, View, Interactor and Presenter. After you’ve added the components, you’ll see your app in action.
The first step is to learn about and create the data model.
Model in VIP
Data Models in VIP are decoupled data abstractions. They pass the data between components and consist of only primitive types such as Int, Double or String.
You could create Struct, Class or Enum, but if the business logic changes, the underlying data models change. Using primitive types makes it easier to change the components without needing to update the entire codebase.
Look at this diagram:

The typical user interaction goes like this: The cycle starts in the view when the user taps a button in the app’s UI.
The view creates a Request object and sends it to the interactor. The interactor takes the request object, performs work and sends the result as a Response to the presenter. The presenter then takes the response, formats the data into primitive types and sends the result as a ViewModel back to the view.
Then, finally, the view displays results to the user.
These three payloads make the data model:
- Request
- Response
- ViewModel
Next, you’ll create your data models.