How To Make A Simple Drawing App with UIKit
This is a blog post by iOS Tutorial Team member Abdul Azeem, software architect and co-founder at Datainvent Systems, a software development and IT services company. At some stage in all of our lives, we enjoyed drawing pictures, cartoons, and other stuff. For me it was using a pen and paper when I was growing […] By .
Sign up/Sign in
With a free Kodeco account you can download source code, track your progress, bookmark, personalise your learner profile and more!
Create accountAlready a member of Kodeco? Sign in
Sign up/Sign in
With a free Kodeco account you can download source code, track your progress, bookmark, personalise your learner profile and more!
Create accountAlready a member of Kodeco? Sign in
Contents
How To Make A Simple Drawing App with UIKit
40 mins
- Getting Started
- Starting the First Screen
- In Living Color
- Quick on the Draw
- The App of Many Colors
- Tabula Rasa
- Nobody’s perfect — the Eraser tool
- Finishing Touches — Settings Layout
- Finishing Touches – Settings Implementation
- Finishing Touches – Settings Integration
- Finishing Touches — A Custom Color Selector
- Finishing Touches – Share and Enjoy!
- Finishing Touches – Saving for posterity
- Finishing Touches – Tweet to your friends!
- Where To Go From Here?
Tabula Rasa
Every great artist has those moments where he steps back and shakes his head muttering “No! No! This will never do!” You’ll want to provide a way to clear the drawing canvas and start over again. You already have a ‘Reset’ button set up in your app. Complete ViewController’s reset method as follows:
- (IBAction)reset:(id)sender {

    self.mainImage.image = nil;

}
and thats it! All the code above does is set the mainImage.image to nil, and — voila — your canvas is cleared!
Compile and run your code. Click the Reset button to clear your canvas by clicking the ‘Reset’ button. There! No need to go tearing up canvases in frustration.
Nobody’s perfect — the Eraser tool
Recall that you implemented an eraser button at the very outset of this tutorial. Complete ViewController’s eraserPressed method as below:
- (IBAction)eraserPressed:(id)sender {

    red = 255.0/255.0;
    green = 255.0/255.0;
    blue = 255.0/255.0;
    opacity = 1.0;
}
The above code simply sets the RGB color to white, and the opacity to full (1.0). As your background color is also white, this will give you a very handy eraser effect!
Compile and run — you’re making a lot of progress in this app with a minimum of code! :] Play around with the eraser button; you’ll quickly see how it works by “painting over” the desired area in white.
Finishing Touches — Settings Layout
Okay! You now have a functional drawing app, so if you’re satisfied you could just bail here and call it a success!
But if you’re an over-achiever, read on for some extra cool stuff – like adding a Setting screen to enable the user to specify the brush opacity, brush width, and a custom color!
Still with me? Let’s continue on then :] Control-click on the ‘DrawPad’ group and click “New File…”. Select the iOS\Cocoa Touch\Objective-C class template, and click Next.
Name the class SettingsViewController, enter UIViewController for subclass, ensure that both checkboxes are NOT selected, and click Next.
In the final popup, click Create again.
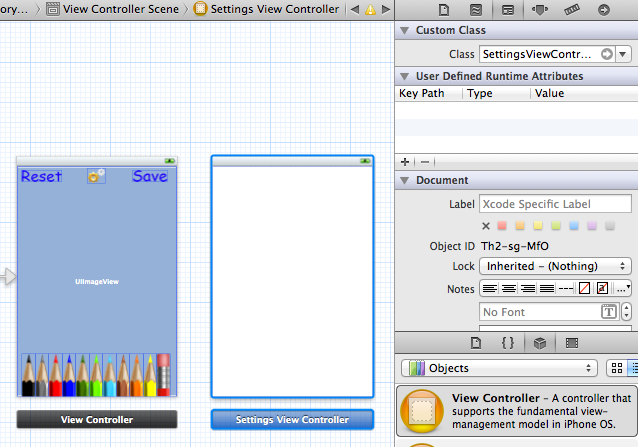
Now, open MainStoryboard.storyboard and drag a new View Controller to the right of the drawing view controller. Select it, and in the Identity Inspector set the Class to SettingsViewController.
Since this view controller will be presented modally (i.e. the popup will stay in front of the main screen), you will need a way to dismiss the settings. Drag a toolbar to the top of the settings view controller, rename the placeholder button from “Item” to “Close”, and drag a flexible space button to the left of the button so it is aligned right:
Then drag a connection to a new IBAction in SettingsViewController.h. Name the action method closeSettings.
While you’re at it you might as well implement the method. In SettingsViewController.m complete the method as follows:
- (IBAction)closeSettings:(id)sender {
    [self dismissViewControllerAnimated:YES completion:nil];
}
Next, you’ll add opacity and brush width controls to the Setting screen.
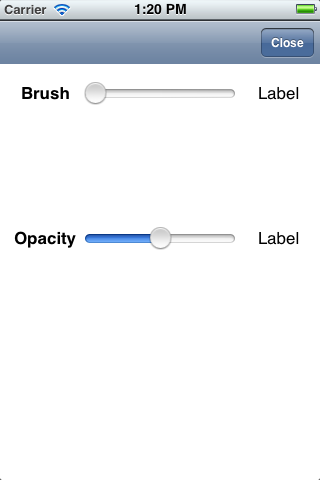
For each of these, you will need to add:
- a UILabel for the title of the property that is being changed that does not change once created
- a UISlider to change the value
- a UILabel to display the current value
- a UIImageView to show the actual effect of the chosen value
Go ahead and set up these elements, as shown in the screenshot below:
Next connect the sliders, image views, and right-side labels to outlets in SettingsViewController.h. The UISlider controls should be connected to outlets named brushControl and opacityControl, and the UIImageView views should be connected to outlets named brushPreview and opacityPreview. Finally, the right-side UILabels should be connected to outlets named brushValueLabel and opacityValueLabel.
UISliders have a default range of 0.0 to 1.0 – this is perfect for the opacity slider, but the brush needs a much larger maximum value. You can tweak the values later to suit, but 80.0 is a reasonable choice for now. Set it in the Attributes inspector before moving on.
Next connect the “value changed” action on the sliders to a method by control-dragging from one of the sliders to the SettingsController.h file (using the Assistant view) – set the connection to “Action” and name the method sliderChanged. Connect the second slider to the same method by control dragging to it. Verify that both connections are made by right-clicking on File’s Owner and checking that both connections appear.
Finally, let’s make it so this view controller appears when you tap the Settings button on the main screen. Control-drag from the settings button in the drawing view controller to your new view controller, and select “modal” from the popup:
Build and run, and tap the Settings button to display the new view controller!
Finishing Touches – Settings Implementation
Done with the layout – time for the implementation!
First, add the following two properties to SettingsViewController.h so it can keep track of the brush size and opacity the user selects:
@property CGFloat brush;
@property CGFloat opacity;
Don’t forget to synthesize the property if you need to in SettingsViewController.m:
@synthesize brush;
@synthesize opacity;
Now modify the sliderChanged function in the SettingsViewController.m file as follows:
- (IBAction)sliderChanged:(id)sender {

    UISlider * changedSlider = (UISlider*)sender;

    if(changedSlider == self.brushControl) {

        self.brush = self.brushControl.value;
        self.brushValueLabel.text = [NSString stringWithFormat:@"%.1f", self.brush];

        UIGraphicsBeginImageContext(self.brushPreview.frame.size);
        CGContextSetLineCap(UIGraphicsGetCurrentContext(), kCGLineCapRound);
        CGContextSetLineWidth(UIGraphicsGetCurrentContext(), self.brush);
        CGContextSetRGBStrokeColor(UIGraphicsGetCurrentContext(), 0.0, 0.0, 0.0, 1.0);
        CGContextMoveToPoint(UIGraphicsGetCurrentContext(),45, 45);
        CGContextAddLineToPoint(UIGraphicsGetCurrentContext(),45, 45);
        CGContextStrokePath(UIGraphicsGetCurrentContext());
        self.brushPreview.image = UIGraphicsGetImageFromCurrentImageContext();
        UIGraphicsEndImageContext();

    } else if(changedSlider == self.opacityControl) {

        self.opacity = self.opacityControl.value;
        self.opacityValueLabel.text = [NSString stringWithFormat:@"%.1f", self.opacity];

        UIGraphicsBeginImageContext(self.opacityPreview.frame.size);
        CGContextSetLineCap(UIGraphicsGetCurrentContext(), kCGLineCapRound);
        CGContextSetLineWidth(UIGraphicsGetCurrentContext(),20.0);
        CGContextSetRGBStrokeColor(UIGraphicsGetCurrentContext(), 0.0, 0.0, 0.0, self.opacity);
        CGContextMoveToPoint(UIGraphicsGetCurrentContext(),45, 45);
        CGContextAddLineToPoint(UIGraphicsGetCurrentContext(),45, 45);
        CGContextStrokePath(UIGraphicsGetCurrentContext());
        self.opacityPreview.image = UIGraphicsGetImageFromCurrentImageContext();
        UIGraphicsEndImageContext();
    }

}
In the code above, as the slider control changes, the slider values will change appropriately to match. The preview images give the user an indication of the size of the brush or the opacity of the brush stroke. As a sharp-eyed developer, you will notice that the preview images are drawn using the same Quartz APIs we used in touchesMoved and touchesEnded.
Build and run your code, open the Settings screen, and play around with the sliders. You will see that the preview images and value labels change as you move it now!


