iPadOS 15 Tutorial: What’s New for Developers

See what’s new in iPadOS 15 and take your app to the next level with groundbreaking changes! By Saeed Taheri.

Leave a rating/review
Download materials
Save for later
Share

While tablets don’t seem high priority for most platform or device makers, Apple never stops improving iPad’s hardware and software. In 2019, Apple renamed the tablet’s operating system iPadOS, emphasizing its unique multitasking and keyboard support. Continuing Apple’s two-year cycle of considerable iPadOS updates, iPadOS 15 offers many improvements.

In this tutorial, you’ll learn about enhancements in iPadOS 15, including:

  • Multitasking improvements
  • Keyboard shortcuts improvements
  • Pointer updates

You’ll do this while modernizing the app NotesLite, which you can use to write notes and add images.

Getting Started

Download the starter project by clicking the Download Materials button at the top or bottom of the tutorial.

The starter project contains a fully functional app with features introduced for iPadOS 14 and below. You’ll improve the app by adding new features introduced in iPadOS 15 and making it look more modern and functional.

Multiple Windows or Scenes

In iPadOS 13, Apple introduced the concept of scenes to support multiple windows in iPad apps.

Windows are represented by UIScene instances. A UISceneSession manages a scene. Throughout this tutorial, when you see a scene or UISceneSession, you can think of it as a window.

If you built an app before iOS 13, you know AppDelegate is the one place that does everything related to app launch, foregrounding, backgrounding and more.

In iOS 13, Apple moved some of AppDelegate‘s responsibilities to SceneDelegate.

Nowadays, application entry points are inside AppDelegate, and window-related stuff — such as backgrounding, foregrounding and URL handling — are inside an object conforming to UISceneDelegate or UIWindowSceneDelegate.

These also apply to iPhone apps. You can think of an iPhone app as a single window application.

Each scene needs an instance of UISceneConfiguration for its configuration. You define these configurations inside Info.plist.

Now, you’ll see how all these connect inside the starter project.

Exploring NotesLite

Open the starter project and choose an iPad target. Then, build and run.

NotesLite first run.

The image above shows how the app works out of the box.

Tap the plus button so a new window appears on the side. Write your note, add a picture and tap Save. The creation window closes and the newly added note appears in the sidebar. Tapping the note in the sidebar will show the detail page on the right.

Note: Sometimes adding an image in the simulator does not work as expected. If this happens, try adding a different image or connecting your iPad and testing on device.

The app already supports multiple windows. Take a look at the file structure:

NotesLite file and folder structure in Xcode

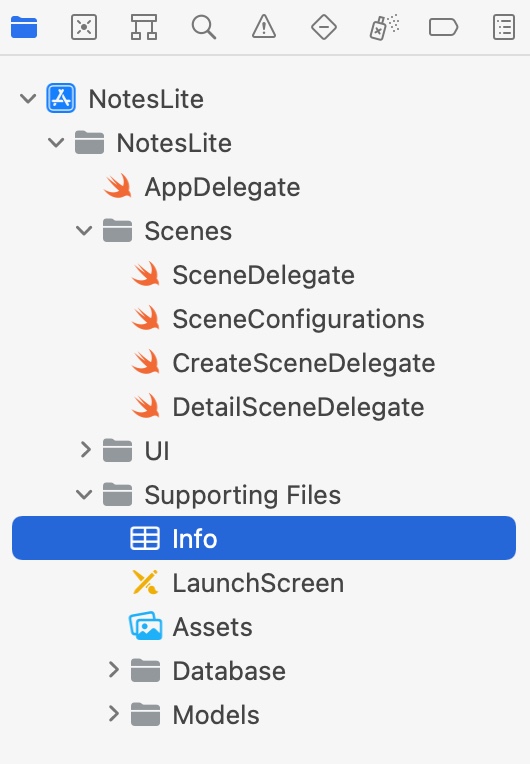
Inside the Scenes folder are the three subclasses for UIWindowSceneDelegate:

  • First, there’s SceneDelegate for the default window of the app.
  • Then, there’s CreateSceneDelegate for the note creation window.
  • Finally, there’s DetailSceneDelegate for the note detail window.

When you opened the app, the default window appeared. After tapping the plus button, CreateSceneDelegate took over. You’ll add support for a detail window later in the tutorial.

Inside the Supporting Files folder, open Info.plist.

There’s a key called Application Scene Manifest whose value is already in the starter project. You need to define each scene configuration your app supports inside this key.

Info.plist for NotesLite app, showing the scene manifest key.

As you can see in the screenshot above, you need to define at least the Configuration Name and the Delegate Class Name to which this configuration relates.

Note: This tutorial assumes prior knowledge of multiple window support on iPad. To learn more about scene-related concepts, check out Adopting Scenes in iPadOS and iPadOS Multitasking: Using Multiple Windows for Your App.

NSUserActivity

In iOS 8, Apple introduced a class called NSUserActivity. At first, you could use this class to integrate the Handoff feature between devices.

Each year, this class became more powerful. There’s even a running joke in the community that Apple might one day deprecate all iOS APIs and release everything under NSUserActivity‘s tent.

As of iOS 15, you can — and should — use NSUserActivity if you support any of these features:

  • Handoff
  • In-app Spotlight search
  • Siri and Shortcuts Intents
  • Multiple windows on iPad

When you want to open a new window inside your app, ask the system to create a scene using requestSceneSessionActivation(_:userActivity:options:errorHandler:) on UIApplication‘s shared object.

However, you can’t directly specify a scene name here. You do this using NSUserActivity. The system will give you back this instance, and you can decide which scene to configure and present.

Window Presentation Style

On iPadOS 14 and earlier, the user interface for managing an app’s windows was so hidden and difficult to use that even some pro users avoided it. Fortunately, on iPadOS 15, this UI is much better.

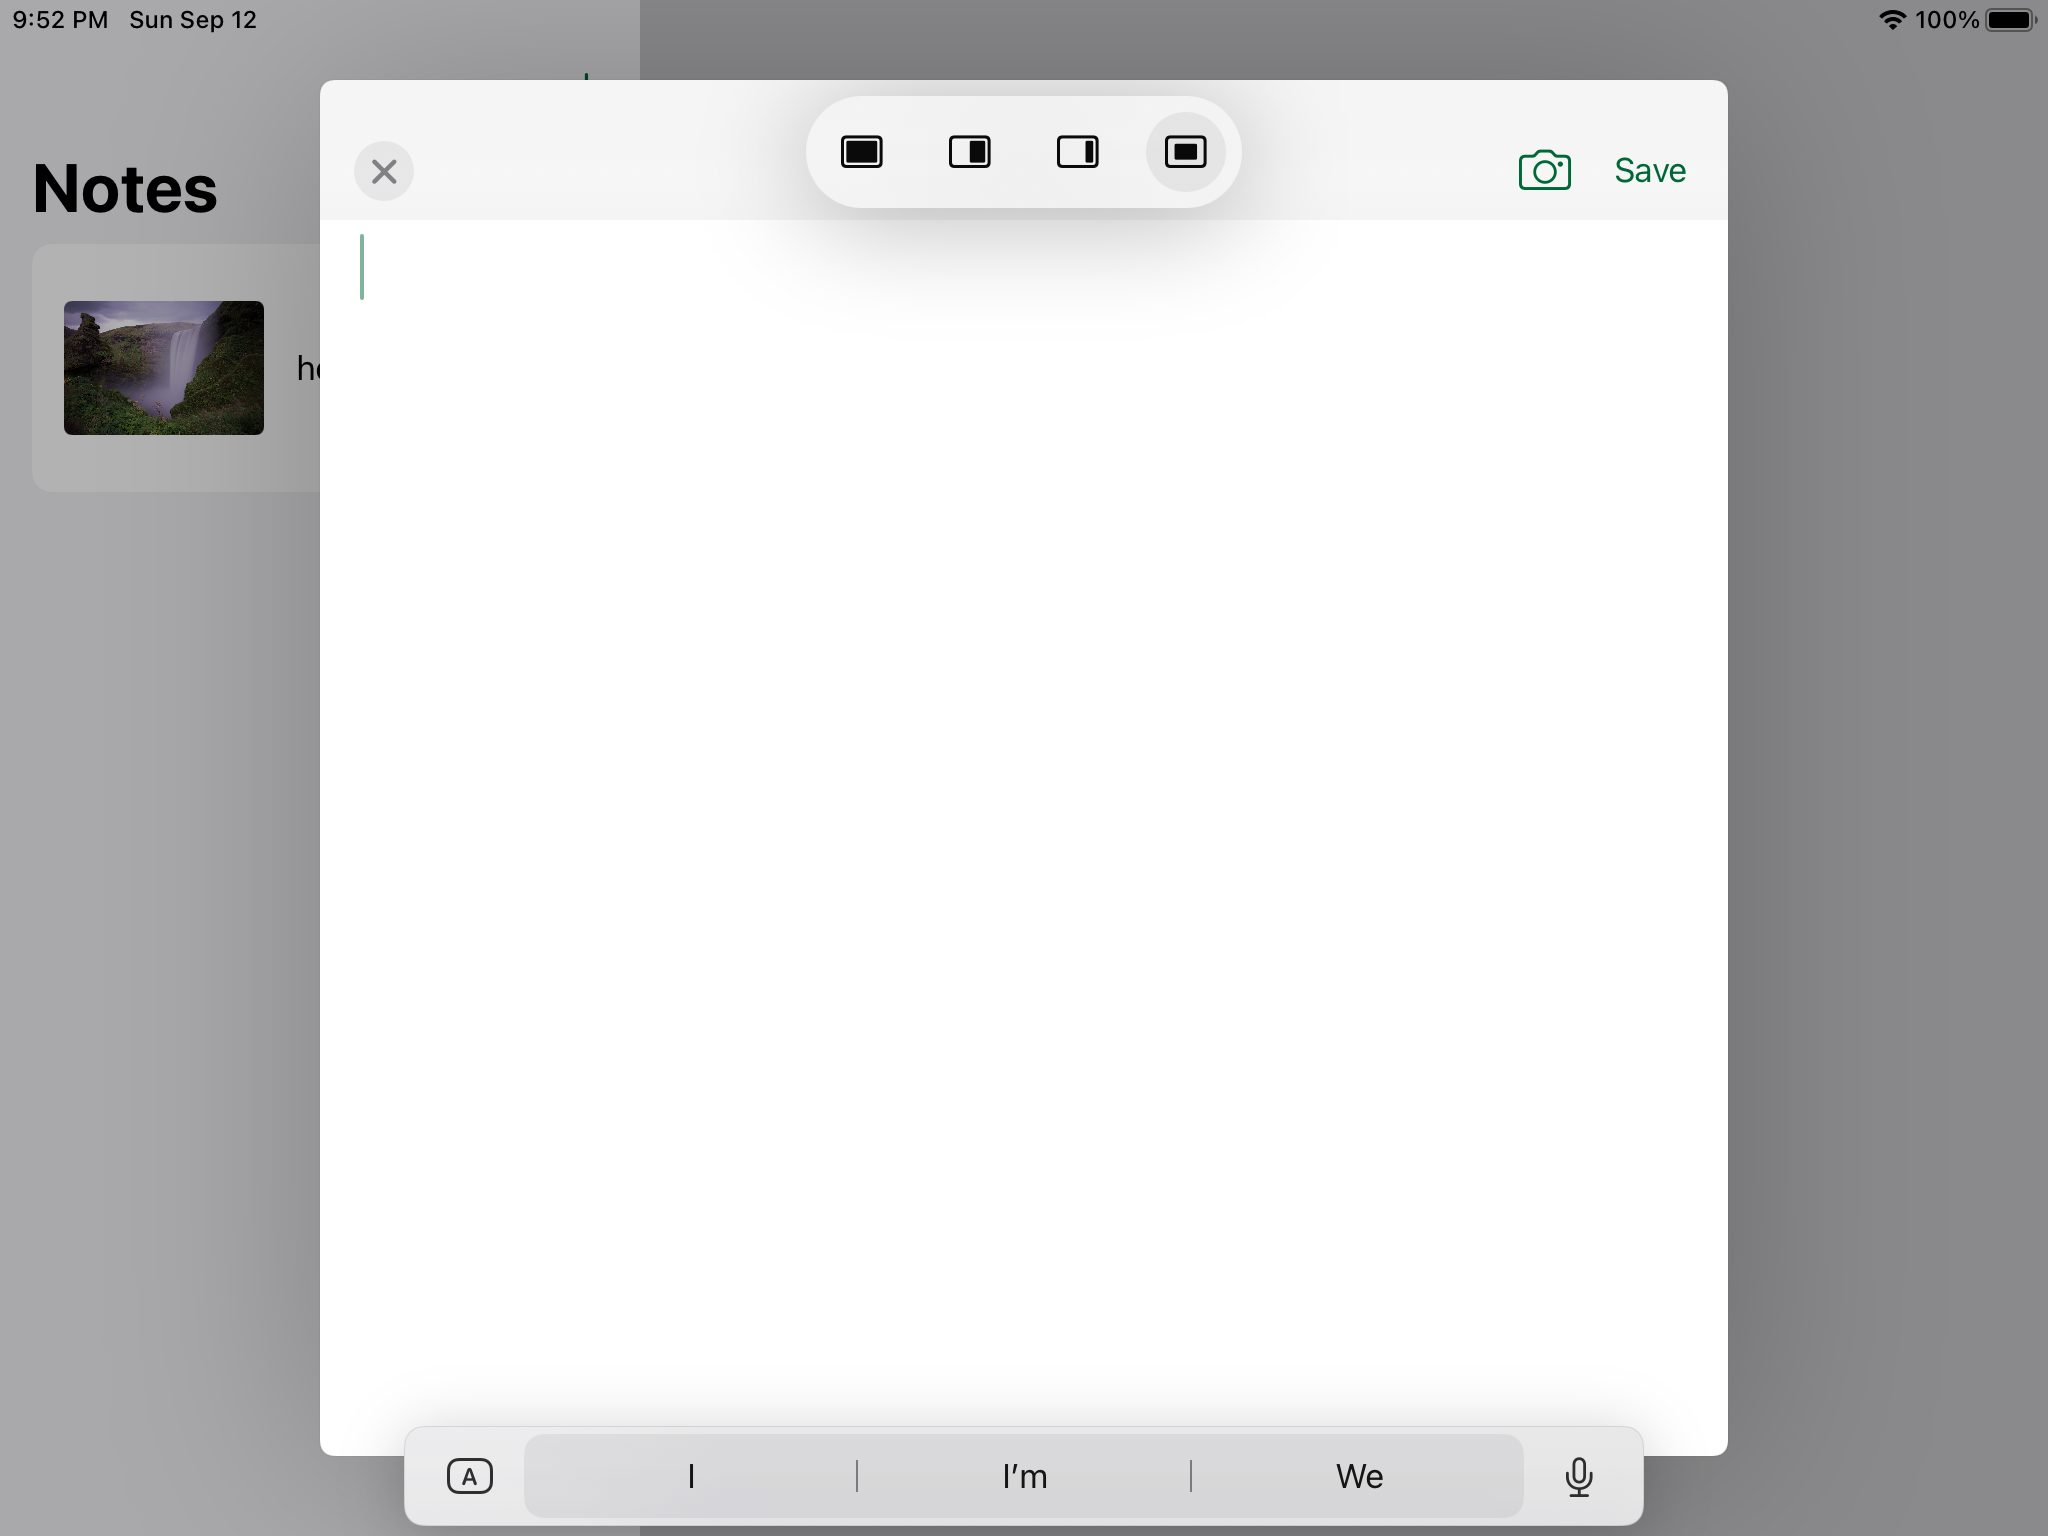
At the top of each app that supports Split View and Slide Over, there’s a new button represented by three dots. With NotesLite open, tap it.

Possible actions of three dots menu

Three buttons appear. This lets you put the window in Full Screen, Split View or Slide Over without going through the hassle of dragging and dropping. Hurray!

However, these aren’t the only options available. In iPadOS 15, Apple added a new style to the window modes: Prominent.

It looks a like a Form Sheet at first, but you can easily put it in any other mode. Now, it’s time to add it to the app.

Open NotesListViewController.swift inside the UI group. Go to openNewNote(). Here’s what it looks like:

@objc func openNewNote() {
  // 1
  if UIDevice.current.userInterfaceIdiom == .pad {
    // 2
    let userActivity = ActivityIdentifier.create.userActivity()

    // 3
    let options = UIWindowScene.ActivationRequestOptions()
    options.preferredPresentationStyle = .standard

    // 4
    UIApplication.shared.requestSceneSessionActivation(
      nil,
      userActivity: userActivity,
      options: options,
      errorHandler: nil)
  } else {
    let navigationController = UINavigationController(
      rootViewController: NoteViewController.storyboardInstance)
    present(navigationController, animated: true)
  }
}

Here’s what this does:

  1. Since iPhone apps don’t support multiple scenes, partition based on the device the code is running on.
  2. Create a userActivity using a helper method from SceneConfigurations.swift.
  3. Next, provide the system with some activation options. The system tries to consider these requests when activating a scene. This code asks the system to show a standard presentation style. This style is what made the creation window appear alongside the main window. On iPadOS 15, this option defaults to automatic, and the system decides what works best.
  4. Request a scene activation with the user activity and the request options. This makes the new window appear.

Now, change the preferred presentation style line to this:

options.preferredPresentationStyle = .prominent

Build and run. Then, tap the plus button.

Launching note creation window in prominent window style

A new window appears on top of the current view.

There’s a tiny indicator that shows this isn’t a form sheet or a usual modal presentation: the three dots button on the top.

Tap it, and you’ll see a new option:

All four possible window modes on iPadOS 15 under the three dots button.

The icon speaks for itself. You asked the system to present this window prominently.

The three dots button does another job, too. This time, instead of tapping it, try swiping it down. If you look closely, the window goes somewhere at the bottom of the screen. This area is the App Shelf. It’s a place where you can see all open windows for an app and switch between them.

If an app has multiple active windows, when you open it from Home Screen, the shelf appears for a split second. You can also summon the shelf at any time by tapping on the three dots button. Close the windows from the shelf by swiping up.

Here’s a GIF to illustrate these interactions:

App Shelf interactions

Next, you’ll learn about activation actions.

Activation Action

Per Apple’s guidelines, you only need to open new windows for your app based on the user’s explicit interaction. As you can implement many of these interactions using UIAction, Apple provided a code shortcut.

In NotesListViewController.swift, go to configureBarButtonItems(). Then, create an action that calls openNewNote(), and attach it to the bar button item.

Do this by replacing the current configureBarButtonItems() with this:

private func configureBarButtonItems() {
  // 1
  let addAction = UIAction { _ in
    let navigationController = UINavigationController(
      rootViewController: NoteViewController.storyboardInstance)
    self.present(navigationController, animated: true)
  }

  // 2
  let newSceneAction = UIWindowScene.ActivationAction(
    alternate: addAction
  ) { _ in
    // 3
    let userActivity = ActivityIdentifier.create.userActivity()

    let options = UIWindowScene.ActivationRequestOptions()
    options.preferredPresentationStyle = .prominent

    // 4
    return UIWindowScene.ActivationConfiguration(
      userActivity: userActivity, 
      options: options)
  }

  // 5
  navigationItem.rightBarButtonItem = UIBarButtonItem(
    systemItem: .add,
    primaryAction: newSceneAction,
    menu: nil)
}

Here’s what this does:

  1. First, create a UIAction that presents NoteViewController modally.
  2. Next, create an instance of UIWindowsScene.ActivationAction. As the name implies, you use it for activating a scene. Pass the addAction you created in step 1 as a parameter to this function. UIKit automatically runs the alternate action when the device doesn’t support multiple windows. How convenient is that?
  3. Then, create a user activity for the note creation scene and configure the request options. You’re already familiar with this step.
  4. Here, you return an instance of UIWindowScene.ActivationConfiguration, passing the user activity and options. It’s like when you passed these items to requestSceneSessionActivation(_:userActivity:options:errorHandler:).
  5. Since newSceneAction is actually an instance of UIAction, you set it as the primary action of the bar button item.

Build and run. Then, try tapping the plus icon. If nothing changes, it means you were successful.

Activation Interaction

While on iPadOS 14 and below, Apple insisted on Drag & Drop as the way to open a new window, on iPadOS 15, it advertises context menus and a new pinch open gesture. Apple also integrated these in its own apps. For instance, open the Notes app.

In the sidebar, you can touch and hold or right-click with a mouse or trackpad to open the context menu. Choosing Open In New Window will open a note in a new window with the prominent style you saw earlier.

Open In New Window option in Notes app context menu.

You can also pinch open with two fingers on any item in the sidebar to open it in a new window, prominently.

Next, you’ll add these options to NotesLite.

Context Menu

In NotesListViewController.swift, scroll to the mark line // MARK: - UICollectionViewDelegate.

Look at collectionView(_:contextMenuConfigurationForItemAt:point:). This method adds context menu items for each row. For now, it only contains delete. You’ll add a new action for opening the note in a new window.

First, though, you need to create a helper method for configuration, which you’ll use in the next step. Add this inside NotesListViewController just below the definition of `deleteItem(at:)`:

private func activationConfiguration(
  for indexPath: IndexPath
) -> UIWindowScene.ActivationConfiguration? {
  // 1
  guard let note = dataSource.itemIdentifier(for: indexPath) else {
    return nil
  }
  // 2  
  var info: [String: Any] = [
    NoteUserInfoKey.id.rawValue: note.id,
    NoteUserInfoKey.content.rawValue: note.content
  ]

  // 3
  if let data = note.image?.jpegData(compressionQuality: 1) {
    info[NoteUserInfoKey.image.rawValue] = data
  }

  // 4
  let userActivity = ActivityIdentifier.detail.userActivity(userInfo: info)

  let options = UIWindowScene.ActivationRequestOptions()
  options.preferredPresentationStyle = .prominent

  let configuration = UIWindowScene.ActivationConfiguration(
    userActivity: userActivity,
    options: options)
  return configuration
}

It looks rather long; however, it’s pretty straightforward:

  1. Get the note pertaining to the indexPath from the collectionView‘s dataSource. It may return nil, so use guard-let syntax and exit the method early if the index is nil.
  2. The way to pass data to the system for creating a new window is through user activities. Each user activity has userInfo, in which you can store property list data. Since userInfo uses a string-based key-value dictionary, decrease possible errors by using some predefined keys, which are inside the starter project. Here, you store the note’s id and content.
  3. Check if the note has an associated image. If so, compress it to JPEG and save it to userInfo as Data.
  4. Like before, create a user activity, set the request options and return a configuration made with them.

Now, return to // MARK: - UICollectionViewDelegate and replace let actions = [delete] with the following:

// 1
var actions = [delete]

// 2
if let configuration = self.activationConfiguration(for: indexPath) {
  // 3
  let newSceneAction = UIWindowScene.ActivationAction { _ in
    return configuration
  }
  
  // 4
  actions.insert(newSceneAction, at: 0)
}

In the code above, you:

  1. Change actions from a let to a var, so you can add items later.
  2. Get an instance of UIWindowScene.ActivationConfiguration using activationConfiguration(for:), which you’ll write later. Since it may be nil in certain cases, you conditionally unwrap it.
  3. Create a new activation action as you did earlier, and then return the configuration you got from step 2.
  4. Insert newSceneAction at the top of actions.

As in the original code, this returns a menu using the specified actions.

Build and run. Invoke the context menu in the notes list by touching and holding or right-clicking. You may now open the note in a new window.

Open In New Window option in NotesLite context menu.

Note detail page opened in a new window prominently.

Next, you’ll add pinch support on UICollectionView items.

Pinching

First, implement a new delegate method. Add this at the end of NotesListViewController.swift, just before the closing brace:

override func collectionView(
  _ collectionView: UICollectionView,
  sceneActivationConfigurationForItemAt
  indexPath: IndexPath,
  point: CGPoint
) -> UIWindowScene.ActivationConfiguration? {
  activationConfiguration(for: indexPath)
}

You return an activation configuration for each item you’d like to support pinching.

Build and run. Then, try pinching open on a note.

Pinch on a note in the sidebar

The entire row gets bigger while you pinch. You can customize the transition in a way that only the image scales up. To do this, tell the system on which view the scale transition should occur.

Open activationConfiguration(for:), and right before the return configuration line, add:

// 1
if let cell = collectionView.cellForItem(at: indexPath) {
  // 2
  if let imageView = cell.contentView.subviews.first(
    where: { subview in
      (subview as? UIImageView)?.image != nil
    }
  ) {
    // 3
    configuration.preview = UITargetedPreview(view: imageView)
  }
}

Here’s what this does:

  1. First, get the cell the user pinched.
  2. Find the imageView inside the subviews of the cell’s contentView where image isn’t nil.
  3. Set the imageView you found in step 2 as the preview of the activation configuration.

Build and run. Try pinching one more time. It looks much more polished.

Pinch on the note in the sidebar. Transition begins from the image.

Note: To support this pinch gesture on views other than cells in a UICollectionView, create a UIWindowScene.ActivationInteraction and attach it to a custom view anywhere in the hierarchy. It’s easy to do, but beyond the scope of this tutorial.

Saving and Restoring State in Scenes

Providing polished, convenient ways to open content in new windows is important. However, it’s equally important to save and restore the scene’s state to be able to return to it seamlessly.

When a scene moves to the background, the system asks the scene’s delegate for an instance of NSUserActivity to represent its state.

For the best experience, the scene state should not only save the content, but also the visual and interaction state such as scroll and cursor position.

You should save and restore state for all your app’s scenes, but for brevity, you’ll learn how to save and restore the state only for the note creation window.

To make saving and restoring easier, Apple introduced two new methods in UISceneDelegate and its inherited object, UIWindowSceneDelegate.

Open CreateSceneDelegate.swift and add:

func stateRestorationActivity(for scene: UIScene) -> NSUserActivity? {
  // 1
  guard
    let navigationController = window?.rootViewController 
      as? UINavigationController,
    let noteVC = navigationController.viewControllers.first 
      as? NoteViewController 
  else {
    return nil
  }

  // 2
  let stateActivity = ActivityIdentifier.create.userActivity()

  // 3
  var info: [String: Any] = [
    NoteUserInfoKey.content.rawValue: noteVC.textView.text ?? "",
    NoteUserInfoKey.contentInteractionState.rawValue: 
      noteVC.textView.interactionState
  ]
  if let image = noteVC.selectedImage?.jpegData(compressionQuality: 1) {
    info[NoteUserInfoKey.image.rawValue] = image
  }

  // 4
  stateActivity.addUserInfoEntries(from: info)

  return stateActivity
}

The system calls this method to save the state for a scene. It returns a user activity, which the system gives back to you when you want to restore the state.

Here, you:

  1. Try to find the instance of NoteViewController, which is in the view hierarchy. If there isn’t any, you don’t have anything to save, so return nil.
  2. Create an empty user activity for the note creation page, as you did when you wanted to request a new window.
  3. Store the values of the text and interactionState properties of textView into the userInfo dictionary. interactionState is a new property of UITextField and UITextView on iPadOS 15 that lets you save and restore cursor and scroll position. You also save the image as Data if it’s available.
  4. Add the contents of the info dictionary to the user activity and return it.

To restore the state, implement the method below, extracting the data you saved into the user activity and restoring it in the respective views. Add this method below the method you just added in CreateSceneDelegate.swift:

func scene(
  _ scene: UIScene, 
  restoreInteractionStateWith stateRestorationActivity: NSUserActivity
) {
  // 1
  guard
    let navigationController = window?.rootViewController 
      as? UINavigationController,
    let noteVC = navigationController.viewControllers.first 
      as? NoteViewController,
    let userInfo = stateRestorationActivity.userInfo 
  else {
    return
  }

  // 2
  noteVC.viewType = .create

  // 3
  let image: UIImage?
  if let data = userInfo[NoteUserInfoKey.image.rawValue] as? Data {
    image = UIImage(data: data)
  } else {
    image = nil
  }

  // 4
  let text = userInfo[NoteUserInfoKey.content.rawValue] as? String
  noteVC.textView.text = text ?? ""
  noteVC.selectedImage = image

  // 5
  if let interactionState = 
    userInfo[NoteUserInfoKey.contentInteractionState.rawValue] {
      noteVC.textView.interactionState = interactionState
  }
}

In the code above:

  1. First, you check if the system has finished setting up the view controllers. You also check if there’s any userInfo available to restore.
  2. Next, you set the viewType of NoteViewController to .create. As you may have noticed, NoteViewController is used for both creating and viewing a note.
  3. Then, you check if image data is available inside userInfo. If it’s there and you can create a UIImage from it, you store its image variable.
  4. Next, you set the contents of textView and selectedImage.
  5. Finally, after setting text on UITextView, you set interactionState if it’s available. Always set the interaction state after setting the content.

That’s it. Build and run.

Steps to trigger save and restore in a scene.

Now, follow these instructions to see the save and restore mechanism in action:

  1. Run the app from Xcode.
  2. Tap the plus button.
  3. Add some text and perhaps an image.
  4. Move the cursor to somewhere apart from the end of the text.
  5. Swipe down on the three dots button of the note-creating window to minimize it to the shelf.
  6. Kill the app from Xcode using the Stop button. This will simulate the situation where the system kills the app process.
  7. Run the app again from Xcode.
  8. Tap the New Note window from the shelf.
  9. Everything is there, even the cursor position.

In the next section, you’ll learn about keyboard improvements.

Keyboard Shortcuts Improvements

One characteristic of a Mac app is its Menu Bar, a single place containing every possible action for the app. After Apple started embracing the hardware keyboard for iPad, many people wished for a menu bar on iPad. On iPadOS 15, Apple fulfilled this wish — kind of!

Apps on iPad won’t get a persistent menu bar like Mac apps. Rather, when you hold Command on the hardware keyboard connected to the iPad, you’ll get a new menu system that looks similar to the Mac implementation.

Here are some of the features of this new system:

  1. Apps can categorize actions into groups.
  2. Users can search for available actions, just like on macOS.
  3. The system automatically hides inactive actions instead of disabling them.
  4. The API is similar to the one used to create menu items for a Catalyst app. As a result, you don’t need to duplicate things when adding keyboard shortcuts for iPad and Mac Catalyst.

In NotesLite, there are a couple of keyboard shortcuts available.

Specifically, NoteViewController contains Save and Close actions triggered by Command-S and Command-W. In NotesListViewController, you can create a new note by pressing Command-N.

See the shortcut action groups available right now in NotesLite by holding the Command key:

Uncategorized keyboard shortcuts

The category for the action is the name of the app. When the developers of an app use the old mechanism for providing keyboard shortcuts, this is how it looks. Next, you’ll update to the modern approach.

Updating to the Menu Builder API

One of the old ways of adding keyboard shortcuts support was overriding the keyCommands property of UIResponder. Since UIViewController is a UIResponder, you can do this in view controllers.

There are two occurrences of keyCommands in NotesLite. In NoteViewController.swift, you’ll see:

override var keyCommands: [UIKeyCommand]? {
  [
    UIKeyCommand(title: "Save", action: #selector(saveNote), 
      input: "s", modifierFlags: .command),
    UIKeyCommand(title: "Close", action: #selector(dismiss), 
      input: "w", modifierFlags: .command)
  ]
}

Remove keyCommands from NotesListViewController.swift and NoteViewController.swift. You can use Xcode’s Find feature.

Apple recommends defining all menu items for your app at launch. To do so, open AppDelegate.swift.

Override buildMenu(with:), which is a method on UIResponder:

override func buildMenu(with builder: UIMenuBuilder) {
  super.buildMenu(with: builder)

  // 1
  guard builder.system == .main else { return }

  // 2
  let newNoteMenu = UIMenu(
    options: .displayInline,
    children: [
      UIKeyCommand(
        title: "New Note",
        action: #selector(NotesListViewController.openNewNote),
        input: "n",
        modifierFlags: .command)
    ])

  // 3
  let saveMenu = UIMenu(
    options: .displayInline,
    children: [
      UIKeyCommand(
        title: "Save",
        action: #selector(NoteViewController.saveNote),
        input: "s",
        modifierFlags: .command)
    ])

  // 4
  let closeMenu = UIMenu(
    options: .displayInline,
    children: [
      UIKeyCommand(
        title: "Close",
        action: #selector(NoteViewController.dismiss),
        input: "w",
        modifierFlags: .command)
    ])

  // 5
  builder.insertChild(newNoteMenu, atStartOfMenu: .file)
  builder.insertChild(closeMenu, atEndOfMenu: .file)
  builder.insertChild(saveMenu, atEndOfMenu: .file)
}

In the code above, you:

  1. Check if the system is calling the menu builder API for the main menu bar.
  2. Create UIMenu instances for all items you want in the menu bar. Here, you’re creating a menu item called New Note with the keyboard shortcut Command-N. The selector for this action is openNewNote() inside NotesListViewController.
  3. Make a menu item for saving a note. This time, the trigger is inside NoteViewController.
  4. Create a menu item for closing the note window.
  5. Put menu items in various system-defined groups, such as File and Edit. You can create a new category if you desire.

Build and run. Tap the plus button or press Command-N, and then hold the Command key.

Categorized keyboard shortcuts for note creation window

The system even added text editing shortcuts under the Edit menu for free. Who doesn’t like free stuff?

Note: If the shortcuts don’t appear, make sure you’re returning true in application(_:didFinishLaunchingWithOptions:) in AppDelegate.

Conditionally Disabling Certain Actions

There’s a small issue, though. What if you want to conditionally disable certain actions? For instance, the Save action doesn’t make sense when the NoteViewController isn’t in create mode.

To resolve this, override another UIResponder method called canPerformAction(_:withSender:). When you return true here, the action works; otherwise, it’ll get ignored. Add this method inside NoteViewController right after viewDidLoad():

override func canPerformAction(
  _ action: Selector, 
  withSender sender: Any?
) -> Bool {
  if action == #selector(dismiss) { // 1
    return splitViewController == nil
  } else if action == #selector(saveNote) { // 2
    return viewType == .create
  } else { // 3
    return super.canPerformAction(action, withSender: sender)
  }
}

In the code above:

  1. The system calls this any time a selector reaches this view controller in the responder chain. As a result, you need to check for action to act based on the input. If it’s the dismiss selector, return true only if splitViewController is nil. If you presented this page inside a new window, there would be no UISplitViewController involved. Pressing Command-W will kill the app if you don’t do this check.
  2. If the action is saveNote, check whether this view controller is in create mode.
  3. Otherwise, let the system decide.

Build and run.

Hiding unrelated keyboard shortcuts in note detail page

Open a note in a new window, and hold the Command key. This time, the Save action isn’t there anymore.

Pointer Improvements

Apple introduced pointer support in iPadOS 13.4. This year, it got its first set of enhancements.

Band Selection

The first addition is band selection, a new pointer-specific multi-selection experience familiar to Mac users.

In iPadOS 15, when you click and drag in a non-list UICollectionView, the pointer stretches into a rectangle, and the collection view selects the items the rectangle encompasses.

Any UICollectionView that supports the existing one and two-finger multi-selection gestures via the shouldBeginMultiple Selection Interaction API gets this behavior automatically in iPadOS 15.

For anything apart from a UICollectionView, the new UIBandSelectionInteraction API allows you to easily adopt this experience.

Here’s a GIF from the Files app:

Band selection in Files app on iPadOS 15

Pointer Accessories

The second addition to the system pointer is the ability to attach accessories.

In iPadOS 14 and earlier, you could provide a custom shape for the pointer if you desired. However, for most use cases, you only need to add certain accessories around the system pointer.

If you look closely at the note detail page, there’s a handle at the bottom of the image. If you touch and drag it, you can resize the image. You’ll add accessories to the pointer, so it’s clearer that you can resize the image vertically.

Resizing the image without pointer interactions

In NoteViewController.swift, find dragHandler. At the end of the didSet block, add:

let interaction = UIPointerInteraction(delegate: self)
dragHandler.addInteraction(interaction)

This creates a new pointer interaction, sets the NoteViewController as its delegate and adds it to the interactions list of dragHandler.

To silence the compiler’s nagging, at the end of the current file, add this:

extension NoteViewController: UIPointerInteractionDelegate {
  // 1
  func pointerInteraction(
    _ interaction: UIPointerInteraction, 
    styleFor region: UIPointerRegion
  ) -> UIPointerStyle? {
    // 2
    let preview = UITargetedPreview(view: dragHandler)

    // 3
    let style = UIPointerStyle(effect: .lift(preview))

    // 4
    style.accessories = [
      .arrow(.top),
      .arrow(.bottom)
    ]

    // 5
    region.latchingAxes = .vertical

    return style
  }
}

In the code above, you:

  1. Override pointerInteraction(_:styleFor:). The system consults this method for a pointer’s style on a certain view.
  2. Create a targeted preview with dragHandler. You know this API since you used it to customize the pinch transition.
  3. Create a pointer-style object with the lift effect. Other options are highlight and hover. Lift looks best for this interaction.
  4. Add accessories around the pointer. Here, you added two arrows to the top and bottom of the pointer. You’re not limited to this, though. One can use a custom shape with a custom position.
  5. Having the ability to set latchingAxes is new this year. When set, the style associated with this region will lock in and allow free-form movement along the specified axes.

Finally, build and run. If you’re testing in the simulator, select InputSend Pointer to Device from the I/O menu.

Resizing the image with pointer interactions and accessories.

Look how cool the pointer interaction is!

Where to Go From Here?

You can download the completed project files by clicking Download Materials at the top or bottom of this tutorial.

While you’ve done a lot today, iPadOS 15 is a solid release and there’s more to learn.

Here are some places to consult:

We hope you enjoyed this tutorial. If you have any questions or comments, please join the forum discussion below!