SwiftUI View Preferences Tutorial for iOS
Learn how SwiftUI view preferences allow views to send information back up the view hierarchy and the possibilities that opens up for your apps. By Andrew Tetlaw.
Generating a Minimap Overlay
You’re going to use the frame information you’ve collected from the flower field and hive to make a minimap and add it to the game screen. A minimap is a small representation of a larger area — lots of games have them, and even Xcode has gotten in on the action recently — you can show a minimap of the file you’re working in by pressing Control-Shift-Command-M.
Open ContentView.swift and add a new property to ContentView:
let miniMapScale: CGFloat = 0.25
You’ll use this value to scale the frame information from the TargetModels and draw a minimap.
After the call to onChange(of:perform:), add:
// 1.
.overlayPreferenceValue(TargetPreferenceKey.self) { mapTargets in
  // 2.
  ZStack {
    RoundedRectangle(cornerRadius: 8, style: .circular)
      .stroke(Color.black)
  }
  // 3.
  .frame(
    width: geometry.size.width * miniMapScale,
    height: geometry.size.height * miniMapScale)
  .position(x: geometry.size.width - 80, y: 100)
}
Here’s what this code is doing:
-
overlayPreferenceValue(_:_:)is a view modifier that lets you transform the values of a preference key into an overlay view. - At the moment, your overlay is just a rounded rectangle, you’ll add more interesting content shortly.
- You use
miniMapScaleto create a scaled-down version of the content view’s frame using the geometry reader.
Build and run. You’ll see the minimap rectangle in the top right.

The minimap is empty right now. Next, you’ll fill it with icons to match the game screen.
Adding Minimap Icons
You probably noticed the unused mapTargets parameter in the overlayPreferenceValue closure. This parameter contains the current value of the preference key. For you, that value is an array of TargetModels containing the frames and identifiers of all the flowers and the hive. You’re going to transform the frames into relative sizes and positions within the minimap using the scale value, then populate the minimap with icons.
In ContentView, add a ForEach to your minimap view after the RoundedRectangle, but within the same ZStack:
// 1.
ForEach(mapTargets) { target in
  // 2.
  let targetFrame = geometry[target.anchor]
  // 3.
  let mapTargetFrame = targetFrame.applying(
    CGAffineTransform(scaleX: miniMapScale, y: miniMapScale))

  // 4.
  switch target.id {
  // 5.
  case TargetModel.hiveID:
    Image(systemName: "house.fill")
      .foregroundColor(.purple)
      .frame(width: mapTargetFrame.width, height: mapTargetFrame.height)
      .position(x: mapTargetFrame.midX, y: mapTargetFrame.midY)
  // 6.
  default:
    Image(systemName: "seal.fill")
      .foregroundColor(.yellow)
      .frame(width: mapTargetFrame.width, height: mapTargetFrame.height)
      .position(x: mapTargetFrame.midX, y: mapTargetFrame.midY)
  }
}
This is a lot of code, so here’s a breakdown of what is happening:
-
ForEachis going to create a view for eachTargetModel. -
GoemetryProxyextracts the frame for eachtarget(and again, marvel at how useful and easy this is!). - You use an affine transform to make a minimap-relative frame by scaling the original frame of the target down.
- You switch on each target’s ID to distinguish between flowers and the hive.
-
house.filladds a purple icon for the hive, and uses the map target frame to specify a suitable size and position. -
seal.filladds a yellow icon for all the other targets (i.e. flowers) and assigns a size and a position for them too.
Build and run. The minimap now shows a scaled-down version of the game screen.
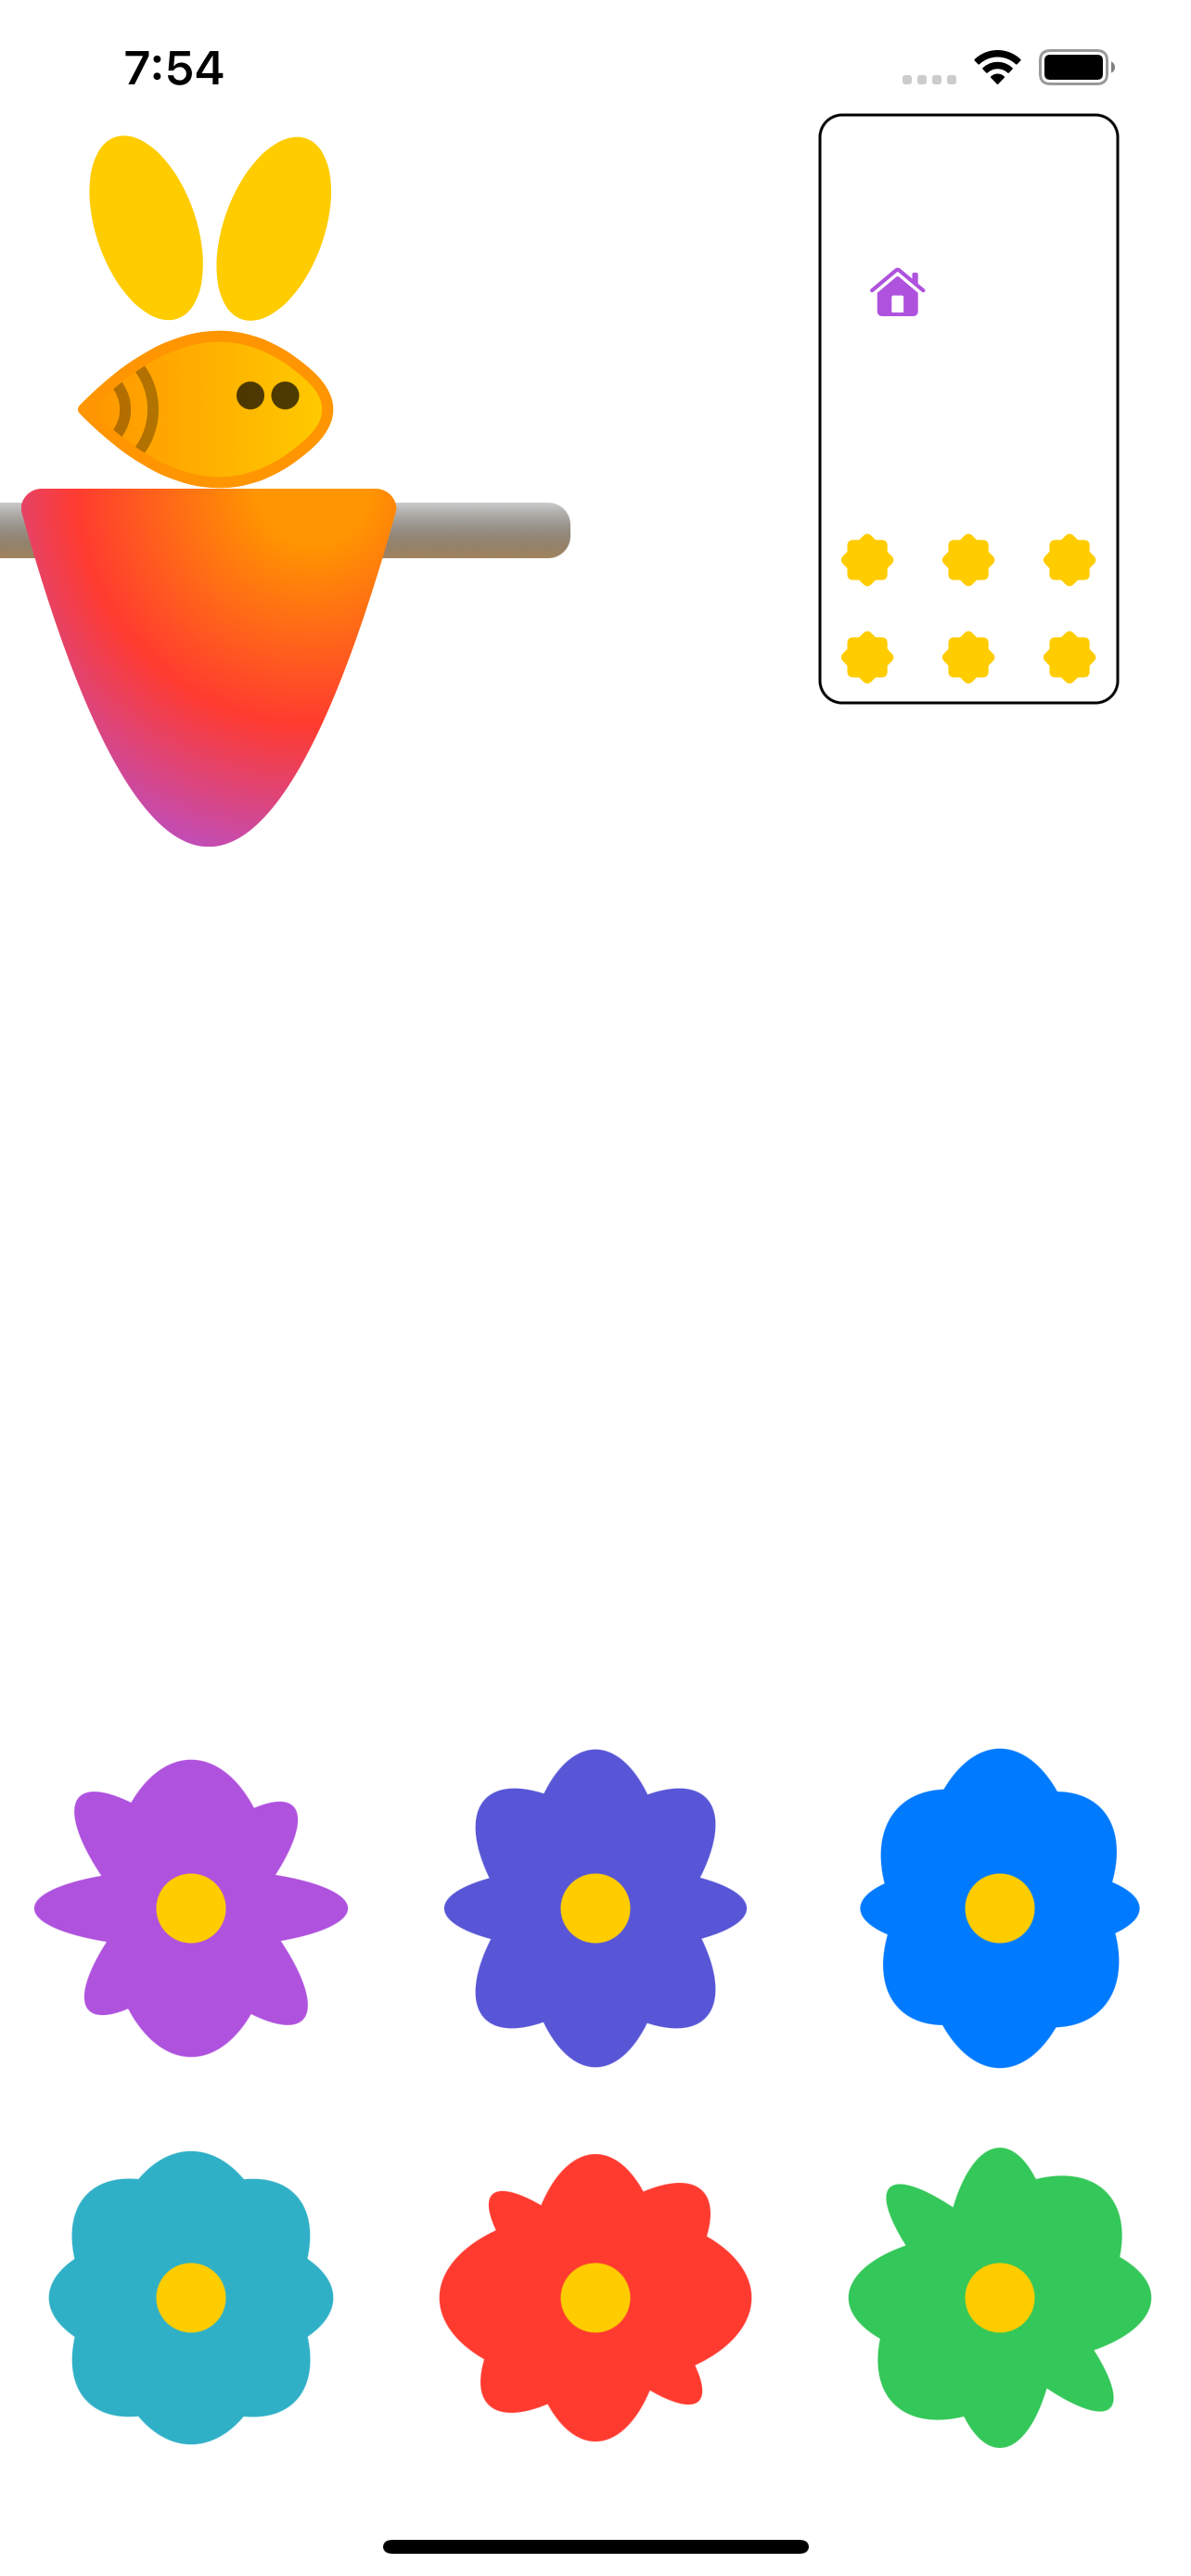
Play around with the number of flowers in the field or rotate the device. You’ll see that the minimap is always correct!

But, wait! Something’s missing from the minimap. Buzzy’s not there. She’ll need a target ID to make it on the minimap.
Adding Buzzy’s Flight Path to the Minimap
To add Buzzy to the minimap, open TargetPreferenceKey.swift and add the ID to TargetModel, like you did for the hive:
static let beeID = 100
In Bee.swift, add the anchor preference to the call to beeBody(rect:) in body:
.anchorPreference(key: TargetPreferenceKey.self, value: .bounds) { anchor in
  [TargetModel(id: TargetModel.beeID, anchor: anchor)]
}
Like you did with the flowers and the hive, you’re extracting the bounds of Buzzy’s body in Anchor.
Surprisingly, there’s only one more step! Back in ContentView.swift, add a new case to the minimap’s ForEach before default:
case TargetModel.beeID:
  Image(systemName: "circle.fill")
    .foregroundColor(.orange)
    .frame(width: mapTargetFrame.width, height: mapTargetFrame.height)
    .position(x: mapTargetFrame.midX, y: mapTargetFrame.midY)
A simple orange circle now represents Buzzy on the minimap. The circle’s relative position and size within the minimap will match Buzzy on the game screen.
Build and run. Tap flowers to send Buzzy around the flower field and watch her matching path on the minimap.

You’re technically done. But your minimap is maxi-sized in terms of code. Next, you’ll learn how to clean up the work you’ve done with view preferences.
Converting to a Custom View Modifier
It’s generally good SwiftUI practice to extract large blocks of code into separate views or modifiers to make them more portable and to make views more readable. For your minimap, you’re going to add a custom view modifier to separate the minimap code from the main view.
Add a new Swift file called Minimap.swift, then import SwiftUI and add an empty ViewModifier:
import SwiftUI

struct MiniMap: ViewModifier {
  func body(content: Content) -> some View {
    content
  }
}
A ViewModifier takes a view, does things to it and returns a new view. Currently, you simply return the view you’ve been given.
Next, add two properties to the struct:
let geometry: GeometryProxy
let miniMapScale: CGFloat = 0.25
Other than your preference key, these are the two required elements the minimap needs to calculate its contents.
Next, cut the entire .overlayPreferenceValue(_:_:) modifier (including the closure) from ContentView and paste it into the body in Minimap.swift, so it’s applied to content.
Finally, add a custom View extension to the top of Minimap.swift:
extension View {
  func miniMap(geometry: GeometryProxy) -> some View {
    self.modifier(MiniMap(geometry: geometry))
  }
}
This makes it easy to apply your minimap to any view. Back in ContentView.swift, where .overlayPreferenceValue(TargetPreferenceKey.self) { ... } used to be, add the call to your new custom view extension:
.miniMap(geometry: geometry)
Build and run. The minimap functions perfectly and the code inContentView is now much neater.
Where to Go From Here?
Nice work! With your help, Buzzy is the most productive bee in the hive.
You can download the completed project using the Download Materials button at the top or bottom of this tutorial.
If you’re interested, there are a few more interesting methods worth exploring in the view preferences API:
- You used
anchorPreference(key:value:transform:)in Buzzy to set preference values relating to layout, but you can also usepreference(key:value:)to set preference values that aren’t related to view layouts. You can send any data you like back up the tree — a title to be used in a container view, for example. - The two modifiers above can’t be called multiple times on the same view — only the latest value will be registered. If you need to add multiple pieces of information to your preference value, you must use
transformPreference(_:_:)andtransformAnchorPreference(key:value:transform:). For example, you might want to obtain multiple anchor values for a single preference key. Buzzy could have used thecenteranchor for navigation, and theboundsanchor for the minimap. - You used an overlay to place the minimap on top of the view. If you want to use preference values to create a contextual background instead, use
backgroundPreferenceValue(_:_:)to generate a view’s background by transforming a preference key value.
With only a few modifications, you could also turn the Buzzy minimap view modifier into a more general one that you can apply to any view hierarchy in any app! You could use PreferenceKey to allow a view to set not only its frame and ID but also an icon or a color. The minimap could then get everything it needs to render just from the preference values.
If you’re buzzing about view preferences and looking for more reasons to use them, you can try:
- Automatically generating table of contents from heading views.
- Generating an outline with collapsible top-level items, including a counter overlay badge.
- Controlling layout guides, based on biggest or smallest child views.
- Changing a view’s background based on the number of child views within.
I hope you enjoyed this tutorial about view preferences in SwiftUI. If you have any questions or comments, please join the forum discussion below.