Flutter Canvas API: Getting Started
Learn how to use the Flutter Canvas API to draw shapes and create custom widgets. By Wilberforce Uwadiegwu.
Drawing Circles
Start off by opening the lib/ovals_painter.dart file. To draw your oval you'll need another instance of paint, so add the following below in paint():
final paint = Paint()
  ..strokeWidth = 4
  ..color = Colors.blueAccent
  ..style = PaintingStyle.stroke;
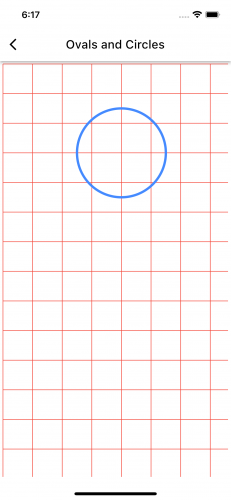
Unlike the straight lines that make up polygons, drawing circles and ovals doesn't require moving from point to point on the Canvas. One of the easiest ways of drawing a perfect circle is to define the center point of the circle and give it a radius. Add the following below the paint declaration:
const circleRadius = 75.0;
const circleCenter = Offset(200, 150);
canvas.drawCircle(circleCenter, circleRadius, paint);
The center of the circle is at 200px from the left and 150px from the top. The radius of the circle is 75px.
Run the app and tap the Ovals and Circles button to see this displayed in the app:
Now onto ovals!
Drawing Ovals
Ovals are just circles but with unequal width and height.
Add the following oval drawing statements below the code for drawing the circle in OvalPainter:
const ovalCenter = Offset(200, 275);
final oval = Rect.fromCenter(center: ovalCenter, width: 250, height: 100);
canvas.drawOval(oval, paint);
The center of the oval will be at 200px from the left and 275px from the top. It'll be 250px wide and 100px tall.
Run the project to see this:
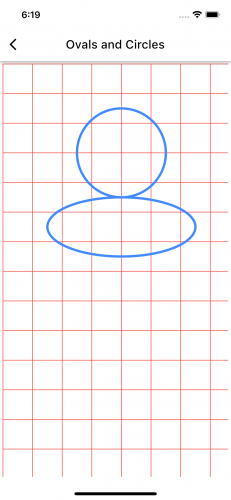
You have drawn an avatar by combining a circle and an oval! You can also combine circles to draw concentric circles. To achieve this, you can iteratively reduce the radius of the circle.
Add the following concentric circle code below the instructions for drawing the oval:
var concentricCircleRadius = 100.0;
const center = Offset(200, 500);
while (concentricCircleRadius > 0) {
  canvas.drawCircle(center, concentricCircleRadius, paint);
  concentricCircleRadius -= 10;
}
Hot-reload and you'll see this:
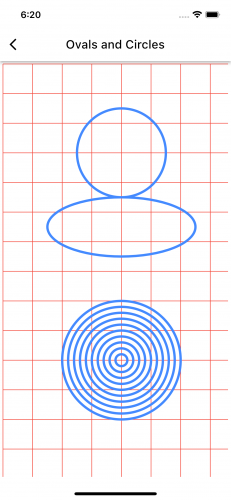
You'll do more shape composition in later sections.
Drawing Arcs and Curves
The Canvas API supports four types of curves: arc, quadratic Bézier, cubic Bézier and conic Bézier. In this section, you'll learn about arcs and quadratic and cubic Bézier curves.
An arc is a section of a circle. Imagine a circular pizza. After you've eaten a slice from it, what's left is an arc. The slice you ate is also an arc. The angle made by the slice of pizza when the slice is equal to the radius of the whole pizza is called the radian.
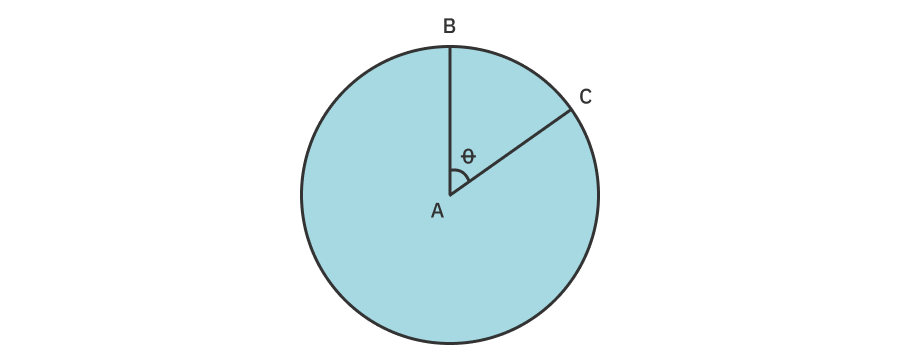
In the diagram above, the angle of θ is defined as one radian if the arc length made by BC equals the circle's radius.
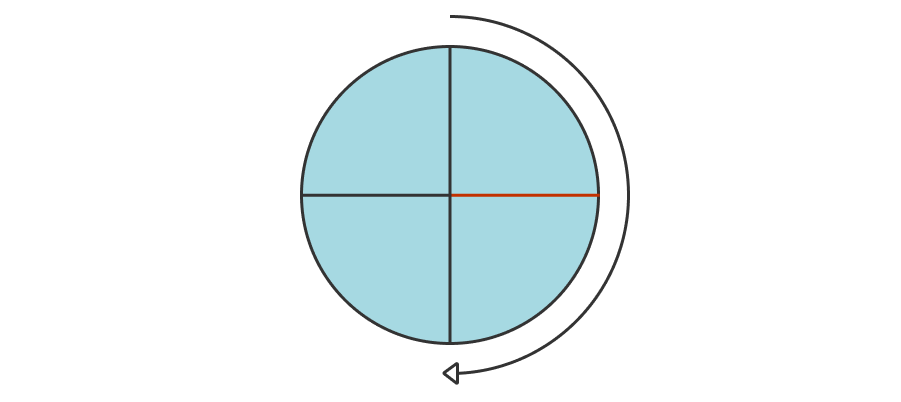
You need a bounding box, a start angle and a sweep angle to draw an arc. Both start and sweep angles are in radians. Because many people like to think of angles in units of degrees, the utility function degreesToRadians() has been provided in the ArcsCurvesPainter class to convert degrees to radians.
The start angle begins at the x-axis on the circle, as shown by the red line shown below. You draw positive angles in the clockwise direction. The end position of the arc is the sum of start and sweep angles.
Add the following lines of code to the paint() of ArcsCurvesPainter in arcs_curves_painter.dart:
const arcCenter = Offset(200, 80);
final arcRect = Rect.fromCircle(center: arcCenter, radius: 75);
final startAngle = degreesToRadians(10);
final sweepAngle = degreesToRadians(90);
canvas.drawArc(arcRect, startAngle, sweepAngle, true, curvesPaint);
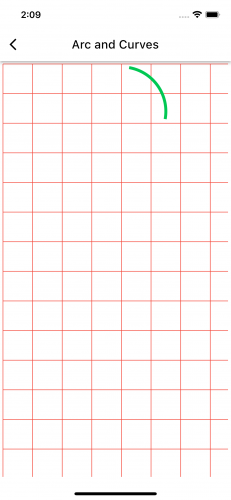
Run the project and tap the Arc and Curves button. You'll see an arc drawn in the clockwise direction:
To draw the arc counterclockwise, change the sweep angle to a negative number:
final sweepAngle = degreesToRadians(-90);
Hot-reload, and you'll see this:
The third parameter of canvas.drawArc() determines how to close the arc. Passing true, as you did, draws the arc like a slice of pizza. Otherwise, it draws just the curved line segment.
Change the drawing instruction of the arc to this:
canvas.drawArc(arcRect, startAngle, sweepAngle, false, curvesPaint);
Hot-reload to see this:
Play around with the parameters to better grasp how canvas.drawArc() behaves.
Onwards to Bézier curves!
Quadratic Bézier curves are sub-path segments that curve from the current point to an endpoint using a control point. The control point defines the slope at the beginning and the end of the curve.
Here's an example. The curve starts at point A (50, 300) and ends at B (350, 300). Point C is the control point at (150, 200). The plotted Bézier curve is the brown line.
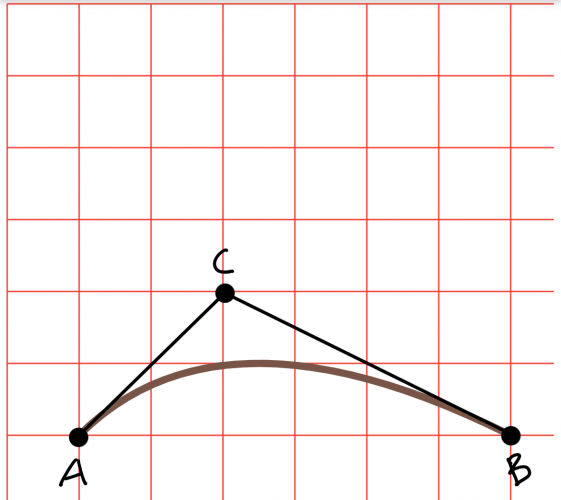
And here's the Dart code for this curve:
final qCurve1 = Path()
  ..moveTo(50, 300)
  ..relativeQuadraticBezierTo(100, -100, 300, 0);
canvas.drawPath(qCurve1, curvesPaint);
Look at another example:
The curve starts at (50, 50) and ends at (350, 150), and the control point is at (200, 350). As illustrated by the image below, A is the starting point, C is the control point and B is the end of the line. The plotted Bézier curve is the brown line.
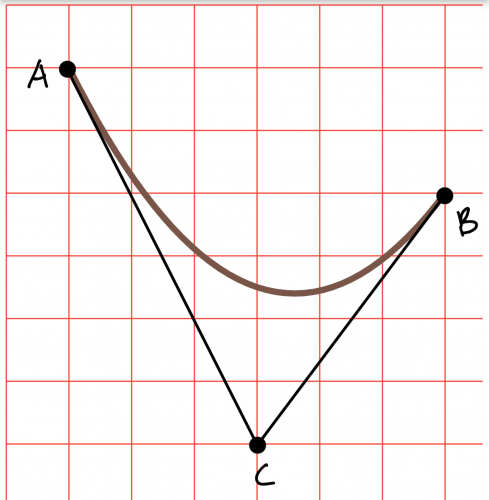
final qCurve2 = Path()
  ..moveTo(50, 50)
  ..relativeQuadraticBezierTo(150, 300, 300, 100);
canvas.drawPath(qCurve2, curvesPaint);
Although Quadratic Bézier uses one control point, Cubic Bézier uses two control points, giving more control over the beginning and end slope of the curve. Here's a simple example:
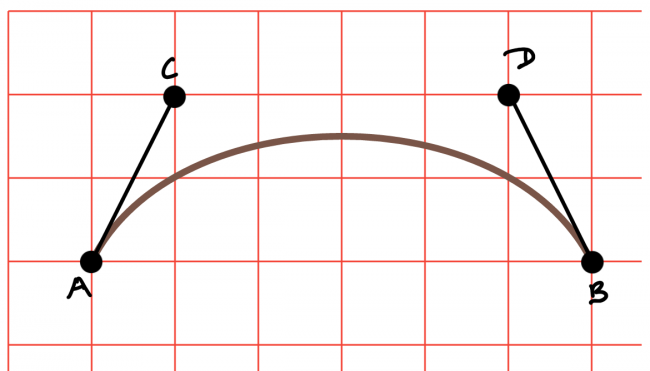
The curve starts at (50, 150) and ends at (350, 150). The curve begins with a slope defined by the line AC and ends with the slope defined by the line DB.
final cCurve1 = Path()
  ..moveTo(50, 150)
  ..relativeCubicTo(50, -100, 250, -100, 300, 0);
canvas.drawPath(cCurve1, curvesPaint);
Here's another example. The curve starts at (350, 50) and ends at (200, 300). Like the previous example, the curve begins with a slope defined by the line AC and ends with the slope defined by the line DB.
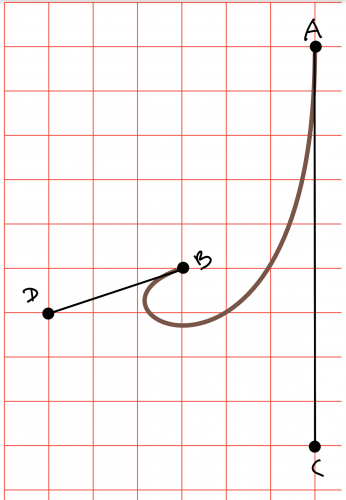
final cCurve2 = Path()
  ..moveTo(350, 50)
  ..relativeCubicTo(0, 450, -300, 300, -150, 250);
canvas.drawPath(cCurve2, curvesPaint);
To run the Bézier curve examples, add the following lines of code to paint() in ArcsCurvesPainter.
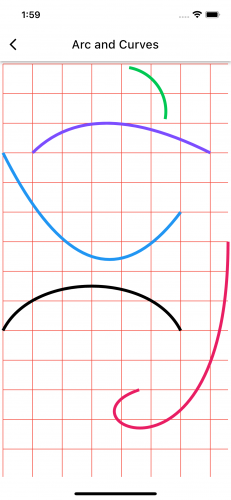
// Quadratic Bézier
final qCurve1 = Path()
  ..moveTo(50, 150)
  ..relativeQuadraticBezierTo(100, -100, 300, 0);
canvas.drawPath(qCurve1, curvesPaint..color = Colors.deepPurpleAccent);

final qCurve2 = Path()
  ..moveTo(0, 150)
  ..relativeQuadraticBezierTo(150, 300, 300, 100);
canvas.drawPath(qCurve2, curvesPaint..color = Colors.blue);

// Cubic Bézier
final cCurve1 = Path()
  ..moveTo(0, 450)
  ..relativeCubicTo(50, -100, 250, -100, 300, 0);
canvas.drawPath(cCurve1, curvesPaint..color = Colors.black);

final cCurve2 = Path()
  ..moveTo(380, 300)
  ..relativeCubicTo(0, 450, -300, 300, -150, 250);
canvas.drawPath(cCurve2, curvesPaint..color = Colors.pink);
Hot-reload to see this: